Turn On Screen Tint in Windows 11 Accessibility Settings

Windows 11 has a new Accessibility setting called Screen tint. You can also use Color filters (Settings Accessibility Color filters), which recolour everything on screen, and Night light (Settings System Display Night light), which adds a warm amber tint. This guide covers both and shows how to pick the right one.
Neither option needs administrator rights, a restart or a particular Windows edition. Both work on Windows 11 Home and Pro. The steps match current Windows 11 builds (22H2 and later). A label may differ slightly on an older build, and I say so where it matters.
Windows 11 has no Accessibility setting called Screen tint. For a coloured overlay, use Night light (Settings System Display Night light) to add a warm amber tint with a strength slider and schedule. To recolour the whole screen, go to Settings Accessibility Color filters and switch the toggle to On, then pick a filter such as Grayscale or Inverted. Neither needs administrator rights or a restart.
Which Setting Gives You the Tint You Want?
Many “screen tint” searches have different goals, and the two settings do different jobs. Choose first, so you don’t change the wrong setting.
Color filters: change how every colour is drawn
Color filters (a set of system-wide colour adjustments, built mainly for people with colour vision deficiency or light sensitivity) remap the colours on your whole display. Windows 11 offers six filters:
- Inverted flips every colour to its opposite.
- Grayscale removes all colour.
- Grayscale inverted removes colour and flips light and dark.
- Red-green (green weak, deuteranopia) shifts colours for people who have trouble seeing green.
- Red-green (red weak, protanopia) shifts colours for people who have trouble seeing red.
- Blue-yellow (tritanopia) shifts colours for people who have trouble telling blue and yellow apart.
Windows 11 does not let you pick your own tint colour, such as a pale yellow or blue overlay, from Accessibility settings. If you want that, you need a third-party app. Check the app’s source before you install it , because tools that overlay or recolour the whole screen run with wide access to your display.
Night light: add a warm tint to reduce blue light
Night light (a built-in feature that shifts the display towards warmer, amber colours) is the right choice if your goal is a softer, yellowish screen in the evening. It sits under Display settings, not Accessibility. It has a strength slider and an optional schedule, which Color filters does not.
Use this rule of thumb:
- Choose Color filters if you need to tell colours apart, want a grayscale display, or want inverted colours for light sensitivity.
- Choose Night light if you want a warm tint for evening use.
Turn On Color Filters in Accessibility Settings
These steps apply a colour filter to the whole display. None of them need administrator rights.
- Open Settings by pressing the Windows logo key + I.
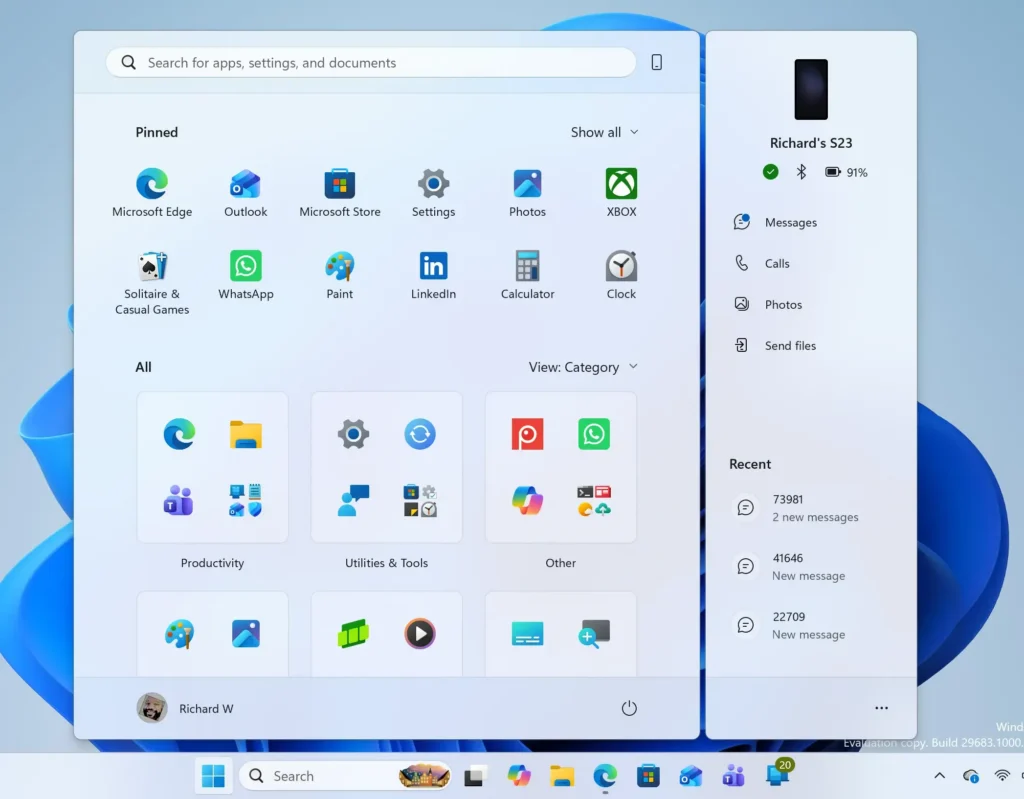
- Select Accessibility in the left sidebar. The Accessibility page opens on the right.
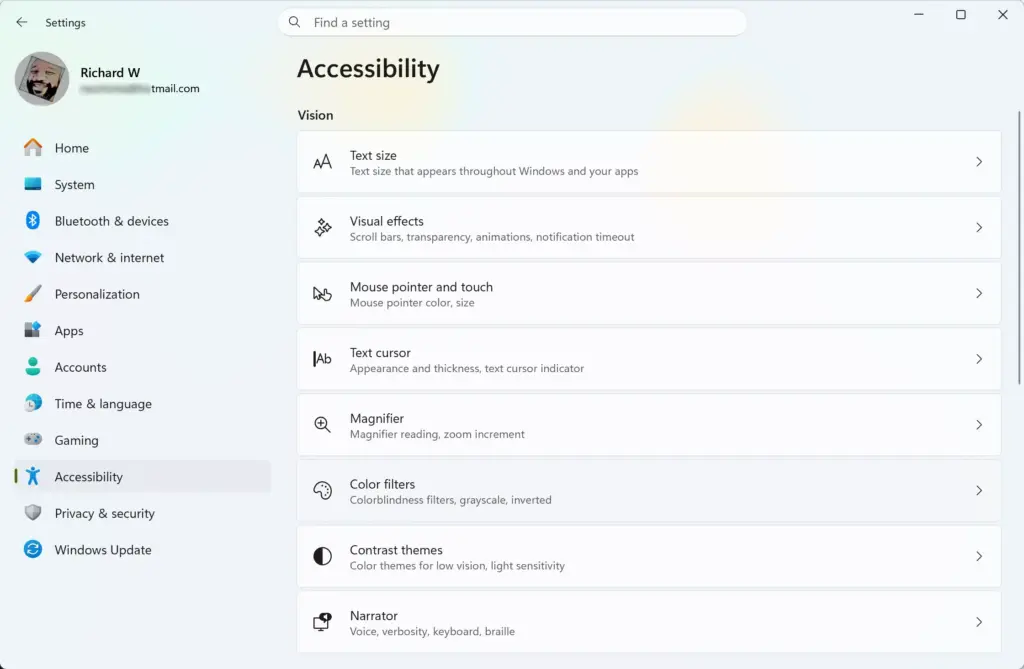
Settings › Accessibility - Under the Vision group, select Color filters. If you don't see it, scroll down. It sits between Magnifier and Contrast themes.
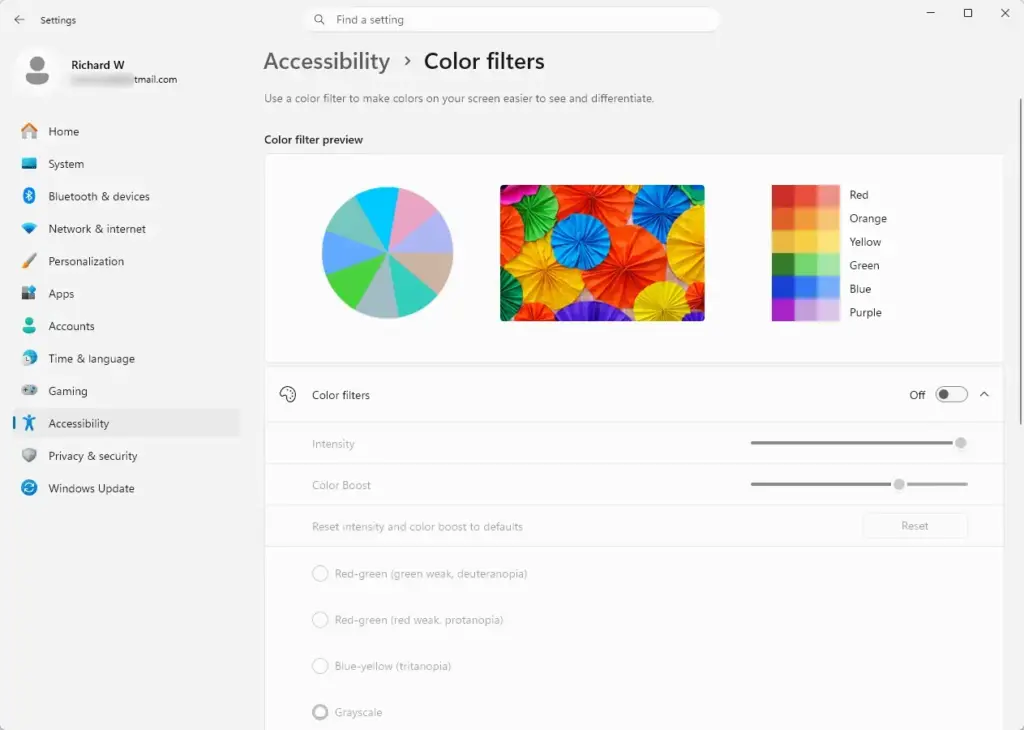
Settings › Accessibility › Color filters - Switch the Color filters toggle to On. The screen changes colour straight away. The default filter is usually Grayscale, so a black-and-white screen at this point is normal.
- Under Choose a filter, select the filter you want from the list. The screen updates as soon as you click, so you can try each one in turn and keep the one that reads best.
You don't need to restart or sign out. The filter applies to all apps, the desktop and your taskbar.
What you should see
The effect differs by filter. Grayscale turns the screen black, white and grey. Inverted makes a white window dark and a dark window light. The red-green and blue-yellow filters shift hues without removing colour, so the change is subtler. Compare a photo or a colourful chart before and after to judge it.
If Color filters is greyed out or missing
- The toggle is greyed out and a message says some settings are managed by your organization. A work or school policy controls the setting. You can't override it from Settings. Ask your IT team.
- You can't find the page. Use the search box at the top of Settings and type Color filters. If the result is still missing, update Windows through Settings Windows Update, then check again.
- The toggle flips back off. Close Settings and reopen it. If it still reverts, restart the PC once and try again.
Set a Keyboard Shortcut to Switch the Filter On and Off
This step lets you toggle the filter without opening Settings. It is useful if you only need the filter for some tasks.
- Open Settings Accessibility Color filters
Settings › Accessibility › Color filters - Switch Keyboard shortcut for color filters to On. In some builds this appears as a checkbox rather than a toggle.
- Press the Windows logo key + Ctrl + C. The filter switches on or off. The shortcut uses the filter you last picked under Choose a filter.
Press it again to return to normal colour. This is a common reason people think their display or driver has failed.
Turn On Night Light for a Warm Screen Tint
Night light adds an amber tint and reduces blue light. It is separate from Color filters, and you can find it in two places.
Turn on Night light from Settings
- Open Settings System Display
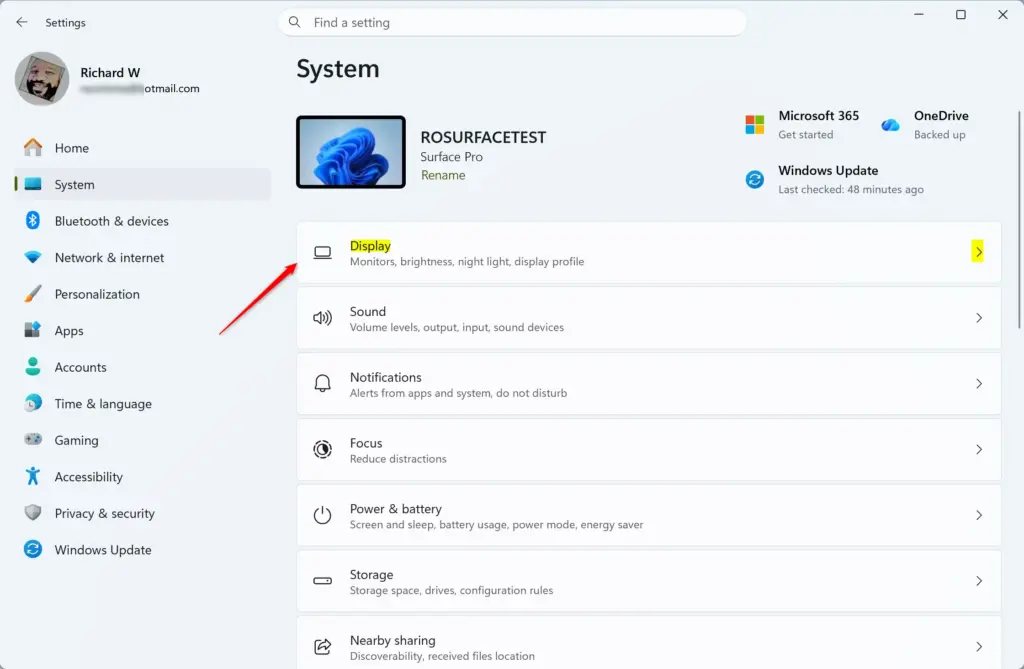
- Select Night light. The row expands, or a separate page opens, depending on your build.
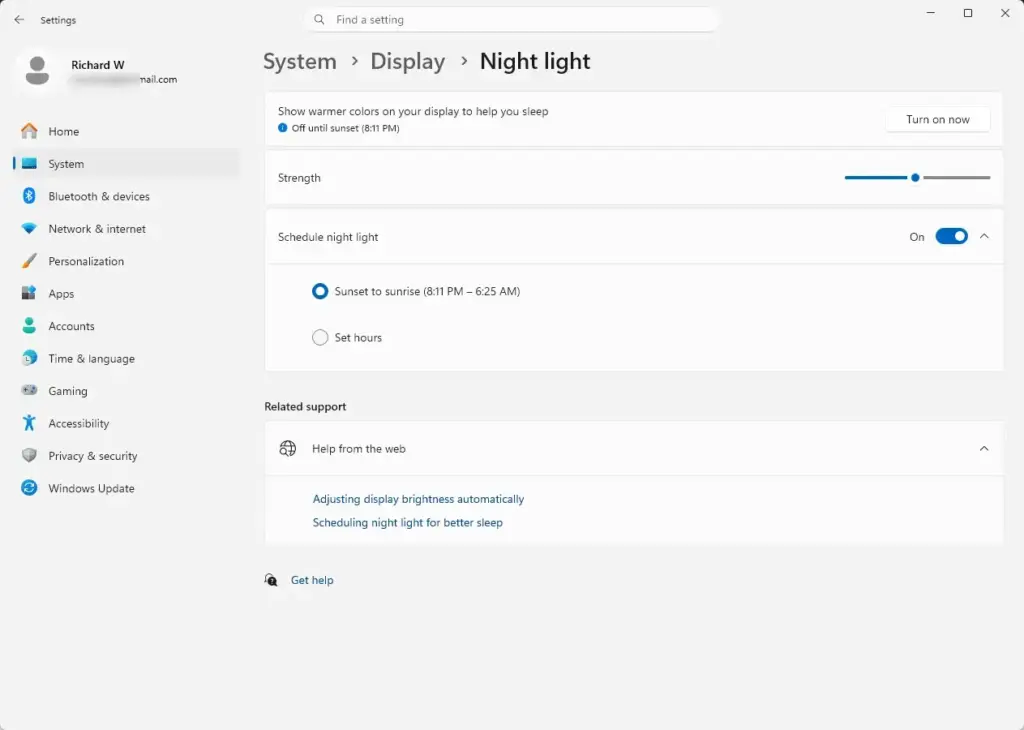
Settings › System › Display › Night light - Select Turn on now. The screen turns warmer immediately. The button label changes to Turn off now.
- Drag the Strength slider to set how strong the tint is. Move it right for a warmer, more orange screen, and left for a milder one. Try a low setting first, because the full strength can look strongly orange.
Schedule Night light
This step makes the tint start and stop on its own, so you don't have to remember it.
- On the same Night light page, switch Schedule night light to On.
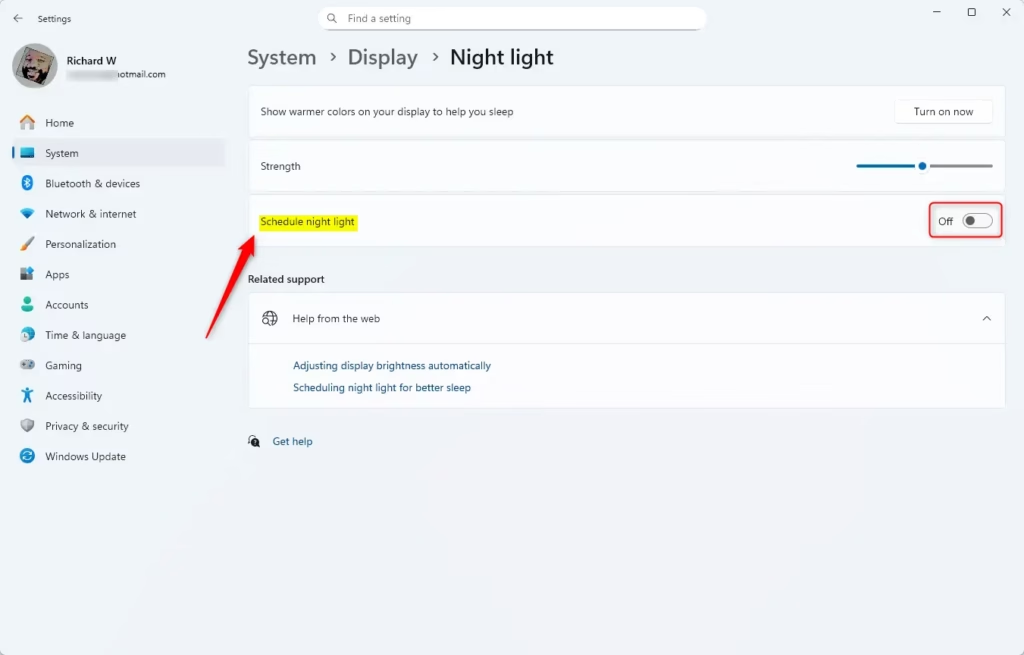
Windows 11 scheduled Night Light settings with custom hours option. - Choose Sunset to sunrise to follow daylight at your location. Windows needs location services for this to work. If it can't find your location, choose Set hours instead.
- If you chose Set hours, enter the times you want Night light to turn on and off.
Turn Night light on from Quick Settings
- Click the network, sound and battery icons at the right end of the taskbar. Quick Settings opens.
- Select the Night light tile. It turns on and the screen warms up.
- If the tile isn't there, select the pencil icon (Edit quick settings), select Add, choose Night light, then select Done.
If Night light is missing or greyed out
- The Night light option is greyed out or does nothing. This is usually a display driver problem. A generic driver, such as Microsoft Basic Display Adapter, often can't apply colour changes. Update your graphics driver from your PC or GPU maker's website, or through Settings Windows Update Advanced options Optional updates
- It works on the laptop screen but not on an external monitor. Some docks, adapters and remote desktop sessions don't pass the colour change through. Test the monitor on a direct cable, if you can.
- The tint appears, then fades. Check whether a schedule is active. A schedule turns Night light off at the end time you set.
Use Color Filters and Night Light Together
You can have both on. The colours then look different from what either setting produces alone, which can make judging colours harder. If a filter looks wrong, turn Night light off first to see the filter on its own.
Avoid either setting for work where colour accuracy matters, such as photo editing or design review. Both change what the display shows, and the change affects everything on screen. Switch them off before you judge colour.
Turn the Tint Off Again
Both settings are fully reversible and change nothing in your files or apps.
- To remove a colour filter, open Settings Accessibility Color filters and switch Color filters to Off. If the keyboard shortcut is enabled, Windows logo key + Ctrl + C also toggles it.
- To remove Night light, open Settings System Display Night light and select Turn off now. If you set a schedule, switch Schedule night light to Off as well, or the tint returns at the next scheduled time.
The screen returns to normal colour at once. Windows remembers your chosen filter and strength setting, so switching back on later restores your earlier choices.
Why the Tint Might Come Back or Not Carry Over
Colour settings belong to your Windows account. A new user account starts with the defaults, so repeat the steps there. A graphics driver reinstall or update can also reset how Night light behaves on a given display. If your tint disappears after one, run through the steps again.
What to do next
If neither setting gives you the effect you want, the next step is to check your display's own menu. Most monitors have colour temperature and blue-light presets that work independently of Windows. If the screen is hard to read rather than the wrong colour, look at Settings Accessibility Contrast themes, which changes the colours of windows and text instead of the whole display.
Have a question about this guide?
Answered by AI from this guide. Good questions may be added to this page — please don't include personal details.
Did this guide fix your problem?

About the Author
Richard
Tech Writer, IT Professional
Richard is a writer at Geek Rewind who turns complex IT tasks into clear, step-by-step guides. He draws on years of hands-on experience in system administration and enterprise IT operations, focusing on Windows, Linux and WordPress: the problems people actually run into, and the fixes that work. His server and WordPress guides come from systems he runs himself. Richard builds and maintains the platform behind Geek Rewind, from its Ubuntu servers and Nginx configuration to its custom WordPress plugins. Many new tutorials start with readers' questions, and he's always glad to answer them in the comments.
No comments yet — be the first to share your thoughts!