How to Share Pictures Between Nearby PCs in Windows 11


Nearby sharing in Windows 11 lets you send pictures between nearby PCs over Bluetooth or Wi-Fi without using email or cloud storage. This built-in tool works just like Apple’s AirDrop, giving you a fast way to transfer files directly between devices that are close to each other.
You need to turn on Wi-Fi , Bluetooth , and the sharing feature on both computers before you start. Do this on the sending PC and the receiving PC:
- Open Settings System Nearby sharing You should see a list of sharing options.
- Choose My devices only if both PCs are signed in with the same Microsoft account. Choose Everyone nearby if the PCs belong to different people or accounts. The selected option is marked with a filled radio button.
- Open Settings Bluetooth & devices and make sure the Bluetooth toggle is On.
- Open Settings Network & internet and make sure Wi-Fi is On. The PCs do not need to be on the same network, but the Wi-Fi adapter must be switched on.
If the Nearby sharing page is missing or the options are greyed out, the PC may lack a Bluetooth adapter that supports the feature, or Bluetooth may be switched off. Home and Pro editions behave the same here. Changes apply immediately, so you do not need to restart. To stop sharing later, set the option back to Off.
Open Settings System Nearby sharing and choose My devices only or Everyone nearby. Turn on Bluetooth and Wi-Fi on both PCs. Windows shares pictures over Wi-Fi Direct or Bluetooth without restarting.
How it Works: Bluetooth vs. Wi-Fi
Nearby Sharing uses the fastest available connection. It prefers Wi-Fi Direct (a technology that connects devices directly without a router) and falls back to Bluetooth if Wi-Fi is unavailable. You do not pick the connection yourself. Windows chooses it, so large batches of photos move faster when both PCs have working Wi-Fi.
Keep the two PCs close together, ideally in the same room. If the receiving PC does not show up when you try to send, check that its screen is awake and that Bluetooth and Wi-Fi are still on.
Requirements for Nearby Sharing
Requirements for windows nearby sharing include running Windows 10 version 1803 or newer, or Windows 11, on both computers. You also need to turn on Bluetooth and make sure your PC is set to be discoverable. Connecting both PCs to the same Wi-Fi network helps speed up transfers, and the devices must stay within normal wireless range.- Both PCs must be running Windows 10 (version 1803 or newer) or Windows 11.
- Bluetooth must be turned on and set to be discoverable on both devices.
- For Wi-Fi sharing, both devices should ideally be on the same network and support Wi-Fi Direct.
- The devices need to be close to each other, within the normal range of Bluetooth or Wi-Fi .
Setting Up Nearby Sharing on Both Devices
Turn on the feature on both the sending and receiving computers before attempting a transfer.
Step 1Open Windows Settings
Open the Start menu and click Settings.
Step 2Go to System Settings
Click System in the Settings window.
Step 3Find Nearby Sharing
Click Nearby sharing in the left menu.
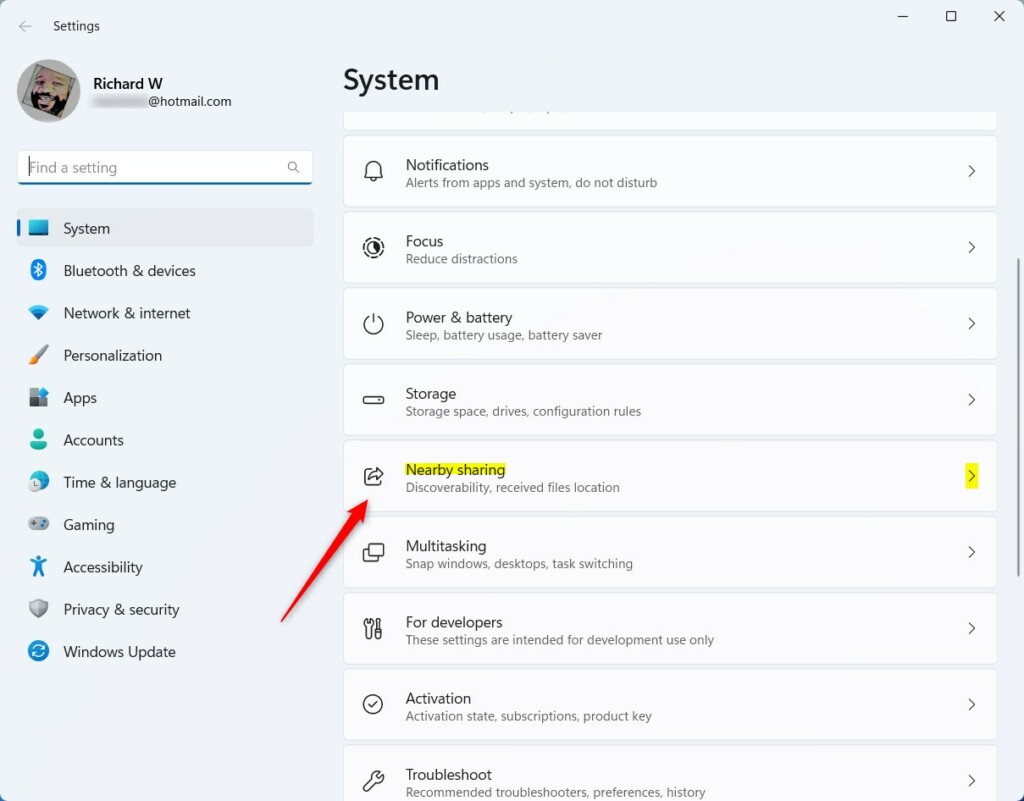
Step 4Set Your Sharing Choices
Sharing choices for windows nearby sharing let you control who can send files to your computer. You can choose between 'My devices only' to restrict transfers to your own signed-in Microsoft accounts, or 'Everyone nearby' to permit any close computer to send files.
- My devices only: This is more private. Your PC can only share with or receive from other Windows devices where you are signed in with the same Microsoft account. This is great if you are sharing between your own computers.
- Everyone nearby: This lets any Windows PC nearby that also has Nearby sharing turned on (and is set to "Everyone nearby") send files to your computer.
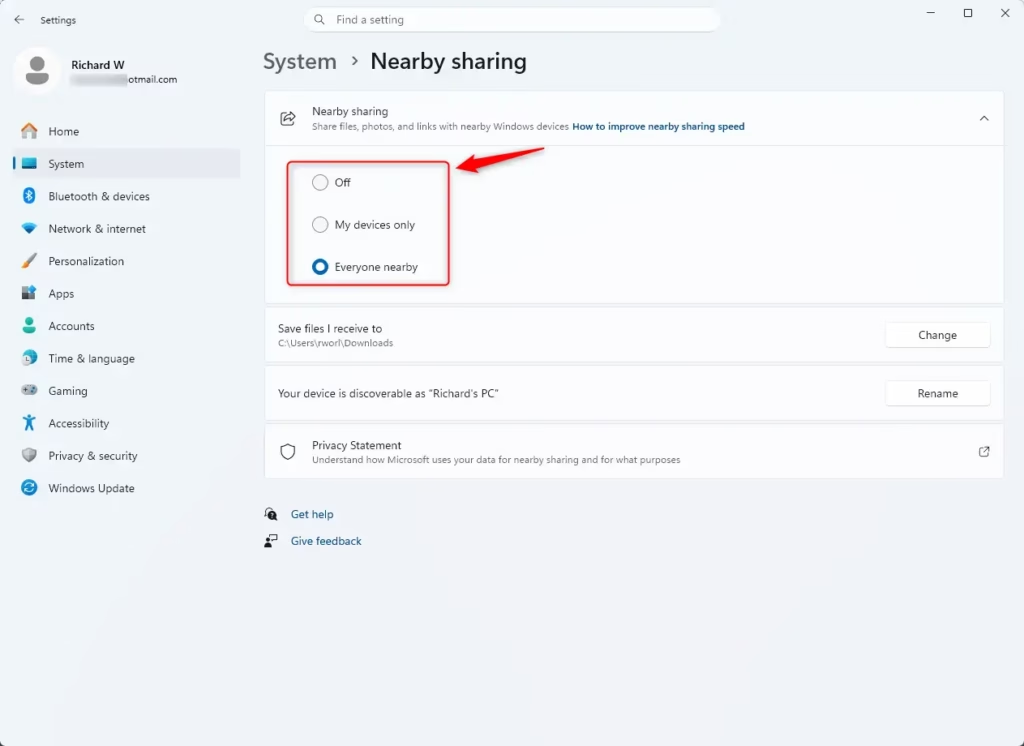
Step 5Turn on Bluetooth and Wi-Fi
Keeping Wi-Fi turned on also helps send files much more quickly, though selecting 'Everyone nearby' makes your PC's Bluetooth name visible to others.
This information could identify the computer. Prioritizing privacy means sticking with "My devices only."
Step 6Choose Where to Save Received Files
Designate a specific folder for incoming files if you prefer not to use the default Downloads directory.
Sharing a Picture: Step-by-Step
Sharing a photo between nearby Windows 11 computers becomes a streamlined process after both machines have the capability set up. Use the Photos app to send pictures.
Step 1Open the Photo You Want to Share
Open the Photos app by typing "Photos" in the Windows search bar and selecting the result.
Step 2Select the Picture
Click the specific picture in your library to expand it.
Step 3Find the Share Button
Click the Share icon, which looks like a box with an upward-pointing arrow.
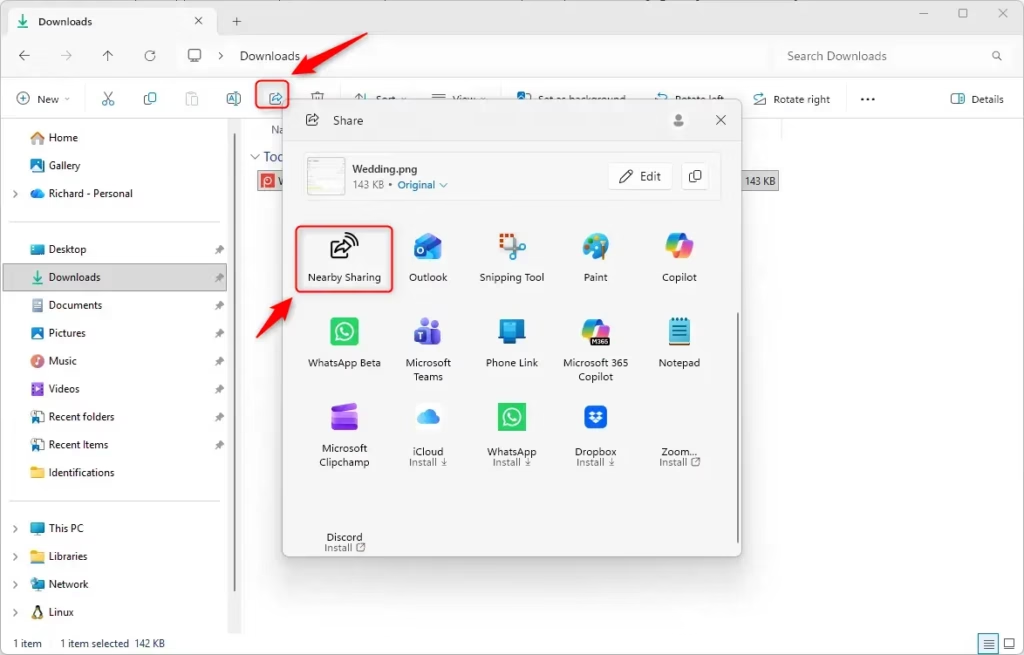
Step 4Choose the Target Device
Click the name of the destination Windows PC in the list of available devices.
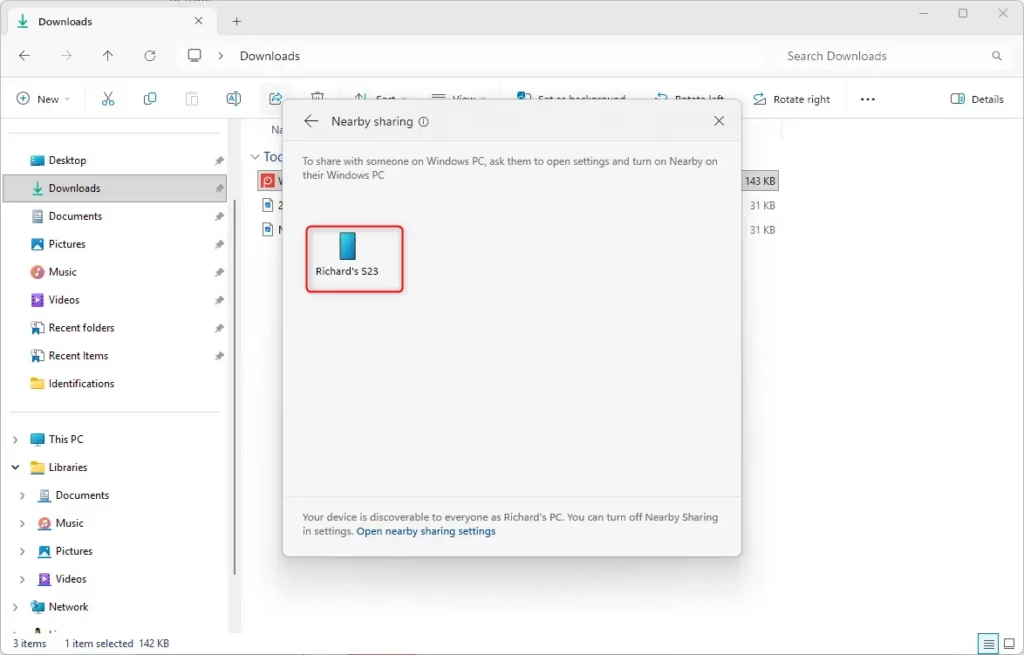
Step 5Accept the Transfer on the Receiving PC
Accepting a transfer in windows nearby sharing is done through an incoming notification that gives you the choice to 'Save & open' or simply 'Save'. Selecting 'Save & open' places the file in your downloads folder and launches it immediately through the Photos app.
- Save & open: This will save the photo to your chosen folder and then open it right away in the Photos app.
- Save: This will save the photo to your chosen folder without opening it automatically.
Click your preferred option to complete the transfer and store the photo on the PC.
Reference:
Summary
Nearby sharing provides a mechanism that many people overlook. Following these steps allows for moving photos and other files between computers without extra friction. Try it out the next time transferring a picture becomes necessary. [Your PC Name]
Once both PCs are ready, send the pictures like this:
- Open File Explorer and select the pictures you want to send.
- Click Share in the toolbar. A share window opens.
- Wait for the receiving PC to appear in the list of nearby devices, then click its name. The sending PC shows that it is waiting for the other side to respond.
- On the receiving PC, a notification appears. Click Save to keep the files, or Save & open to keep and view them. Click Decline to refuse the transfer.
The sending PC shows a confirmation when the transfer finishes. Received files are saved in the Downloads folder by default. You can change that location on the Nearby sharing settings page.
Have a question about this guide?
Answered by AI from this guide. Good questions may be added to this page — please don't include personal details.
Did this guide fix your problem?

About the Author
Richard
Tech Writer, IT Professional
Richard is a writer at Geek Rewind who turns complex IT tasks into clear, step-by-step guides. He draws on years of hands-on experience in system administration and enterprise IT operations, focusing on Windows, Linux and WordPress: the problems people actually run into, and the fixes that work. His server and WordPress guides come from systems he runs himself. Richard builds and maintains the platform behind Geek Rewind, from its Ubuntu servers and Nginx configuration to its custom WordPress plugins. Many new tutorials start with readers' questions, and he's always glad to answer them in the comments.
No comments yet — be the first to share your thoughts!