How to Send Files Directly Through Email in Windows 11


File Explorer (the app you use to browse files and folders on your PC) has a built-in share feature. It lets you send documents, photos, and videos through your email app in a few clicks, without opening a browser or starting the message yourself.
This method suits files up to about 25 megabytes, which covers most everyday reports and pictures. Larger files need a different approach, covered near the end.
Open File Explorer , right-click the file you want to send, click the Share icon, select your email app from the window, then fill in the recipient, subject, and message before clicking Send. The file attaches automatically.
Step 1Find the File You Want to Send
Start by finding the file you want to send. You can do this from any folder on your PC.
- Click the folder icon on your taskbar to open File Explorer .
- Browse to the document, photo, or video you want to send. The sidebar on the left gives you quick access to Documents, Pictures, Downloads, and Desktop.
- If you cannot find it, click the search box at the top right of the File Explorer window and type part of the file name. Results appear as you type.
Check the file size before you go further. Right-click the file, choose Properties, and read the Size line. If it is close to 25 MB or over, skip ahead to the size limits section.
Step 2Start the Sharing Process
Once you have found the file, open the Windows share window. You can do this from the toolbar or from the right-click menu .
Using the toolbar:
- Click the file once to select it.
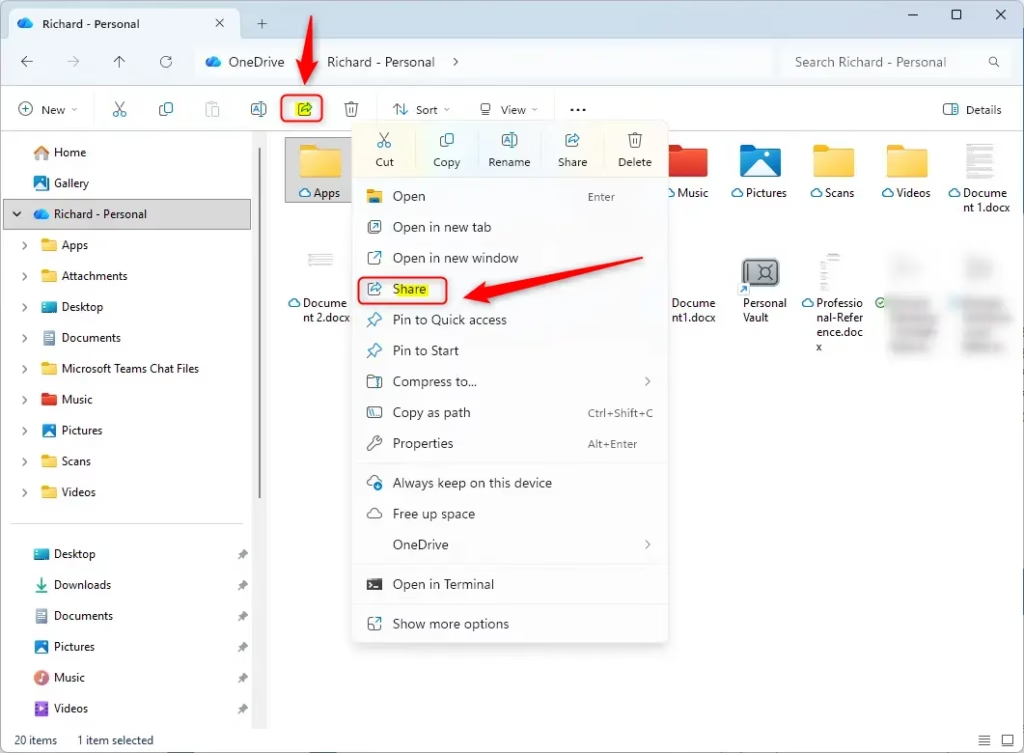
- Look at the command bar at the top of the File Explorer window and click the Share icon. In Windows 11 it appears once a file is selected.
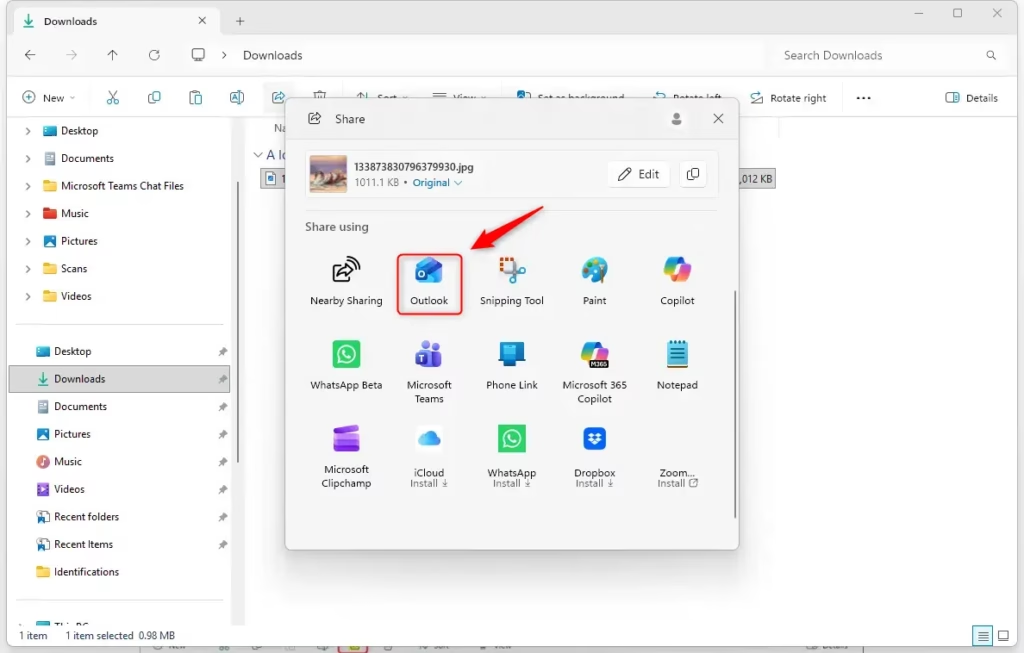
- The Windows share window opens, with a list of nearby devices, contacts, and apps you can share to.
Using the right-click menu:
- Right-click the file.
- In the Windows 11 menu, find the row of small icons (Cut, Copy, Rename, Share, Delete). Click the Share icon. On some builds, the menu shows a Share entry with a label instead.
- The same share window opens.
Both methods lead to the same place. We are sending by email, so look in the share window for your mail app.
Step 3Pick Your Email App
Now pick the email program. This is the step where Windows hands the file to your mail app.
- In the share window, find the icon for your mail program, such as Mail or Outlook. If the app list is short, scroll or look for a More option.
- Click the icon for the app you want to use.
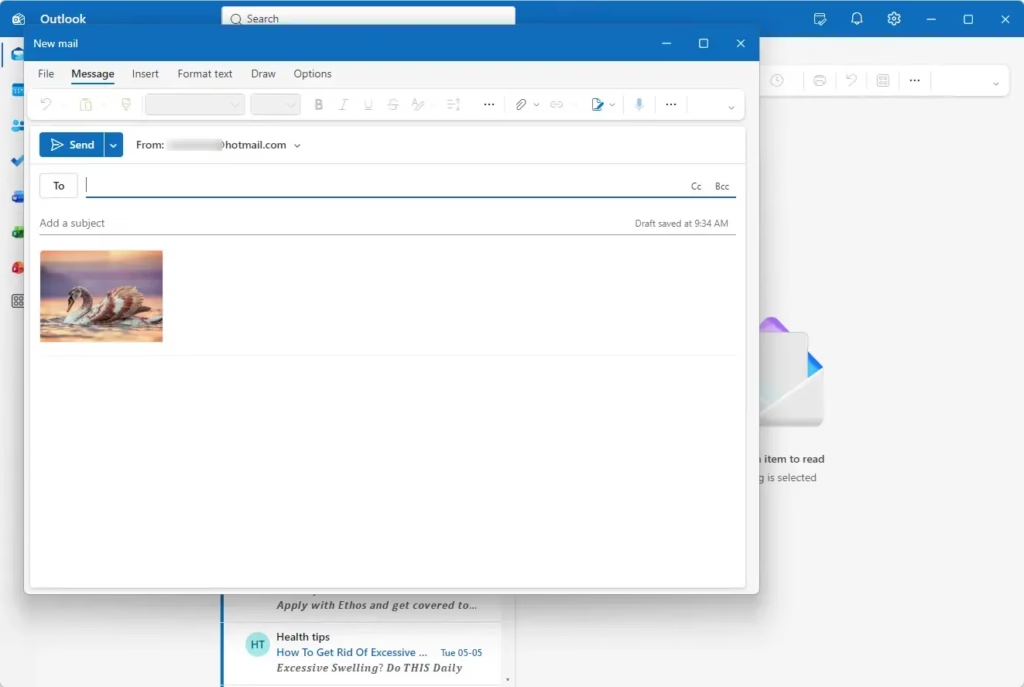
- The app opens with a new message already created and your file attached. You should see the file name in the attachment area of the message.
If you picked the wrong app, close the new message without sending it and start again from the share window.
Certain file types also might not be shareable this way. You may need to go into Windows settings to choose your default email app. Check Settings Apps Default apps and confirm a mail app is set for email links. Also make sure the app has an account signed in, because an app with no account cannot send anything.
Some desktop mail programs do not appear in the share window at all. If yours is missing, right-click the file, choose Show more options, then Send to > Mail recipient. That uses your default mail program instead.
Step 4Write and Send Your Email
The last step is to finish the message and send it. Fill in these fields in the new email:
- Click the To field and type the recipient's email address. If you have saved contacts, the app suggests matches as you type.
- Click the Subject field and write a clear subject line so the person knows what the file is. "March sales report" is better than "File".
- Click in the message body and add a short note. Say what the file is and whether you need anything back.
- Check that the attachment is still listed and the file name is correct.
- Click Send.
After you click Send, the message moves to your Sent folder. Delivery usually takes seconds to a few minutes. If you get a bounce-back message later, the most likely causes are a mistyped address or a file that is too large for the other person's mailbox.
Tip: If you're sending a very large file, remember that most email services have limits on attachment sizes (usually around 20-25 MB). If your file is too big, you might get an error. In that case, try using a cloud storage service like OneDrive, Google Drive, or Dropbox. These are made for sharing bigger files.
Another option for a single large file or a folder is to compress it first. Right-click it and choose Compress to ZIP file. This helps most with documents and less with photos and videos, which are already compressed.
A Note on File Size Limits
Email size limits are the most common reason a send fails. Most major providers, including Gmail and Outlook.com, limit attachments to about 20 to 25 MB per message. If your file is over the limit, the email will fail to send. You will need to use a cloud storage link or compress the file instead.
Keep in mind that email adds overhead to attachments, so a file that is just under the limit on disk can still be rejected. Leave some margin.
Here's a quick look:
- Typical Email Limit: Most big email providers (like Gmail, Outlook.com, Yahoo) limit attachments to about 20-25 MB per email.
- Work/School Accounts: These can be different based on your company's rules. Some might allow bigger files, while others might be stricter. Ask your IT department if you are not sure.
- Recipient's Mailbox: The limit on the receiving side can be lower than yours, so a large attachment may still bounce.
Services like OneDrive, Google Drive, and Dropbox handle large files by generating shareable download links. These services allow people to bypass email size limits when sending files, with some offering up to 2GB of free file transfer. Specialized services like WeTransfer also offer direct file sharing as an alternative to email.
Direct email attachments work well for regularly sending small files, avoiding future sending problems. Cloud file links offer better control and are the best choice for sending larger files. With a link you can usually stop sharing later, which you cannot do with an attachment that has already been delivered.
Reference:
Summary
To sum up: sharing from File Explorer is a quick way to email a file. Select the file, click Share, pick your mail app, fill in the message, and click Send. Direct email works best for small files, as long as you stay under your mail provider's attachment limit. Check the file size and how sensitive the information is before you send anything important.
Think about both when picking how to share. For quick shares of small files, direct email works well. For larger files or when you need more control, OneDrive is a great option. And for sharing with someone nearby, Windows has a feature called Nearby sharing.
Have a question about this guide?
Answered by AI from this guide. Good questions may be added to this page — please don't include personal details.
Did this guide fix your problem?

About the Author
Richard
Tech Writer, IT Professional
Richard is a writer at Geek Rewind who turns complex IT tasks into clear, step-by-step guides. He draws on years of hands-on experience in system administration and enterprise IT operations, focusing on Windows, Linux and WordPress: the problems people actually run into, and the fixes that work. His server and WordPress guides come from systems he runs himself. Richard builds and maintains the platform behind Geek Rewind, from its Ubuntu servers and Nginx configuration to its custom WordPress plugins. Many new tutorials start with readers' questions, and he's always glad to answer them in the comments.
No comments yet — be the first to share your thoughts!