How to Select Your Default Keyboard Language in Windows 11

Windows 11 lets you pick which keyboard layout starts up by default when you open a new app. This keyboard layout is what Windows calls an “input method” — the combination of your language and the keys you want to use. You set this in Settings under Time & language Typing Advanced keyboard settings, in a section called “Override for default input method.”
The default keyboard is the one Windows switches to whenever you launch a new program or window. Without changing it, Windows uses whichever keyboard you added first. This article shows you three ways to set your default: the fastest method using the override setting, changing the order of your keyboards, and fixing what appears on the sign-in screen.
These steps work the same way in Windows 11 Home and Pro. You won’t need to restart your computer in most cases. Apps that are already open may keep the old keyboard until you close and reopen them.
Open Settings Time & language Typing Advanced keyboard settings, then select your keyboard from the Override for default input method list. Windows will switch to it whenever you open a new app window.
Language vs Keyboard: What You Are Actually Choosing
Windows 11 treats a language and a keyboard as two separate things. A language, such as English (United Kingdom) or French (France), can have one or more keyboards attached to it. A keyboard is the layout that decides what each key types, such as United Kingdom or US. Windows calls the combination of language and keyboard an input method (the setup Windows uses to turn your key presses into characters).
Your display language (the language Windows uses for menus, buttons and Settings) is a separate choice. Changing the default keyboard does not change the display language, and changing the display language does not change the keyboard.
Check the taskbar before you start. If you see a short code such as ENG near the clock, more than one input method is installed. If you see nothing there, you probably have only one, and you need to add a second before you can choose a default.

How to Add a Language or Keyboard Layout
You can only pick a default from the keyboards that are already installed. Add the one you want first. Skip this section if it is already installed.
Add a New Language
Use this if the language you need isn't already listed. Adding a language also adds its standard keyboard.
- Open Settings by pressing the Windows key + I.
- Select Time & language in the left pane.
- Select Language & region. You should see a Preferred languages list.
- Select Add a language next to Preferred languages. A search window opens.
- Type the name of the language in the search box, select it in the results, and select Next.
- Look at the options on the next screen. These include Language pack, Set as my Windows display language, and others such as speech recognition and handwriting. Clear Set as my Windows display language if you only want to type in this language and keep your current menus.
- Select Install. Windows downloads the language pack and adds the language to the list.
Requires administrator privileges: Installing a language pack may show a User Account Control prompt. If you are on a standard account, enter an administrator's credentials when asked.
If the install fails or stalls, check that you are online and that Windows Update is working. Language packs download through the same service.
Add Another Keyboard to a Language You Already Have
Use this when you want a different layout for a language that is already installed. For example, you want a US layout on an English (United Kingdom) setup.
- Open Settings Time & language Language & region
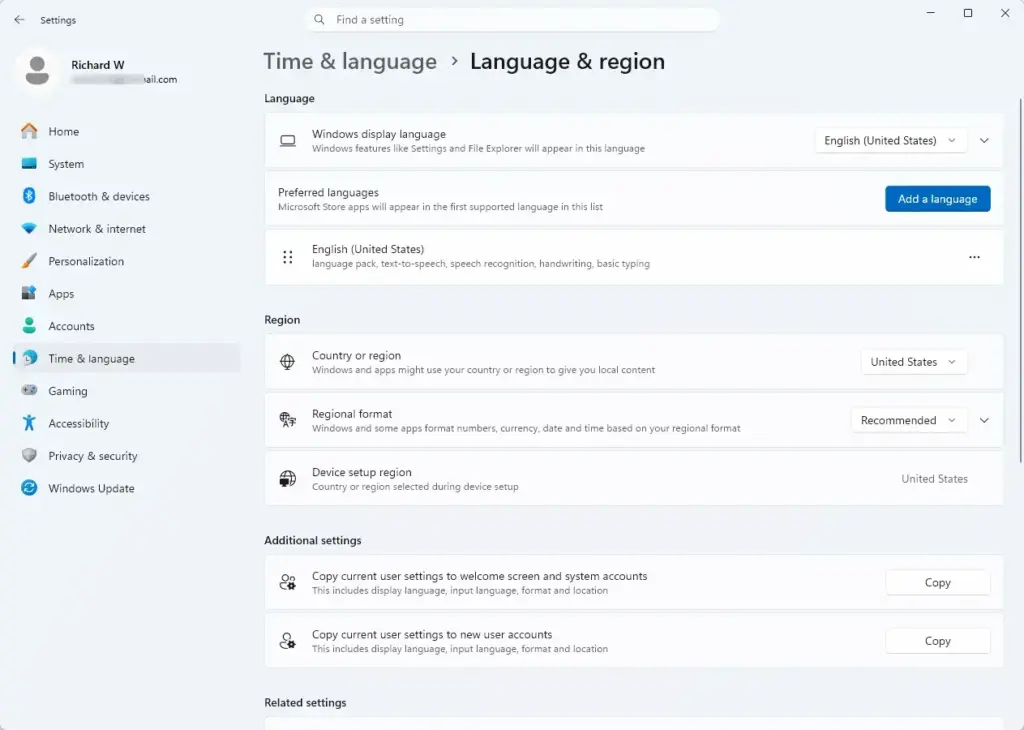
Settings › Time & language › Language & region - Find the language in the Preferred languages list. Select the three dots (...) on its right, then select Language options.
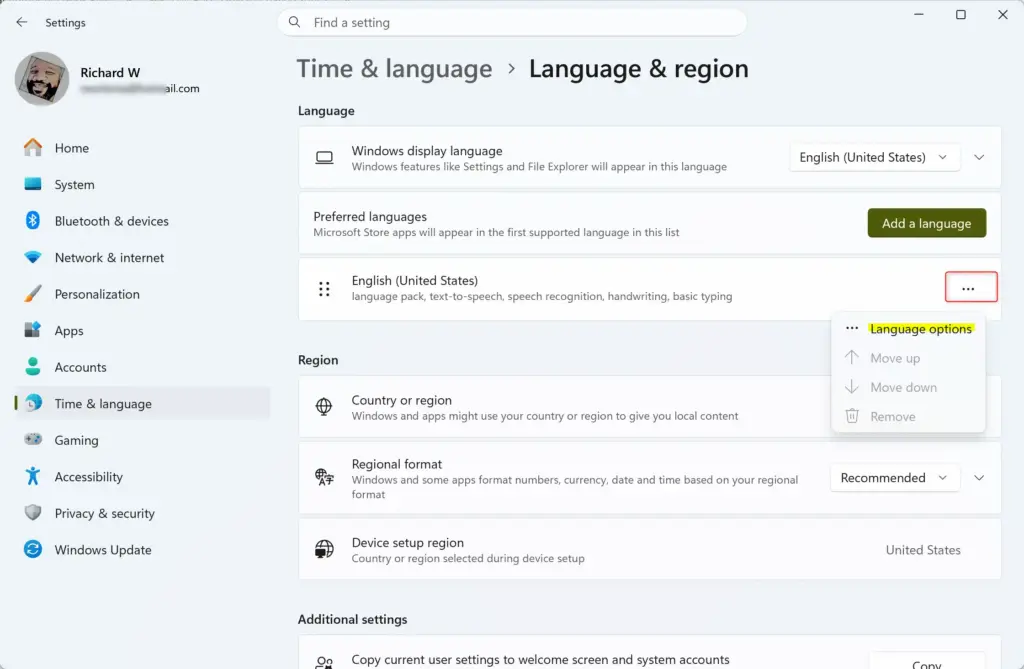
- Scroll to the Keyboards section and select Add a keyboard.
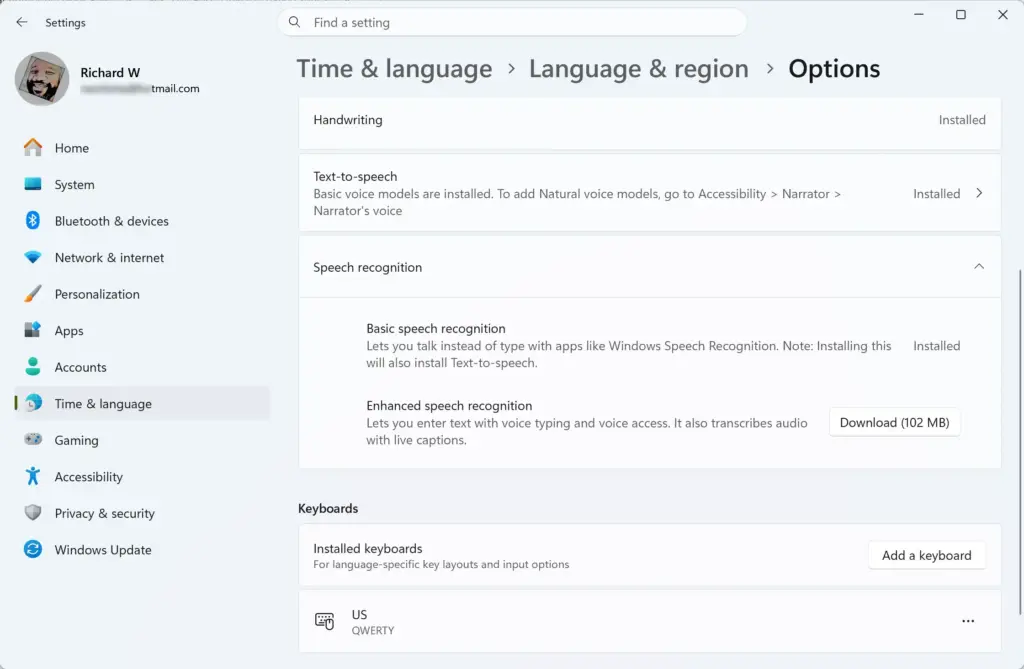
- Select the layout you want from the list. The keyboard appears under Keyboards immediately.
Windows does not offer a way to edit the layout of an installed keyboard. To change the layout for a language, add the new one as above. Then remove the old one by selecting the three dots next to it in the Keyboards list and choosing Remove. Add the new layout first so you are never left with no keyboard.
How to Set the Default Keyboard in 🪟 Windows 11
There are two ways to do this. The first is direct and works whatever order your languages are in. The second changes the order of your languages and lets Windows pick the keyboard from that.
Method 1Use Override for Default Input Method
This is the quickest route. It names one input method as the default and ignores the language order.
- Open Settings by pressing the Windows key + I.
- Select Time & language, then select Typing.
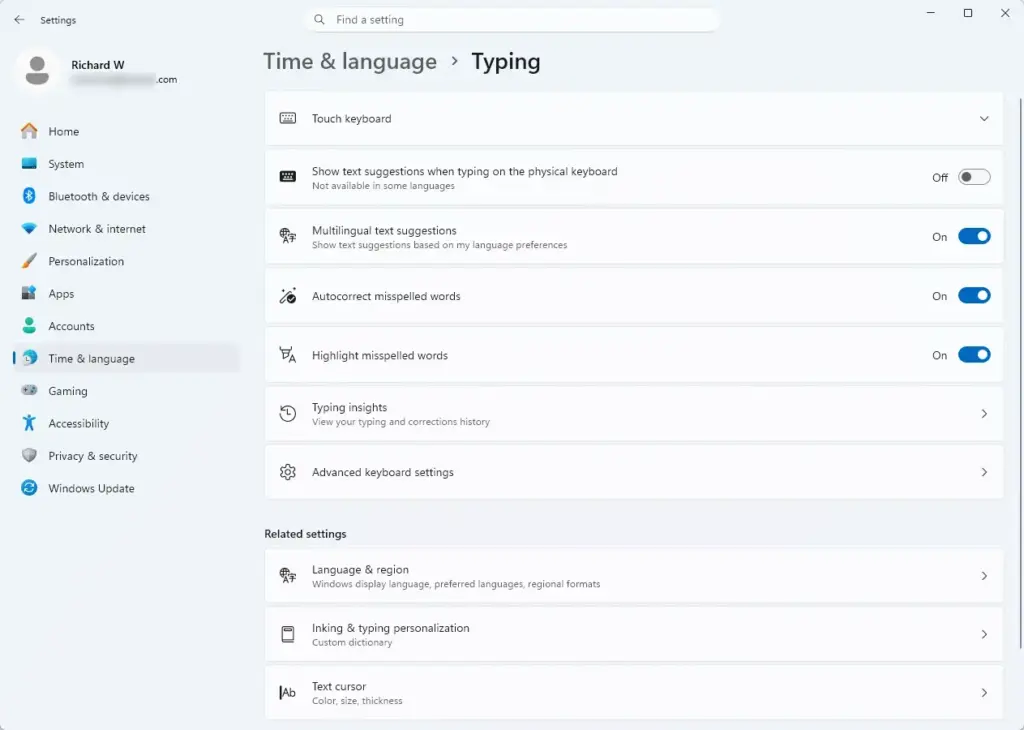
Settings › Time & language › Typing - Scroll down and select Advanced keyboard settings. A page opens with the heading Switching input methods.
- Open the Override for default input method drop-down list. It shows each installed input method by language and keyboard name, for example English (United Kingdom) followed by the layout name.
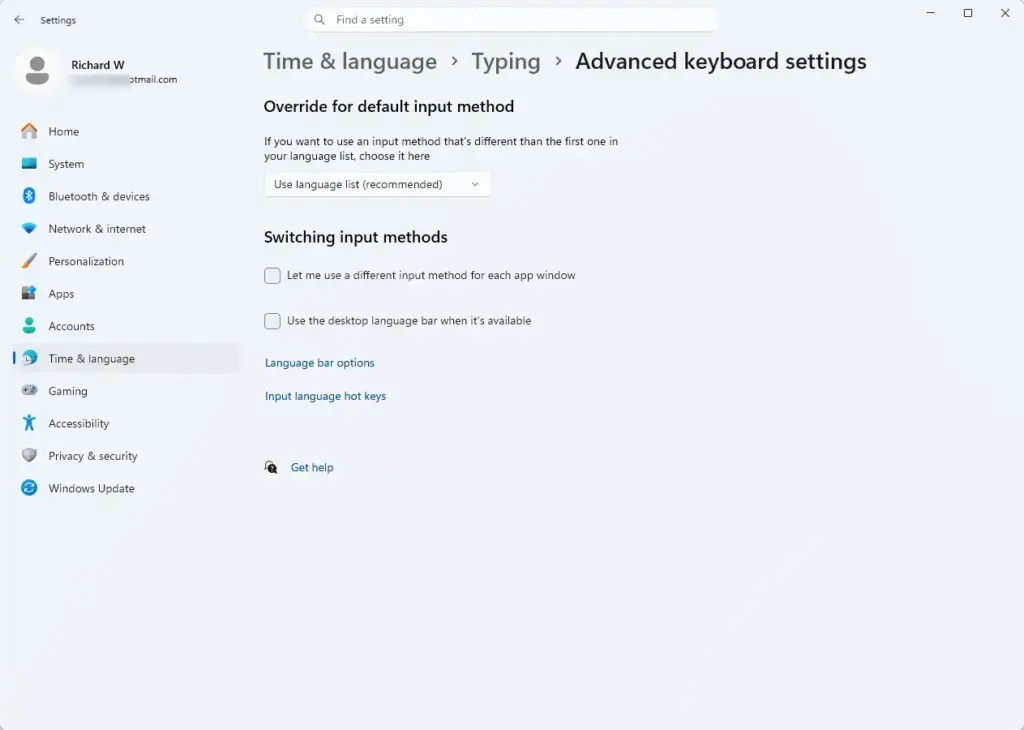
Settings › Time & language › Typing › Advanced keyboard settings - Select the keyboard you want as the default. The list closes and shows your choice.
- Close Settings. The change is saved as soon as you pick the item.
To test it, open a new Notepad window and check the language code at the taskbar. It should show your chosen input method.
If the drop-down shows only one entry, you have only one keyboard installed. Add a second using the steps in the previous section, then return here.
Method 2Move the Language to the Top of the List
Windows treats the language at the top of Preferred languages as your main one. Windows tries that language first for apps and websites. It also uses that language's keyboard as the starting input method. Use this method if you want your language priorities and your default keyboard to match.
- Open Settings Time & language Language & region
- Find the language you want as your default in the Preferred languages list.
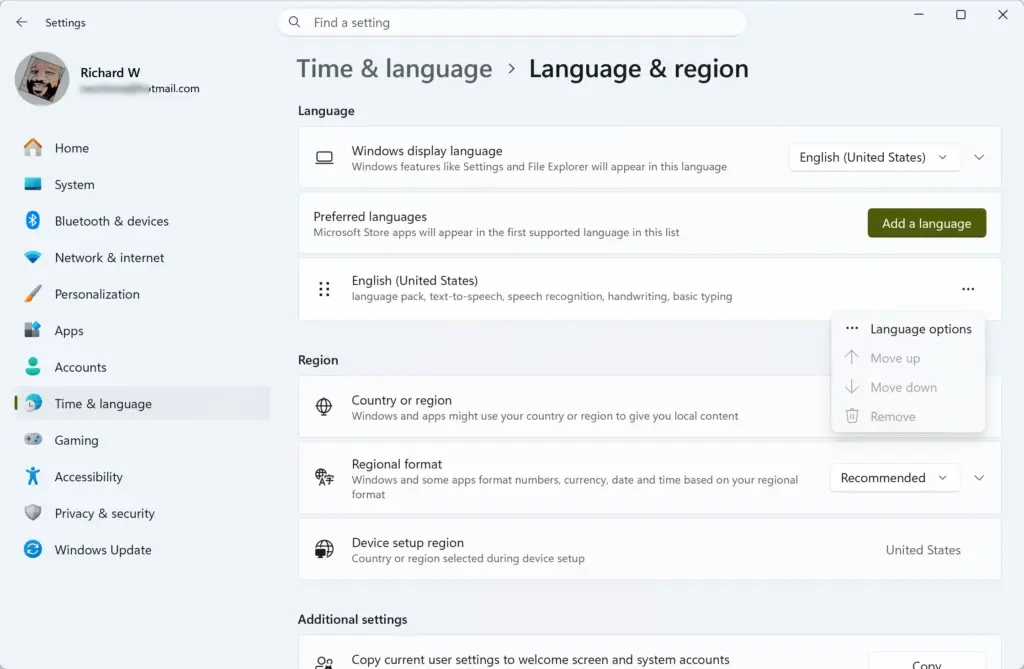
- Select the three dots (...) next to it, then select Move up. Repeat until it is at the top. You can also drag it upward by its handle.
- Check the order. The language you want should now be first in the list.
The order of this list does not change your display language. That is controlled by the Windows display language drop-down at the top of the same page.
If a language has more than one keyboard, Windows starts with the first one listed under that language's Keyboards section. If you want a specific one, use Method 1 instead.
How to Switch Keyboards Day to Day
The default only decides where you start. You can change the active keyboard at any time without touching Settings.
- Taskbar: Select the language code near the clock, such as ENG. Choose a keyboard from the list that opens.
- Keyboard shortcut: Press the Windows key + Spacebar to cycle through your installed input methods. Alt + Shift also cycles through them on most setups.
If a shortcut does not behave as expected, check the shortcut settings. Go to Settings Time & language Typing Advanced keyboard settings, then select Language bar options. In the window that opens, go to the Advanced Key Settings tab, where you can change the key sequence for switching input languages.
The same Advanced keyboard settings page has a check box called Let me use a different input method for each app window. With it on, Windows remembers the keyboard per window. With it off, one keyboard applies across all windows. If your keyboard keeps changing when you switch between apps, check this box first.
How to Set the Default Keyboard for the Sign-In Screen
Your choice above applies to your own account. The sign-in screen, where you type your password or PIN, uses separate settings. If your password contains special characters, a mismatch can cause sign-in failures. Windows can copy your current settings to the sign-in screen and to new accounts.
Requires administrator privileges: This step changes settings for the whole PC. Copying also applies your current display language and region settings, not only the keyboard, so make sure those are set the way you want first.
- Open Settings Time & language Language & region
- Scroll down to the related settings and select Administrative language settings. A Region window opens.
- Select the Administrative tab.
- Select Copy settings. If a User Account Control prompt appears, approve it. The Welcome screen and new user account settings window opens.
- Check Welcome screen and system accounts. Check New user accounts as well if you want future accounts on this PC to start with the same settings.
- Select OK, then select OK again in the Region window. Windows may ask you to restart.
After you restart and reach the sign-in screen, you can check the result. This is clear enough, though a reader unfamiliar with the interface might benefit from: 'Look for the language indicator (a small code or flag) at the bottom right of the screen.' It should show your chosen input method.
If the sign-in screen has the wrong keyboard for a moment, select that language indicator and choose the correct one before you type your password.
If the Option Is Missing or the Keyboard Changes Back
Most problems come down to a few causes. Check these in order.
The Override List Has Only One Entry
The list only shows input methods that are installed. Add the language or keyboard first, using the steps near the start of this guide.
The Language Won't Install
Language packs download through Windows Update. If the install stops, check your internet connection and run Windows Update from Settings. Then try Add a language again. A metered connection can also delay downloads, so check that setting if your connection is metered.
Settings Are Greyed Out or Reset Themselves
On a work or school PC, an administrator may control language and keyboard settings. If the options are greyed out, or your choice reverts after you sign in, ask your IT team. You cannot override a managed setting from your own account.
The Wrong Keyboard Appears in One App
If one app behaves differently from the rest, open Advanced keyboard settings and look at Let me use a different input method for each app window. Windows may have stored a different keyboard for that app. Close and reopen the app after changing the setting.
Keys Type the Wrong Characters
If the language code looks right but the keys produce the wrong symbols, the layout is probably wrong. A common case is a US layout where you need a UK one. Open the language's options, add the correct keyboard, and remove the wrong one.
How to Undo the Change
All changes in this guide are fully reversible and safe.
- Change the default again: Return to Settings Time & language Typing Advanced keyboard settings and pick a different entry in Override for default input method.
- Restore the old language order: Open Settings Time & language Language & region and use Move up or Move down on the languages until the order matches what you had.
- Remove a keyboard: Open Language options for that language and use the three dots next to the keyboard to select Remove.
- Remove a language: Select the three dots next to the language in Preferred languages, then select Remove.
- Undo the sign-in screen copy: Set your account back to the settings you want, then repeat the Copy settings steps.
What to Do Next
If you added a language and want Windows menus in it too, use the Windows display language drop-down at the top of Language & region. That setting is separate and needs you to sign out and back in. If you share the PC, run Copy settings again after any later change so the sign-in screen stays in step with your account.
Was this guide helpful?

About the Author
Richard
Tech Writer, IT Professional
Richard is a writer at Geek Rewind who turns complex IT tasks into clear, step-by-step guides. He draws on years of hands-on experience in system administration and enterprise IT operations, focusing on Windows, Linux and WordPress: the problems people actually run into, and the fixes that work. His server and WordPress guides come from systems he runs himself. Richard builds and maintains the platform behind Geek Rewind, from its Ubuntu servers and Nginx configuration to its custom WordPress plugins. Many new tutorials start with readers' questions, and he's always glad to answer them in the comments.



No comments yet — be the first to share your thoughts!