How to Configure Advanced Keyboard Settings for Multi-Language Input in Windows 11

Windows 11 lets you type in multiple languages and switch between them smoothly using Settings. You set up each language and keyboard in Language & region, then use Typing Advanced keyboard settings to pick your default input method, decide whether switching happens per-app, and create keyboard shortcuts.
Advanced keyboard settings give you control over how quickly Windows switches between languages, whether your choice sticks to one app or applies everywhere, and which keyboard layout loads when you open a document. This matters if you regularly type in more than one language or share your PC with people who do.
This guide covers Windows 11 Settings in builds 22H2, 23H2, and 24H2. The steps work the same way across all three versions.
Open Settings Time & language Language & region and select Add a language to install it . Then go to Settings Time & language Typing Advanced keyboard settings to configure default input method, per-app switching, and keyboard shortcuts for multi-language typing.
Before You Start
Windows separates three things that people often mix up:
- Language is the language Windows uses for typing, spell-checking and, optionally, menus and dialogs.
- Keyboard layout decides which character each key produces. For example, French (AZERTY) and English (QWERTY) put letters in different places.
- Input method is the pairing of a language with a keyboard layout. This is what you switch between while you work. Some input methods—like Microsoft Pinyin or Microsoft Japanese IME—use special software called an Input Method Editor (or IME) that converts what you type into characters a standard keyboard cannot produce, like Chinese or Japanese characters.
Check these points first:
- You need an internet connection to download language features.
- Installing a language pack may show a User Account Control prompt. On a standard account (one without admin rights), you need to enter an administrator’s password to continue.
- Windows 11 Home and Pro handle typing languages the same way. The difference is with the Home Single Language edition, which cannot add display languages. You can still add keyboards for typing in other languages on that edition.
Add a Language and Keyboard in 🪟 Windows 11
Each language you add comes with at least one keyboard. Add the language first, then adjust which keyboards it uses.
Step 1Add a language
This step downloads the language so Windows can check your spelling and suggest corrections when you type in it.
- Open Settings by pressing the Windows key + I.

Windows 11 Start menu with Settings gear icon highlighted. - Select Time & language, then select Language & region.
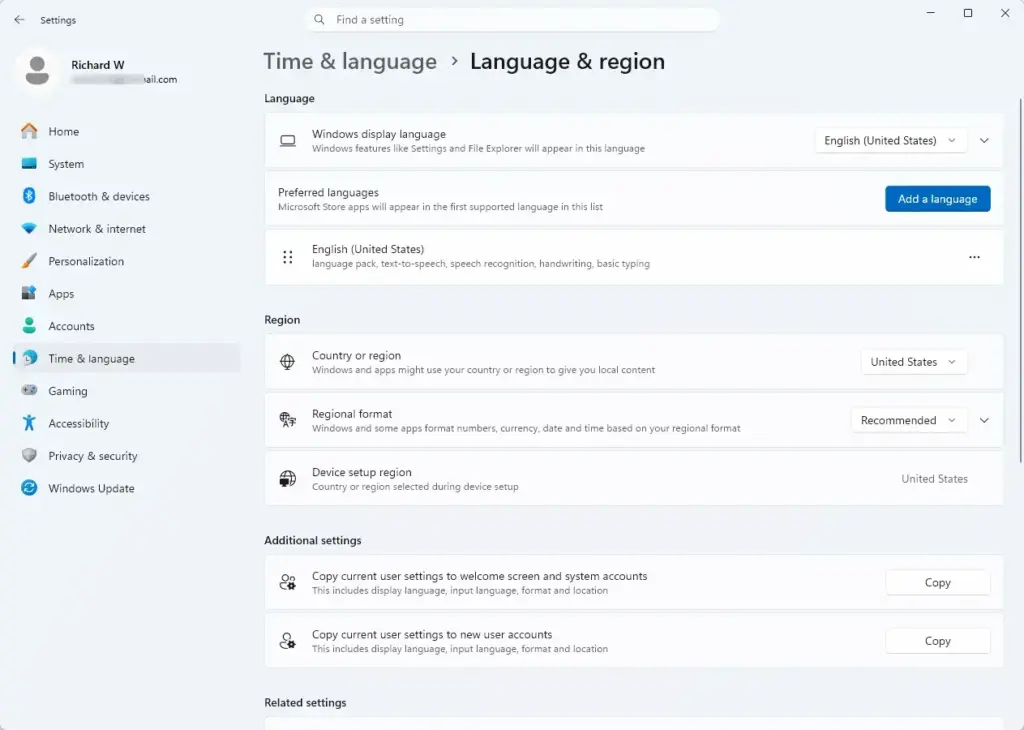
Settings › Time & language › Language & region - Next to Preferred languages, select Add a language. A list of languages opens.
- Type the language name in the search box, select it, then select Next.
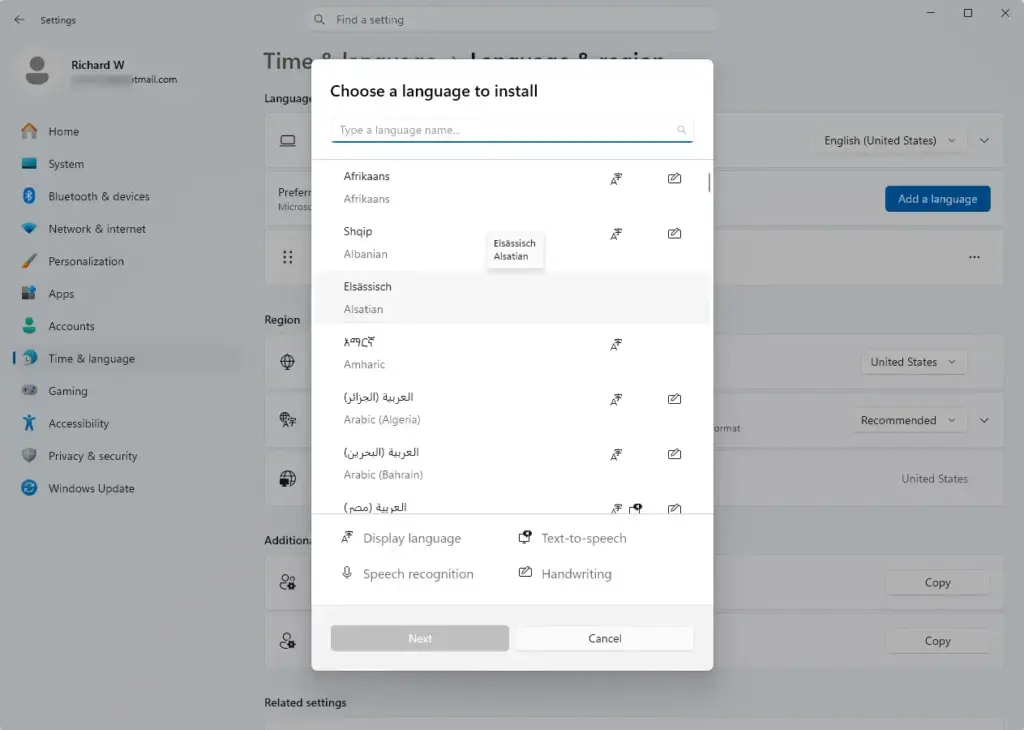
- Review the optional features. Typical options are Language pack, Text-to-speech, Speech recognition and Handwriting.
- Clear Set as my Windows display language if you only want to type in the language. Leave it selected only if you want menus and dialogs in that language.
- Select Install.
The language appears in the Preferred languages list with a progress indicator while it downloads. Apps and websites pick the first language in your list when they need to choose one.
If you set the language as your display language, Windows asks you to sign out so the new language takes effect.
Step 2Add or remove keyboards for that language
A language often installs with one default keyboard. Add others if you need a different layout, such as United States-International for accented letters on an English keyboard.
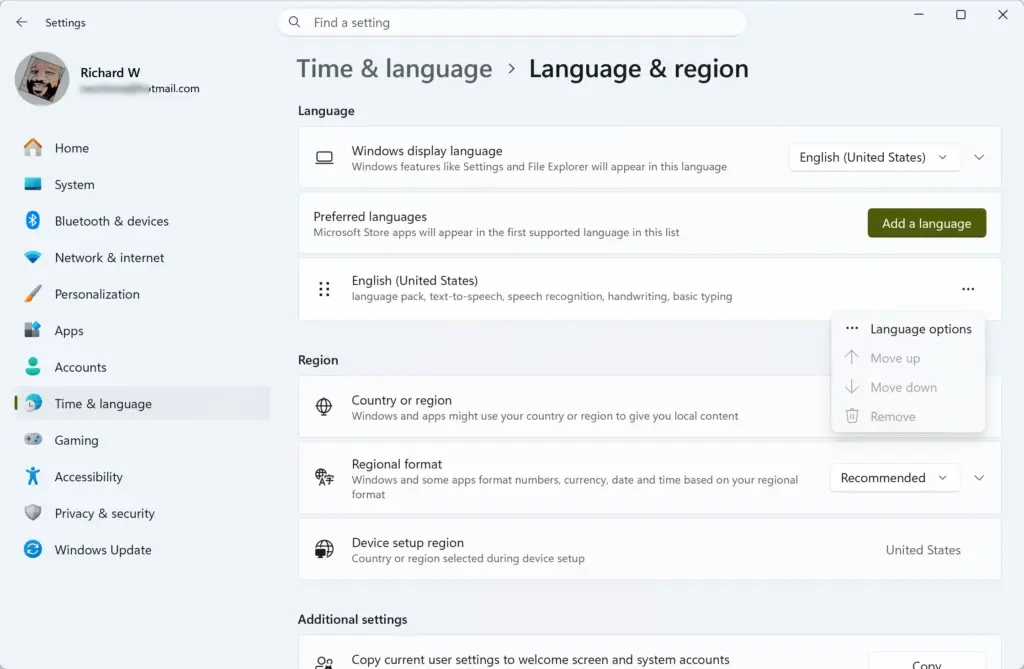
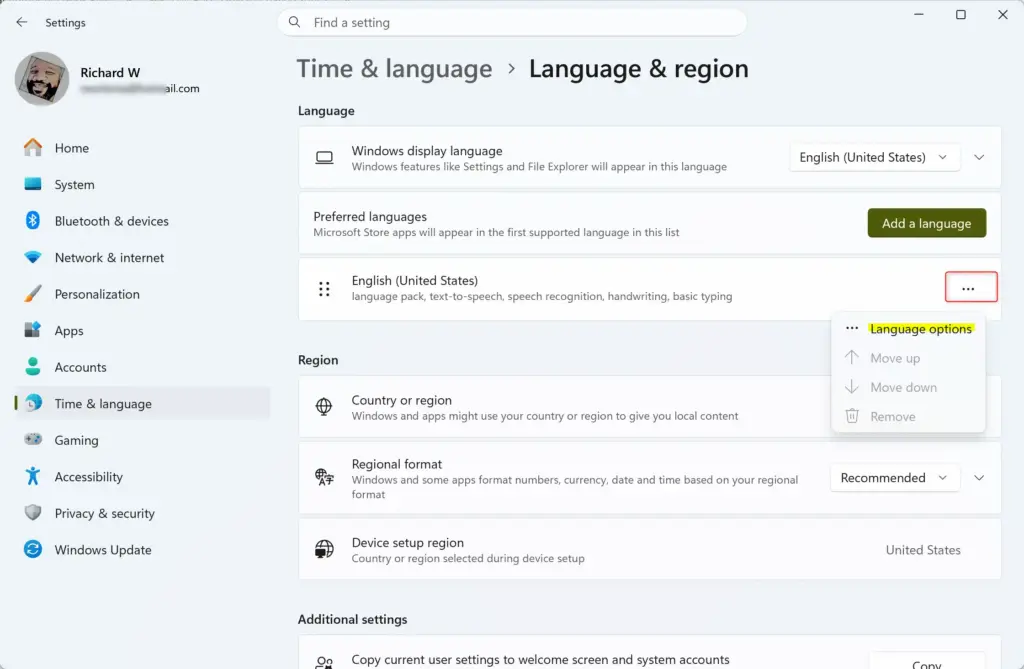
- In Settings Time & language Language & region, find the language under Preferred languages.
- Select the three-dot button (...) next to it, then select Language options.
- Under Keyboards, select Add a keyboard.
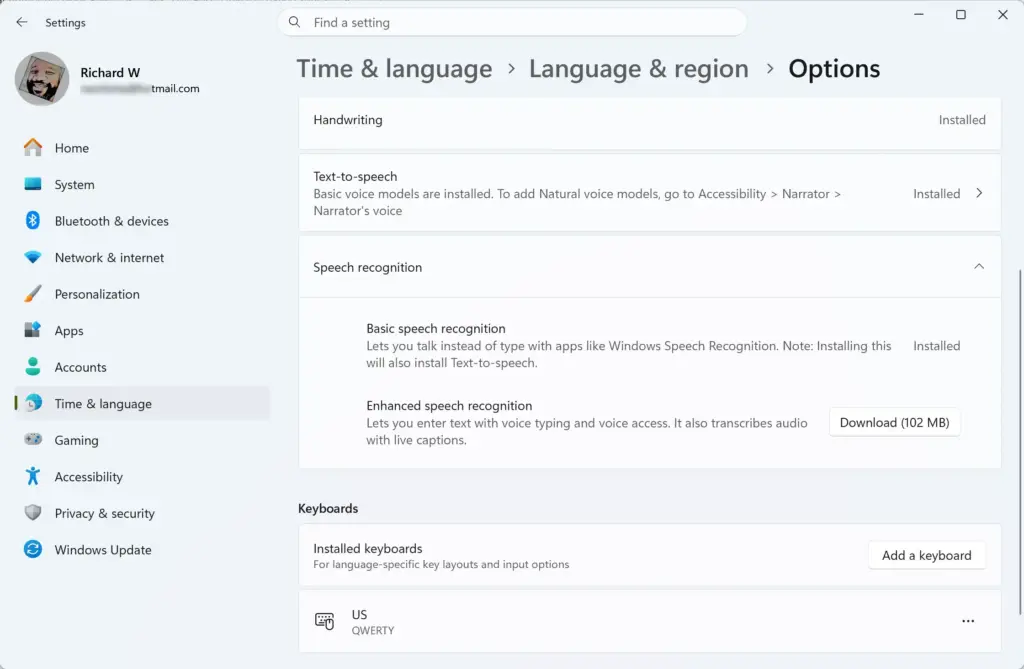
- Select the layout you want from the list.
The new keyboard appears in the Keyboards list. To remove one, select the three-dot button next to it and select Remove. Keep at least one keyboard for each language you want to type in.
Some languages—Chinese, Japanese, and Korean—use an IME and have their own settings on the Language options page. Open them to change behavior such as default input mode.
If the language won't install
A language can stall on "Downloading" or fail with an error. Try these in order:
- Check that your connection is not set as metered (limited by your provider or set to save data). Go to Settings Network & internet, open your connection's properties, and turn off Metered connection.
- Open Settings Windows Update and select Check for updates. Language features download through Windows Update, so a stuck update can block them.
- Restart the PC and try the install again.
Switch Between Languages and Keyboards
Once you have two or more input methods, a language indicator appears in the taskbar notification area, near the clock. It shows a short code, such as ENG.
Use the keyboard shortcuts
Windows 11 gives you two ways to switch by keyboard:
- Windows key + Spacebar opens a small list of your input methods. Keep holding the Windows key and press Spacebar again to move down the list. Release both keys to select one.
- Left Alt + Shift switches the input language. Ctrl + Shift switches the keyboard layout. Which of these is active depends on your hot key settings, covered below.
Use the taskbar language indicator
Select the language code in the taskbar and choose an input method from the list. This works with a mouse or touch screen when you do not want to use a shortcut.
Open Advanced Keyboard Settings
This page holds the settings that control how Windows chooses and switches input methods. You use it for most of the remaining steps.
- Open Settings.
- Select Time & language, then select Typing.
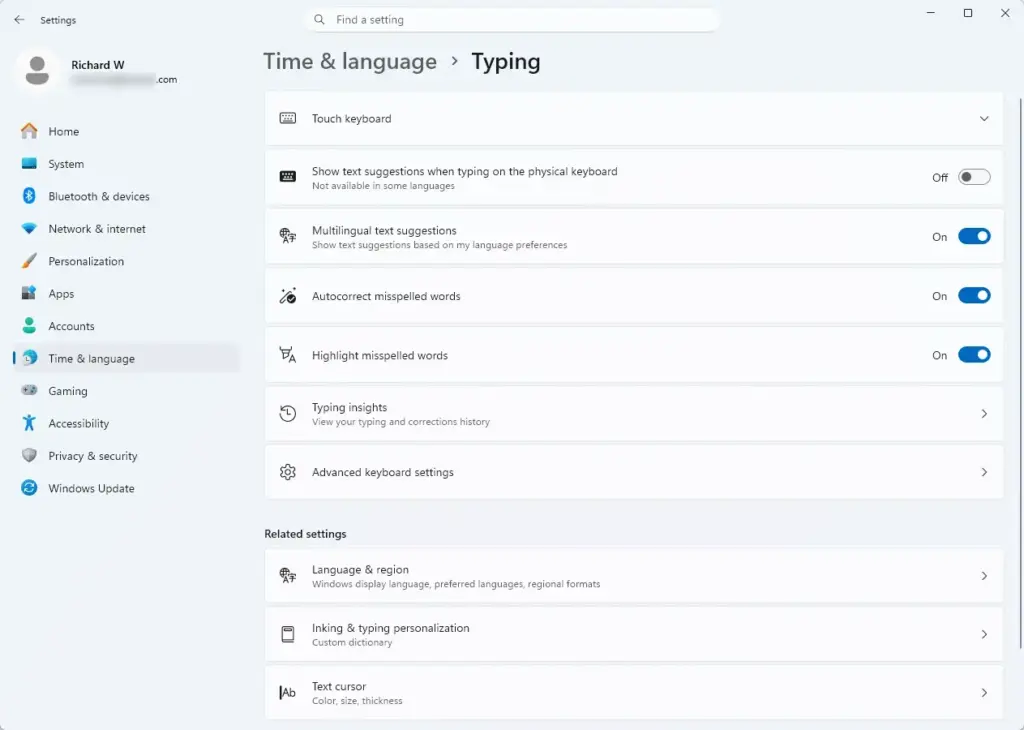
Settings › Time & language › Typing - Select Advanced keyboard settings.
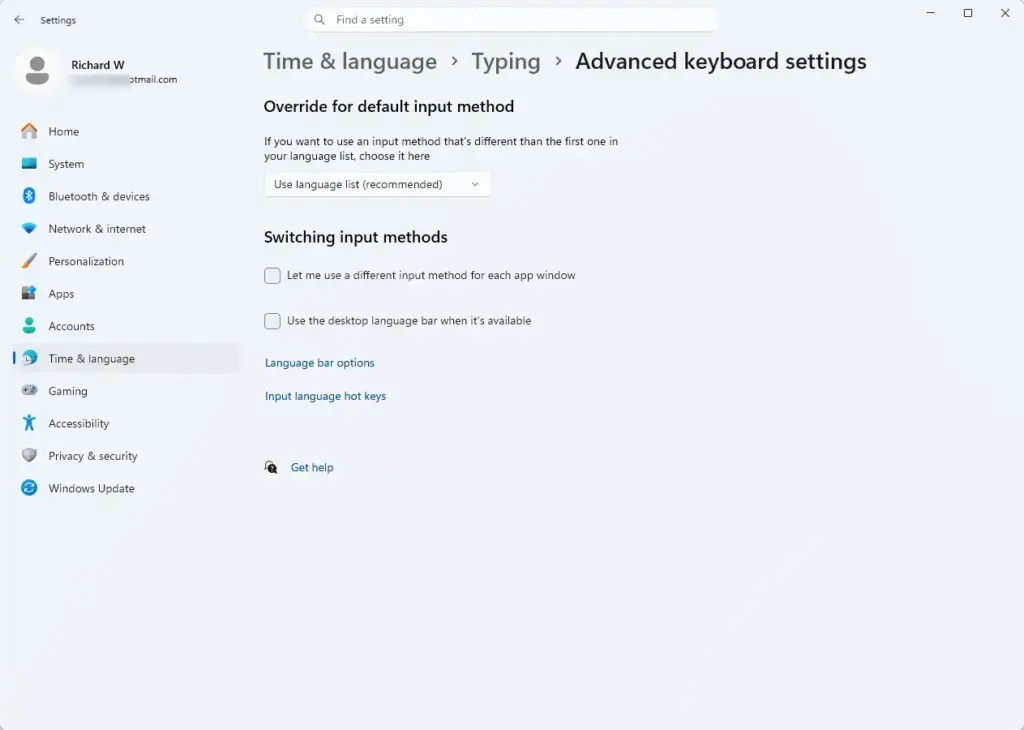
Settings › Time & language › Typing › Advanced keyboard settings
You should see the Override for default input method drop-down, a Switch input methods section, and a link named Input language hot keys. If a name differs slightly on your build, look for the same option in the same area of the page.
Choose a Default Input Method
The default input method is the one Windows uses when you sign in or open a new window. Windows defaults to the first language in your Preferred languages list. Override that if you work mostly in a language that is not first in the list.
- Go to Settings Time & language Typing Advanced keyboard settings
- Open the Override for default input method drop-down.
- Select the input method you want, for example your second language's keyboard.
To go back to the automatic behavior, open the same drop-down and select Use language list (Recommended).
Use a Different Input Method for Each App Window
By default, Windows applies one input method across everything. If you chat in one language in a messaging app and write documents in another, turn on per-window switching. Windows then remembers the input method for each open window.
- Go to Settings Time & language Typing Advanced keyboard settings
- Under Switch input methods, select Let me use a different input method for each app window.
Switch input methods in each window as normal. When you return to a window, Windows restores the input method you last used there. The setting applies to windows you have open. A new window starts with your default input method.
Change the Input Language Hot Keys
The shortcuts for switching are configurable. Change them if Left Alt + Shift conflicts with another program, or if you accidentally trigger a switch when you type.
- Go to Settings Time & language Typing Advanced keyboard settings
- Select Input language hot keys. The Text Services and Input Languages dialog opens on the Advanced Key Settings tab.
- Under Hot keys for input languages, select the action you want to change, such as Between input languages.
- Select Change Key Sequence.
- Choose a shortcut for Switch Input Language and for Switch Keyboard Layout. The available choices include Ctrl+Shift, Left Alt+Shift and Not Assigned. The exact list can vary by language.
- Select OK, then select Apply and OK in the main dialog.
The new shortcut works straight away. You do not need to restart. If you set both actions to Not Assigned, you can still switch with Windows key + Spacebar or from the taskbar indicator.
The same tab has a To turn off Caps Lock option. Choose Press the SHIFT key if you want Shift to turn Caps Lock off. This helps when you type in a language that uses Caps Lock differently.
Turn On Multilingual Text Suggestions
If you switch languages mid-sentence, text suggestions normally follow only the active language. Multilingual text suggestions show suggestions from every language you have enabled.
- Go to Settings Time & language Typing
- Find Multilingual text suggestions.
- Turn the toggle On.
Windows Settings can arrange the Typing page differently between builds. If you do not see this toggle, look under the text suggestion options on the same page. If it is still absent, your build or the languages you added may not support it.
Use the Desktop Language Bar
The desktop language bar is a small toolbar that lists your input methods. Windows 11 uses the taskbar indicator by default, but you can bring back the older bar.
- Go to Settings Time & language Typing Advanced keyboard settings
- Under Switch input methods, select Use the desktop language bar when it's available.
- Select Language bar options to choose where the bar appears.
The Language Bar options dialog lets you float the bar on the desktop, dock it in the taskbar, or hide it. The bar only appears when the option is available for your input methods. If it does not show, turn the option off and use the taskbar indicator instead.
Apply Your Language Settings to the Sign-In Screen and New Accounts
Administrator privileges required. Your language and keyboard choices apply to your own account. The sign-in screen and new accounts keep the old settings until you copy yours to them. This matters if you type your password with a non-English layout.
- Go to Settings Time & language Language & region
- Scroll to Related settings and select Administrative language settings. The Region dialog opens.
- On the Administrative tab, select Copy settings.
- Select Welcome screen and system accounts, New user accounts, or both.
- Select OK. Approve the User Account Control prompt if it appears.
Windows may ask you to restart. Restart when it asks, then check the sign-in screen for your language indicator.
The same Administrative tab has a Change system locale button. It sets the language for older programs that do not support Unicode (the standard that covers characters from all languages). Change it only if an older program shows garbled text. It requires administrator privileges and a restart.
Fix Missing or Misbehaving Options
The language indicator does not appear
The indicator shows only when you have two or more input methods. Add another keyboard under Settings Time & language Language & region, and it appears.
A keyboard shortcut does nothing
Open Input language hot keys and check that the shortcut is not set to Not Assigned. If another program uses the same shortcut, change one of them. Test with Windows key + Spacebar, which Windows reserves for input switching.
Keys type the wrong characters
If your physical keyboard is a different type from the layout Windows assumes, the symbols will not match the key labels. Open Settings Time & language Language & region, select the three-dot button next to the language, then select Language options. Look for Hardware keyboard layout and select Change layout if it is shown. Restart the PC to apply the change. If the option is not shown for your keyboard, try selecting the language's keyboard list to see if you can change the layout there.
Windows keeps changing input method on its own
This can happen when per-window switching is on. Windows remembers an input method for each window. If you want one input method everywhere, clear Let me use a different input method for each app window on the Advanced keyboard settings page.
You cannot change the display language
Windows 11 Home Single Language does not allow additional display languages. You can still type in other languages by adding keyboards. To change the display language, you need a different edition of Windows.
How to Undo These Changes
- To restore automatic default input, set Override for default input method to Use language list (Recommended).
- To stop per-window switching, clear Let me use a different input method for each app window.
- To restore shortcuts, return to Input language hot keys Change Key Sequence and choose the shortcuts you used before.
- To remove a keyboard, open Language options for that language and select Remove beside the keyboard.
- To remove a language, select the three-dot button next to it under Preferred languages and select Remove. This removes its keyboards too.
What to Do Next
Test your setup in the apps you use most, and adjust the hot keys if you trigger a switch by accident. If you changed your display language, sign out and back in so menus and dialogs update. If you type your password in a second language, run the Copy settings step so the sign-in screen offers the same keyboard.
Was this guide helpful?

About the Author
Richard
Tech Writer, IT Professional
Richard is a writer at Geek Rewind who turns complex IT tasks into clear, step-by-step guides. He draws on years of hands-on experience in system administration and enterprise IT operations, focusing on Windows, Linux and WordPress: the problems people actually run into, and the fixes that work. His server and WordPress guides come from systems he runs himself. Richard builds and maintains the platform behind Geek Rewind, from its Ubuntu servers and Nginx configuration to its custom WordPress plugins. Many new tutorials start with readers' questions, and he's always glad to answer them in the comments.


No comments yet — be the first to share your thoughts!