How to Download a Language Pack for Offline Use in Windows 11

A language pack in Windows 11 lets you add a new language to your computer so you can use Windows in that language, even offline. Once you download the pack, Windows stores it on your PC, so you don’t need an internet connection to keep using that language.
The fastest way is to open Settings Time & language Language & region, select Add a language, and install the pack you need. Windows 11 downloads and saves all the files automatically.
If your PC never connects to the internet, you can copy the language pack files from another computer and install them using Lpksetup or DISM (a command-line tool built into Windows). This method works when you have no internet access on the target PC.
Open Settings Time & language Language & region, select Add a language, choose your language, tick the features you need, and select Install. Windows downloads and stores the files locally so the language works offline after installation.
Which Method Do You Need?
“Offline” means two different things, and each has its own route:
- The PC is online now, but you want the language to work offline later. Use Method 1. After the download finishes, the language runs from local files.
- The PC has no internet access, or you need to install the same language on many PCs. Use Method 2. You collect the pack files once on a computer with internet, then install them from a USB drive or network share.
What a Language Pack Contains
A Windows 11 language is not one file. It has several parts, and you can install them separately:
- Language pack: the translated menus, dialogs and system text (the display language).
- Basic typing: keyboard layouts and input support.
- Text-to-speech: the voice Narrator and other apps use to read text aloud.
- Speech recognition: support for voice typing and Windows speech features in that language.
- Handwriting: pen input recognition.
- Optical character recognition (OCR): reading text from images.
Windows calls the optional parts Features on Demand (components Windows installs only when you ask for them). If you need only the display language, skip the rest. For voice or pen input to work offline, install those parts as well.
Before You Start
Check Your Windows Edition
Windows 11 Home Single Language cannot add display languages. Picking a language on this edition triggers a message stating your license supports only one display language. Windows 11 Home and Pro (not Single Language) can add them. To check your edition, open Settings System About and read the Edition line under Windows specifications.
Match the Version and Architecture
This matters mainly for Method 2. A language pack file must match both the Windows 11 version (for example, 23H2 or 24H2) on the PC and its processor type—either x64 (standard) or ARM64 (newer chips). A mismatched pack fails to install. Settings handles this for you in Method 1. To check, open Settings System About. Read Version under Windows specifications, and System type under Device specifications.
Know Which Steps Need Administrator Rights
Method 1 works from a standard account in some setups, but Windows may ask for administrator credentials. Every step in Method 2 needs administrator privileges, and each one is flagged.
Method 1Download a Language Pack Through Settings
This is the fastest way to get a language onto a connected PC. Windows fetches the files through Windows Update and installs them locally.
- Press Windows key + I to open Settings.

Windows 11 Start menu with Settings gear icon highlighted. - Select Time & language in the left pane, then select Language & region. You should see your current display language and a Preferred languages list.
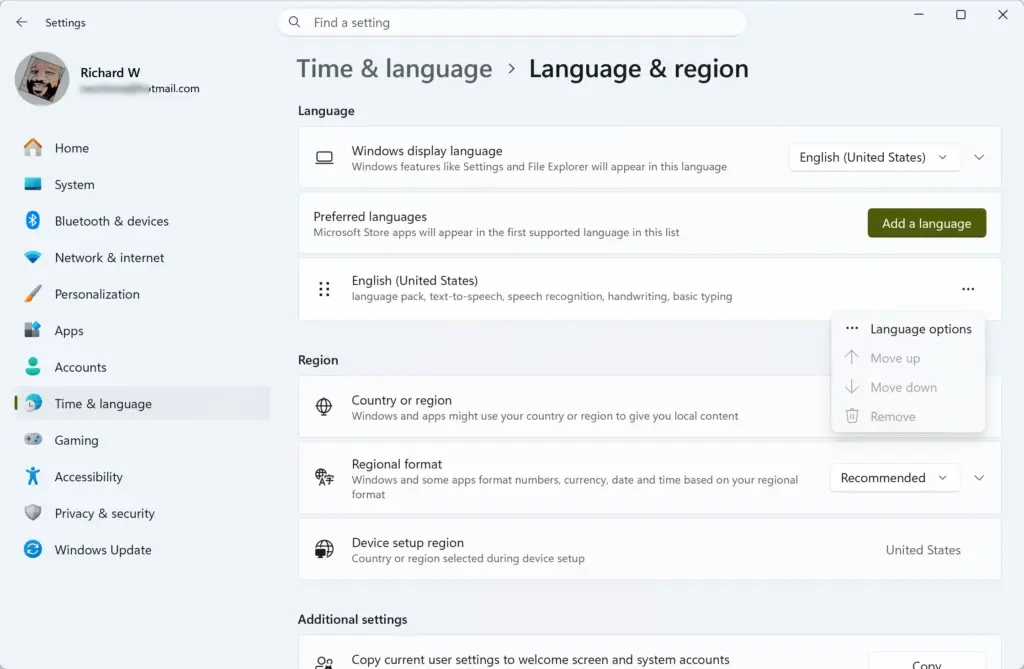
- Next to Preferred languages, select Add a language. A Choose a language to install window opens.
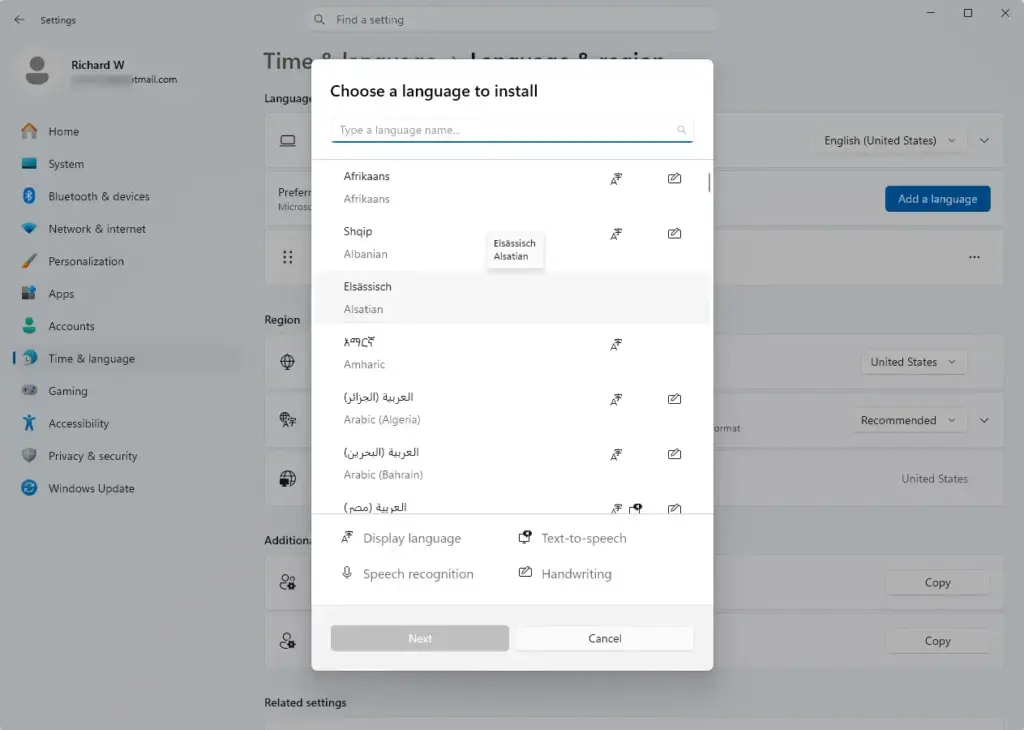
- Type the language name in the search box, select it in the results, and select Next. Regional variants (for example, French for France and French for Canada) appear as separate entries. Choose the one you need.
- On the Install language features screen, tick the parts you want. You should see options such as Language pack, Text-to-speech, Speech recognition and Handwriting. Not every language offers every option.
- Tick Set as my Windows display language only if you want the menus to change to this language. Leave it unticked to add the language for typing only.
- Select Install. A progress bar shows next to the language in the Preferred languages list.
When the download finishes, the language shows in the list with no progress bar. If you chose it as the display language, Windows asks you to sign out. Sign out and back in to see the new language on menus and the sign-in screen.
The files are now stored on the PC. You can disconnect from the internet and the language keeps working.
If the Download Stalls or Fails
Settings gets language files from Windows Update, so anything that blocks Windows Update blocks the download. Try these in order:
- Check the connection. Open a web page to confirm you are online.
- Check whether the connection is metered (limited data). Open Settings Network & internet, select your Wi-Fi or Ethernet connection, and turn Metered connection off. Windows can pause large downloads on metered connections.
- Open Settings Windows Update and select Check for updates. Install anything pending, restart, and try the language again. A stuck update queue can hold up language downloads.
- If the pack still will not download, or the PC is behind a firewall that blocks Windows Update, use Method 2.
If the language list has no usable language, or you see the one-display-language message, you are likely on Windows 11 Home Single Language (see "Check Your Windows Edition" above). Adding a typing-only language still works on that edition. The display language does not.
Method 2Install a Language Pack on a PC With No Internet
Use this method for locked-down or air-gapped PCs, or to install one language on many computers without downloading it each time. First, get the pack files. Then copy them to the target PC.
Get the Language Pack Files
Microsoft distributes offline language files as the Windows 11 Language and Optional Features ISO. An ISO is a disc image file you can open like a drive. Microsoft does not offer it as a public download for ordinary users. It is available to organizations through the Volume Licensing Service Center and to Visual Studio subscribers through their subscription downloads. Download the ISO that matches the version of Windows 11 on your target PC.
I cannot confirm a public download link for these files, and third-party sites that offer language pack downloads are not safe to use. Use only Microsoft's own channels.
- On the connected PC, right-click the downloaded ISO file and select Mount. A new virtual drive appears in File Explorer.
- Open the drive and find the folder that holds the language files. Language pack files are
.cabfiles (compressed packages). A typical name looks likeMicrosoft-Windows-Client-Language-Pack_x64_fr-fr.cab, wherex64is the processor type andfr-fris the language. - Copy the
.cabfiles for your language to a USB drive or a network share. If you also want typing, speech or handwriting, copy the matching feature files from the same ISO. They carry the same language code in the file name. - Copy the files to a folder on the target PC, for example
C:\LanguagePacks.
The ISO holds files for many languages. Copy only the ones you need to save space and time.
Install With Lpksetup
Lpksetup is the built-in Windows tool for installing display languages from a file. This step requires administrator privileges.
- Press Windows key + R to open the Run dialog.

Run dialog - Type
lpksetupand press Enter. If a User Account Control prompt appears, select Yes or enter an administrator password. The Install or uninstall display languages window opens. - Select Install display languages.
- Select Browse, open the folder with your files (for example
C:\LanguagePacks), and select the folder. The tool displays the language packs it finds. - Tick the language you want and select Next.
- Accept the license terms and select Next. Installation starts and shows progress.
- Select Close when it finishes.
If Lpksetup reports that it cannot find a valid language pack, the file does not match your Windows version or processor type. Check the build number and architecture as described earlier. If Lpksetup gives only a vague error, use DISM below, which returns a clearer message.
Install With DISM
DISM (Deployment Image Servicing and Management) is a command-line tool that adds and removes Windows components. It is the better choice for scripts and for installing on several PCs. This step requires administrator privileges.
- Click Start, type Terminal, right-click Terminal (or Windows Terminal), and select Run as administrator. Select Yes at the prompt. An elevated PowerShell or Command Prompt window opens.
- Run this command, replacing the path and file name to match where your language pack file is stored:Code
DISM /Online /Add-Package /PackagePath:"C:\LanguagePacks\Microsoft-Windows-Client-Language-Pack_x64_fr-fr.cab"
- Wait for the progress bar to reach 100%. You should see The operation completed successfully.
If DISM shows an error that the package is not applicable, the file does not match the Windows version or architecture on this PC. Get the correct ISO and try again. If DISM says it cannot find the file, check the path and the quotation marks around it.
Add Typing, Speech and Handwriting Offline
The language pack alone changes the display text. To add the optional parts from local files, use the Add-Capability command with the copied feature files as the source. The /LimitAccess switch stops DISM from contacting Windows Update, which is what you want on an offline PC. This step requires administrator privileges.
- In the elevated terminal, add basic typing support:Code
DISM /Online /Add-Capability /CapabilityName:Language.Basic~~~fr-FR~0.0.1.0 /Source:C:\LanguagePacks /LimitAccess
- Add text-to-speech if you need it:Code
DISM /Online /Add-Capability /CapabilityName:Language.TextToSpeech~~~fr-FR~0.0.1.0 /Source:C:\LanguagePacks /LimitAccess
- Repeat with
Language.Speech,Language.HandwritingorLanguage.OCRin place ofLanguage.TextToSpeechfor the other parts.
Replace fr-FR with your language code in every command. The source folder must contain the matching feature .cab files from the ISO. If a command fails with a "source files could not be found" message, the feature file for that language is missing from the folder. Copy it from the ISO and run the command again.
Switch Windows to the New Language
Installing the files does not always change the display language. Set it in Settings:
- Open Settings Time & language Language & region
- Next to Windows display language, open the drop-down list and select the new language. Only installed display languages appear here.
- Select Sign out when Windows prompts you. Sign back in. Menus, Settings and File Explorer now appear in the new language.
If the language is missing from the drop-down, the pack did not install fully. Check the list in the next section. Some apps keep their own language setting and may not follow the Windows display language until you restart them.
Check Which Language Packs Are Installed
Confirm what is on the PC before you assume an install failed. Open a terminal and run:
Get-InstalledLanguage
The command lists each installed language and which parts are present, such as language pack, basic typing and speech. It runs in PowerShell. If you opened Command Prompt, type powershell first, then run the command.
Remove a Language Pack
You can reverse either method from Settings. This is safe, and you can reinstall the language later.
- Open Settings Time & language Language & region
- If the language you want to remove is your current display language, switch the Windows display language to another language first and sign out. Windows will not remove the language that is in use.
- In the Preferred languages list, select the three dots (...) next to the language, then select Remove.
The language disappears from the list and its files are removed from the PC. To reinstall it offline, repeat Method 2 with the same files.
If This Didn't Work
If a pack installs but never appears as a display language, the usual cause is a version mismatch between the file and the PC. Check the build under Settings System About and get the ISO that matches it. A major Windows update can also change the language state, so after a feature update, open Language & region and confirm the language and its optional parts are still installed. Keep the original .cab files so you can reinstall without downloading them again.
Was this guide helpful?

About the Author
Richard
Tech Writer, IT Professional
Richard is a writer at Geek Rewind who turns complex IT tasks into clear, step-by-step guides. He draws on years of hands-on experience in system administration and enterprise IT operations, focusing on Windows, Linux and WordPress: the problems people actually run into, and the fixes that work. His server and WordPress guides come from systems he runs himself. Richard builds and maintains the platform behind Geek Rewind, from its Ubuntu servers and Nginx configuration to its custom WordPress plugins. Many new tutorials start with readers' questions, and he's always glad to answer them in the comments.



No comments yet — be the first to share your thoughts!