How to Manage Display Language Packs in Windows 11 Language and Region Settings

Language packs in Windows 11 change the text on your menus, buttons, and settings pages into any of over 100 supported languages. You can download extra language packs from the Microsoft Store, switch your main display language in a few clicks, and remove old packs to free up disk space.
Open the Settings app and go to Time & language Language & region to add or remove any language pack you need on your PC. Everything in this guide starts from that page. The steps are the same on Windows 11 Home and Pro. One exception is a Single Language edition of Windows, which may not let you add a new display language at all.
Open Settings , go to Time & language Language & region, click Add a language, search for your language, and check Install language pack. Windows downloads the files and adds it to your preferred languages list immediately.
Understanding 🪟 Windows 11 Language Packs
A Windows 11 language pack contains the translation files needed to change the text in your menus, windows, apps, and websites into a different language. Installing a full language pack updates your entire system display language. It also adds tools like text-to-speech, voice typing, and matching keyboard layouts, so you can read, write, and navigate your computer in that language.
When you install a full language pack, Windows gives you several features:
- Display Language: Translates menus, buttons, and settings into your chosen language.
- Text-to-Speech and Speech Recognition: Lets your computer read text aloud to you, or understand your spoken commands, in that language.
- Handwriting Recognition: Helps Windows understand your handwriting if you use a digital pen.
- Basic Spelling and Grammar Check: Helps you write correctly in apps.
Some of these features are separate downloads. Windows may fetch extra files after you add a language, so keep an internet connection active until everything finishes. Next, let’s check what you already have installed.
Check What Languages Are Installed in 🪟 Windows 11
Before you download anything, look at your preferred languages list in the Settings app. This list shows every language currently available on your PC, so you can see whether the one you want is already there.
- Click the Start button on your taskbar.
- Type Settings and press Enter to open the Settings app. You can also press Windows Key + I, which skips the Start menu.
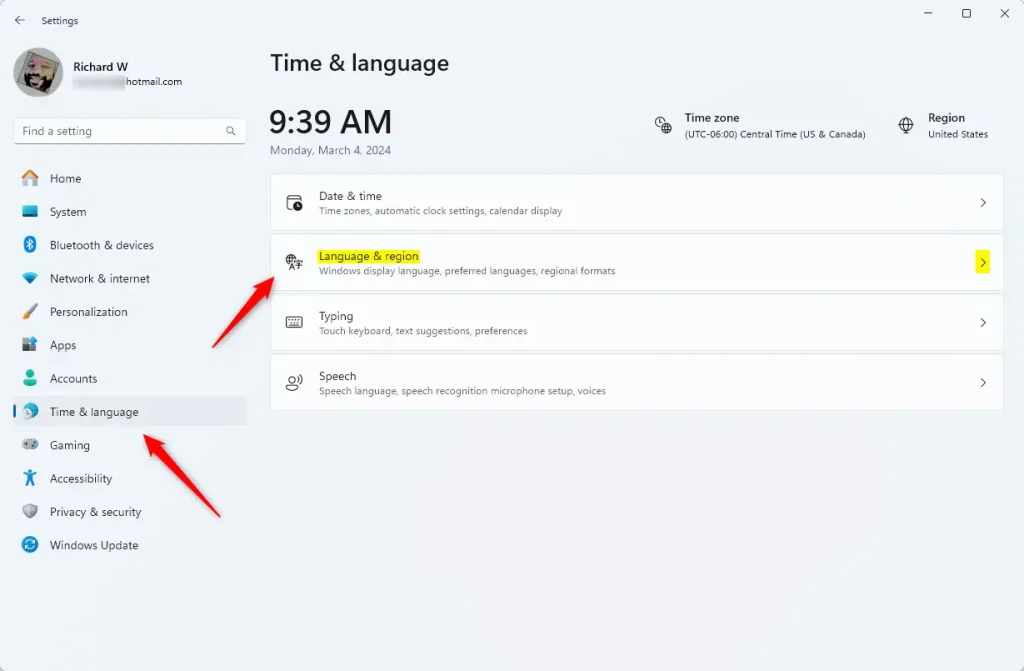
- Click Time & language in the left-hand menu. The right side of the window now shows date, time, typing, and language options.

Settings › Time & language - Click Language & region on the right side of the screen.
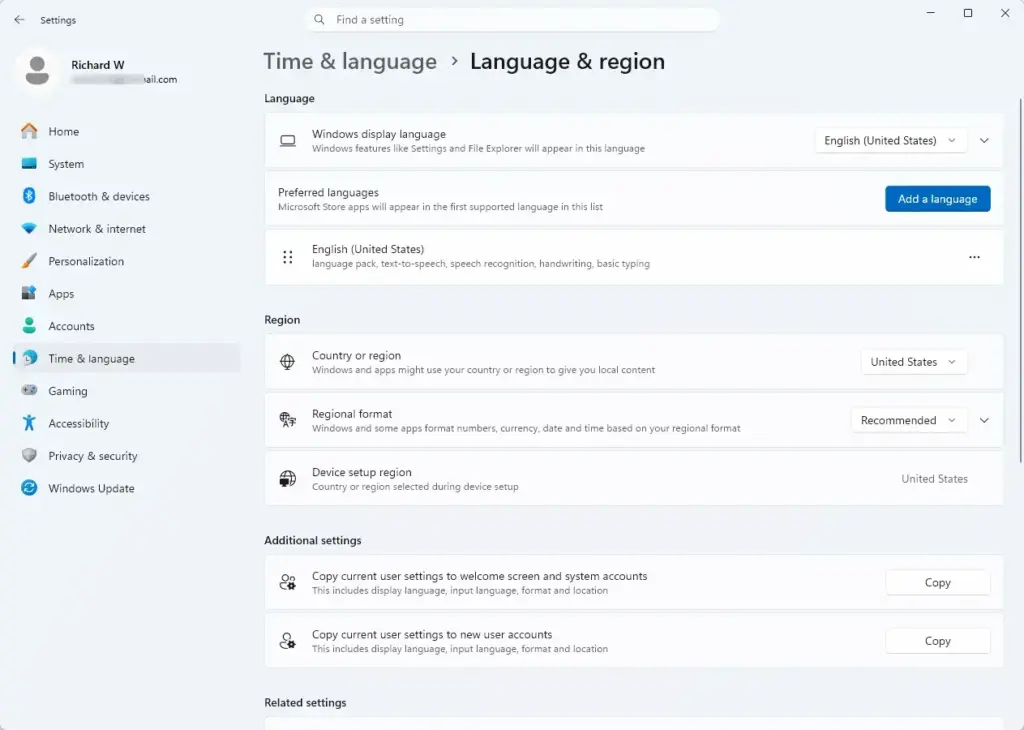
Settings › Time & language › Language & region - Look under the Preferred languages section. You will see a list of all languages currently installed on your system.
Settings › Time & language › Language & region › Preferred languages
The language at the very top of the list, labelled Windows display language, is your main Windows 11 system language. Any languages below it are installed for typing, apps, or websites. They do not control the main operating system menus yet. If the language you want is already in the list, you can skip ahead to changing the display language.
How to Install a New Language Pack in 🪟 Windows 11
To install a new language pack, open Settings Time & language Language & region, click Add a language, search for the language, and follow the prompts. Windows downloads the system files over your internet connection.
- Press Windows Key + I to open the Settings app.

Settings - Select Time & language from the menu.
- Click Language & region.
- Under the Preferred languages section, click the Add a language button. A new window pops up with a long list of available languages.
- Scroll through the list, or type the name of your language into the search box at the top. Searching is faster, and you can type the name in English or in the language itself.
- Click the language you want to install.
- Click the Next button at the bottom of the window. A screen titled Install language features appears.
- Choose the extra features you want to download. Check the box next to Install language pack to be able to use this language as your display language. You can also select the boxes for text-to-speech or speech recognition if you need them. Any other options listed there, such as handwriting, depend on the language you picked.
- Check the box that says Set as my Windows display language if you want your whole computer to switch to this new language. Leave it unchecked if you only want the language available for typing or want to switch later.
- Click the Install button.
Windows downloads the necessary files from the internet. You can watch the progress next to the language name in your list. Once the download finishes, the language is ready to use. If you chose to make it your display language, Windows will ask you to sign out before the change takes effect. If the download stalls, check your connection and try again. To undo the install, you can remove the language later (covered below).
Change the Windows Display Language
You can change your Windows 11 display language at any time. The new language must already be installed with its language pack, and then you pick it from a dropdown menu. The change applies to your system menus, buttons, and notifications.
- Open the Settings app (Windows Key + I).
- Go to Time & language and then click Language & region.
- Find the Windows display language dropdown menu near the top of the page.
- Click the dropdown menu and select the language you want from the list of installed languages. If the language you want is missing, its language pack did not finish installing. Go back to Add a language and make sure Install language pack is checked.
- Windows will display a notification telling you that you need to sign out and sign back in for the change to take full effect. Save your work, then click the Sign out button.
Log back into your user account. Your computer will now display menus and settings in your newly chosen language. To go back, repeat these steps and pick your old language from the same dropdown, then sign out again.
Change the Language Used by Microsoft Store Apps and Websites
You can change the language order for Microsoft Store apps and websites by adjusting your preferred language priority list. Windows checks this list from top to bottom. If an app does not support your first choice, it automatically switches to the next language on your list.
To change the order of your languages:
- Open Settings and navigate to Time & language Language & region.
- Find your language under the Preferred languages section.
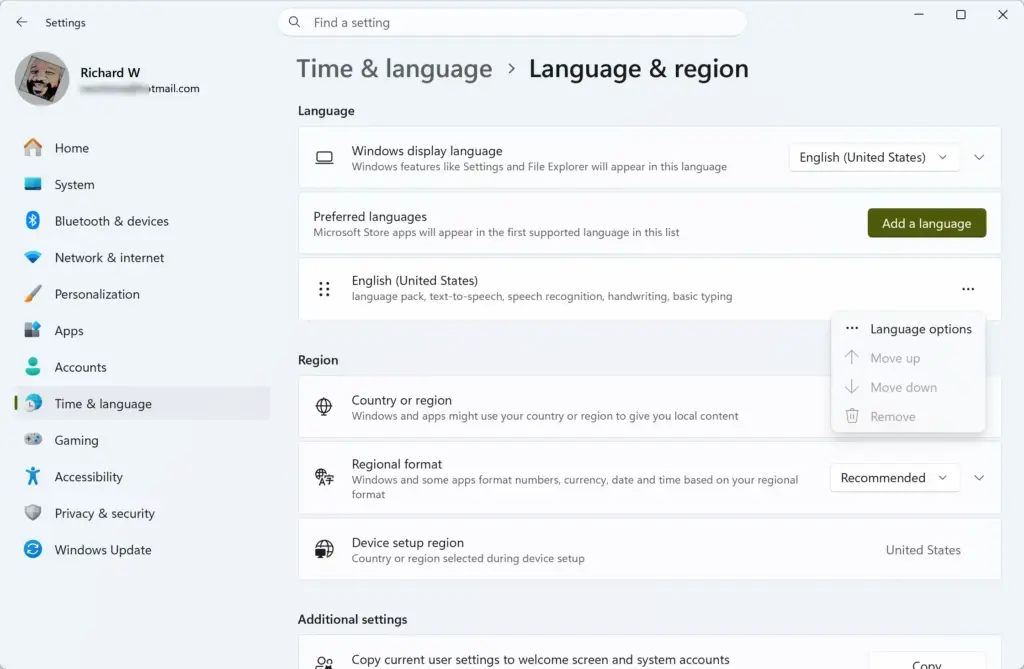
- Click the three dots (...) next to the language name. A small menu opens.
- Click Move up to move the language higher in your priority list, or Move down to lower its priority. The language changes position in the list straight away.
Windows 11 apps and websites will always use the highest language on your list that they support. This ordering is for apps and websites. To change the language of Windows itself, use the Windows display language dropdown described in the previous section. You can undo any reordering by using Move up or Move down again.
Install Speech and Handwriting Features
You can add speech and handwriting features to a language you have already installed. Open your language options in the Settings app and download the extra features, such as text-to-speech, voice typing, and handwriting recognition.
- Open Settings and go to Time & language Language & region.
- Find the language you want to update in your Preferred languages list.
Settings › Time & language › Language & region › Preferred languages - Click the three dots (...) next to that language.
- Click Language options. A page opens with the details for that language.
- Scroll down to find sections for speech, handwriting, or other features. If a feature is not installed, you will see a button to download or install it. Click the install button and wait for the download to finish. Keep your internet connection active until it completes.
Not every language offers every feature, so some sections may be missing. Once installed, you can use voice commands and text-to-speech features in that language.
How to Add and Change Keyboard Layouts
You can add keyboard layouts to any installed language, so the keys on your keyboard match the letters and symbols of the language you are typing in. Start from the three dots next to the language in Time & language Language & region.
- Open Settings and go to Time & language Language & region.
- Find your language in the Preferred languages list, click the three dots (...), and select Language options.
- Scroll down to the Keyboards section.
- Click the Add a keyboard button. A list of available layouts appears.
- Select the keyboard layout you want from the list. It now appears under Keyboards for that language.
To switch between different keyboard layouts while you are typing, press Windows Key + Spacebar. A small menu pops up on your screen, and you can choose your active typing layout straight away. Keep in mind that the labels on your physical keys will not change, so you may need to learn the new layout or use the on-screen keyboard.
Remove a Language Pack or Keyboard Layout
You can remove an unwanted language pack or keyboard layout to free up storage and clean up your menus. Find the language in your preferred languages list, click the three dots next to it, and select Remove.
- Open Settings and go to Time & language Language & region.
- Locate the language you want to remove in the Preferred languages list.
Settings › Time & language › Language & region › Preferred languages - Click the three dots (...) next to that language name.
- Click Remove from the menu. The language disappears from your list.
If you want to remove a language that is currently set as your main display language, you must first switch your display language to a different language, sign out, sign back in, and then return to remove the unwanted language.
To remove a specific keyboard layout without removing the whole language:
- Go to Settings Time & language Language & region.
- Click the three dots (...) next to the language and choose Language options.
- Find the keyboard under the Keyboards section, click the three dots next to it, and select Remove.
If you remove something by mistake, add it back with Add a language or Add a keyboard. Language packs will need to download again.
Display the Input Language Icon in the Taskbar

The input language indicator usually appears on the taskbar near the clock once you have more than one language or keyboard layout installed. If you want the desktop language bar as well, turn it on in the typing settings.
- Open Settings and click Time & language Typing.
- Click Advanced keyboard settings.
- Check the box that says Use the desktop language bar when it's available. The language bar now shows your active language and keyboard layout, and you can switch between them from there.
Alternatively, you can press Windows Key + Spacebar at any time to see your active layout overlay on the screen. To hide the language bar again, clear the same checkbox.
Expert Tips for Managing 🪟 Windows 11 Languages
A few practical points will save you trouble when managing languages, especially on work computers and smaller drives.
- Language Packs on Corporate Computers: If you are using a work or school computer, your system administrator might block you from downloading new language packs. If you see greyed-out options or an error when you try to add a language, contact your IT department for help.
- Saving Hard Drive Space: Language packs take up storage space. If you installed a language just to try it out, remove it completely from your preferred languages list so it stops taking up space on your hard drive.
- Regional Formats vs. Display Language: You can keep your display language in English while changing your regional format (like date, time, and currency) to match another country. Go to Time & language Language & region and look at the Regional format section to adjust this independently.
Summary
This guide covered adding, changing, and removing display language packs, speech features, and keyboard layouts in Windows 11. You now know how to use the Settings app to check your preferred languages, switch your main system language, adjust app language priorities, and clean up extra files to save disk space. Remember that changing the display language needs a sign-out, and the current display language cannot be removed until you switch to another one.
Frequently asked questions
How to change language in Windows?
Open Settings, then go to Time & language Language & region Under Windows display language, pick the language you want from the list. If it isn't listed, click Add a language first. Sign out and back in to apply the change to your menus and settings pages.
How to change language chinese to english in win 11 pro?
Open Settings and go to Time & language Language & region Under Windows display language, choose English (United States). If English isn't listed, click Add a language, install it, and then select it. Sign out and sign back in so Windows 11 Pro shows English everywhere.
How to get help with french in 🪟 Windows 11?
Install French as a language pack in Settings under Time & language Language & region Add a language. Then set French as your Windows display language. Menus, buttons, and built-in Help text will appear in French. You can switch back at any time from the same page.
Where to find alphabet in different languange in control panel 🪟 Windows 11?
Open Control Panel and go to Clock and Region Region On the Administrative tab or Keyboards and Languages tab, select Change keyboards to add or switch alphabets and layouts. For newer options, open Settings Time & language Language & region, select a language, and choose Language options.
How to convert my germany computer´s setting page into completely english version? acer nitrov15?
Open Settings and go to Time & language Language & region. Click Add a language, choose English (United States), and install it. Then set it as your Windows display language and sign out. Your region can stay Germany. Only the display language changes the text on your settings pages.
How to install new 🪟 Windows 11 on my PC that ensures that the language is completely english but not korean?
Choose English (United States) at the language screen when you start setup from your installation media. On the keyboard page, pick US. If Korean appears later, select English under Settings Time & language Language & region A clean install erases files on the drive, so back up first.
Still have a question?
Answered by AI from this guide. Good questions may be added to this page — please don't include personal details.
Did this guide fix your problem?

About the Author
Richard
Tech Writer, IT Professional
Richard is a writer at Geek Rewind who turns complex IT tasks into clear, step-by-step guides. He draws on years of hands-on experience in system administration and enterprise IT operations, focusing on Windows, Linux and WordPress: the problems people actually run into, and the fixes that work. His server and WordPress guides come from systems he runs himself. Richard builds and maintains the platform behind Geek Rewind, from its Ubuntu servers and Nginx configuration to its custom WordPress plugins. Many new tutorials start with readers' questions, and he's always glad to answer them in the comments.
No comments yet — be the first to share your thoughts!