How to Install Text-to-Speech Voices in Windows 11 Speech Settings

Text-to-speech in Windows 11 reads on-screen text aloud through built-in tools such as Narrator and Read Aloud. It uses voice files that come with Windows language packs and plays them through your speakers or headphones.
The default voices can sound flat and robotic. Windows 11 lets you download clearer, more natural voices for free from Settings. Better voices make a real difference when you listen to long documents, web pages, or books.
Open Settings , go to Time & language, select Language & region, and click Add a language under Preferred languages. Choose your desired language, check the box for Text-to-speech in the install options, and click Install to download the new voice files for your Windows 11 computer.
Step-by-Step: How to Install Text-to-Speech Voices in 🪟 Windows 11 Settings
Voices are installed from the Time & language page in Settings. Add a language there, make sure its Text-to-speech feature is ticked, and Windows downloads the voice files for you. You need an administrator account to do this. On a standard account, Windows asks for an administrator password, and without it the install fails.
- Press Win+I to open Settings . You can also click Start and then select Settings (the gear icon). The Settings window opens.
- Click Time & language in the left-hand menu.

Settings › Time & language - Click Language & region on the right side. You should now see your current display language and a list of preferred languages.
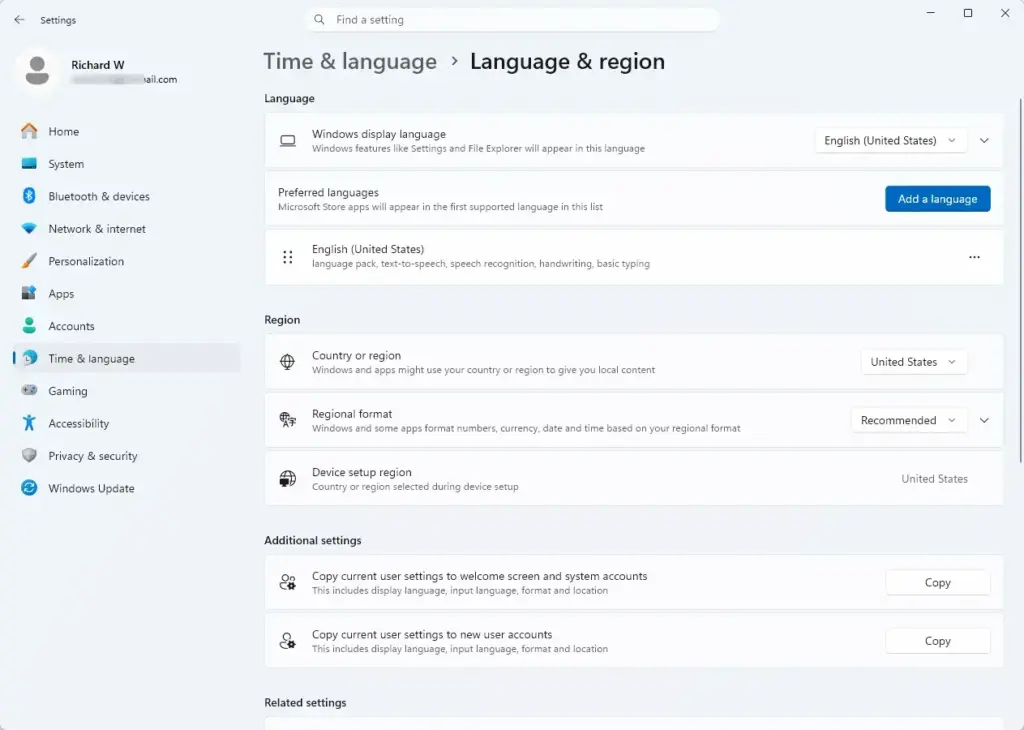
Settings › Time & language › Language & region - Find the Preferred languages section and click the Add a language button. A window opens with a long list of languages.
- Type the language or region you want into the search box, or scroll to find it.
- Click the language to select it, then click Next at the bottom of the window.
- On the list of optional features, make sure the box next to Text-to-speech is checked. If you only want the voice, you can uncheck options like handwriting or basic typing to save space. Also look at the Set as my Windows display language option. Leave it unchecked unless you want the whole Windows interface to change language.
- Click Install. Windows downloads the language pack and the voice files in the background. You can keep using the PC while it downloads, and the language shows a progress indicator under Preferred languages.
- Wait until the progress indicator disappears. The new voice is then available to apps that use Windows speech voices. If an app was open during the install, close it and reopen it so it sees the new voice.
On recent builds of Windows 11, you can also add voices without adding a whole language. Go to Time & language Speech and look for the Manage voices section, where an Add voices button appears. If you don’t see it, your build may be older, so run Windows Update first.
Managing and Changing Your Installed Voices
Once a voice is installed, you choose and test it from the Accessibility settings. Narrator has its own voice settings. The system-wide speech settings are on the Speech page under Time & language. Both let you preview voices and change the reading speed.
Follow these steps to check and test your newly installed voices:
- Press Windows Key + I to open Settings.

Settings - Click Accessibility in the left-hand menu.
- Scroll down on the right side and click Narrator. The label can differ slightly between Windows versions. For general speech settings that apply outside Narrator, go to Time & language Speech instead.
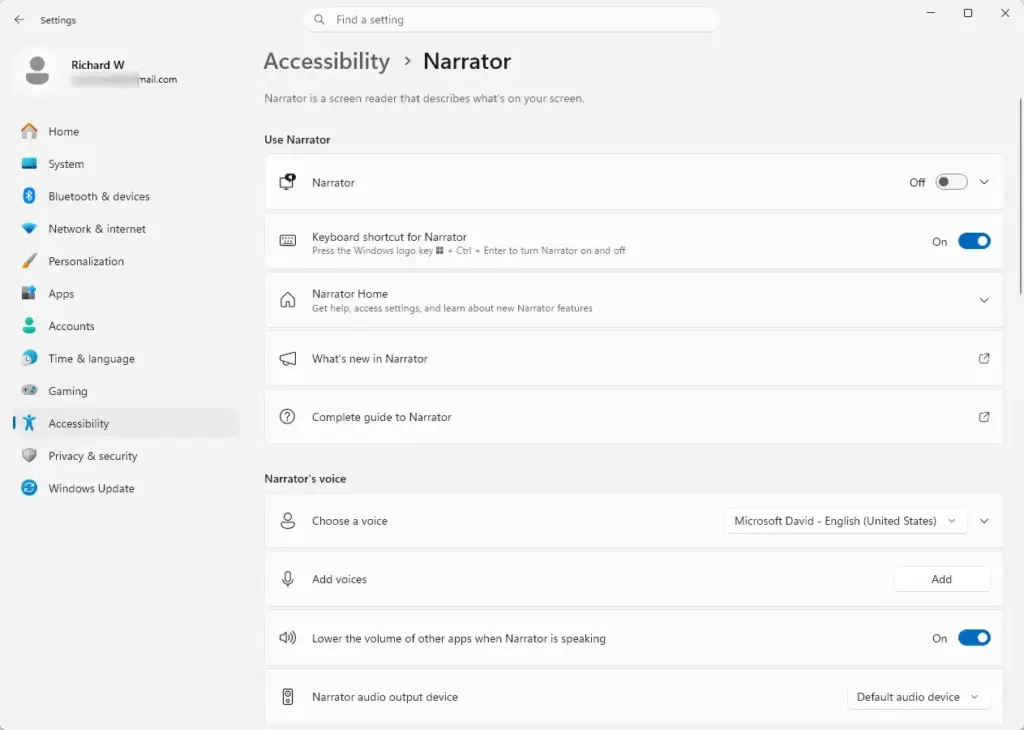
Settings › Accessibility › Narrator - Find the voice section. Depending on your version it is called Voices or Add natural voices.
- Open the voice dropdown menu. It lists every voice currently installed on the PC.
- Select a voice from the list. Click the Preview or play button, if you see one, to hear it before you commit.
- Move the speed and pitch sliders to make the voice faster, slower, higher, or lower. Narrator offers both sliders, while the Speech page may only offer speed.
Speed is the setting most people change. Matching it to your own reading pace makes long documents easier to follow. Start a little slower than feels necessary, then raise it in small steps. If you don't like a change, set the slider back or pick the previous voice from the dropdown.
Troubleshooting Common Voice Installation Issues
Most voice installation problems come from a dropped internet connection or too little free disk space. Check your Wi-Fi signal, make sure the drive Windows is installed on (usually C:) has several gigabytes free, and restart the PC if the download stalls or never starts.
Here are the most common problems and how to solve them:
- Download gets stuck: A paused download usually means an unstable connection, and large language packs are the first to suffer from a weak Wi-Fi signal. Restart the PC, then go back to Settings and try the download again. If you are on a metered connection, check that Windows is allowed to download over it. Running Windows Update first can also clear the problem.
- Voice does not appear in apps: Close the app and reopen it. If the voice still isn't listed, restart the PC. This forces Windows to refresh its list of installed voices. Some apps keep their own voice list and may not show every voice.
- Missing admin rights: If you get an error saying you don't have permission to install features, sign in with an administrator account. Standard accounts cannot add system languages or voice packs.
Advanced Tip: Finding and Using Natural Microsoft Voices
Natural voices are the newer, more human-sounding option. They add proper pauses and intonation when reading text aloud. You get them from the Narrator settings: go to Settings Accessibility Narrator and look for Add natural voices. They are designed for Narrator. Other apps may not offer them. You need a recent Windows 11 build, so update Windows if the option is missing.
- Open Settings Accessibility Narrator
- In the Narrator's voice section, click the Add button next to the natural voices option. Windows shows a list of available natural voices for your language.
- Listen to the audio sample of each voice. Select the ones you want and click the download or install button. Once a voice has downloaded, it works without an internet connection.
- Return to the voice dropdown and choose the new voice. It should now appear in the list alongside the older voices.
Natural voices are larger files than the standard ones, so check your free space before downloading several at once.
Expert Tip: Managing Storage Space for Language Packs
Language packs and voices take up disk space, so remove the ones you no longer use. This matters most on a small SSD. Removing a pack is not permanent: you can add it back later by repeating the install steps above.
- Go to Settings Time & language Language & region
- Find the language you no longer need under Preferred languages.
- Click the three dots next to it and select Remove. The language disappears from the list and its files are removed.
You cannot remove the language Windows is currently using as its display language. Change the display language first if you want to remove it. To remove only a voice, look under Time & language Speech > Manage voices.
Summary
Installing new text-to-speech voices lets you change how your PC reads text aloud. Add a language pack or a natural voice, tune the speed in the speech settings, and clear out what you don't use. Reading on screen gets easier as a result.
Take a few minutes to try several voices and speeds, and keep the one you find easiest to listen to. For more ways to customize Windows 11, see our other Windows tutorials and guides.
Frequently asked questions
How to use text to speech 🪟 Windows 11?
Turn on Narrator by pressing Windows key + Ctrl + Enter, and it will read on-screen text aloud. To read a web page, open it in Microsoft Edge, select the text, and choose Read aloud from the toolbar. Both tools use the voice you picked in Settings.
How can I use tts on my w11 PC?
Press Windows key + Ctrl + Enter to start Narrator, which reads text on your screen. For a web page, open it in Microsoft Edge and choose Read aloud. To change the voice, open Settings, go to Accessibility, then Narrator, and pick a voice from the list.
How to get text to speech voice 🪟 Windows 11?
Open Settings with Windows key + I, then click Time & language and Language & region. Click Add a language, choose the one you need, and tick Text-to-speech. Windows downloads the voice files. You need an administrator account or the administrator's password, or the install fails.
Are there other voices you can download to a Windows computer?
Yes. Windows offers more voices through Settings, and many languages come with their own text-to-speech voice. Some other companies also sell or give away voices that work with Windows apps. Only download voices from a source you trust, and check that the file is safe before you install it.
How to add text to speech voices?
Open Settings, click Time & language, then Language & region. Add a language and make sure its Text-to-speech box is ticked. Windows downloads the voice files for that language. You need an administrator account to install them, so have the administrator's password ready if you use a standard account.
How to add more desktop voices to 🪟 Windows 11 "speech properties" voice selection dropdown?
First, add a language with Text-to-speech ticked in Settings under Time & language. Then open Control Panel, select Speech Recognition, and click Text to Speech. The new voices should appear in the Voice selection dropdown. If they do not, restart your PC and check again.
Still have a question?
Answered by AI from this guide. Good questions may be added to this page — please don't include personal details.
Did this guide fix your problem?

About the Author
Richard
Tech Writer, IT Professional
Richard is a writer at Geek Rewind who turns complex IT tasks into clear, step-by-step guides. He draws on years of hands-on experience in system administration and enterprise IT operations, focusing on Windows, Linux and WordPress: the problems people actually run into, and the fixes that work. His server and WordPress guides come from systems he runs himself. Richard builds and maintains the platform behind Geek Rewind, from its Ubuntu servers and Nginx configuration to its custom WordPress plugins. Many new tutorials start with readers' questions, and he's always glad to answer them in the comments.
No comments yet — be the first to share your thoughts!