How to configure live captions styling in Windows 11 Accessibility Speech settings
Live captions in Windows 11 turn spoken audio into on-screen text, which helps you follow videos, podcasts, and meetings. You can change how that text looks by adjusting the font size, text color, opacity, and window layout. Live captions is built into Windows 11 version 22H2 and later, in both Home and Pro. If you can’t find the feature, run Windows Update 🔃 first.
Advertisement
⚡ Quick Answer
Open Settings›Accessibility›Captions and set Live captions to On. Click the Settings ⚙️ gear icon in the live captions window, select Caption style, then Edit style to adjust font size, text color, opacity, and window background. Changes appear in the preview.
Advertisement
Turn on live captions
📝Good to KnowLive captions transcribe whatever audio your PC plays, in real time.
Turn the feature on first, because none of the style options below do anything until the captions window exists.
Press Win+I to open Settings. Windows 11 Start menu with Settings gear icon highlighted.
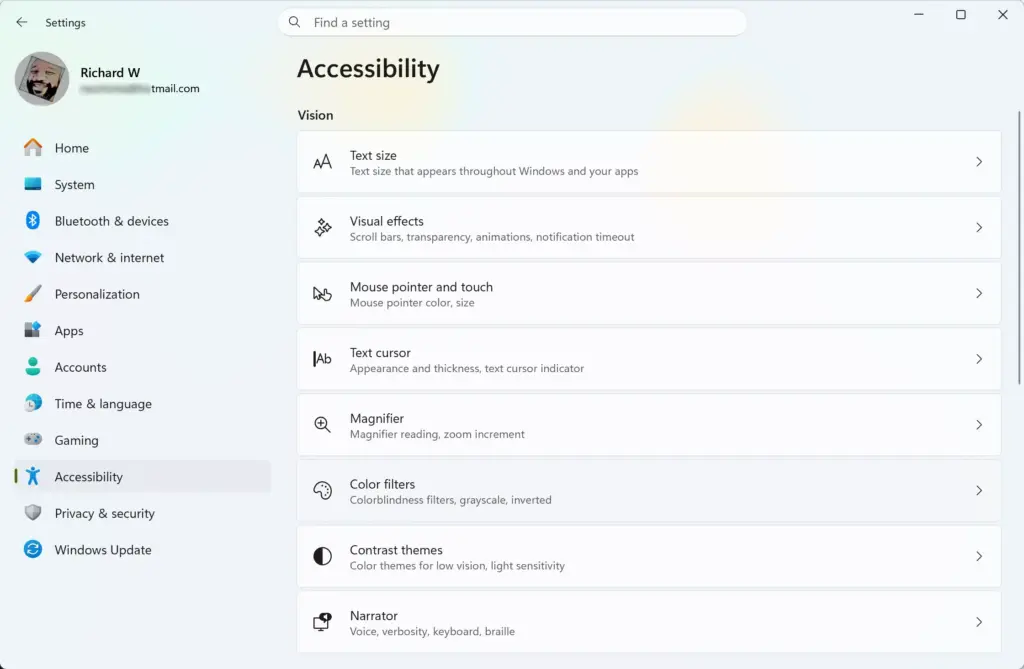
Select Accessibility in the left-hand menu. Settings › Accessibility
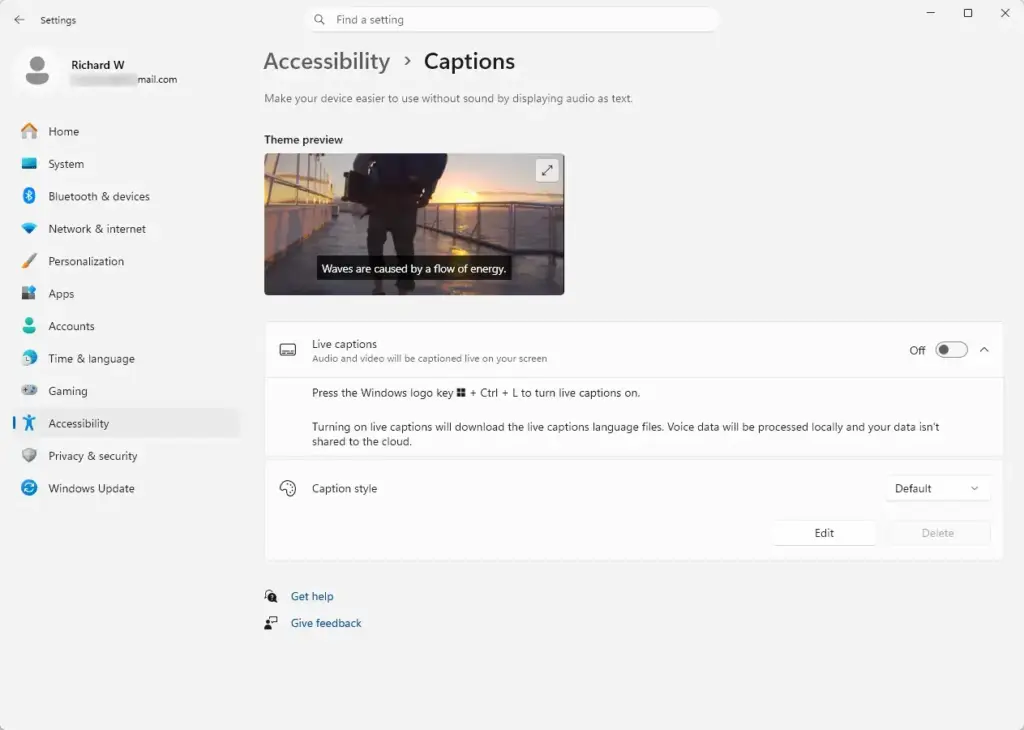
Click Captions. On current Windows 11 builds this sits in the Hearing group. Older guides place it under Vision, so look in both if you don’t see it. The page now shows the live captions controls and a caption style preview.
Set the Live captions toggle to On. Settings › Accessibility › Captions
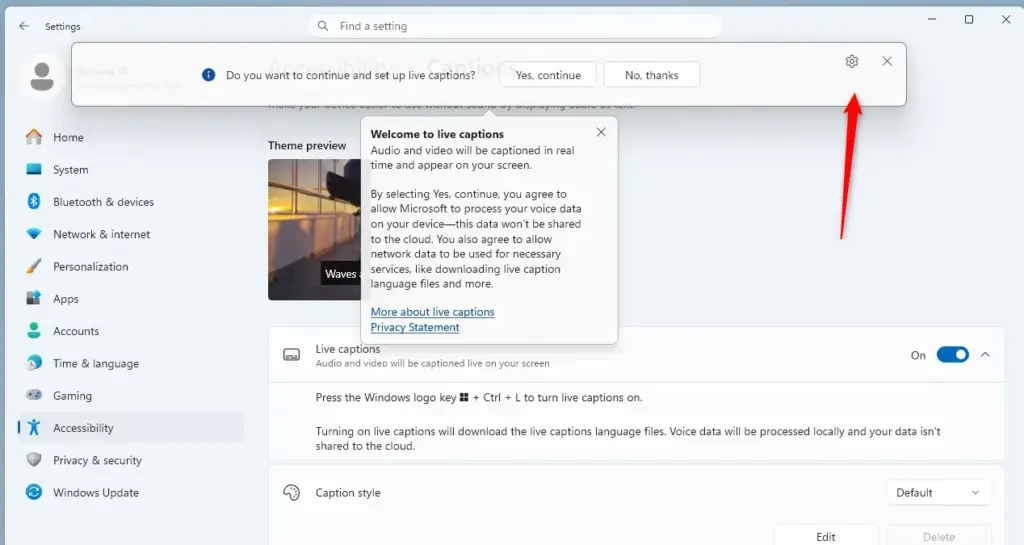
If this is your first time, accept the prompt to download the ⬇️speech files. Wait for the download to finish. A caption bar then appears, docked at the top of the screen by default.
To turn the feature off, set the same toggle to Off. No restart is needed. If the toggle is missing, your Windows version is probably too old.
Personalize how your captions are displayed
You can change the font size, background color, and text style from the floating live captions window. The settings ⚙️ you change here are the same ones you will find under Settings›Accessibility›Captions.
Click the Settings button (the gear icon) in the top right corner of the live captions window. A small menu opens.
Hover over or click Caption style.
Select Edit style to open the text appearance options.
Choose a preset style from the dropdown menu, or click Add to create a custom style. Presets are the quickest way to get a high-contrast look, and a custom style lets you adjust each part separately.
Adjust the text color, text size, text transparency, caption window background color, and window transparency to suit you. The preview updates as you make each change, so you can judge the result before you close the editor.
Exact option labels can differ slightly between Windows 11 builds. To undo your changes, go back to the preset dropdown and pick the default style again.
Make captions easier to read
Captions are hard to read when a busy video or bright desktop shows through the text. Two settings fix most of these problems: text opacity and window opacity.
Advertisement
Open Settings and select Accessibility in the sidebar.
Click Captions, then go to the Caption style menu and open the editor with Edit or Edit style.
Adjust the Text opacity slider. Set it to fully opaque for solid letters, or lower it if you want semi-transparent text. For readability, solid is almost always better.
Scroll down to the Window section in the style editor and increase the Window opacity. At full opacity you get a solid block behind the text, so desktop elements no longer show through the transcription lines.
Choose a window color that contrasts strongly with the text color, such as light text on a dark window. If you also use a high-contrast theme, check that the caption colors still look right with it.
Use your microphone to caption your speech
📝Good to KnowLive captions can transcribe your own voice as well as the audio your PC plays.
This helps in video calls and in-person conversations. It is off by default, because it sends your microphone input through the same transcription process.
Open the live captions window on your desktop. If it isn't visible, turn on Live captions in Settings›Accessibility›Captions.
Click the Settings gear icon inside the window.
Select Microphone. On some builds this option sits under Preferences and is labeled Include microphone audio.
Check the box labeled Enable microphone to start capturing your spoken words alongside computer audio. Speak a sentence and confirm it appears in the caption window.
If nothing appears, check that the correct microphone is set as the input device and that microphone access is allowed for your apps under Privacy & security. To stop captioning your voice, clear the same box.
Add and use other languages
Adding a language lets live captions transcribe speech in that language. Each language needs its own download of speech files, so you need an internet connection for this step.
Advertisement
Open Settings and navigate to Accessibility›Captions.
Click the Add language button near the top of the captions menu. If you don't see it there, open the gear menu in the live captions window and look for the language option.
Select your desired language from the list of available options.
Check the box to include translation options if you want the tool to translate foreign audio into English automatically. Translation is not offered on every PC. It is generally limited to Copilot+ PCs, so the box may be missing on other hardware.
Click Add to begin downloading the language files. Wait until the download completes before you test the language.
Once the language is installed, you can switch between your languages from the live captions window. You don't need to restart Windows.
Get the most out of live captions
The caption bar can cover buttons or text you need. Moving it to a better spot, or making it larger, avoids that. Dragging and resizing work when the window is floating.
Click and hold the grip dots on the left side of the live captions window.
Drag the window away from the docked position. It now floats freely over your applications.
Drag a corner of the window to resize it. A taller window shows more lines of text at once.
If the window is still docked to the top or bottom and won't move, switch it to Floating in the Position menu (see the last section). A docked window also pushes other windows out of its way, which is another reason to float it if your screen space is tight.
Advanced styling techniques for high-contrast reading
If you need strong contrast, the text edge style makes the biggest difference. It adds a border or shadow around each letter, so the text stays readable over complex backgrounds.
Advertisement
Open Settings and navigate to Accessibility›Captions›Caption style.
Click the Edit button next to your active custom style, or create a new one. The built-in presets can't be edited, so start from a custom style if Edit is unavailable.
Find the Caption text edge style dropdown menu.
Select Raised, Depressed, Uniform, or Drop shadow. Each option draws a distinct border around individual letters and separates them from the background. Uniform and Drop shadow are usually the easiest to read.
Click Save to apply your changes. The caption window updates straight away.
If one edge style looks worse than the last, reopen the editor and choose another. Nothing is permanent.
Managing caption window positioning and docking behavior
The caption window can be locked to the top or bottom of the screen, or left to float over your apps. A docked bar stays out of your way and keeps the same place. A floating one gives you more control over placement.
Open the live captions floating window.
Click the Settings gear icon and select Position.
Choose Top of screen, Bottom of screen, or Floating to set your preferred anchoring behavior. The window moves as soon as you pick one.
If the text box appears cut off, or doesn't stay visible over full-screen applications, check your display scaling under Settings›System›Display. High scaling values on a small screen can push the window partly off the edge. Then recheck the position.
Some full-screen apps and games take over the display, and the caption window may not appear on top of them. Running the app in a borderless windowed mode, if it offers one, usually fixes that.
Was this guide helpful?
📬 Get new Windows tips in your inbox
One email when we publish something worth your time. No spam, unsubscribe anytime.
Richard is a writer at Geek Rewind who turns complex IT tasks into clear, step-by-step guides. He draws on years of hands-on experience in system administration and enterprise IT operations, focusing on Windows, Linux and WordPress: the problems people actually run into, and the fixes that work.
His server and WordPress guides come from systems he runs himself. Richard builds and maintains the platform behind Geek Rewind, from its Ubuntu servers and Nginx configuration to its custom WordPress plugins.
Many new tutorials start with readers' questions, and he's always glad to answer them in the comments.
One email when we publish a guide worth your time — new Windows features, the fixes that actually
work, and a heads-up when Microsoft breaks something. Unsubscribe in one click.
📬 Get new Windows tips in your inbox
One email when we publish something worth your time. No spam, unsubscribe anytime.



No comments yet — be the first to share your thoughts!