How to Use Live Captions with Microphone Audio in Windows 11

Live Captions in Windows 11 turns spoken words into text on your screen in real time. On devices running version 23H2 or newer, it can include microphone audio as well. This built-in accessibility tool shows what you say or hear in a floating box, so you can follow meetings, phone calls, and voice chats more easily.
You can turn on microphone captions with a few clicks. Once the option is on, the captions update as you speak into your headset or microphone. This guide covers the shortcut, the Quick Settings route, the microphone option, and the controls for the caption bar. It also covers what to check if something does not show up.
Press Win+Ctrl+L to turn on Live Captions, click the gear icon on the caption bar, select Preferences, and switch on Include microphone audio. Your spoken words then appear as text in the caption bar. This feature requires Windows 11 version 23H2 or newer.
What Are Live Captions?
Live Captions turns spoken words into text that appears on your screen in real time. It works with most audio coming from your device, such as videos, calls, and apps. The captions are generated on your PC, so they keep working without an internet connection once the language files are installed. Microsoft added this feature in Windows 11 build 22557.
It may also show a short notice about how captions are processed. Accept both and wait for the download to finish. The caption bar appears when it is done.
How to Turn On Live Captions
You should see a caption bar appear at the top of your screen, and any audio playing on the computer starts turning into text.
If the shortcut does nothing, try the Quick Settings method below. You can also go to Settings Accessibility Captions and switch on the Live captions toggle there. If the bar never appears, your Windows 11 version may be too old. Run Windows Update and try again.
Windows key + Ctrl + LYou can also start Live Captions from Windows Quick Settings. This is handy on a touchscreen or when you do not want to remember the shortcut. Follow these steps:
- Click the Quick Settings area at the bottom-right of your screen, near the clock. The panel opens with tiles such as Wi-Fi, Bluetooth, and Airplane mode.
- Click the Accessibility button. It looks like a person inside a circle. If you do not see it, click the pencil (Edit quick settings) icon, choose Add, and pick Accessibility from the list. A small menu of accessibility options opens.
- Find Live captions and turn it on. The caption bar appears on your screen. To undo this, open the same menu and switch it off.
How to Include Microphone Audio with Live Captions
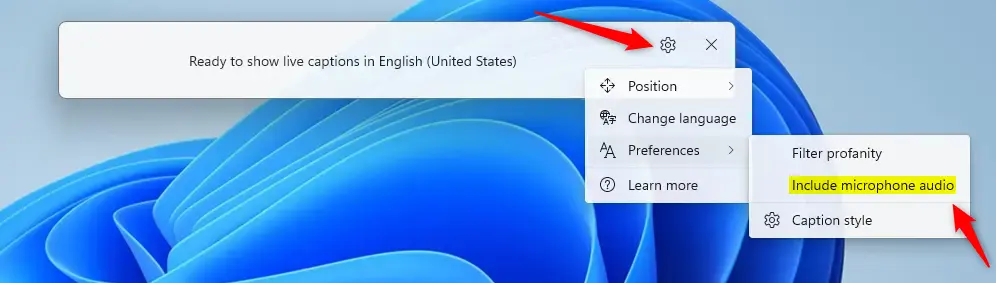
By default, Live Captions only captions audio that plays from your PC, such as a video or the other people on a call. Your own voice is not included until you change one setting in the caption preferences. Turn on Live Captions, click the gear icon on the caption bar, choose Preferences, and switch on the microphone option. Your voice, and any sound your microphone picks up, will then appear as text on screen.
This option is available on Windows 11 version 23H2 or newer. If you cannot find it, check your version in Settings System About and install any pending updates.
- Turn on Live Captions by pressing
Windows key + Ctrl + L. The caption bar appears, usually at the top of the screen. - In the Live Captions bar, click the Settings button. It looks like a gear icon. A small menu opens with the caption settings.
- Choose Preferences. A list of caption options opens.
- Find the option called Include microphone audio and turn it on. Now speak into your microphone. Your words should appear in the caption bar within a second or so. To undo this, open the same menu and switch the option off.
Here's an example of what the settings look like:
If nothing appears when you speak, make sure the microphone you want is selected as your input device and that it is not muted. Also check that microphone access is allowed in the Windows privacy settings. Live Captions cannot caption a microphone that Windows is blocking.
With the microphone option on, Live Captions shows text for the sounds your microphone picks up, alongside any other audio playing on the computer. It provides real-time transcription on the device. Captions work best with clear speech, a good microphone, and little background noise. Expect the odd wrong word, especially with names or technical terms.
Extra Tips
Live Captions has a few controls that make the text easier to read while you work. You can drag the caption bar anywhere on your screen, change the caption language, or close the tool when you no longer need it.
- You can move the Live Captions bar anywhere on your screen by dragging it. Place it where it does not cover the app you are working in. The gear menu also has position settings if you prefer the bar docked to the top or bottom of the screen.
- Change the caption language if you want to see captions in a different language. Open the gear menu on the caption bar and look for the language option. Windows may need to download language files first, so connect to the internet for that step. The language must match what is being spoken, or the captions will be poor.
- Turn off Live Captions anytime by pressing
Windows key + Ctrl + Lagain. The caption bar closes. The microphone setting you chose stays saved for next time. - For more info about Live Captions and how to customize them, check out this Microsoft Support page. The gear menu also lets you change the caption style, such as text size and colors, if the default is hard to read.
Summary
Live Captions turns spoken audio into readable text on your screen as it happens. It helps you follow videos, meetings, and your own voice. It combines a keyboard shortcut, Quick Settings, and microphone support in one accessibility feature. Here is a quick recap:
- Live Captions helps you see spoken words as text on your screen in real time.
- You can include your microphone's audio. This captions sounds around you or your voice. The option is off by default and needs Windows 11 version 23H2 or newer.
- It's easy to turn on and off. Use the keyboard shortcut or Quick Settings.
- You can customize captions to fit your needs. This includes moving the caption bar and changing languages.
Was this guide helpful?

About the Author
Richard
Tech Writer, IT Professional
Richard is a writer at Geek Rewind who turns complex IT tasks into clear, step-by-step guides. He draws on years of hands-on experience in system administration and enterprise IT operations, focusing on Windows, Linux and WordPress: the problems people actually run into, and the fixes that work. His server and WordPress guides come from systems he runs himself. Richard builds and maintains the platform behind Geek Rewind, from its Ubuntu servers and Nginx configuration to its custom WordPress plugins. Many new tutorials start with readers' questions, and he's always glad to answer them in the comments.

No comments yet — be the first to share your thoughts!