Windows 11 Microphone Not Working? 8 Ways to Fix Audio Input Issues

Microphone problems in Windows 11 stop your voice from reaching apps like Zoom, Discord, or Teams. The usual causes are blocked privacy permissions, the wrong default input device, a muted or turned-down input, or a broken driver. The eight fixes below use only built-in tools and settings, and most take a few minutes each.
Work through them in order, because the simplest checks come first. You can test your hardware, reset your sound permissions, and get your microphone working again without installing extra software.
Fixing a Windows 11 microphone not working usually requires checking physical connections, updating privacy permissions, or selecting the correct default recording device in your sound settings. Open the Start menu , go to Settings , select Privacy and security, click Microphone, and make sure app access is turned on.
Way 1Check Physical Connections and Mute Switches
Start with the hardware. A loose plug, a muted cable, or a dead port causes more “broken” microphones than any software fault, and these checks take under a minute.
- Unplug your microphone or headset from the computer completely.
- Wait a few seconds, then plug it firmly back into the correct port. On a desktop PC, use the pink microphone jack (or the headset jack on a combo port) for a 3.5 mm plug. Plugging a microphone into the green headphone jack is a common mistake.
- If you use a USB microphone, plug it into a different USB port. Try a port directly on the computer instead of a hub or a front-panel port. You should hear the Windows connect sound when the device is detected.
- Look closely at the headset cable for an inline mute switch. Make sure it is set to active, not mute.
- If your microphone has a power switch, a gain knob, or a volume dial, make sure it is turned on and turned up. Many headsets also have a mute button or a flip-up boom arm that mutes the mic when raised, so check for those too.
Way 2Make Sure Apps Have Access to the Microphone
If one app cannot hear you but others can, Windows privacy settings are the likely cause. Windows 11 blocks microphone access at three levels: for the whole device, for apps in general, and for each app. All three must be on. This is the same on Windows 11 Home and Pro.
- Click the Start button and open the Settings app.
- Select Privacy & security from the left-hand menu.
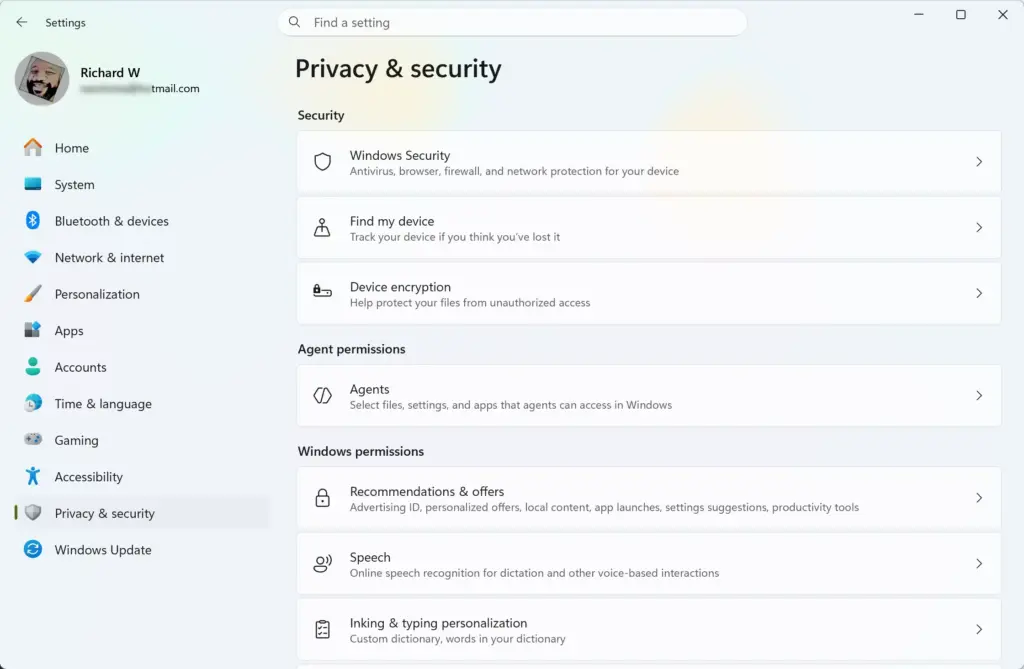
Settings › Privacy & security - Scroll down to the App permissions section and click Microphone.
- Make sure the main Microphone access switch is turned On. If it is off, Windows blocks the microphone for every app and for every user on the PC.
- Make sure the Let apps access your microphone switch is also turned On.
- Scroll down the list of apps and find the program you want to use, such as your video calling app. Turn the switch next to it On. You should see the app’s name listed with the toggle in the on position.
- Scroll to the bottom of the page and check the Let desktop apps access your microphone setting if it is there. Classic desktop programs such as Discord or Zoom may be listed under it instead of in the main app list.
- Close and reopen the affected app. Some apps only check for the microphone when they start.
If you manage this PC through a work or school account, an administrator may control these switches. In that case they can appear greyed out, and you need to ask your IT team.
Way 3Set Your Microphone as the Default Recording Device
Windows may be listening to the wrong device, such as a webcam microphone, a monitor, or a Bluetooth headset you are no longer using. Telling Windows which microphone to use fixes this.
- Click the Start button and open the Settings app.
- Go to System Sound
- Scroll down to the Input section. You will see a list of connected recording devices. If your microphone is not listed, go back to the physical checks or the driver fix later in this guide.
- Click the name of the microphone you want to use to open its properties.
- Look for the option that sets the device as your default for audio input, and make sure it is selected. The exact wording and position of this option vary slightly between Windows 11 versions. If you cannot find it, open the classic Sound Control Panel from the Start menu search, go to the Recording tab, right-click your microphone, and choose Set as Default Device.
- Speak into your microphone and watch the input meter. If the blue bar moves back and forth as you talk, Windows is receiving your voice.
Even with the right default set, some apps have their own microphone choice. If the meter moves in Settings but the app still cannot hear you, check the audio settings inside that app and pick the same device there.
Way 4Run the Built-In Windows Audio Troubleshooter
The built-in troubleshooter checks for common problems such as disabled devices, bad settings, and stuck services. It will not catch everything, but it is quick and safe to run.
- Open the Windows Settings app.

Settings - Go to System Troubleshoot
- Click Other troubleshooters. You should now see a list of troubleshooters.
- Find the entry labeled Recording Audio and click the Run button next to it.
- Follow any instructions that appear on your screen. If asked, pick the microphone you are having trouble with. The tool checks your audio devices, tests your settings, and applies automated fixes where possible.
- Restart your computer once the troubleshooter finishes, then test the microphone again.
If the troubleshooter reports that it found nothing, that is still useful. It tells you the problem is likely in the driver, an app setting, or the hardware, so move on to the next fix.
Way 5Update or Reinstall Your Audio Drivers
An old, corrupted, or mismatched driver can stop Windows from talking to the microphone. Updating the driver is the first step. If that does not help, removing it and letting Windows reinstall it often does.
- Right-click the Start button and select Device Manager.
- Click the arrow next to Audio inputs and outputs to expand the list. Some USB and headset devices also appear under Sound, video and game controllers, so look there if you do not see yours.
- Find your microphone in the list, right-click it, and select Update driver.
- Choose Search automatically for drivers and let Windows find and install the latest software. Windows will tell you if the best driver is already installed.
- If updating does not work, right-click your microphone again and select Uninstall device. Confirm your choice. (Note: Administrator privileges may be required to make these hardware changes.)
- Restart your computer. When Windows starts back up, it automatically installs a fresh, clean copy of the audio driver.
If a disabled device shows a down-arrow icon in Device Manager, right-click it and choose Enable device. For laptops, the PC maker’s support page may also offer a newer audio driver than the one Windows finds on its own.
Way 6Restart the Windows Audio Service
The Windows Audio service handles all sound on your PC. If it freezes, your microphone can stop working even though everything else looks fine. Restarting it clears the problem without a full reboot.
- Press the Win+R on your keyboard to open the Run dialog box.

Run dialog - Type
services.mscinto the box and press Enter. The Services window opens. (Note: Administrator privileges may be required to modify system services.)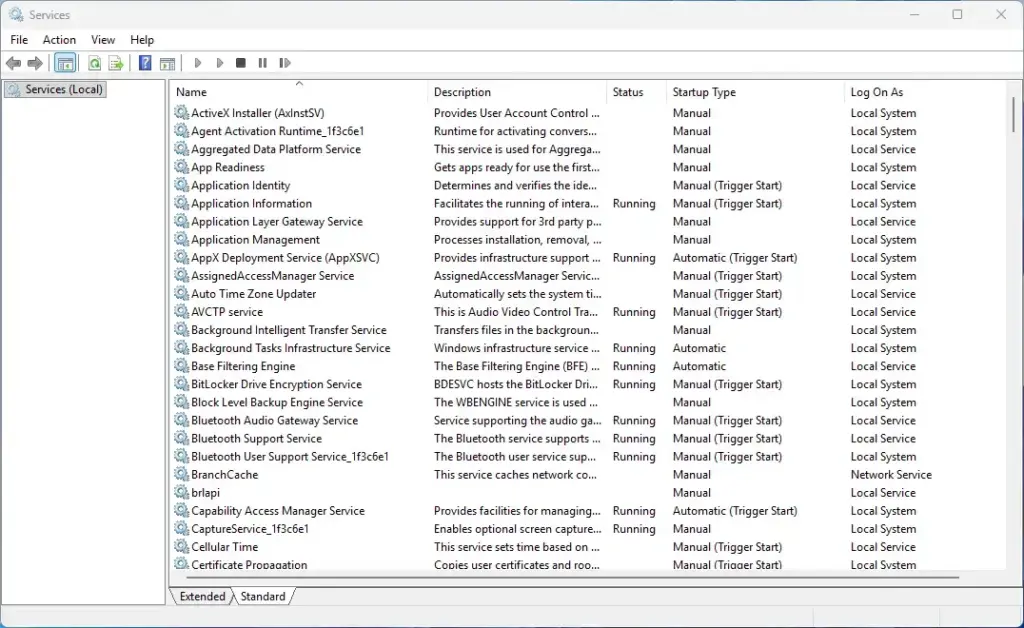
Services - Scroll down the alphabetical list of services until you find Windows Audio.
- Right-click Windows Audio and select Restart. If the restart option is grayed out, click Stop first, and then click Start. The status column should show Running afterward.
- Next, find Windows Audio Endpoint Builder in the list, right-click it, and select Restart as well.
- Close the Services window and test your microphone.
You do not need to restart the PC for this fix. If sound stops working for a moment during the restart, that is normal and it comes back once the service is running.
Way 7Check and Adjust Microphone Volume Levels
If people say you sound very quiet, or the input meter barely moves, the input volume may simply be too low. Windows sometimes resets this after a driver update or when a new device is connected.
- Open the Windows Settings app and go to System Sound
- Scroll down to the Input section and click your active microphone.
- Look for the Input volume slider.
- Drag the slider toward the right to increase your microphone volume. Aim for a level around 80 to 100 percent, then adjust down if you sound distorted or too loud.
- Click Start test in the Test your microphone area right below the volume slider, speak normally, and check the result. A result around 75 percent or higher means other people should hear you clearly.
Some headsets and USB microphones also have their own volume control on the device or in the maker’s software. If the slider in Windows is high and you are still quiet, check those too.
Way 8Turn Off Audio Enhancements
Audio enhancements are extra processing, such as noise suppression and echo cancellation, applied to your microphone signal. With some drivers they cause static, cut-outs, or a mic that goes silent. Turning them off is a quick way to test whether they are the cause.
- Open the Windows Settings app and go to System Sound
- Click your microphone under the Input section.
- Look for an option labeled Audio enhancements.
- Click the drop-down menu next to Audio enhancements and set it to Off. (Note: If you do not see this option directly in your settings, search for “Sound Control Panel ” in the Start menu search bar , right-click your microphone, select Properties, go to the Enhancements tab, and check the box to disable all enhancements.)
- Test your microphone to see if turning off enhancements fixed your problem.
To undo this, set the drop-down back to its previous value, or clear the checkbox on the Enhancements tab. If turning enhancements off made no difference, you can safely turn them back on.
Advanced Pro Tips: Fixing Stubborn Microphone Issues
If you have tried all eight standard fixes and your microphone still refuses to work, you may be dealing with a deeper system conflict. Here are two checks that many people overlook when troubleshooting stubborn audio problems.
Check for Third-Party Audio Software Conflicts
Many computers ship with audio management software from the manufacturer, such as Realtek Audio Console, Dolby Access, or a custom sound suite from the PC maker. These programs can override the standard Windows microphone settings.
- Open the audio program from the Start menu.
- Look through its settings for the microphone or input section.
- Check for a hidden mute toggle, a privacy restriction, or a setting that disables the microphone input, and turn it off.
- Test your microphone again in Windows and in your app.
Test Your Microphone on Another Computer
Plug the microphone into another computer, smartphone, or tablet to rule out hardware failure. If it fails on a second device too, the hardware itself is broken and needs replacement. If it works fine on another machine, the issue is isolated to your Windows 11 software settings, so go back over the permission, default device, and driver steps.
Summary
A broken microphone in Windows 11 can usually be fixed with these eight steps, which range from checking cable connections and app permissions to updating drivers and restarting background audio services. Start with the simplest fix and work your way down until your audio input works properly again. If the microphone also fails on another device, plan on replacing it.
Have a question about this guide?
Answered by AI from this guide. Good questions may be added to this page — please don't include personal details.
Did this guide fix your problem?

About the Author
Richard
Tech Writer, IT Professional
Richard is a writer at Geek Rewind who turns complex IT tasks into clear, step-by-step guides. He draws on years of hands-on experience in system administration and enterprise IT operations, focusing on Windows, Linux and WordPress: the problems people actually run into, and the fixes that work. His server and WordPress guides come from systems he runs himself. Richard builds and maintains the platform behind Geek Rewind, from its Ubuntu servers and Nginx configuration to its custom WordPress plugins. Many new tutorials start with readers' questions, and he's always glad to answer them in the comments.
No comments yet — be the first to share your thoughts!