How to Configure Microphone Input Gain Levels in Windows 11 Sound Settings

Microphone input gain in Windows 11 controls how loud or quiet your voice sounds to apps like Discord, Zoom, Teams, and recording software. Set it too low and you’ll sound distant or muffled. Set it too high and you get clipping and background noise.
Windows 11 gives you two places to adjust this. The Settings app (System Sound Input) has a Volume slider and, on newer builds, extra options such as audio enhancements and Voice Clarity. The older Sound Control Panel adds a Microphone Boost option that lets you amplify the signal further for finer control. Both work on the same microphone, so you can use one or both depending on how much adjustment you need.
Open Settings with Win+I, then go to System Sound Input, click your microphone’s name, and drag the Volume slider to set the input gain. Keep your normal voice in the middle of the live meter without touching the far right, where clipping distorts your voice. Changes apply immediately, with no restart needed.
Adjust Microphone Input Gain in Settings
This is the fastest way to raise or lower how sensitive your microphone is, and it’s the method most people need.
- Press Win+I to open Settings. It opens on the System page by default.
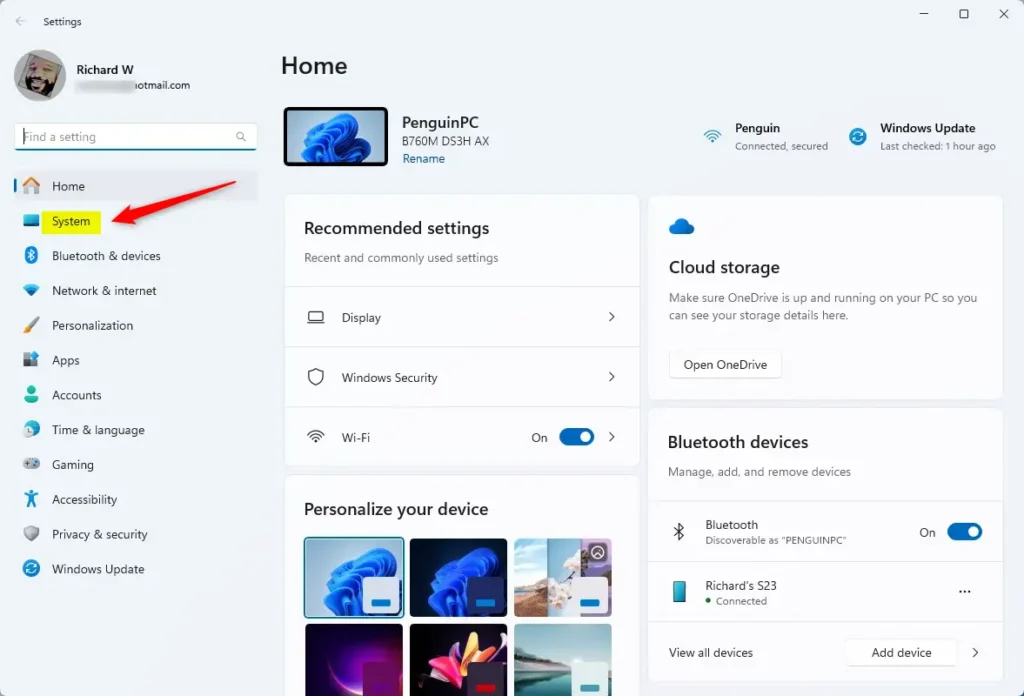
System in the Settings app - Click Sound in the right-hand list of System settings (or scroll to it). You’ll see separate Output and Input sections.
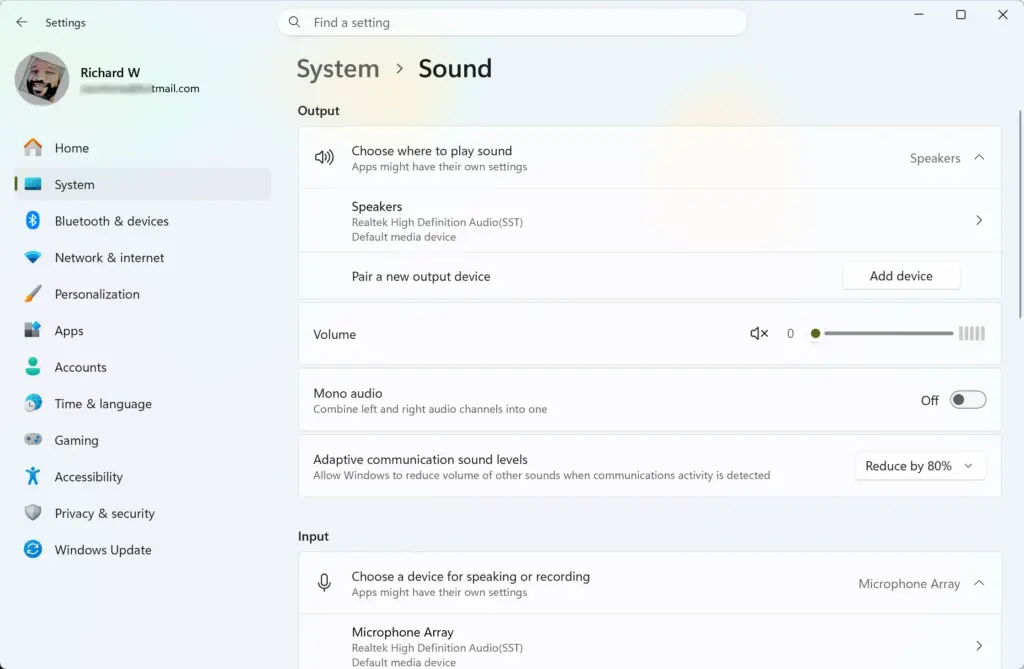
Settings › System › Sound - Look under Input and check that the device shown is the microphone you want to adjust. If you have more than one microphone connected, such as a headset mic and a webcam mic, pick the right one from the list first. The slider only affects the device you select here.
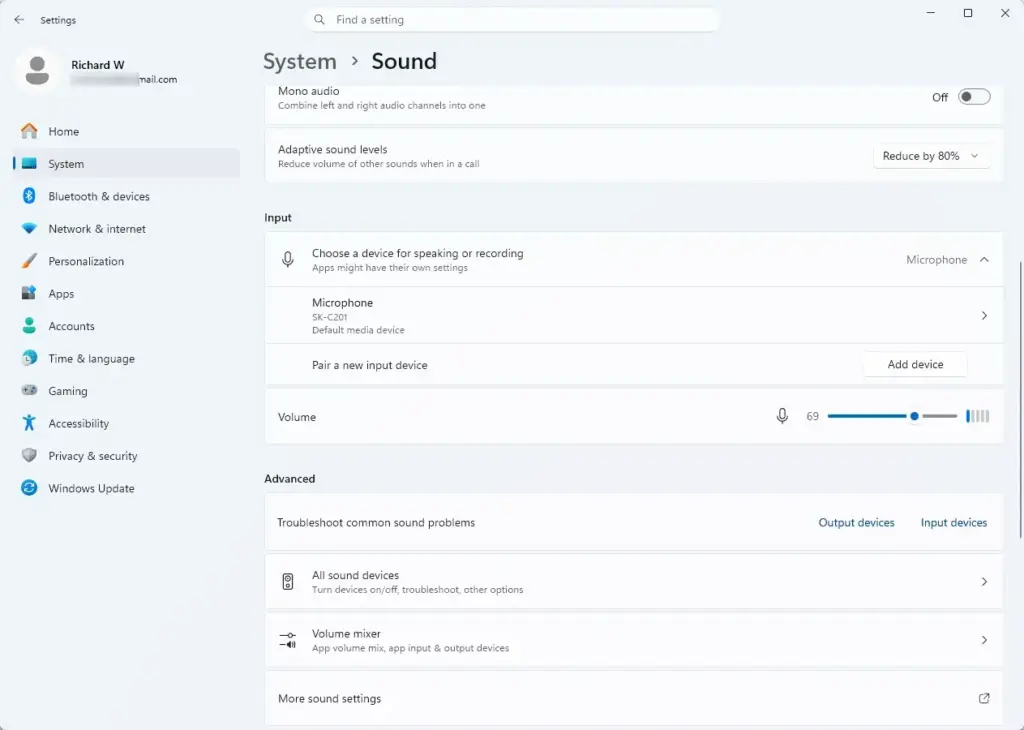
Settings › Sound › Input - Click the microphone’s name to open its properties. You’ll see a live input meter, a Volume slider, and a Test your microphone button.
- Drag the Volume slider left or right to lower or raise the input gain. Watch the meter as you speak. Your normal voice should sit comfortably in the middle and not keep hitting the far right edge. That’s where clipping happens, and it makes you sound distorted to others.
- Click Test your microphone and speak normally. Windows plays back a short recording so you can hear what other people will hear. That is more reliable than judging by the meter alone.
There’s no save button, and you don’t need to restart your PC or reopen any app that’s using the microphone.
While you’re on this properties page, look for the Audio enhancements dropdown. Depending on your build and driver, it offers options such as Voice Clarity and Default Device Effects, as well as an option to turn enhancements off. These effects process your voice before apps receive it, so they can change or override the level you set with the slider. If your levels sound odd, for example the volume seems to pump up and down, or the slider doesn’t seem to match what you hear, set Audio enhancements to off, run Test your microphone again, and compare. If the sound improves, leave enhancements off or try a different option. You can switch it back at any time. If you don’t see the dropdown, your build or audio driver doesn’t expose it, and the options available vary from device to device.
Fine-Tune with Microphone Boost in the Legacy Sound Control Panel
The Settings app slider is fine for most people, but it has a ceiling. If your microphone is still too quiet even at maximum volume, which is common with older headsets or budget USB mics, you need Microphone Boost. It isn’t available in the modern Settings app.
- Open the microphone’s properties in Settings using the first four steps above.
- Scroll down and click Device properties. Windows opens a page with basic device details.
- Click Additional device properties, usually listed on the right side of that page. This opens the older Sound Control Panel dialog for that specific microphone.
- Click the Levels tab at the top of the dialog. You’ll see two sliders: Microphone (the same gain control as the Settings app) and Microphone Boost.
- Raise the Microphone Boost slider in small increments, a few dB at a time, and test after each change. Boost amplifies the signal electronically. Pushing it too high adds background hiss and static, especially on cheaper microphones where the electronics are less refined.
- Click OK to apply and close the dialog.
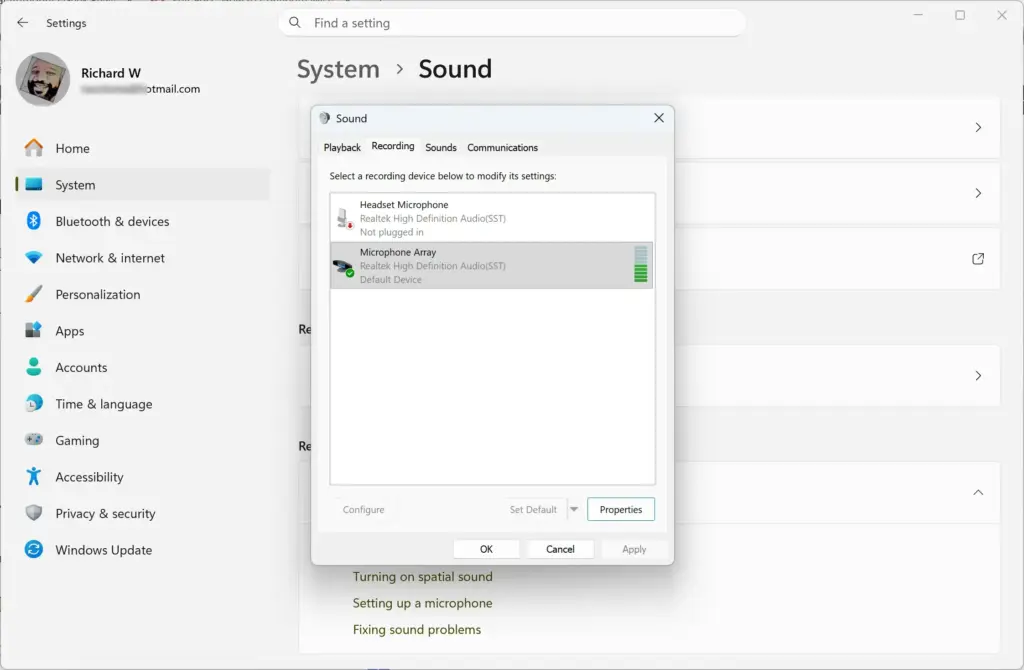
There’s also a faster way to reach the same legacy dialog if you don’t want to click through Device properties. Press Win+R, type mmsys.cpl, and press Enter. Or go to Settings System Sound and click More sound settings near the bottom of the page. Either way, the Sound dialog opens. Click the Recording tab, select your microphone, click Properties (double-clicking the microphone also works), and then open the Levels tab. Check that you’ve selected the right microphone here, because the Recording tab lists every input device.
Not every microphone shows a Microphone Boost slider. Whether it appears depends on the audio driver (the software that controls your audio hardware), not on Windows itself. Some manufacturers build boost control into their own companion app instead. Realtek Audio Console and various headset software do this, and in that case the Levels tab in Windows won’t show it at all. If you don’t see it, check whether your microphone or motherboard came with dedicated audio software and look for gain or boost controls there.
Test Your Microphone Levels While You Adjust
Gain settings are only useful if you can hear the actual result, so test as you go rather than guessing at a slider position.
- Use the Test your microphone button on the Input page in Settings for a quick playback check, as covered above.
- Open whichever app you actually use the microphone with, such as Discord, Teams, Zoom, OBS, or Voice Recorder, and check its own input meter too. Some apps apply their own gain or automatic gain control on top of the Windows-level setting. A level that looks right in Windows can still sound different inside a specific app.
- If an app has its own microphone sensitivity or input volume setting, adjust the Windows-level gain first to get a clean signal without clipping, then fine-tune inside the app. Doing it in the other order means you’re compensating for the wrong thing.
- If the result still sounds wrong, go back to the microphone’s properties in Settings and check the Audio enhancements dropdown. Voice Clarity and Default Device Effects can change the level and tone of your voice. Switch enhancements off, repeat the test in your app, and see whether the difference is the effect or the gain.
Fix a Microphone Volume Slider That’s Greyed Out or Missing
Most guides skip this part, but it matters. Here’s what to check when the controls don’t behave as expected.
- The microphone doesn't appear under Input at all. This usually means Windows doesn't have permission to use it, not a hardware fault. Go to Settings Privacy & security Microphone and confirm Microphone access is turned on, and that Let apps access your microphone is enabled. If access is blocked at the system level, the device can be connected and working but still won't show up as an input option.
- The Volume slider is greyed out. This happens when another application has taken exclusive control of the device, or when a third-party audio management app (Realtek Audio Console, GoXLR, or headset software) is managing the level itself. Close any audio utility running in the background and check again. If it's still greyed out, click Device properties and confirm the device isn't disabled. You can also stop apps from taking exclusive control:
- Press Windows key + R, type mmsys.cpl, and press Enter.
- Click the Recording tab, select your microphone, and click Properties.
- Click the Advanced tab.
- Under Exclusive Mode, clear the Allow applications to take exclusive control of this device checkbox.
- Click OK, then close and reopen any app that was using the microphone.
- Microphone Boost is missing from the Levels tab. As mentioned above, this is driver-dependent, not a bug. Some USB microphones and webcams don't expose a boost control to Windows at all because the manufacturer's driver doesn't support it.
- Changing the slider has no audible effect. Confirm you adjusted the correct device. If you have a headset and a separate webcam or built-in laptop mic, it's easy to adjust the wrong one while the app you're testing in is actually using the other. Check which device is selected under Input in Settings, and check the device the app has selected in its own audio settings. If both are right, check the Audio enhancements dropdown on the microphone's properties page. An enhancement such as Voice Clarity can mask or override the effect of the slider, so try setting it to off.
Reset or Undo Your Input Gain Changes
There's no single "reset to default" button for microphone gain in Windows 11, so before you start adjusting sliders, note where they were. Windows typically sets new devices to a default volume level around the middle-to-high end of the slider. To return to something close to the original, drag the Volume slider back toward that range and re-test with Test your microphone. If you changed Microphone Boost in the Levels tab, setting it back to 0.0 dB removes the amplification entirely, which is the same as never having boosted it. If you changed the Audio enhancements option, set it back to what it was, or to the default your device offers.
If you're not sure what your original setting was and the microphone still sounds wrong after several attempts, unplugging and reconnecting a USB microphone (or reinstalling its driver) often resets it to the manufacturer's default input level.
If This Didn't Work
If your microphone still sounds too quiet, too loud, or distorted after adjusting both the Volume slider and Microphone Boost, and after checking Audio enhancements, the problem is more likely the microphone hardware, cable, or driver than the gain setting itself. Try a different USB port or a known-working cable before adjusting levels further. From here, a natural next step is checking that your default recording and playback devices are set correctly, or reviewing your microphone privacy permissions if an app still can't detect the mic at all.
Frequently asked questions
How do I adjust the microphone gain in 🪟 Windows 11?
Open Settings (Windows key + I), go to System Sound, then select Input. Find your microphone and adjust the Volume slider left to decrease gain or right to increase it. For more control, open Sound Control Panel, select your microphone, click Properties, then use the Microphone Boost slider on the Levels tab.
What should mic gain be set at?
Set your microphone gain so your voice sounds clear without distortion or background noise. Test by speaking at normal volume and checking if others hear you clearly. Adjust the Volume slider until the input meter reaches about 50–75% during speech. Avoid maxing it out, which causes clipping and picks up unwanted noise.
How to change microphone gain settings?
Go to Settings System Sound Input and drag the Volume slider to adjust microphone sensitivity. For finer control, open Sound Control Panel (right-click the speaker icon in the taskbar), select your microphone, click Properties, then use the Microphone Boost slider on the Levels tab to amplify the signal further.
How to make mic input volume louder?
Open Settings System Sound Input and increase the Volume slider for your microphone. If that's not enough, open Sound Control Panel, select your microphone, click Properties, go to the Levels tab, and turn up the Microphone Boost slider. Test the level with a recording app or video call to confirm.
Still have a question?
Answered by AI from this guide. Good questions may be added to this page — please don't include personal details.
Did this guide fix your problem?

About the Author
Richard
Tech Writer, IT Professional
Richard is a writer at Geek Rewind who turns complex IT tasks into clear, step-by-step guides. He draws on years of hands-on experience in system administration and enterprise IT operations, focusing on Windows, Linux and WordPress: the problems people actually run into, and the fixes that work. His server and WordPress guides come from systems he runs himself. Richard builds and maintains the platform behind Geek Rewind, from its Ubuntu servers and Nginx configuration to its custom WordPress plugins. Many new tutorials start with readers' questions, and he's always glad to answer them in the comments.
No comments yet — be the first to share your thoughts!