How to Set Up a Microphone in Windows 11 Sound Settings from Scratch
Setting up a microphone in Windows 11 means telling the system which microphone to use, giving apps permission to access it, and checking that it picks up your voice clearly. The whole process takes about five minutes once you know where each setting lives.
Advertisement
Windows 11 keeps microphone settings in the Sound section of Settings, in the Input area. This is where you choose which microphone Windows listens to. That matters if you have more than one plugged in, or if Windows picks the wrong one by default.
This guide covers a completely fresh setup. You will plug in the microphone, tell Windows which device to use, grant apps permission to access it, test that it picks up your voice, and reduce hiss with audio enhancements. It ends with fixes for the most common reasons a microphone doesn’t show up or work.
⚡ Quick Answer
Open Settings ⚙️, go to System›Sound, and under Input select your microphone from the list. Windows then shows a blue volume bar that moves when you speak, confirming it works. Plug the microphone into a USB port directly rather than a hub, and check Device Manager under Audio inputs and outputs if it doesn’t appear.
Advertisement
Check the Microphone Is Physically Connected
Before touching any settings, confirm Windows can see the hardware. A microphone that isn’t detected at the physical level won’t appear anywhere in Sound settings, no matter what you change.
Plug in your microphone. If it’s a USB microphone, connect it directly to a USB port on your computer rather than through a hub. Some hubs don’t pass audio devices through correctly. If it’s a 3.5mm microphone or headset (the standard size for consumer audio gear), plug it into the pink or labeled microphone jack. On many laptops and some desktops, the microphone and headphone jacks are combined into one port. A headset with separate mic and audio plugs may need a splitter adapter.
Wait for the driver to install. A driver is the software that lets Windows communicate with the hardware. Windows usually installs a generic one automatically within a few seconds. You’ll see a notification in the bottom-right corner confirming the device is ready, or you’ll hear the “device connected” chime.
Open Device Manager to confirm Windows sees it. Right-click the Start button and select Device Manager. Expand Audio inputs and outputs. Your microphone should be listed here by name. If it has a yellow warning triangle, which means a driver problem, or you don’t see it at all, skip ahead to the troubleshooting section below.
Advertisement
Set the Microphone as the Default Input Device
Windows needs to know which device to treat as your active microphone, especially if you have more than one connected, such as a built-in laptop mic and a USB headset. This is the step most people skip. It’s also the most common reason apps like Zoom or Teams “can’t hear” a mic that’s clearly plugged in.
Open Settings ⚙️. Press Win+I, or right-click the Start button and choose Settings. Windows 11 Start menu with Settings gear icon highlighted. The Settings ⚙️ window opens on the System page.
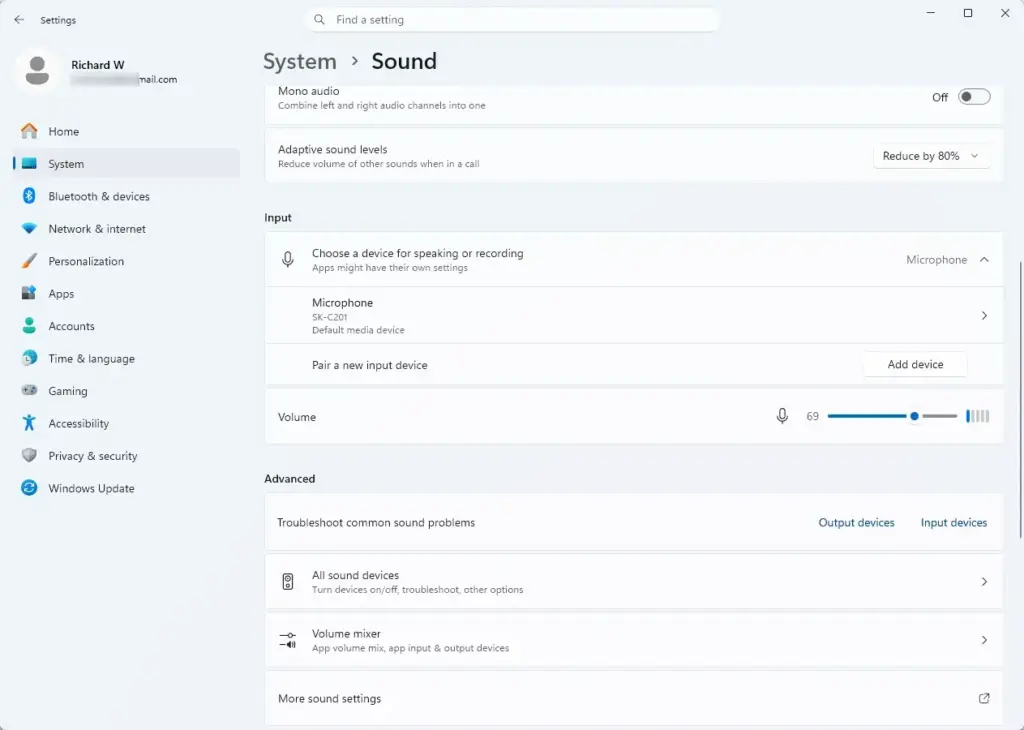
Go to System, then Sound. Click System in the left sidebar, then select Sound from the list on the right. You’ll land on a page with two main sections: Output and Input. Settings › Sound › Input
Find the Input section and pick your microphone. Under Input, Windows lists every microphone it currently detects. Select the one you just connected. On some Windows 11 builds this is a dropdown, and on others it’s a list of devices you click. The idea is the same.
Watch the volume meter move. Once selected, Windows shows a small blue volume bar for the device. Speak normally at your usual distance from the mic. The bar should rise and fall with your voice. If it doesn’t move at all, the microphone is selected but not receiving signal. Check the physical connection again or try a different USB port.
💡TipThere’s a faster way back to this page later.
Right-click the volume icon in the taskbar 🖥️ (near the clock) and choose Sound settings. It opens the same System›Sound page without going through the Settings ⚙️ sidebar.
If your microphone doesn’t appear in the list at all, don’t adjust other settings yet. Jump to the “Fix a Microphone That Isn’t Listed” section further down. None of the input or privacy settings will matter until Windows can see the device.
Advertisement
Allow Apps to Access Your Microphone
📝Good to KnowWindows 11 asks for permission before apps use your microphone.
You can control access system-wide and for individual apps. This step catches many people setting up a mic for video calls for the first time. The hardware works fine, but Teams or a browser can’t reach it because permission was never granted.
Open Settings ⚙️ and go to Privacy & security. Press Win+I, then click Privacy & security in the left sidebar. Windows 11 Start menu with Settings gear icon highlighted.
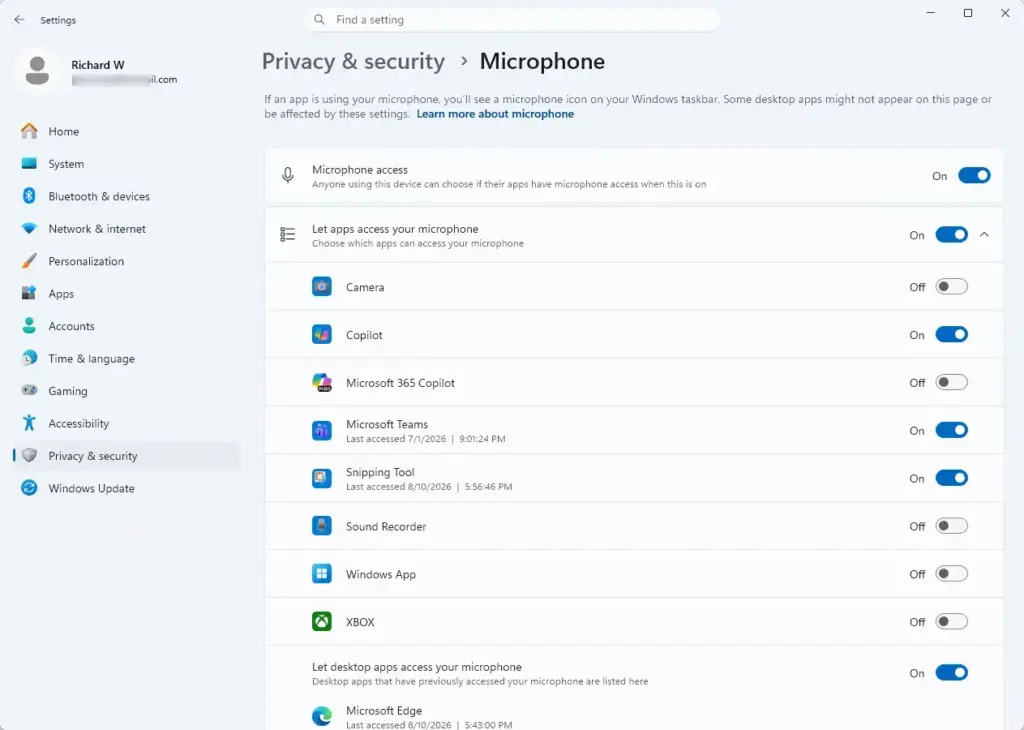
Select Microphone under App permissions. Scroll down to the App permissions section and click Microphone. Settings › Privacy & security › Microphone The Microphone privacy page opens.
Turn on Microphone access. At the top of this page is a toggle labeled Microphone access. If it’s off, none of your apps can use any microphone, regardless of the individual app settings below it. Turn it on.
Turn on “Let apps access your microphone.” This toggle controls whether apps in general are allowed to request microphone access at all. Leave it on.
Enable access for specific apps you use. Below that is a list of installed apps, such as Zoom, Teams, Discord, your browser and voice recorder apps. Each has its own toggle. Turn on the ones you need. If an app you use isn’t in the list, it likely hasn’t requested microphone permission yet. Open the app and try its microphone feature. Windows should prompt you to grant access, or the app will appear in this list afterward.
Scroll down for desktop app access, if needed. Older desktop applications (not downloaded from the Microsoft Store) sometimes need a separate toggle further down the page, labeled for classic desktop apps. If a traditional Win32 program still can’t access the mic after the steps above, check this section too.
If you’re on a work or school-managed PC, an administrator may have locked microphone access through policy. The toggles on this page will appear greyed out and you won’t be able to change them. Contact IT instead.
Test the Microphone
The built-in test confirms your mic captures usable audio, not just that the bar moves. It helps you spot a mic that is technically active but too quiet.
Advertisement
Open the microphone’s device page. Go to Settings›System›Sound Under Input, click your microphone’s name to open its properties page. Settings › Sound › Input
Click Start ⊞ test next to “Test your microphone.” Speak normally for a few seconds, then stop. Windows shows the input level it measured as a result you can read on screen.
Judge the result. A healthy level means your voice is registering well without being pinned at the maximum. If the level is very low or constantly maxed out, move on to the volume adjustments in the next section. If you also hear hiss or background noise in calls, see the audio enhancements steps below.
Listen to a real recording if you want to hear it. Open Voice Recorder from the Start menu ⊞, record a short clip, and play it back. This is the quickest way to hear what other people will hear.
You can also test a mic inside any app that uses it, such as a Teams test call or a Discord voice channel. The test in Sound settings is still the fastest way to confirm Windows itself is receiving clean input before you blame the app.
Adjust Microphone Volume and Sensitivity
If your voice comes through too quiet or too loud in calls and recordings, the fix is usually here rather than in the individual app’s settings. Most apps just use whatever level Windows is already set to.
Open the microphone’s device page.In Settings›System›Sound, click your microphone under Input.
Drag the Volume slider. Raise it if your voice sounds faint during the test, or lower it if it’s peaking and distorting. Re-run the test after each adjustment rather than guessing. Small changes make a bigger difference than they look like they should.
Try the Audio enhancements setting for hiss and background noise. On the same properties page, look for Audio enhancements. It’s a dropdown for that specific microphone. Choices depend on the device and its driver, but typically include Off and a default set of effects. On supported hardware you may also see Microsoft Voice Clarity, which applies noise suppression to cut background noise and hiss. Pick an option, then run Start test again. If the option isn’t there, your driver doesn’t offer it. This is normal, and some devices have their own noise reduction in the manufacturer’s software instead.
Turn enhancements off if your voice sounds wrong. Noise suppression can make a voice sound thin or clip the start of words. If that happens, set Audio enhancements back to Off. Some conferencing apps apply their own noise suppression as well, so you may not need both.
Open the older Sound control panel 🎛️ for more detailed options, if needed. Some settings, like microphone boost, only exist in the legacy interface. Scroll down on the Sound page and click More sound settings, or search for Sound Control Panel 🎛️ from the Start menu ⊞. On the Recording tab, right-click your microphone, choose Properties, then open the Levels tab. Here you’ll find the main Microphone volume slider and, on many devices, a separate Microphone Boost slider that amplifies a naturally quiet mic.
Apply changes and re-test. Click OK to save, then repeat the test from the previous section. Confirm the level sounds right, not just measures right on the input meter.
Advertisement
There's no single reset button for volume changes. To undo them, set the Volume slider back toward the middle (around 70-100, depending on the device) and turn Microphone Boost back down to 0.0 dB, which is the neutral starting point on most drivers. To undo noise suppression, set Audio enhancements back to its previous choice. None of these changes need a restart.
Fix a Microphone That Isn't Listed or Detected
If your microphone never showed up in the Input list or Device Manager earlier, work through these in order rather than jumping straight to reinstalling drivers.
Run the built-in sound troubleshooter first. Right-click the volume icon in the taskbar, choose Sound settings, and look for Troubleshoot common sound problems. It opens the Windows 11 Get Help troubleshooter. Follow its prompts and pick the microphone or recording problem when asked. It can fix simple issues like a muted or disabled device. If it can't, carry on with the steps below. The exact location of this link can vary slightly between Windows 11 versions.
Try a different USB port or audio jack. A faulty port is one of the most common causes. USB 3.0 ports sometimes have compatibility issues with audio hardware, so try a USB 2.0 port if your computer has one.
Check Device Manager for a warning icon. Right-click Start, choose Device Manager, and expand Audio inputs and outputs and also Sound, video and game controllers. A yellow triangle on any entry means Windows has a driver problem with that device.
Update the driver. This step requires administrator privileges. Right-click the device with the warning icon and select Update driver, then Search automatically for drivers. Windows will look for a matching driver online and install it if found.
Uninstall and let Windows reinstall the device, if updating doesn't help. This step requires administrator privileges and temporarily removes the device from Windows. It's easily undone because Windows redetects the hardware automatically, but don't do it mid-call or mid-recording. Right-click the problem device, select Uninstall device, confirm, then restart your computer. Windows redetects the hardware on boot and reinstalls a fresh driver.
Check that the microphone isn't disabled. In Device Manager, a device with a downward arrow icon is disabled. Right-click it and select Enable device.
Restart Windows Audio services if the mic still won't show up anywhere. Press Windows key + R, type services.msc, and press Enter. This requires administrator privileges. Find Windows Audio in the list, right-click it, and choose Restart. Do the same for Windows Audio Endpoint Builder.
If none of that brings the microphone back, and it's a built-in laptop or desktop mic that used to work, check whether a recent Windows update reset the sound driver. Reinstalling the manufacturer's audio driver from the laptop or motherboard vendor's website, rather than the generic Windows driver, sometimes restores a built-in mic that Device Manager otherwise can't fix.
What to Do Next
Once your microphone tests clean in Sound settings, open the app you actually plan to use it with, such as Teams, Zoom, Discord or Voice Recorder. Run a quick test call or recording there too. Some apps keep their own separate input device selection that can override what you just set in Windows. If you also want to fine-tune your speakers or headphones while you're on the Sound settings page, the Output section works the same way as the steps above, just for playback instead of recording.
Frequently asked questions
How can I fix voice chat not working in Sons of the Forest?
Open Settings›System›Sound›Volume mixer, find Sons of the Forest, and set its input device to your correct microphone. Also check Settings›Privacy & security›Microphone and toggle the app permission on.
How to enable mic on PC?
Open Settings›Sound›Input devices, select your microphone from the list, then go to Privacy & security›Microphone and turn on the toggle. Check that individual apps have permission to use the mic in the same Privacy menu.
Where do I find my audio settings?
Right-click the volume icon in your taskbar and select Sound settings, or open Settings›Sound For microphone and input-specific controls, go to Sound›Input devices
How to change mic input in 🪟 Windows 11?
Open Settings›Sound›Input devices, click on your current microphone, then select a different device from the dropdown menu under Choose your input device.
Still have a question?
Answered by AI from this guide. Good questions may be added to this page — please don't include personal details.
📬 Get new Windows tips in your inbox
One email when we publish something worth your time. No spam, unsubscribe anytime.
Richard is a writer at Geek Rewind who turns complex IT tasks into clear, step-by-step guides. He draws on years of hands-on experience in system administration and enterprise IT operations, focusing on Windows, Linux and WordPress: the problems people actually run into, and the fixes that work.
His server and WordPress guides come from systems he runs himself. Richard builds and maintains the platform behind Geek Rewind, from its Ubuntu servers and Nginx configuration to its custom WordPress plugins.
Many new tutorials start with readers' questions, and he's always glad to answer them in the comments.
One email when we publish a guide worth your time — new Windows features, the fixes that actually
work, and a heads-up when Microsoft breaks something. Unsubscribe in one click.
📬 Get new Windows tips in your inbox
One email when we publish something worth your time. No spam, unsubscribe anytime.



No comments yet — be the first to share your thoughts!