Fix Sound Problems in Windows 11

- 23 steps
- Needs administrator rights
- Includes a restart or sign-out
Sound problems in Windows 11 usually come from a wrong output device, a muted app, an outdated driver, or a stopped audio service. The quickest fix is to check the output device in Settings System Sound, then run the built-in audio troubleshooter.
This guide lists the fixes in the order that solves most cases first. It starts with a volume check and ends with restarting the Windows Audio service. A separate section covers a known issue with USB audio devices after the September 2026 updates.
Sound problems in Windows 11 usually come from the wrong output device, a muted app, an outdated driver, or a stopped audio service. Start by checking the output device in Settings System Sound, then run the Output devices troubleshooter from the Troubleshoot common sound problems option. Also raise the app’s slider in Volume mixer.
Fix sound problems in 🪟 Windows 11 step by step
- Select the speaker icon in the taskbar. Quick Settings opens with a volume slider. Drag the slider to the right. If the icon shows a line through it, the sound is muted, so select the icon to unmute. Also check the mute key on your keyboard and any volume control on a headset cable. The guide to muting and unmuting sound in Windows 11 covers every method.
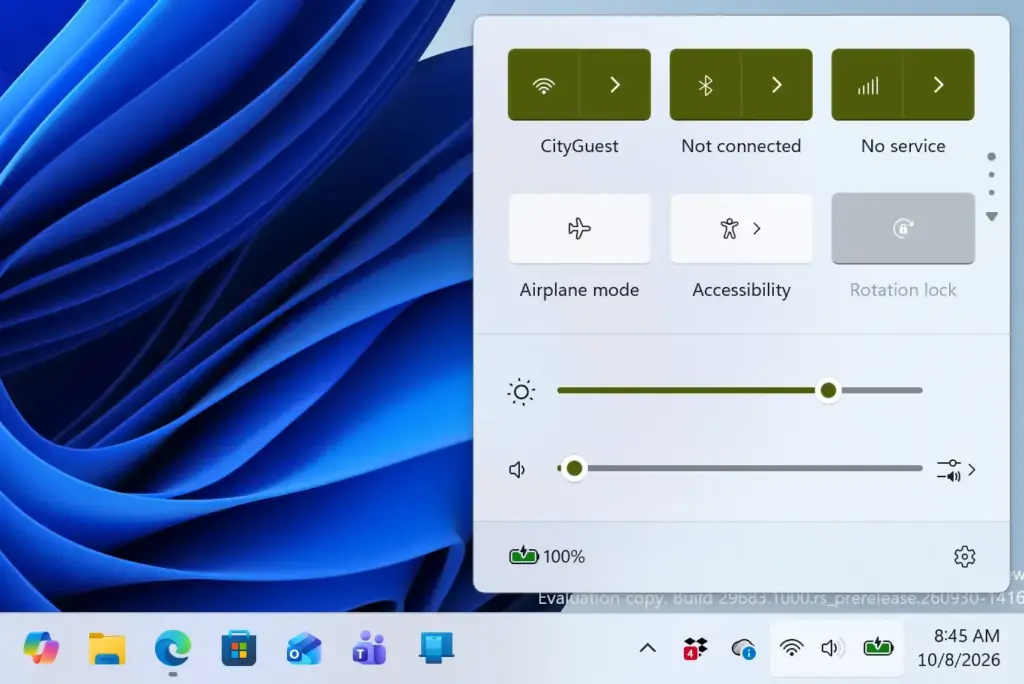
Notification Centre - Check the cable, port and power. Unplug the cable and plug it back in firmly, or try a different port or jack. Speakers with their own power switch or volume knob need both turned on. For Bluetooth speakers or headphones, confirm the device shows as connected and sits within range.
- Open Settings. Press Win+I to open Settings.
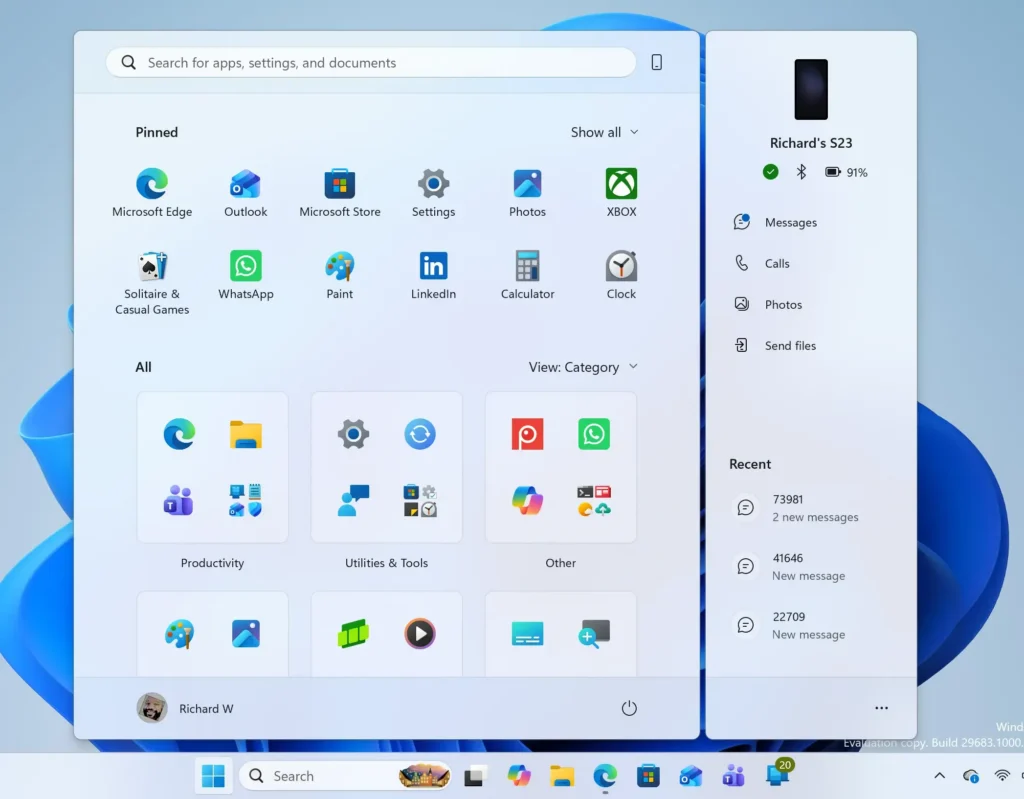
Windows 11 Start menu search panel for opening OpenSSH Client settings - Go to Settings System Sound. The page lists your output devices under Output and your input devices under Input.
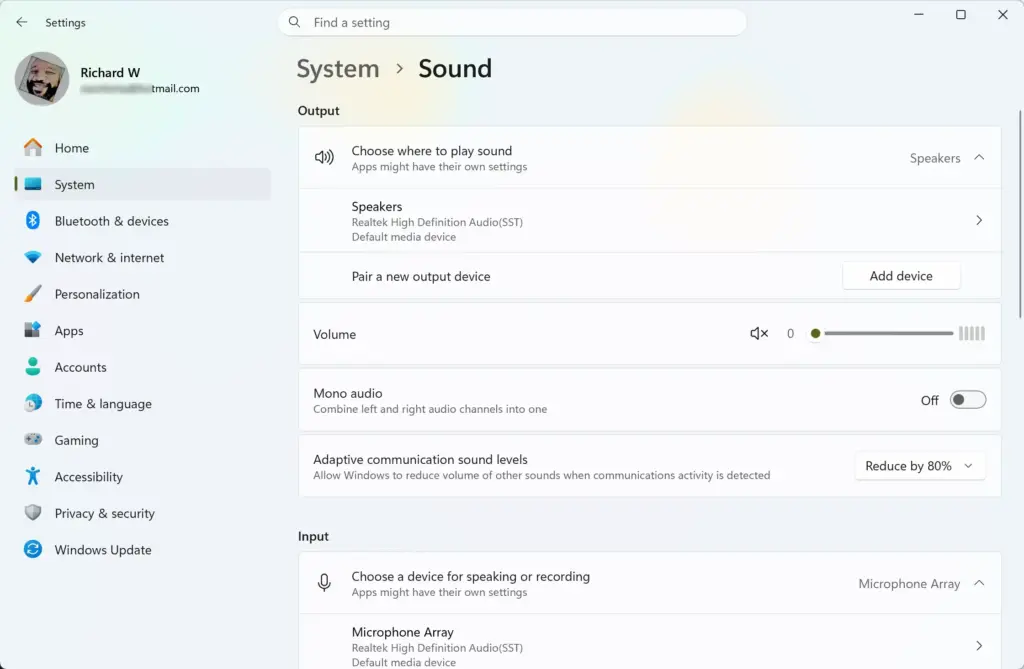
Settings › System › Sound - Choose your speakers or headphones under Output. Select the device you want to hear. Windows makes it the default for sound. If your device is missing from the list, go to the section on missing devices below. If sound keeps jumping to a monitor or TV, read why Windows 11 sound keeps switching to the monitor.
- Select the device name to open its properties. The page that opens shows the device’s volume, test option, enhancements and format. These are the settings the next few steps change.
- Select Test or Start test. The label depends on your build. You should hear a short sound from the selected device. If you hear nothing, keep going. If you hear it here but not in one app, the problem is the app, not Windows.
- Check app volume in Volume mixer. Go back to Settings System Sound and select Volume mixer. Every open app has its own slider. An app set to zero stays silent even when the main volume is high. Raise the slider for the app that has no sound. The guide to adjusting volume levels in Windows 11 Sound settings explains the mixer in more detail.
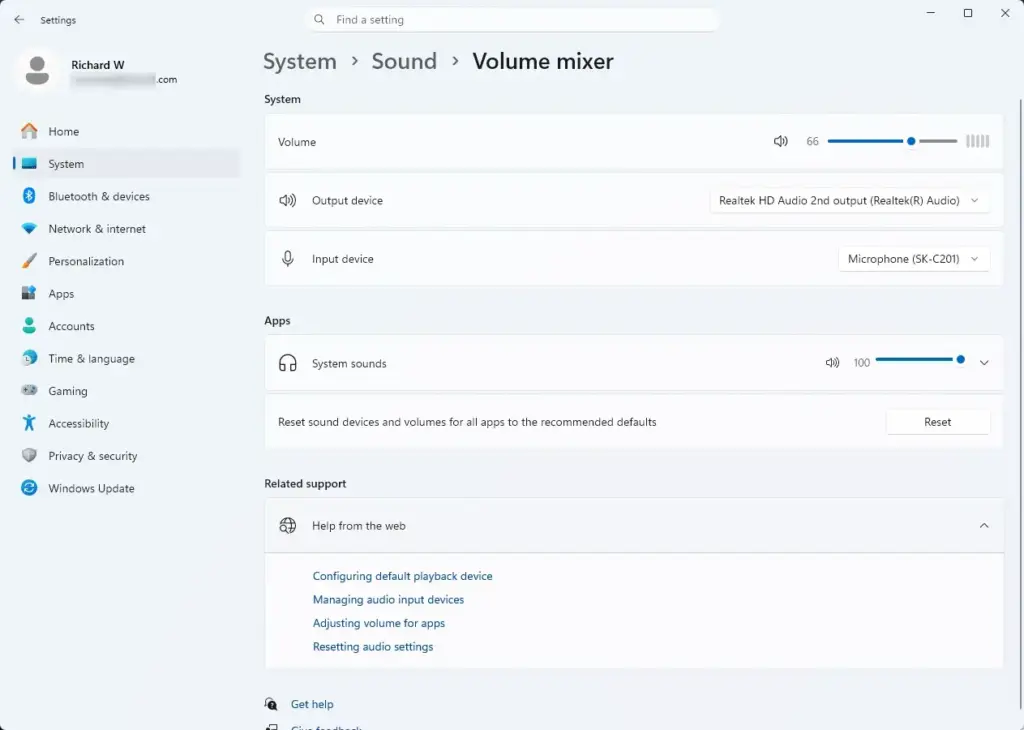
Settings › Sound › Volume mixer - Run the audio troubleshooter. In Settings System Sound, scroll to Advanced and select Troubleshoot common sound problems. Choose Output devices and follow the prompts. On some builds the troubleshooter opens in the Get Help app instead. Accept any fix it offers, then test your sound again.
- Turn off audio enhancements. Open the device properties again (step 6). Set Audio enhancements to Off. Depending on your build, the setting may be called Enhance audio. Enhancements are processing effects from Windows or the driver, and they sometimes cause silence, echo or distortion. Test your sound after you change it.
- Choose a different audio format. On the same properties page, open the Format list and pick another entry. Each entry pairs a bit depth (how much detail each sound sample holds) with a sample rate (how many samples play each second). A device that does not support the selected format can play nothing at all. Test after each change. If the sound gets worse, set Format back to the original entry.
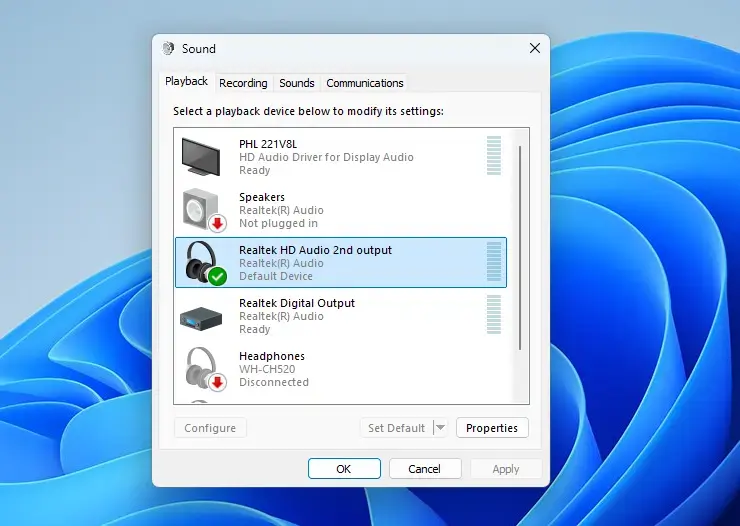
- Check for a disabled device. Go back to Settings System Sound, scroll to Advanced and select More sound settings. The classic Sound window opens. On the Playback tab, right-click an empty area and select Show Disabled Devices. Right-click any greyed-out device and select Enable. Then select OK.
- Install Windows updates. Go to Settings Windows Update and select Check for updates. Windows Update often delivers audio fixes, including driver updates. Select Download & install if updates appear.
- Restart the PC. Select Start Power Restart. Some audio updates only apply after a restart. Use Restart rather than Shut down, because Fast startup (a feature that partly saves Windows on shutdown) can keep a faulty driver loaded.
- Test your sound again. Play a video or music track. If sound works, stop here. If it still does not, the cause is probably a driver or a service, which the next steps address.
- Open Device Manager. Right-click Start and select Device Manager. Device Manager lists every piece of hardware and its driver, and driver changes in it require administrator privileges. If the User Account Control prompt appears, select Yes. Expand Sound, video and game controllers. A yellow triangle on your audio device means Windows reports a problem with it.
- Update the audio driver. Right-click your audio device, select Update driver, then select Search automatically for drivers. A driver is the software that lets Windows talk to the sound hardware. If Windows reports the best driver is already installed, check the PC maker’s support site for a newer audio driver. This step needs administrator privileges.
- Uninstall the audio device and restart. Right-click the same device and select Uninstall device. Leave any option to delete the driver software cleared. Restart the PC, and Windows reinstalls the audio device on startup. This step needs administrator privileges. It also fixes a device that Device Manager lists with an error.
- Restart the Windows Audio service. Press Win+R, type
services.mscand press Enter. Scroll to Windows Audio, right-click it and select Restart. A service is a background program, and Windows Audio runs all sound on the PC. This step needs administrator privileges. If the sound stays silent, restart Windows Audio Endpoint Builder the same way. Windows asks to restart the services that depend on it, so confirm.
If the steps above don’t fix it, the Geek Rewind guide on Windows 11 sound not working: 9 ways to fix audio issues covers more situations.
Why a device is missing or a setting is greyed out
Several things can hide your speakers or stop a setting from responding. Check these before you reinstall anything.
The output device does not appear in the list
A device that is disabled does not show under Output. Use step 12 to reveal disabled devices in the classic Sound window and enable them. For Bluetooth audio, remove the device in Settings Bluetooth & devices and pair it again.
For wired headphones, try a different port. A faulty jack or cable is a common cause.
If the device appears in Device Manager under a different name, such as a monitor or TV, Windows sends sound over HDMI or DisplayPort. Select your speakers in Settings System Sound as in step 5.
Audio enhancements or Format options are missing
Not every device shows these options. Some drivers hide them, and a few apps from the PC maker replace them with their own audio control panel. If you see no Audio enhancements or Enhance audio setting, check the maker’s audio app in Start. Some Bluetooth and USB devices also limit the format list to what the hardware supports.
Spatial sound makes audio sound wrong
Spatial sound is a virtual surround effect, and on some hardware it makes audio quiet or muffled. If sound is distorted but not silent, turn it off and test. The guide to enabling or disabling spatial sound in Windows 11 shows where. To switch it on again, see how to turn on spatial sound in Windows 11.
The troubleshooter finds nothing
The troubleshooter reports problems in settings and services. It cannot repair broken hardware. If it reports nothing and the Test in step 7 is silent, try the same speakers or headphones on another device.
If they work there, the issue is on the PC. If they stay silent, replace the cable or the speakers.
USB audio devices stopped working after a September 2026 update
Microsoft has confirmed this as a known issue on Windows 11, version 25H2. After the September 8, 2026 security update (KB5124008), some USB Audio Class 1.0 devices may not start. USB Audio Class 1.0 is a standard that lets USB headsets, DACs (digital-to-analog converters) and sound cards work without a maker’s driver.
Affected devices may show This device cannot start (Code 10) in Device Manager. They may also produce no audio, or leave the volume and sound settings unresponsive. Microsoft lists the status as Mitigated.
Microsoft released an out-of-band update on September 14, 2026 (KB5129195). An out-of-band update is released outside the normal monthly schedule. It fixes the problems with 8-channel (7.1 surround) and 3D audio modes. Microsoft is still working on the other symptoms.
If you use a USB headset or audio interface and have these symptoms, try the following:
- Open Device Manager. Right-click Start and select Device Manager. Look for a yellow triangle on your USB audio device, usually under Sound, video and game controllers.
- Open the device’s properties. Double-click it. On the General tab, read Device status. If it says the device cannot start (Code 10), you have this issue.
- Install the latest Windows updates. Go to Settings Windows Update and select Check for updates. KB5129195 fixes the 8-channel and 3D audio symptoms. Restart when prompted.
- Switch the device to 2-channel mode. Go to Settings System Sound, select your USB device, and open the Format list. Pick an entry that says 2 channel if one is listed. Some users restored audio this way. If the device does not appear because it cannot start, try this after another restart.
Microsoft has not published a full fix for the remaining symptoms. Check Windows Update again later, because a future update may address them.
How to undo these changes
Most changes in this guide reverse in the place where you made them. If a change made things worse, put it back and test again.
- Audio enhancementsSet Audio enhancements (or Enhance audio) back to its previous setting on the device properties page.
- Audio formatChoose your original entry in the Format list.
- Disabled devicesIn the classic Sound window, right-click a device and select Disable to hide it again.
- A driver update that broke soundIn Device Manager, double-click the audio device and open the Driver tab. Select Roll Back Driver. If this button is greyed out, Windows has no previous driver saved and cannot roll back.
- Default deviceReturn to Settings System Sound and select the other device under Output.
Restarting a service changes nothing permanent. Windows Audio starts again with its normal settings.
What to do next
If sound now plays from your speakers but your microphone does not, move on to setting up a microphone in Windows 11 Sound settings. If sound still fails after the driver reinstall and the service restart, test the same speakers or headphones on another device to separate a hardware fault from a Windows one. A Windows feature update or a later driver update can change your default output device again, so recheck Settings System Sound if the problem returns.
Have a question about this guide?
Answered by AI from this guide. Good questions may be added to this page — please don't include personal details.
Did this guide fix your problem?

About the Author
Richard
Tech Writer, IT Professional
Richard is a writer at Geek Rewind who turns complex IT tasks into clear, step-by-step guides. He draws on years of hands-on experience in system administration and enterprise IT operations, focusing on Windows, Linux and WordPress: the problems people actually run into, and the fixes that work. His server and WordPress guides come from systems he runs himself. Richard builds and maintains the platform behind Geek Rewind, from its Ubuntu servers and Nginx configuration to its custom WordPress plugins. Many new tutorials start with readers' questions, and he's always glad to answer them in the comments.
No comments yet — be the first to share your thoughts!