How to Reset Audio Settings in Windows 11 Sound Properties

Resetting audio settings in Windows 11 fixes no sound, distorted playback and wrong volume levels by clearing device and app settings that have gone wrong. The aim is to return your sound setup to a known clean state so your speakers and headphones work normally again. Start with the simple methods first. The later ones (driver removal, registry edits) take more effort and carry more risk.
Open Settings System Sound, scroll to Volume mixer, find your silent app, click the arrow to expand it, then change its Output device dropdown from the current selection back to Default or your speakers by name.
Windows lets you send each app’s sound to a different playback device. If an app is routed to a disabled or unplugged device, you get silence from that program only, while everything else sounds fine. The fix is to point the app back at your active default device. This is the first thing to check when only one program is silent.
- Press the Windows key, type Settings, and click the app in the search results. The Settings window opens.
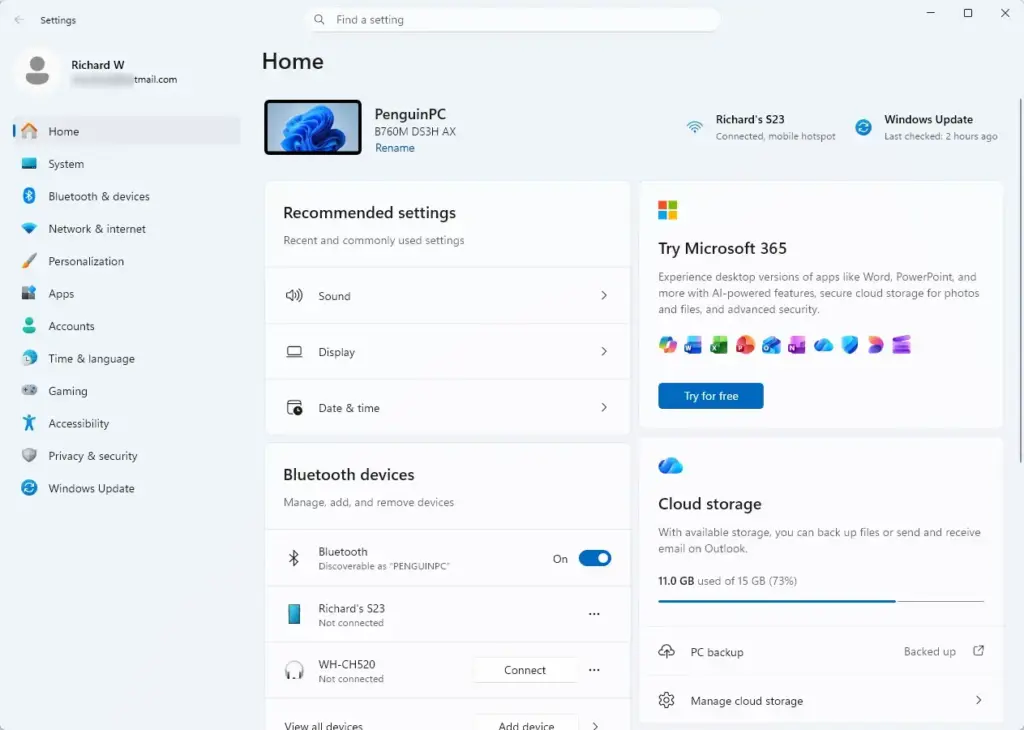
Settings › Home - Select System in the left-hand menu.
- Click Sound. You will see your output devices, input devices and volume sliders. Check that the right device is selected under Output before you go further.
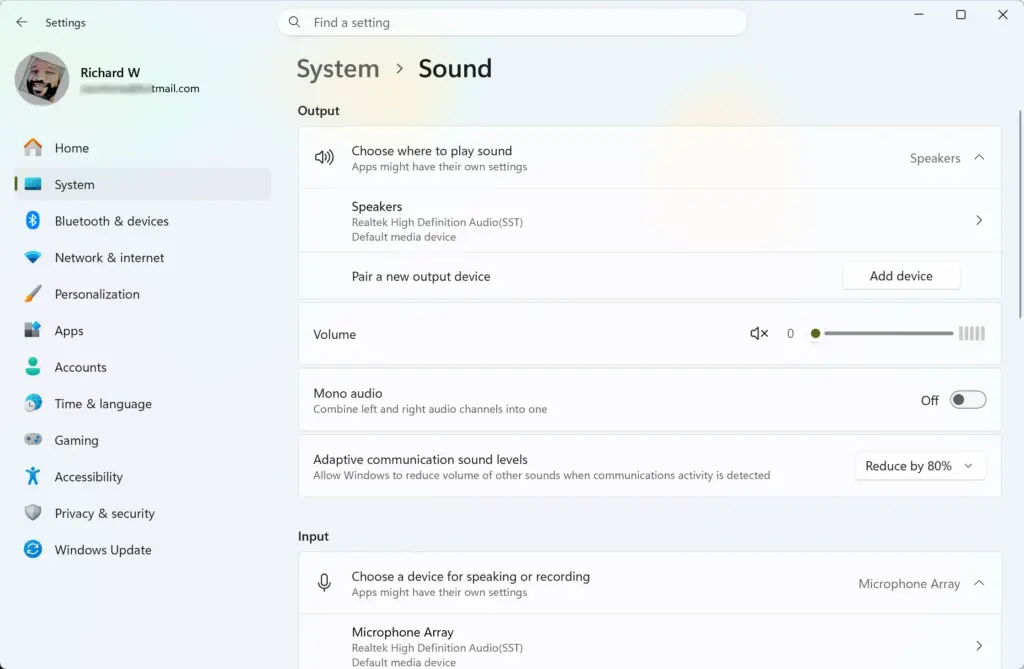
Settings › System › Sound - Scroll down to the Advanced section and click Volume mixer. A list of apps that are currently open appears, each with its own volume slider.
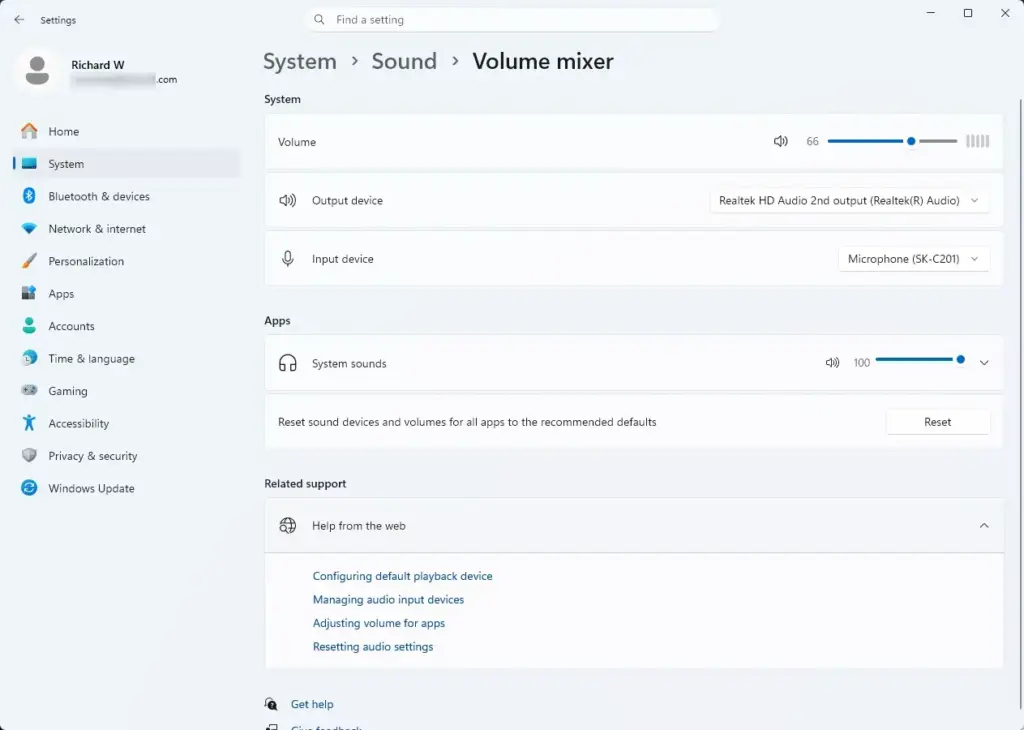
Settings › Sound › Volume mixer - Find the app that has no sound. Click the arrow beside it to expand its settings and look at the Output device and Input device dropdowns.
- Open the dropdown for the affected app and change it back to Default, or pick your speakers or headphones by name. Also check that the app’s volume slider is not at zero.
- If you want deeper control, go back to the main Sound page, scroll down and click More sound settings. This opens the classic Sound window used in the next section.
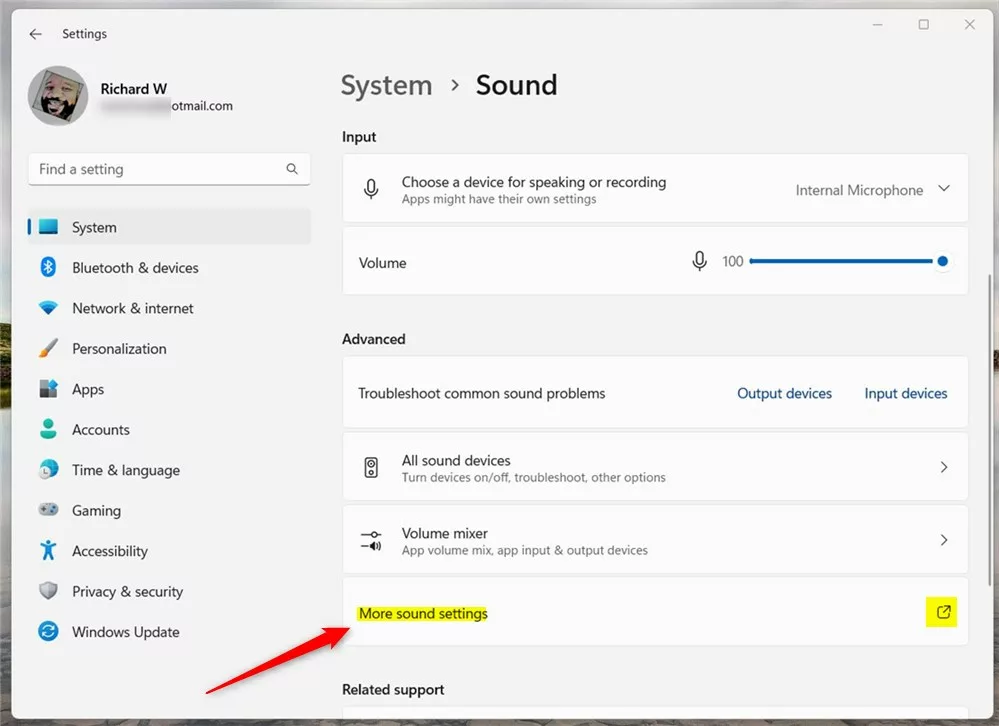
Windows More sound settings
Tip: the app must be open and have played sound recently to appear in the Volume mixer. If it is missing, start it, play something, and look again. Some builds of Windows 11 also show a button near the bottom of this page to reset all apps’ sound devices and volumes to the recommended defaults. If you see it, it is the fastest way to undo every per-app change at once.
Restoring Sound Device Defaults via the Sound Control Panel
Distorted playback and odd volume jumps are often caused by custom tweaks such as spatial sound, enhancements or a sample rate your hardware does not handle well. The classic Sound Control Panel lets you reset these settings on a single device, back to what the manufacturer recommends.
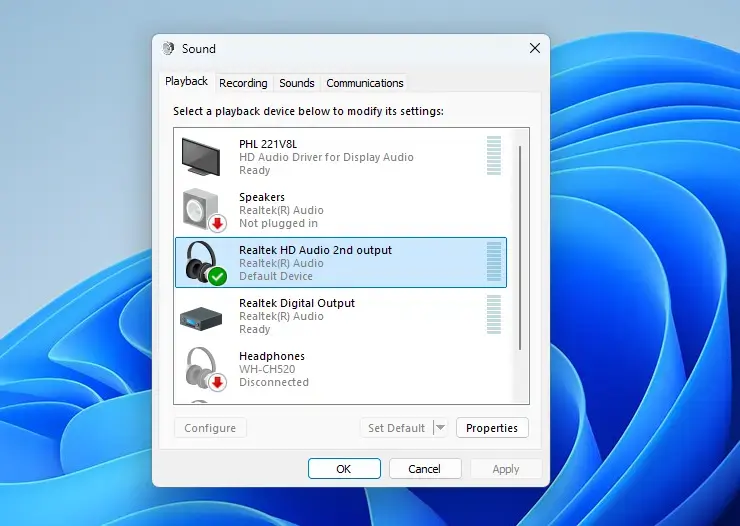
- Press the Windows key, type mmsys.cpl, and press Enter. The Sound window opens.
- Select the Playback tab. It lists every output device Windows knows about. If a device you expect is missing, right-click an empty area of the list and tick Show Disabled Devices.
- Click your main speakers or headphones to highlight them. The device with the green tick is your current default.
- Click the Properties button at the bottom right of the window.
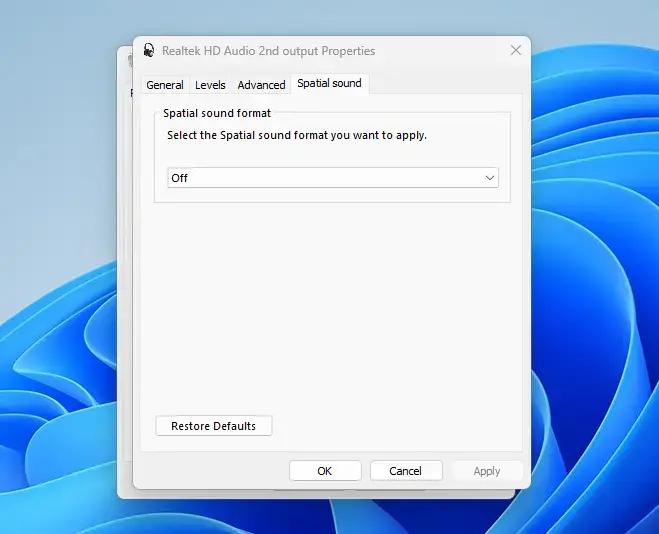
- Work through the tabs in the Properties window and reset what you find:
- On Enhancements, tick Disable all enhancements, or untick options such as loudness equalization or virtual surround.
- On Spatial sound, set the Spatial sound format to Off.
- On Advanced, click Restore Defaults to put the default format (sample rate and bit depth) back to its original value. Also look at the exclusive mode checkboxes if an app is hogging the device.
- Click Apply, then OK. Play a sound to see if the problem is gone.
- Switch to the Recording tab, select your microphone, click Properties, and repeat the same checks. Use Restore Defaults where it is offered, and look at the Levels tab for a muted or very low microphone.
Which tabs you see depends on your audio driver. A Realtek or other vendor driver may add its own tabs, while the generic Windows driver shows fewer. If Enhancements is missing, that is normal for some drivers and you can skip it.
Troubleshooting Audio Services Using Task Manager
If your speakers stop responding or the volume control disappears from the taskbar , the Windows audio services may be stuck. Restarting them clears the stuck state and reloads your sound hardware, and you do not need to reboot the whole PC. Expect a few seconds of silence while this happens, and save any audio work first.
- Press Ctrl + Shift + Esc to open Task Manager.
- Click Services in the left-hand sidebar. If you only see the compact view, click the menu icon at the top left to show the sidebar names. On older builds, Services is a tab along the top.
- Click the Name column header to sort the services alphabetically.
- Scroll down and find Audiosrv, which is the Windows Audio service.
- Right-click Audiosrv and select Restart. The status briefly changes, then shows Running again.
- Find AudioEndpointBuilder (Windows Audio Endpoint Builder) in the same list.
- Right-click AudioEndpointBuilder and select Restart. Windows Audio depends on this service, so it may restart too. If Audiosrv shows Stopped afterwards, right-click it and choose Start.
Stopping or restarting services needs administrator rights. If Restart is greyed out or you get an access denied message, sign in with an administrator account and try again.
Reinstalling Audio Drivers Through Device Manager
If the earlier steps did not help, a damaged driver is a likely cause. Removing the audio device in Device Manager makes Windows reinstall a clean copy at the next start. This clears persistent errors from broken or outdated driver files.
- Press the Windows key, type Device Manager, and press Enter. You need administrator rights to make changes here.
- Click the arrow next to Sound, video and game controllers to expand it.
- Right-click your main audio device, such as Realtek Audio, High Definition Audio Device or your USB headset, and select Uninstall device. A confirmation box appears.
- If the box shows Attempt to remove the driver for this device, tick it. This deletes the driver files as well as the device entry. Only tick it if you have a fresh driver available from your PC or motherboard maker, in case Windows does not supply a working one.
- Click Uninstall. The device disappears from the list.
- Restart your computer straight away. Windows Plug and Play detects the hardware on startup and installs a fresh driver.
After the restart, check that the device is back in Device Manager and play a sound. If you ticked the driver removal box and Windows installs only a generic driver, download the latest audio driver from your PC or motherboard manufacturer's support page and install it.
Running the Built-In Audio Troubleshooter
The built-in audio troubleshooter checks for common problems such as stopped services, disabled devices and bad settings, and can apply fixes for you. It costs nothing to try, so it is worth running before you make deeper changes.
- Press the Windows key, type Settings, and open the app.
- Select System.
- Click Troubleshoot.
- Click Other troubleshooters. A list of diagnostic tools appears.
- Find Playing Audio and click Run next to it. On newer builds of Windows 11 this entry may be named Audio.
- Follow the prompts. When asked which device to troubleshoot, choose your main speakers or headphones.
- Apply any fixes it recommends. The tool tells you what it found and whether it fixed it.
If it reports that nothing was found but you still have no sound, move on to the next method. The troubleshooter cannot detect every fault, especially ones caused by a bad driver or physical hardware.
Resetting Audio Endpoints and Device Volumes via PowerShell
PowerShell lets you restart the audio service from the command line, which is handy over remote sessions or when Task Manager will not cooperate. Be realistic about what it does: it restarts the sound service, but it does not reset your volume levels or repair corrupted device entries on its own.
- Press the Windows key, type PowerShell, right-click Windows PowerShell, and select Run as administrator. Click Yes if User Account Control asks for permission.
- Optionally, run Get-AudioDevice -List to see your playback and recording devices. This command is not part of Windows. It only works if you have installed an audio device module, so if PowerShell says the command is not recognised, skip this step.
- Run Stop-Service Audiosrv -Force, then run Start-Service Audiosrv. The first command stops the Windows Audio service and the second starts it again.
- Close the PowerShell window once the service is running again, then play a sound to test.
If an error appears, check that PowerShell is running as administrator. A missing administrator window is the usual cause of access errors.
Clearing Audio Configurations in the Registry
Old entries from removed hardware or virtual audio cables can cause ghost devices and wrong routing. Removing these entries forces Windows to rebuild a clean state for your current devices. This is the most risky method in this guide, so use it last.
Back up the registry before you change anything.
- Press the Windows key, type regedit, and press Enter. Click Yes if User Account Control appears. You need administrator rights.
- In the left pane, go to HKEY_LOCAL_MACHINE\SOFTWARE\Microsoft\Windows\CurrentVersion\MMDevices. This key holds the audio device settings.
- Right-click the MMDevices key and select Export. Choose a location, give the file a name and click Save. To undo your changes later, double-click this .reg file and confirm the merge.
- Look through the device entries under this key and delete only the orphaned device subkeys that belong to ghost devices still shown in your sound settings. If you are not sure which entry belongs to a device, leave it alone. Windows may refuse to delete some keys because of permissions, and you should stop there rather than forcing it.
- Close the Registry Editor and restart your computer so the changes take effect.
If you only want to get rid of ghost devices, there is a safer route first. In Device Manager, click View, tick Show hidden devices, and uninstall the greyed-out audio entries there.
What to do next
If none of the software resets worked, the problem may be physical or specific to the manufacturer's software. Rule out hardware faults before you spend more time on Windows settings.
- Check that cables are fully seated, and try a different port. For USB or Bluetooth devices, unplug and reconnect, or remove and re-pair the device.
- Test your speakers or headphones on another computer or phone. If they stay silent there, the hardware is the problem, not Windows.
- Look for a physical mute switch, a volume knob turned down, or a headset that is switched off.
- Download the latest audio driver and any control panel app from your PC, motherboard or headset manufacturer, and install it. Vendor drivers often include features and fixes that the generic Windows driver does not.
Frequently asked questions
How do I restart audio settings?
Open Settings and go to System Sound. Scroll to Advanced and click Volume mixer. Find each app with audio problems and change its Output dropdown back to Default. For deeper resets, click More sound settings at the bottom of the Sound page.
How to Reset audio on iPhone?
On iPhone, go to Settings Sounds & Haptics and toggle the Mute switch on the side of the phone off. Check that your ringer volume is turned up and you're not in focus modes that silence notifications. Restart the iPhone if audio still doesn't work.
How to fix audio quality on PC?
Right-click your speaker icon in the system tray and select Open Volume mixer. Check that no apps are set to low volumes individually. Go to Settings System Sound Advanced and review your audio device properties. Update your audio drivers through Device Manager.
How do I get my audio Sound back?
Open Settings System Sound and check that your speakers or headphones appear under Output devices. In Volume mixer, ensure the app causing silence isn't routed to a disabled device—change its Output dropdown to your active speaker or headphone. Unmute your device with the physical mute switch if present.
Still have a question?
Answered by AI from this guide. Good questions may be added to this page — please don't include personal details.
Did this guide fix your problem?

About the Author
Richard
Tech Writer, IT Professional
Richard is a writer at Geek Rewind who turns complex IT tasks into clear, step-by-step guides. He draws on years of hands-on experience in system administration and enterprise IT operations, focusing on Windows, Linux and WordPress: the problems people actually run into, and the fixes that work. His server and WordPress guides come from systems he runs himself. Richard builds and maintains the platform behind Geek Rewind, from its Ubuntu servers and Nginx configuration to its custom WordPress plugins. Many new tutorials start with readers' questions, and he's always glad to answer them in the comments.
No comments yet — be the first to share your thoughts!