How to Change the Default Sound Output Device When Multiple Speakers Are Connected

The default sound output device is where Windows sends all your sound: system alerts, videos, music, and calls. When you have multiple speakers, headsets, or monitors with audio plugged in, Windows picks one as the default, but it’s not always the one you want right now.
Switching the default output takes about 30 seconds. Open Settings , go to System Sound, and pick a different device in the Output section. That device stays the default until you change it again or until Windows switches it automatically when a new device connects.
The problem shows up fast. Say you have two sets of speakers, a monitor with built-in audio, a USB headset, and a Bluetooth speaker all connected at once. Windows often picks the wrong one. This guide covers the quickest way to switch between devices, how to set a separate device just for calls, how to lock individual apps to specific devices, and what to do when a connected speaker doesn’t appear in the list.
Open Settings , go to System Sound, and select the device you want under Output. Windows switches the default right away, with no restart needed. To change it faster, click the speaker icon in the taskbar , press the arrow next to the volume slider, and pick a device from the list.
Quick Way to Switch Output Devices from the Taskbar
This is the fastest option and skips Settings entirely. Use it when you’re bouncing between two devices you switch often, such as desk speakers and a headset.
- Click the speaker icon in the system tray , the notification area on the far right of the taskbar near the clock. A flyout opens with volume, Wi-Fi , and Bluetooth quick settings.
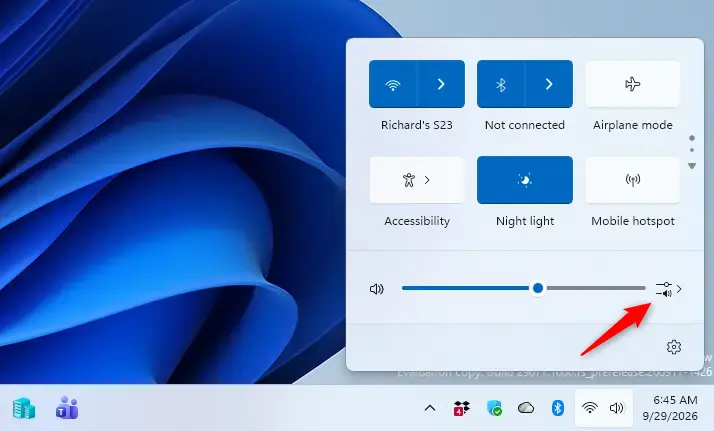
- Click the arrow (>) to the right of the volume slider. A list of all connected output devices opens.
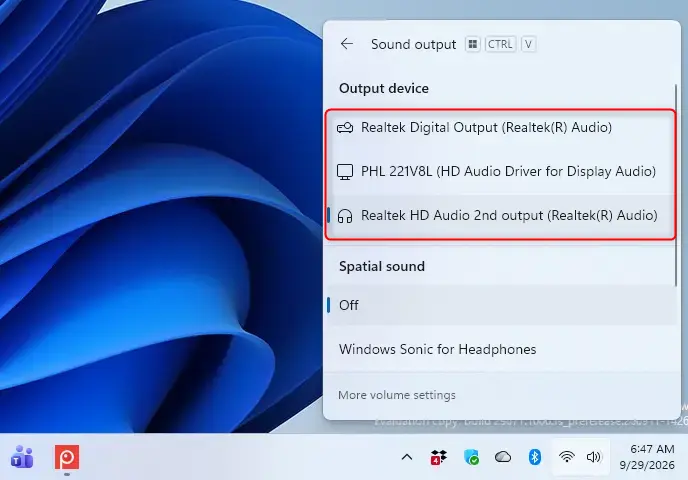
- Select the device you want. Windows switches to it right away, with no confirmation prompt and no restart. Whatever is playing keeps going, just through the new device.
If the device you want isn’t in the list, jump to the troubleshooting section below.
Change the Default Output Device in Settings
Use this method when you want to see every connected device at once, rename them, or adjust their individual volumes alongside the default.
- Open Settings . Press Win+I, or right-click the Start button and choose Settings.

Windows 11 Start menu with Settings gear icon highlighted. - Go to System Sound The Output section sits near the top of the page. It lists every playback device Windows currently sees.
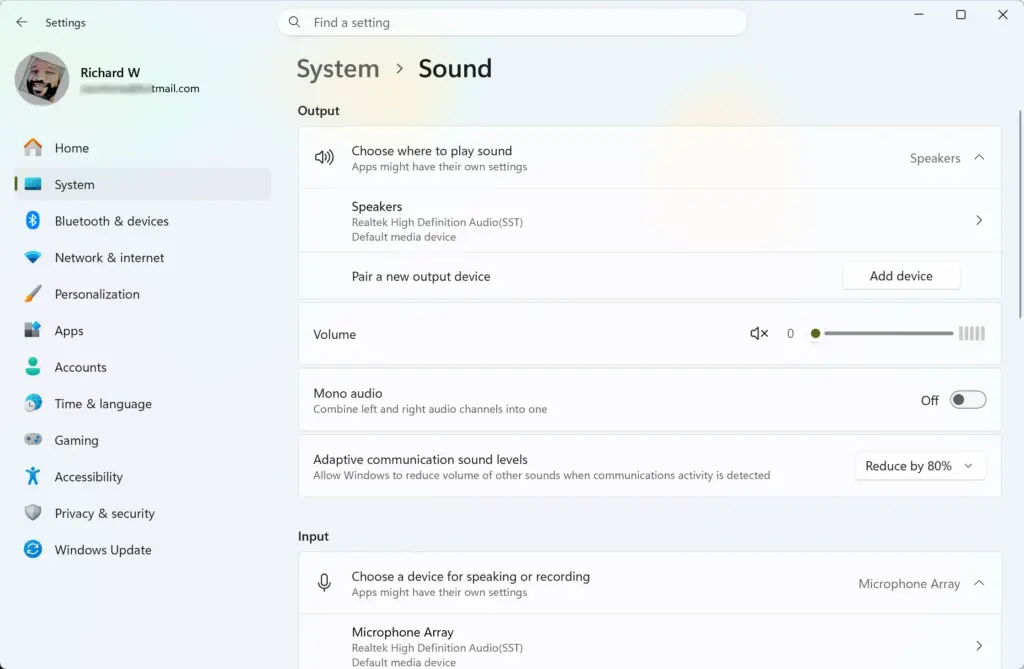
Settings › System › Sound - In the Output section, select the speaker, headset, or monitor you want as the default. Windows applies the change immediately, and the selected device is marked as the active one in the Output section.
- To check or adjust a device, select it in the Output list to open its properties page. There you can see its volume, rename it, and set it as the default. Renaming helps when you have two devices both labeled “Speakers (Realtek Audio).”
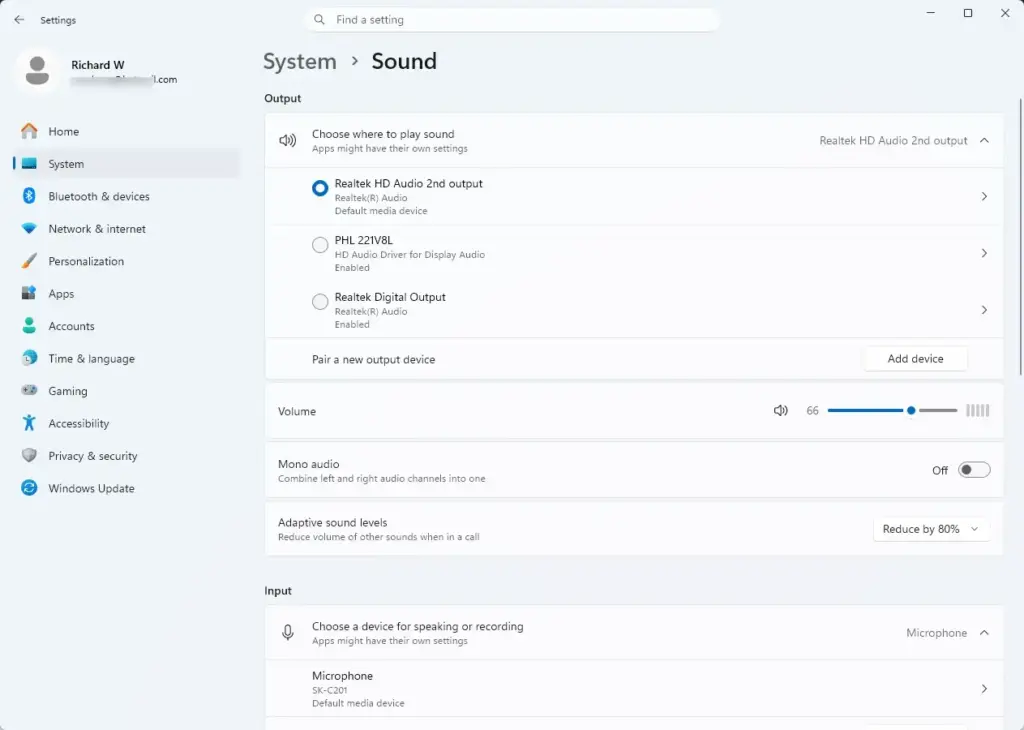
Settings › Sound › Output
The exact layout of this page differs a little between Windows 11 builds. Older builds use a single dropdown, and newer ones show a list of devices. The steps above work either way.
Set a Different Default Device for Calls and Notifications
That’s useful if you want music and video through your desk speakers but calls always going to a headset with a microphone. The Settings app doesn’t offer this option directly for most devices, so you’ll need the classic Sound control panel (mmsys.cpl).
- Open the Sound control panel . Right-click the speaker icon in the taskbar , choose Sound settings, scroll down, and click More sound settings. Or press Win+R, type
mmsys.cpl, and press Enter. The Sound window opens. - Click the Playback tab. You’ll see every playback device Windows knows about, with a green checkmark beside the current default.
- Right-click the device you want for calls and choose Set as Default Communication Device. That device now handles only calls and communication-app alerts, while your main default keeps handling everything else. A green phone icon appears next to it.
- Click OK to save the change.
To undo this, right-click the same device on the Playback tab and choose Set as Default Device, or pick a different communication device.
Set the Default Output Per App
Instead of relying on one system-wide default, you can lock a specific app’s audio to a specific device, no matter what the system default is. For example, you can keep Spotify on your good speakers while Chrome plays through a Bluetooth speaker in another room.
- Open Settings , then go to System Sound
Settings › System › Sound - Scroll down to the Advanced section and click Volume mixer. You’ll see every app that is playing sound, or has recently played sound, each with its own volume slider.
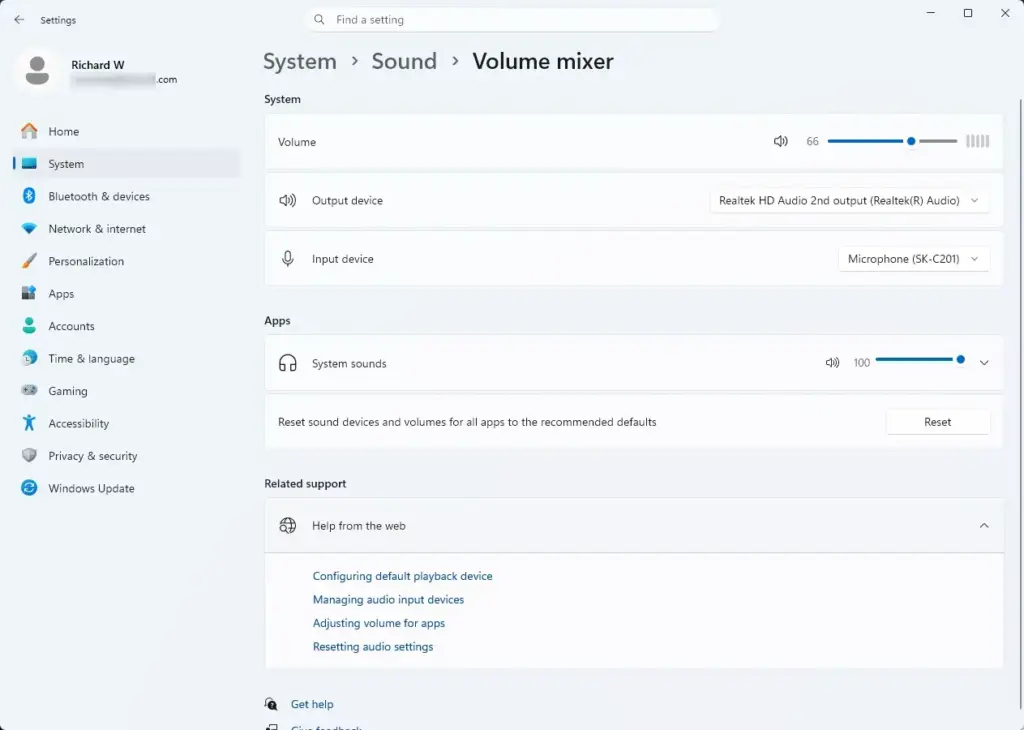
Settings › Sound › Volume mixer - Expand the app’s entry. The per-app device dropdowns live inside these expandable entries, not on the main list. The Output device dropdown shows the device that app is currently using.
- Choose a different output device from the dropdown. That app now sticks to your choice even if you change the system default later.
- If the app uses a microphone, use the input device dropdown in the same expanded entry. Volume mixer offers a per-app input device as well as an output device.
Apps only show up in the Volume mixer after they’ve made sound at least once since you signed in. If an app is missing, open it, let it make some noise, then check the mixer again. To undo a per-app choice, set that app’s dropdown back to the default option.
What to Do If a Speaker Isn’t Listed
If a plugged-in, powered-on device doesn’t appear in the Output list or on the Playback tab, it’s usually one of three things. Work through them in order.
Requirement: The driver step (step 3) needs administrator rights. If you’re signed in with a standard account, Windows will ask for an administrator’s credentials. Uninstalling a driver also requires a restart, and after the restart the Windows reinstall may need the device to be reconnected. That means unplugging and replugging a USB device, or reconnecting a Bluetooth one.
- Check for hidden or disabled devices. In the Sound control panel's Playback tab, right-click any empty space and check both Show Disabled Devices and Show Disconnected Devices. Windows hides devices it thinks you're not using, and it's often wrong. An HDMI speaker, or a Bluetooth device that's paired but hasn't connected this session, might be hidden.
- Re-enable a disabled device. If a device appears greyed out with "Disabled" underneath, right-click it and choose Enable. It should move into the active list right away.
- Check the driver in Device Manager, the Windows tool that lists all hardware on your computer. Right-click the Start button and choose Device Manager. Expand Sound, video and game controllers, right-click your audio device, and choose Update driver. If Windows reports the driver is already up to date but the device still won't appear, right-click the device again and choose Uninstall device. Then restart your computer. Windows will usually reinstall a working driver on its own during boot. If the device is still missing afterward, reconnect it.
Bluetooth speakers have their own quirk. If a speaker is paired but hasn't actively connected this session, it won't show up as a playback option at all, even with hidden devices visible. Go to Settings Bluetooth & devices and confirm the speaker shows as Connected rather than just Paired. Reconnect it if it isn't, and it should then appear as an audio output.
Switching Back or Undoing the Change
This change is safe to reverse. Setting a default output device doesn't affect drivers or system files. To revert, go back to the Output section in Settings System Sound, or use the taskbar speaker icon, and select your original device again. If you can't remember which device was the default, check the Playback tab in the Sound control panel. Windows usually leaves the previous default enabled and connected, just without the checkmark.
One thing to watch for: Windows sometimes switches your default device automatically when you plug in something new, especially USB headsets and newly connected HDMI displays. There's no dedicated toggle in Settings to stop this. If you run several devices at once and your default changes on its own, check the Output list after plugging anything in rather than assuming it held steady.
What to Do Next
If you're using a headset, check your microphone's default on the same Sound settings page, in the Input section. Sometimes the microphone setting drifts out of sync with your speaker choice. If audio still doesn't come through after switching devices, try a driver reinstall through Device Manager next, rather than adjusting Settings again. Remember that this needs administrator rights and a restart.
Frequently asked questions
How do I change the default audio output?
Open Settings and go to System Sound In the Output section, select the speaker or headset you want as your default. Windows makes it your default until you change it again or connect a new device.
What is the 83% rule for speakers?
The 83% rule for speakers refers to speaker placement: position them at ear level, angled toward the listening area, with the distance between them roughly 1.5 times the distance from each speaker to the listener for balanced stereo sound.
Can I connect multiple speakers to one output?
Yes, but only one device can be the default output at a time. You can connect multiple speakers to different ports or wirelessly, then switch which one Windows sends audio to through Settings System Sound Output. Apps can play through the current default or one you manually assign in Volume mixer.
How to set different audio outputs for different programs?
Open Settings and go to System Sound. Scroll to Advanced and select Volume mixer. Find each app in the list and click it to reveal its output device dropdown. Choose a different speaker for that app alone—it overrides the system default just for that program.
Still have a question?
Answered by AI from this guide. Good questions may be added to this page — please don't include personal details.
Did this guide fix your problem?

About the Author
Richard
Tech Writer, IT Professional
Richard is a writer at Geek Rewind who turns complex IT tasks into clear, step-by-step guides. He draws on years of hands-on experience in system administration and enterprise IT operations, focusing on Windows, Linux and WordPress: the problems people actually run into, and the fixes that work. His server and WordPress guides come from systems he runs himself. Richard builds and maintains the platform behind Geek Rewind, from its Ubuntu servers and Nginx configuration to its custom WordPress plugins. Many new tutorials start with readers' questions, and he's always glad to answer them in the comments.
No comments yet — be the first to share your thoughts!