How to Disable or Enable a Sound Device in Windows 11 Sound Settings

Disabling a sound device in Windows 11 turns it off without unplugging it or removing its driver. You can switch between speakers, headsets and microphones without touching any hardware.
The quickest way is the Sound control panel . Right-click a device, select Disable to turn it off, and enable it the same way when you need it again. It takes about 30 seconds and works for any audio device on your PC.
If Disable is greyed out or missing, or you would rather use the Settings app, Windows 11 has other routes. The control panel is still the fastest and most reliable.
To disable a sound device in Windows 11, open the Sound window (press Win+R, type mmsys.cpl and press Enter), go to the Playback or Recording tab, right-click the device and select Disable. The device greys out and drops out of app audio menus. No restart is needed, and you can re-enable it the same way.
Where to Find Sound Devices in 🪟 Windows 11
Windows 11 splits audio controls across two places. In current Windows 11, Settings System Sound lists devices under All sound devices, including disabled ones, and lets you allow or not allow each one. The older Sound control panel still lists every device Windows has seen. Either one can disable or re-enable a device. The steps below open the classic Sound window, which most of this tutorial uses.
- Open Settings . Press Win+I, or right-click the Start button and choose Settings. The Settings window opens.

Windows 11 Start menu with Settings gear icon highlighted. - Go to System Sound Click System in the left-hand list, then Sound on the right. Your current output and input devices are listed near the top.
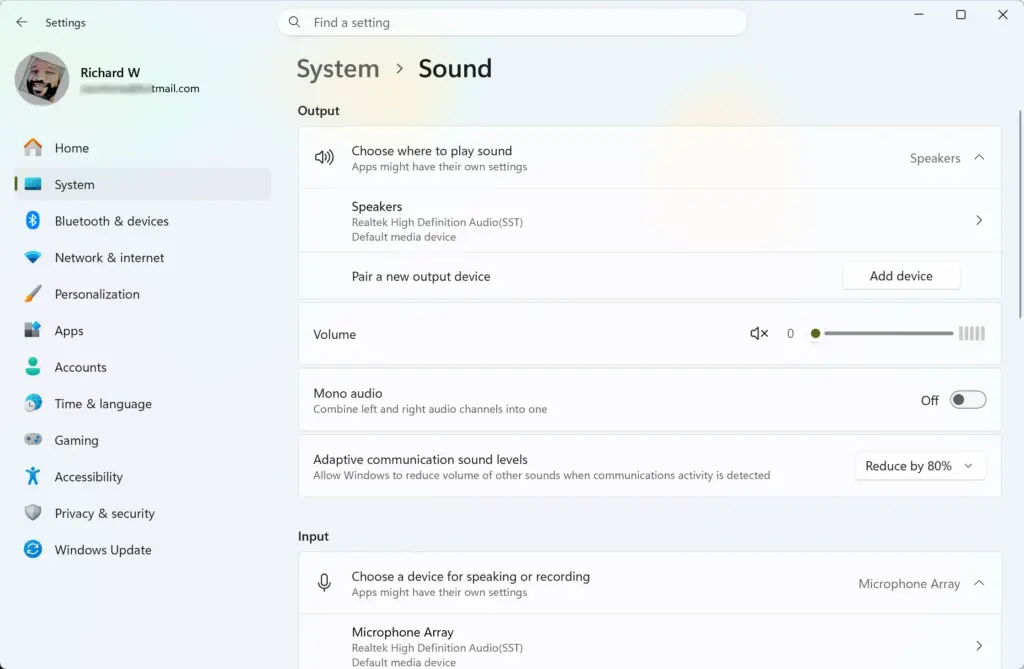
Settings › System › Sound - Open the classic Sound panel. Scroll down to the Advanced section and click More sound settings. A separate Sound window opens with three tabs: Playback, Recording and Sounds. You’ll use this window for the control panel steps below.
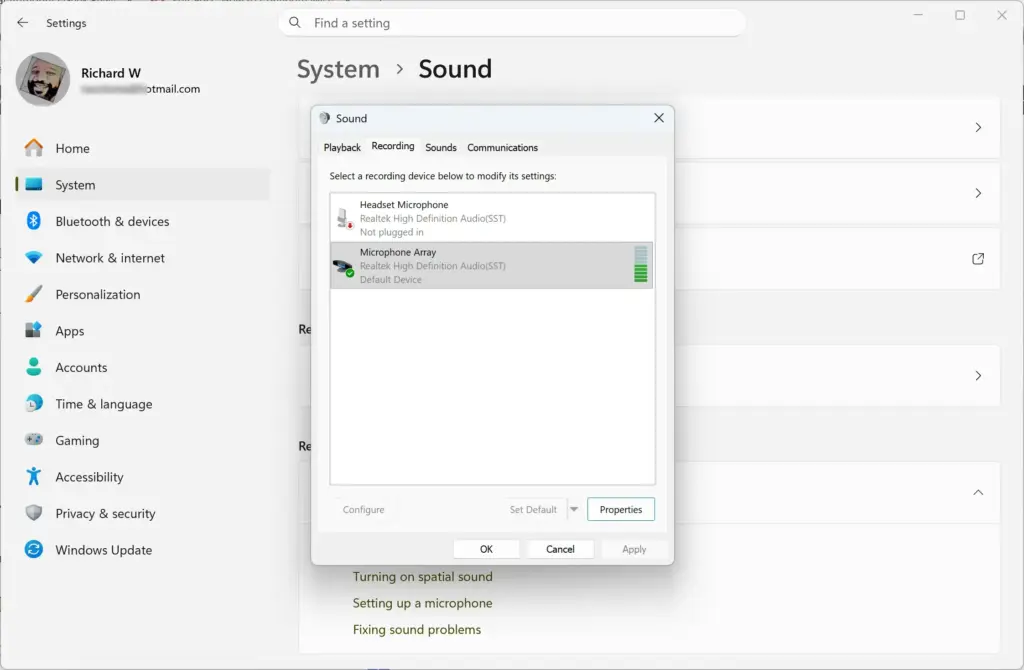
Press Win+R, type mmsys.cpl and press Enter. Or open Start , search for Change system sounds and open the result. Both take you straight to the Sound window without going through Settings.
How to Disable a Sound Device
Disabling a device hides it from every app’s audio device list (Discord, Zoom, Spotify, the volume mixer) without touching the driver. It’s the cleanest way to stop Windows from defaulting to a webcam mic or a monitor’s built-in speakers every time you plug something in.
Option 1: the Sound control panel
- Pick the right tab. In the Sound window, click Playback for speakers and headphones, or Recording for microphones.
- Right-click the device you want to turn off. A short menu appears with options like Disable, Set as Default Device and Properties.
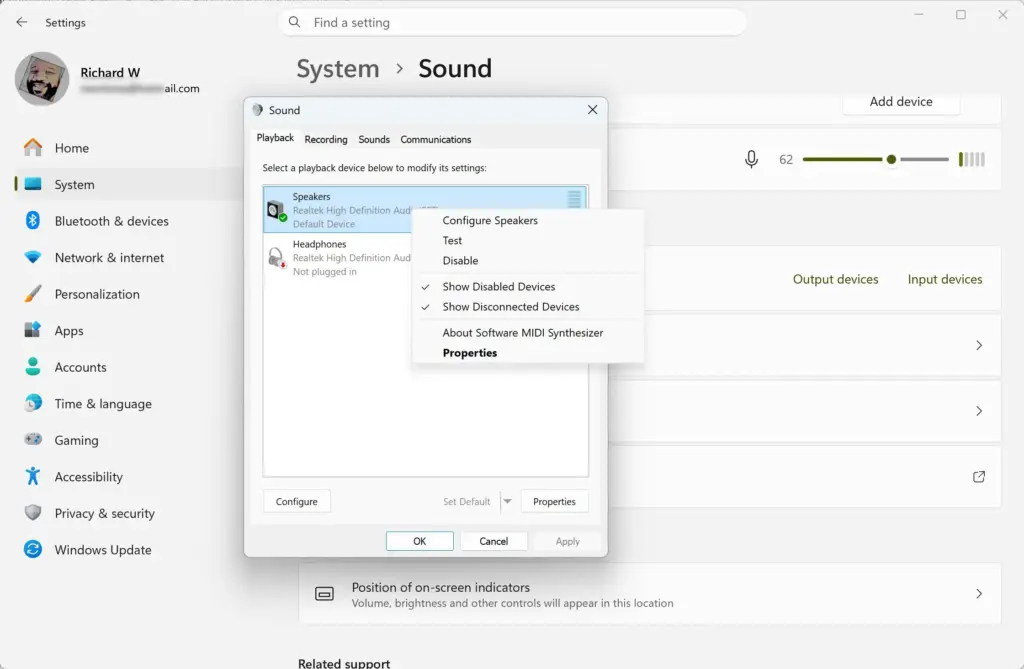
- Click Disable. The device’s icon greys out and its label shows “Disabled”. No restart is needed. The device drops out of app dropdown menus within a second or two.
If you only see Enable and no Disable, the device is already disabled. If the right-click does nothing, or the menu is empty, see the troubleshooting section below.
Option 2: the Settings app
Current Windows 11 builds have a newer method. If you don’t see these options, your build is older, so use the control panel instead.
- Open Settings System Sound Scroll down and click All sound devices. You’ll see your output devices and input devices listed.
- Select the device. Click its name in the output or input list. Its properties page opens.
- Click Don’t allow. This disables the device. Windows stops offering it to apps, the same as Disable in the control panel .
How to Enable a Sound Device You Previously Disabled
Re-enabling a device is the same process in reverse. In the control panel , disabled devices often don’t show up unless you tell Windows to display them.
Option 1: the Sound control panel
- Open the Sound window. Use the steps above (Settings System Sound More sound settings), or press Win+R and run mmsys.cpl.
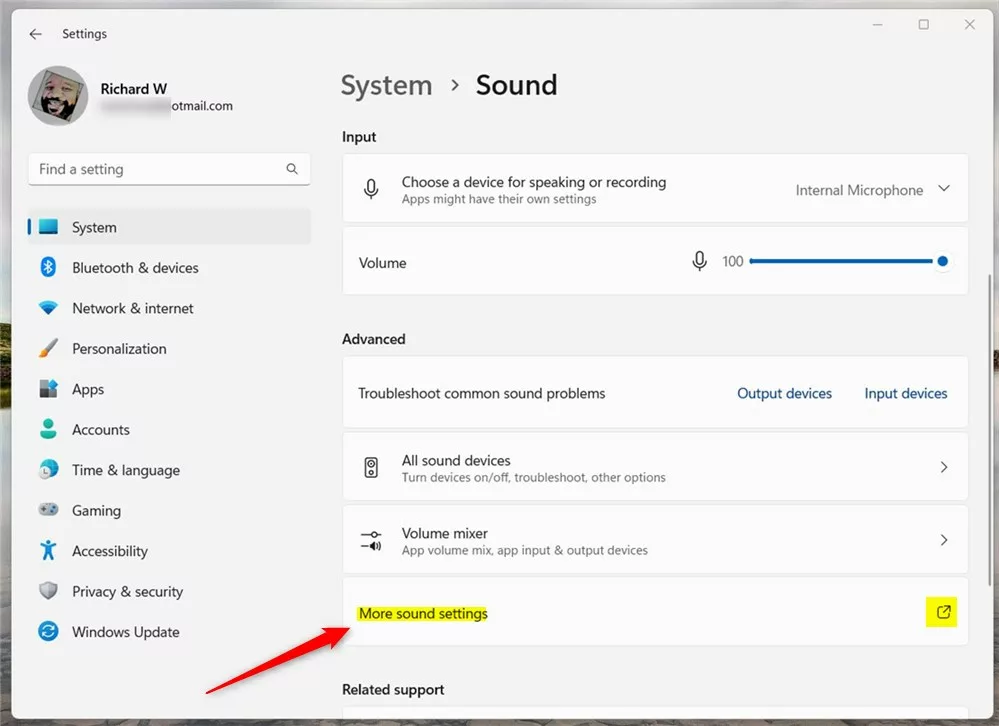
Windows More sound settings - Right-click an empty area of the Playback or Recording list. A context menu appears with two checkboxes: Show Disabled Devices and Show Disconnected Devices.
- Click Show Disabled Devices. If it already has a checkmark, skip this step. The device should already be visible, just greyed out.
- Right-click the greyed-out device and choose Enable. Its icon returns to normal colour, and it’s available again in every app’s audio menu.
If you want the device to be the default again, right-click it once more. Choose Set as Default Device for most apps, and Set as Default Communication Device for calling apps like Teams or Discord.
Option 2: the Settings app
- Open Settings System Sound and click All sound devices. Disabled devices are listed here too.
- Select the disabled device from the output or input list.
- Click Allow. The device is enabled again and returns to your apps’ device lists.
Why the Device Is Missing or the Option Is Greyed Out
A few things cause this, and they’re easy to mix up:
- The device isn’t connected. Disconnected USB headsets, unpaired Bluetooth speakers and HDMI displays that are turned off won’t appear unless you also check Show Disconnected Devices in the same right-click menu described above.
- A driver problem, not a Windows setting. If a device vanished after a driver update, or doesn’t show up even with both “Show” boxes checked, the issue is likely in Device Manager, not the Sound panel. Note that enabling or disabling the driver in Device Manager requires administrator rights. Sign in with an administrator account, or approve the UAC prompt with an admin’s credentials. Then open Device Manager, expand Sound, video and game controllers, and check whether the device has a yellow warning icon or is listed as disabled.
- It’s the only enabled playback device. Windows won’t let you disable the last enabled output device, because the system needs somewhere to send audio. If Disable is greyed out and you only have one speaker or headset listed, that’s why. Enable or connect a second device first.
- Company or school policy. On a work or school-managed PC, IT administrators can lock down audio device settings through policy. If every option in the Sound window is greyed out no matter which device you click, that’s usually the cause, and you can’t change it yourself. It’s more common on domain-joined machines running Windows 11 Pro or Enterprise than on a personal Windows 11 Home PC.
Administrator Rights: What You Actually Need
You normally don’t need an administrator account or a UAC prompt to enable or disable a sound device through the Sound control panel . It’s a per-device setting, not a system-wide change, so a standard user account can usually do it. The exception is a managed device where policy has restricted access. There, no amount of clicking will help, and you’ll need an IT administrator to lift the restriction.
The Device Manager fallback is different. Enabling or disabling the sound driver there does require administrator rights, so a standard account will be asked for admin credentials or won't be able to do it.
Undo the Change
If disabling a device causes a problem, such as an app that can't find its microphone or speakers that go silent, undoing it takes the same steps as enabling a device above. Open the Sound window, right-click the list and turn on Show Disabled Devices, find the device and click Enable. If you used Settings, go to Settings System Sound All sound devices, select the device and click Allow.
Nothing is deleted or uninstalled when you disable a device. There's no driver to reinstall and no settings to recreate. Enabling it brings back the same device, including its name and any custom level or enhancement settings.
What to Do Next
Disabling and re-enabling a device can sometimes change which one Windows treats as default.
If audio still won't play or record correctly after re-enabling, that usually points to a driver issue rather than the enable/disable setting. Check Device Manager next, and remember that changing a driver's state there needs administrator rights.
Frequently asked questions
How do I disable a sound output device in 🪟 Windows 11?
Open Settings System Sound More sound settings (or run mmsys.cpl). Select the device, right-click it, and choose Disable. The device turns off without being removed, and you can enable it again the same way whenever you need it.
How do I disable audio devices?
Open Sound control panel from Settings System Sound More sound settings (or run mmsys.cpl). Find the device in the list, right-click it, and choose Disable. You can disable speakers, headsets, microphones, and any other audio device this way. Enable them again using the same steps.
How to fix audio sound problem in 🪟 Windows 11?
Start by checking Settings System Sound to see if your device is plugged in and recognized. Restart your PC. If audio still doesn't work, open Sound control panel and make sure your device isn't disabled. Run the audio troubleshooter in Settings System Troubleshoot Other troubleshooters Audio (it opens in the Get Help app).
How to change audio device without activating Windows?
Open Sound control panel from Settings System Sound More sound settings (or run mmsys.cpl). Find the device you want to use, right-click it, and select Set as Default Device. Windows switches to that device immediately without requiring activation or a restart.
Still have a question?
Answered by AI from this guide. Good questions may be added to this page — please don't include personal details.
Did this guide fix your problem?

About the Author
Richard
Tech Writer, IT Professional
Richard is a writer at Geek Rewind who turns complex IT tasks into clear, step-by-step guides. He draws on years of hands-on experience in system administration and enterprise IT operations, focusing on Windows, Linux and WordPress: the problems people actually run into, and the fixes that work. His server and WordPress guides come from systems he runs himself. Richard builds and maintains the platform behind Geek Rewind, from its Ubuntu servers and Nginx configuration to its custom WordPress plugins. Many new tutorials start with readers' questions, and he's always glad to answer them in the comments.
No comments yet — be the first to share your thoughts!