How to Manage Audio Input Devices in Windows 11

Is Windows listening to the wrong microphone, or to none at all? This guide shows you how to choose the right one, set its volume, and control which apps can use it. Most of this happens in Settings System Sound, in the Input section. The classic Sound dialog, opened with More sound settings, handles the rest.
This guide covers choosing a default microphone, testing and adjusting it, assigning a different microphone to one app, and blocking apps from the microphone. It also covers disabling devices you don’t use and fixing the problems that stop a microphone from appearing or working. The steps are the same on Windows 11 Home and Pro. Screen layouts differ slightly between builds, and the guide notes where.
To manage audio input devices in Windows 11, open Settings System Sound and choose your microphone under Input. Then select it as the default, set the Input volume slider, and use Start test to confirm the level bar responds. Control which apps can use it under Settings Privacy & security Microphone.
Before you start
Connect the microphone first. For a USB microphone or headset, plug it into the PC and wait a few seconds for Windows to install the driver. For a Bluetooth headset, pair it in Settings Bluetooth & devices Devices before you open the sound settings.
A microphone built into a laptop, webcam or monitor shows up as its own input device, so the Input list can hold several entries at once. That is normal. The sections below show how to pick the right one and switch off the rest.
Manage audio input devices in 🪟 Windows 11: step by step
These steps cover managing audio input devices from start to finish: finding the device, selecting it, setting its volume, testing it, and confirming apps are allowed to use it.
- Open Settings. Press Win+I, or right-click the Start button and choose Settings.
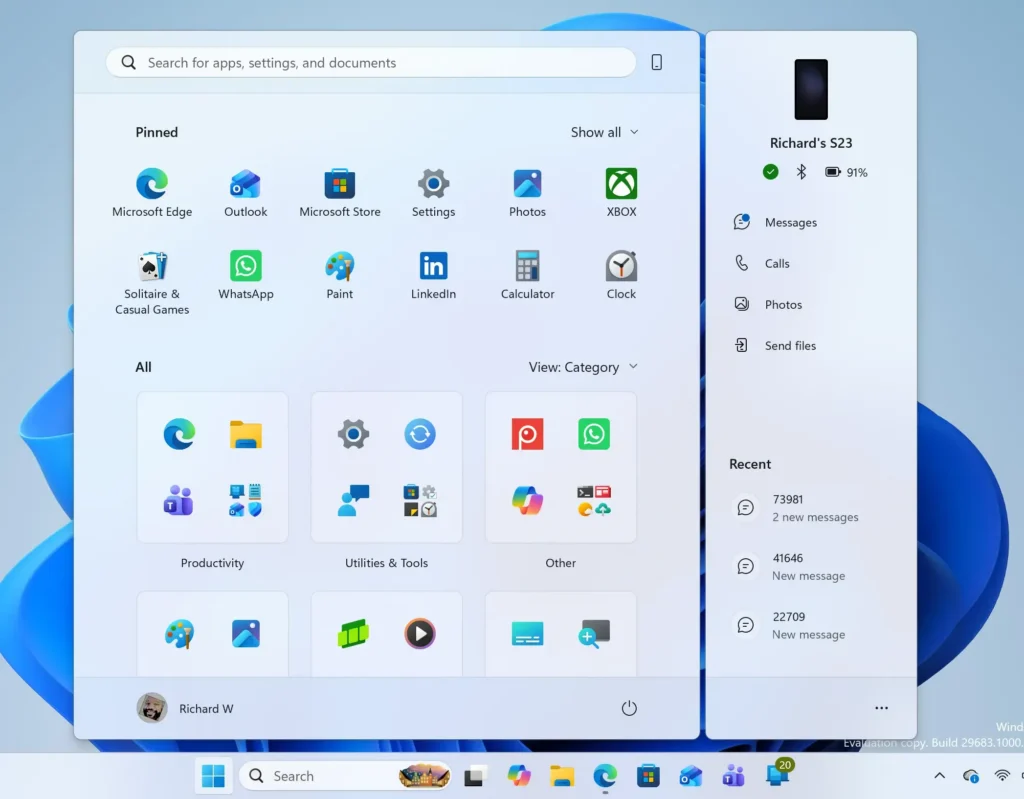
Windows 11 Start menu search panel for opening OpenSSH Client settings - Select System in the left pane, then click Sound. The Sound page opens with output devices at the top and an Input section below them.
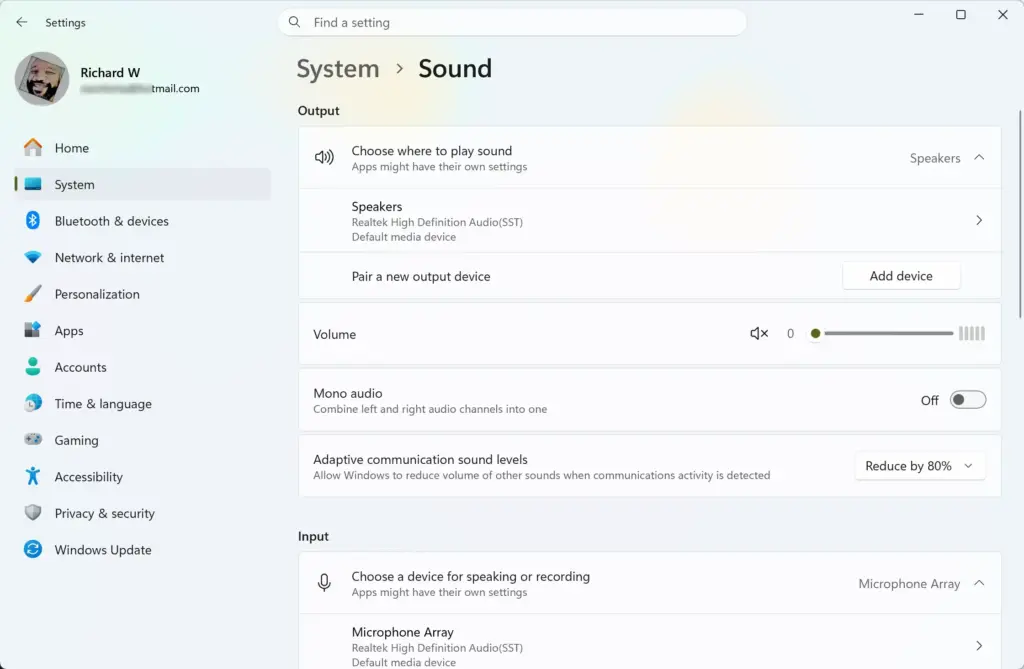
Settings › System › Sound - Find the Input section. Under Choose a device for speaking or recording, Windows lists every microphone and other input device it detects. The device currently in use has its radio button filled in.
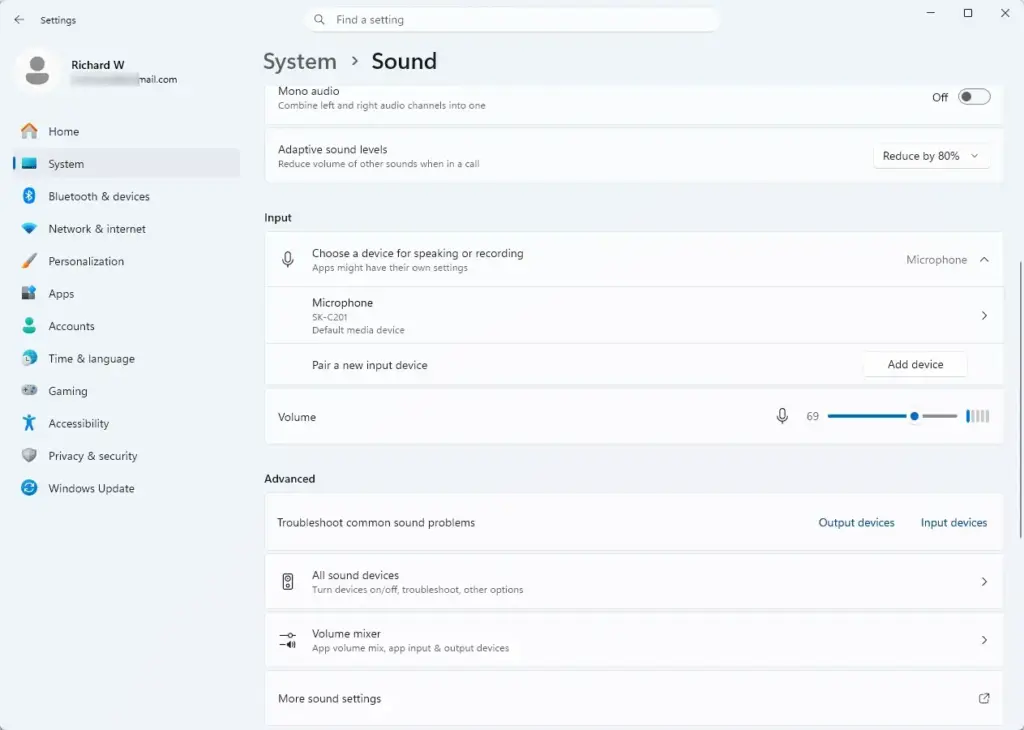
Settings › Sound › Input - Click your microphone in the list. This opens the properties page for that device. On older Windows 11 builds, the same controls appear on the Sound page itself, under Properties.
- Set it as the default. If the device is not already in use, select the option to make it the default sound device. On some builds this is a radio button in the list rather than a button on the properties page. Windows now sends all microphone input to this device unless an app is set to use another one.
- Drag the Input volume slider. Set it so the level is comfortable but does not clip. Clipping means the sound distorts because the signal is too loud. A starting point around 70 to 80 usually leaves headroom.
- Click Start test under Test your microphone, then speak normally. A level bar moves as Windows hears you. Click Stop test when you finish. Windows reports the result as a percentage of the peak volume it heard.
- Check Audio enhancements on the same page if your voice sounds processed or clipped. Switch the setting off to hear the raw microphone signal. The audio enhancements guide explains what each option does and how to turn them off.
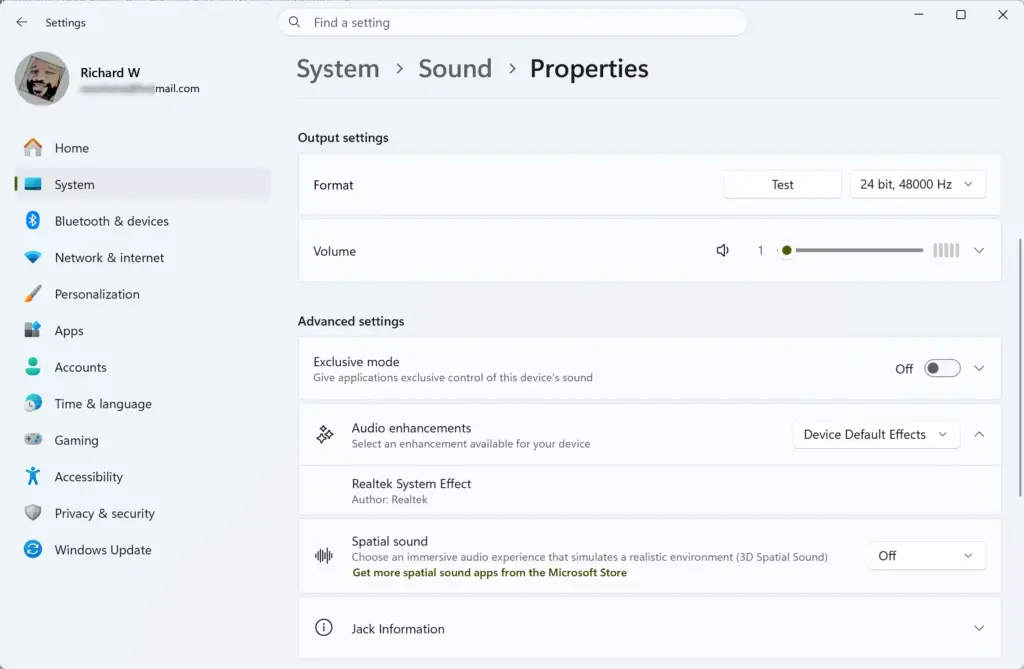
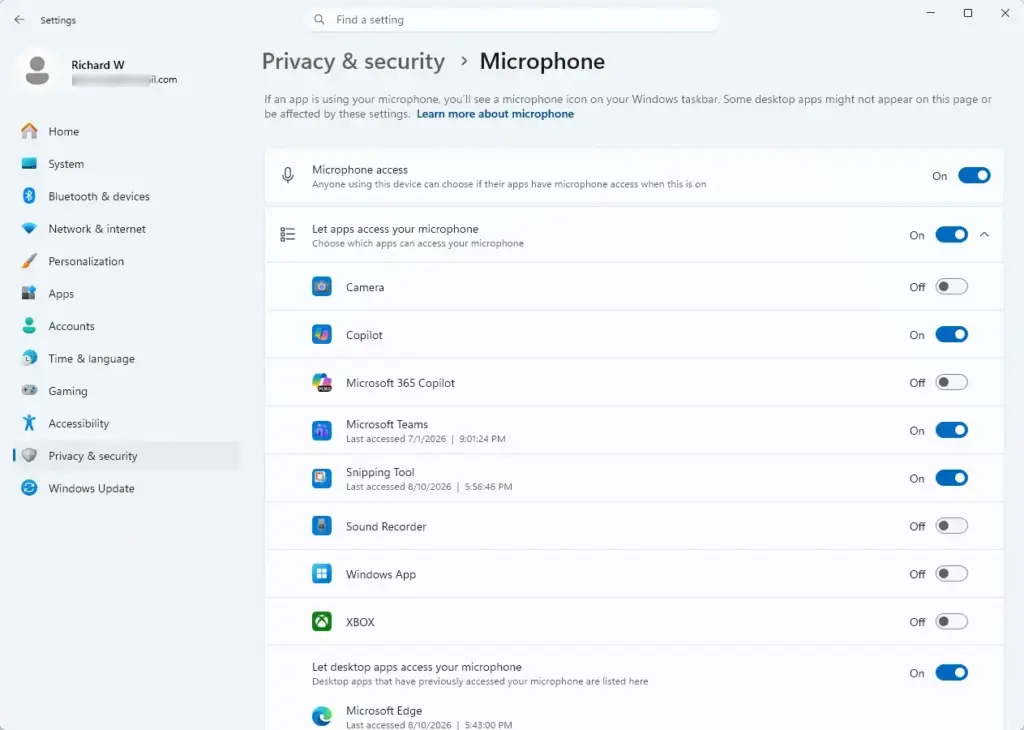
Settings > System > Sound - Open Privacy & security. Go to Settings Privacy & security Microphone and confirm that Microphone access is on. Apps cannot hear any microphone while it is off.
Settings › Privacy & security › Microphone - Test in the app you use. Open Teams, Zoom, OBS or a recording app and speak. Most apps have their own microphone picker, and it may still point to a different device.
If the level bar does not move in step 7, the device is muted, not connected, or blocked. Jump to the troubleshooting section below.
Set the default input device in the classic Sound dialog
Windows 11 still includes the classic Sound dialog, and it offers more options than the Settings page, including a separate default for calls and a switch for exclusive control.
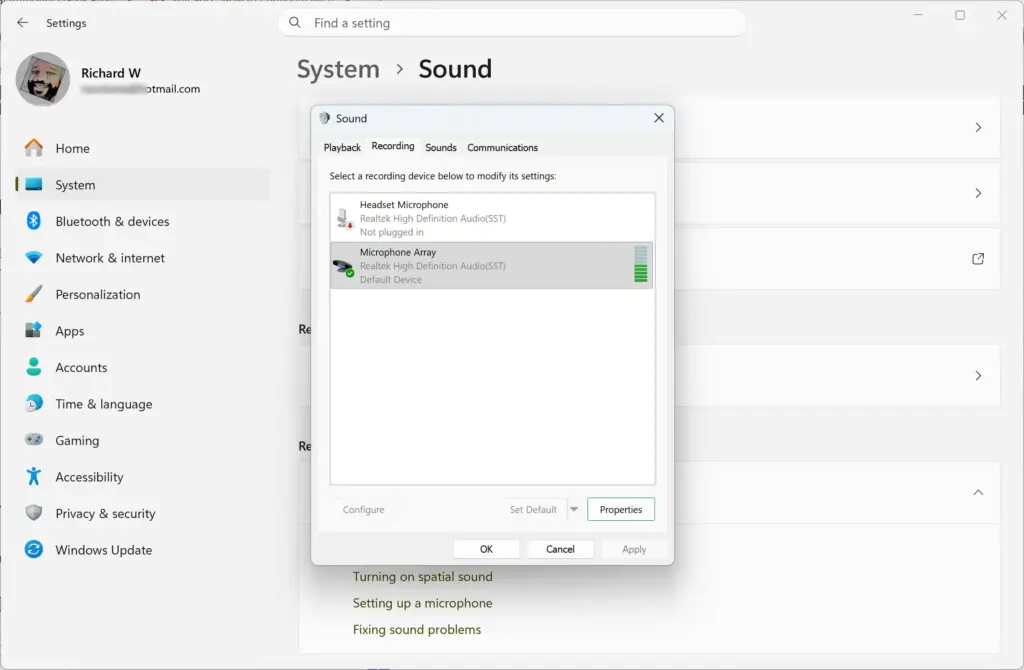
Open the Recording tab
Open the Recording tab when Settings does not show the control you need. To get there, open the classic Sound dialog and select the Recording tab.
- Open Settings. Press Win+I.
- Go to System Sound. Select System, then Sound.
- Scroll to Advanced at the bottom of the page and expand it if it is collapsed.
- Click More sound settings. The classic Sound dialog opens. You can also press Win+R, type mmsys.cpl and press Enter.
Settings > System > Sound 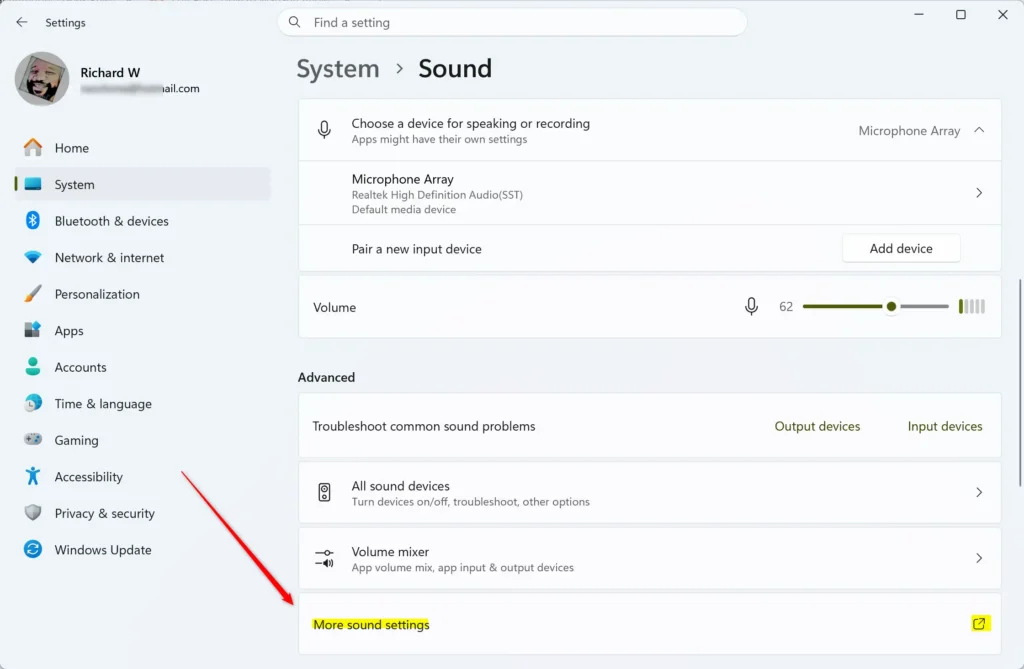
Settings > System > Sound - Select the Recording tab. It lists your input devices. A green check mark marks the default device. A green phone icon marks the default communications device.
Settings > System > Sound - Right-click your microphone and choose Set as Default Device. Choose Set as Default Communication Device if you want calls to use a different microphone than everything else.
Some apps, including many calling apps, use a separate default for calls, called the default communications device. If a call uses the wrong microphone, check that setting first.
Adjust levels and exclusive mode
Double-click the microphone on the Recording tab to open its Properties. The Levels tab holds the main volume slider and, on some devices, a boost control. Boost makes a quiet microphone louder. Gain is the amount of amplification it adds, and it also raises background noise, so raise it in small steps.
It also has the checkbox Allow applications to take exclusive control of this device. With that box ticked, one app can lock the microphone and block every other app from using it. If a recording app and a call app fight over the same microphone, clear the checkbox.
Click Apply after each change, then OK to close the dialog.
Use a different microphone for one app
Windows lets you assign an input device to a single app, which is useful when your call app should use a headset while your recording software uses a studio microphone. The setting is in the Volume mixer.
- Open Settings System Sound. Scroll down to the Advanced section.
- Click Volume mixer. The page lists apps that are currently open and using audio.
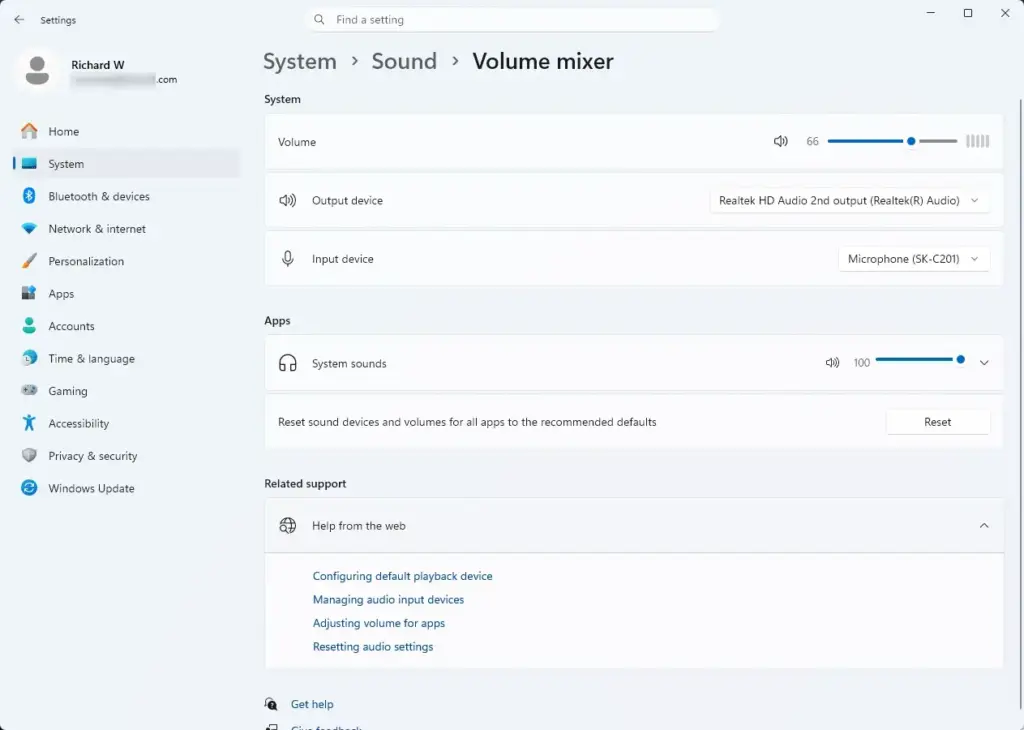
Settings › Sound › Volume mixer - Expand the app you want to change by clicking its arrow.
- Open the Input device list for that app and choose your microphone. The app now uses that device instead of the system default.
An app must be running before it appears in the list. If it is missing, start the app, let it play or record a sound, and reopen the Volume mixer. For the full walkthrough, including how to undo the assignment, read the guide on changing default audio devices per application.
Control which apps can use your microphone
Windows blocks microphone access at three levels: for the whole PC, for Microsoft Store apps, and for desktop apps. A block at any level silences the apps it covers, even when the device itself works. Check this first if your microphone shows a level in the test but one app hears nothing.
- Open Settings. Press Win+I.
- Select Privacy & security in the left pane.
- Click Microphone under App permissions. The page shows the master switch and a list of apps.
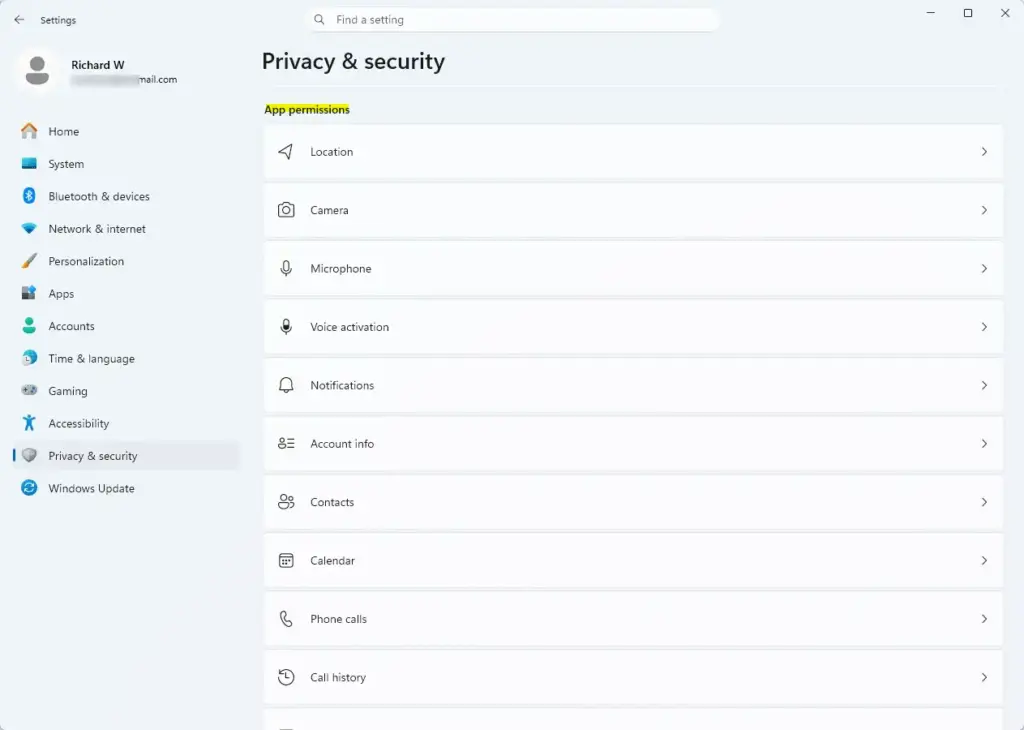
Settings › Privacy & security › App permissions - Turn on Microphone access. This is the master switch for the whole PC.
- Turn on Let apps access your microphone. Below it, switch individual apps on or off in the list.
- Turn on Let desktop apps access your microphone. Classic programs such as Zoom, Discord and OBS follow this switch, and they do not appear in the per-app list.
If a switch is greyed out and shows the message Some settings are managed by your organization, a work or school policy controls it. Only your IT administrator can change that setting. On a personal PC, a greyed-out switch can also come from a leftover setting from a privacy tool that locked the switch.
Disable or enable an input device
Disabling a microphone you never use stops it from appearing in app pickers and from becoming the default after an update or a Bluetooth reconnect. Disabling a device does not uninstall it, and you can turn it back on at any time. This change may ask for administrator approval.
- Open Settings System Sound. Scroll to Advanced.
- Click All sound devices. The page lists input and output devices, including any you have already disabled.
- Click the microphone you want to turn off.
- Click Don’t allow. The device moves to the disabled list.
To turn it back on, go back to All sound devices, select the device, and click Allow, which re-enables it. The guide to disabling and enabling sound devices covers the same method with screenshots. If your build has no All sound devices page, use the Recording tab: right-click the device in the classic Sound dialog and choose Disable.
Rename an input device
Two microphones both called “Microphone” are hard to tell apart. Renaming them in Windows makes the right one obvious in every picker. The steps are in how to rename audio devices on Windows 11. The new name applies to the device on that PC only.
Fix common problems with audio input devices
Start with the quick checks: look for a hardware mute switch on the headset or microphone, make sure the cable is seated, and try a different USB port. Then work through the specific cases below.
The microphone does not appear in the list
Windows hides disabled and disconnected devices by default. Show them, then check the driver (the software that lets Windows control the hardware).
- Open the Sound dialog. Press Win+R, type mmsys.cpl and press Enter.
- Select the Recording tab.
- Right-click an empty area of the device list.
- Tick Show Disabled Devices and Show Disconnected Devices. Any hidden microphone now appears greyed out.
- Right-click the device and choose Enable if it is disabled.
If the microphone is still missing, open Device Manager (right-click Start and choose Device Manager) and expand Audio inputs and outputs. A yellow warning icon means the driver has a problem. Right-click the device and choose Update driver. Driver changes need administrator approval, and a restart may follow.
The microphone is too quiet, too loud or noisy
Raise or lower Input volume in Settings first. If the sound is still poor, open the microphone’s Properties in the classic Sound dialog and adjust Levels. Then turn off Audio enhancements and test again, since some effects add noise or cut off quiet speech. Moving the microphone closer to your mouth often helps more than any slider.
Bluetooth headsets add another quirk. When the headset microphone is active, many headsets switch to a lower-quality call mode, and playback sounds thinner. This is how Bluetooth audio works, not a fault in Windows. A Bluetooth profile is the set of rules that decides how the headset sends and receives sound. For clearer sound, use a separate microphone for recording.
Another app has taken control of the microphone
If one app records fine and another hears silence, an app with exclusive control may be holding the device. Open the microphone’s Properties from the Recording tab, select Advanced, and clear Allow applications to take exclusive control of this device. Close and reopen the affected apps afterwards.
A USB microphone or headset shows Code 10 or stops working after an update
Microsoft lists a known issue on Windows 11 version 24H2 and 25H2 (feature updates released in 2024 and 2025). After the September 8, 2026 security update (KB5124008), some USB Audio Class 1.0 devices might show “This device cannot start (Code 10)” in Device Manager. Some might also produce no audio or have unresponsive volume and sound settings. Many USB headsets use that standard (USB Audio Class 1.0), but check your device’s documentation to confirm yours does.
KB5129195, released September 14, 2026, is an out-of-band update (released outside the normal monthly schedule). It fixes the 8-channel and 3D audio problems. Microsoft says it is still working on the other symptoms. Some users restored audio by switching the device to 2-channel mode. You can try this in the device’s Properties in the classic Sound dialog, under the Advanced tab and Default Format, if your device offers a 2-channel format.
If your device matches this description, install pending updates in Settings Windows Update before changing anything else. The no audio troubleshooting guide covers the output side of the same problem.
Reset the audio settings
If this didn’t work
Work through the eight fixes in Windows 11 Microphone Not Working? 8 Ways to Fix Audio Input Issues. These cover drivers, services and privacy settings in more depth. Windows can change your default device after a feature update, a driver reinstall or a new Bluetooth connection, so recheck Input in Settings System Sound if the wrong microphone returns.
Have a question about this guide?
Answered by AI from this guide. Good questions may be added to this page — please don't include personal details.
Did this guide fix your problem?

About the Author
Richard
Tech Writer, IT Professional
Richard is a writer at Geek Rewind who turns complex IT tasks into clear, step-by-step guides. He draws on years of hands-on experience in system administration and enterprise IT operations, focusing on Windows, Linux and WordPress: the problems people actually run into, and the fixes that work. His server and WordPress guides come from systems he runs himself. Richard builds and maintains the platform behind Geek Rewind, from its Ubuntu servers and Nginx configuration to its custom WordPress plugins. Many new tutorials start with readers' questions, and he's always glad to answer them in the comments.
No comments yet — be the first to share your thoughts!