How to Reset Audio Settings in Windows 11

Resetting audio settings in Windows 11 clears out bad configurations and sound bugs that cause static, missing speakers, or a microphone that stopped working. It puts your sound setup back to its defaults, and you do it entirely from the Settings app and one classic Sound window.
The whole process takes a couple of minutes and needs no extra tools. You will work through the app volume reset first, then the device-level reset, and only move on to drivers if the problem is still there.
Reset audio settings in Windows 11 by opening Settings, navigating to System Sound, and using the Volume mixer to click Reset. For more advanced options, go to More sound settings, select your audio device, and click Restore Defaults in its Properties.
Why Reset Audio Settings?
A reset puts your audio back to the default setup. That helps when a persistent problem comes from a changed configuration, such as a forced sample rate, a disabled enhancement, or an app stuck at zero volume. It does not fix a failed driver or a broken cable. Those are covered at the end.
Before you start, check the basics. Make sure the correct output device is selected in the volume flyout, the cable is plugged in, and the device is not muted. Then work through the steps below.
How to Reset Audio Settings in 🪟 Windows 11
Step 1Open the Settings App
- Open the Start menu and select Settings. You can also press Win+I on the keyboard.
- Check that the Settings window opens with a list of categories on the left.
Step 2Go to Sound Settings
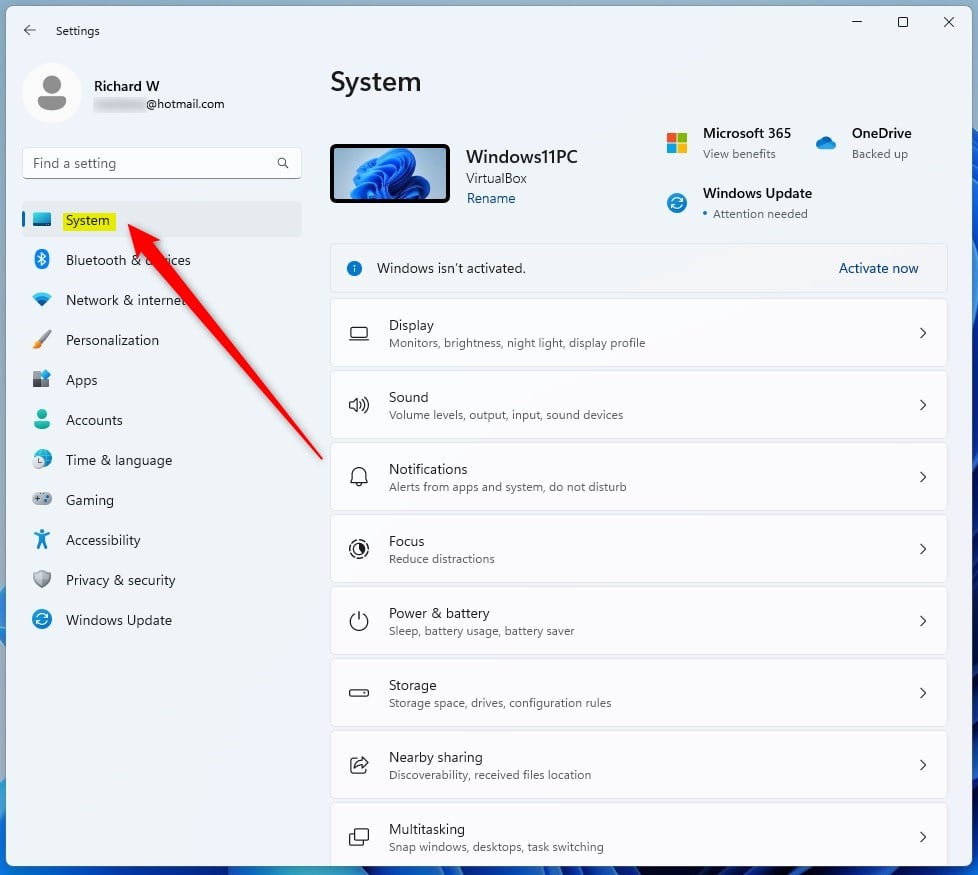
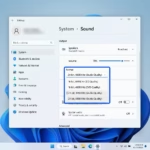
- Select System in the left menu.
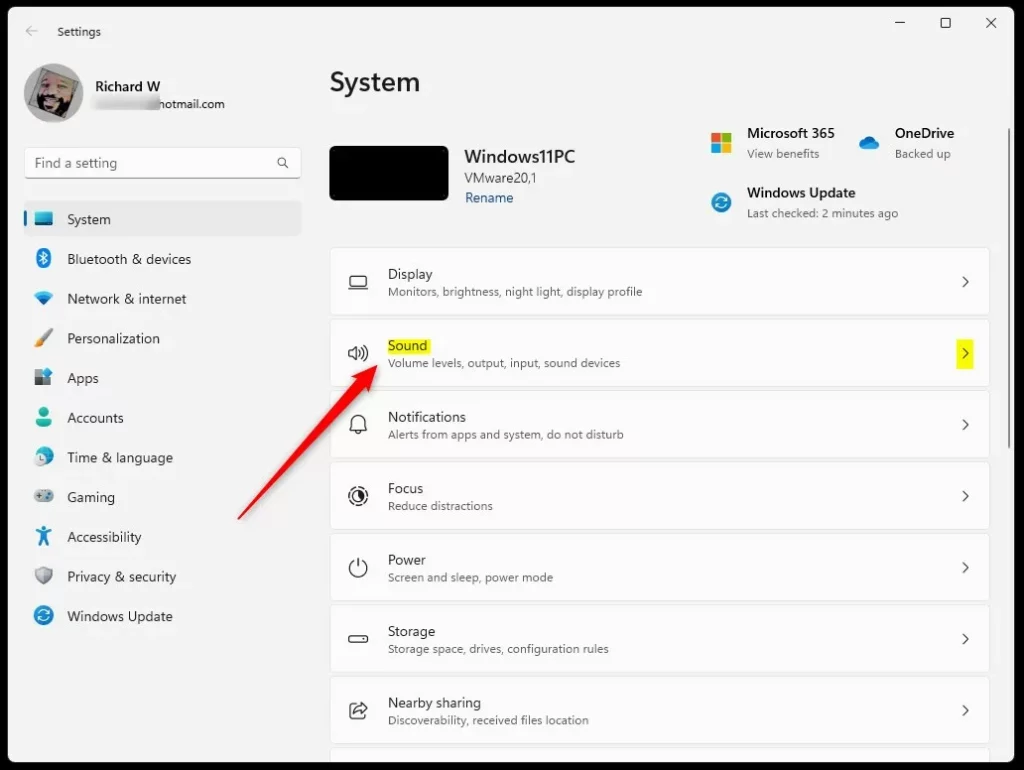
- Click Sound on the right side.
- You should now see your output and input devices, with volume sliders for each. This is the page you will return to later.
Step 3Open Volume Mixer
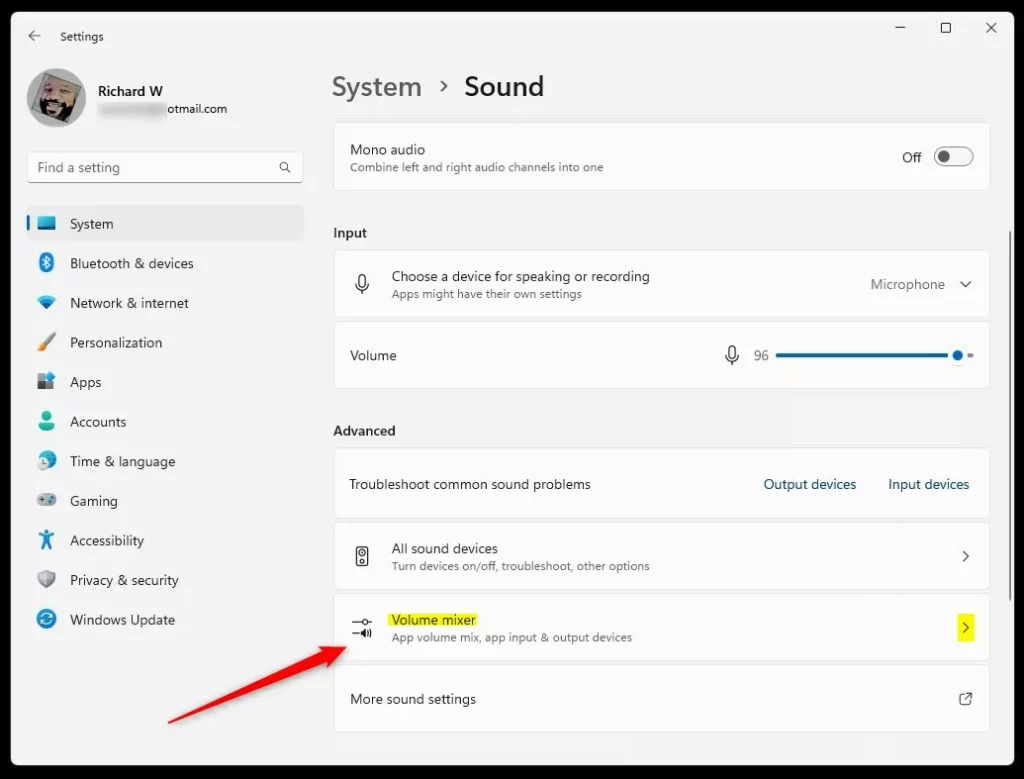
- Scroll down to the Advanced section.
- Select Volume mixer.
- The page that opens lists the apps currently making sound, each with its own volume slider.
If an app sits at zero here, it will stay silent no matter how high the main volume is. That is a common cause of “no sound in one program” problems.
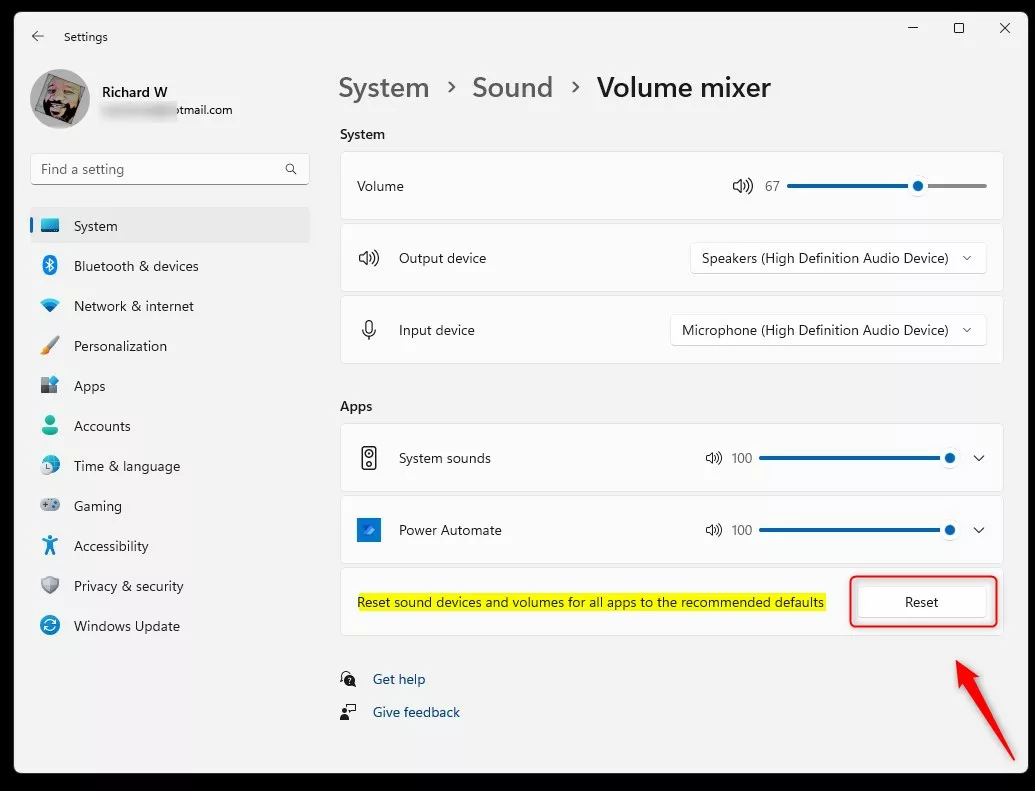
Step 4Reset Volume Mixer
- Click the Reset button on this page. It returns all application sound levels to their default settings.
- Play something in the app that had the problem and check that you can hear it.
The label and position of this button can differ between Windows 11 builds. If you cannot find it on the Volume mixer page, look at the bottom of the page or in the app volume section of the main Sound page. Make sure Windows is fully updated. There is no undo for this reset, so you will need to set any custom per-app volumes again.
Step 5Reset Advanced Audio Settings
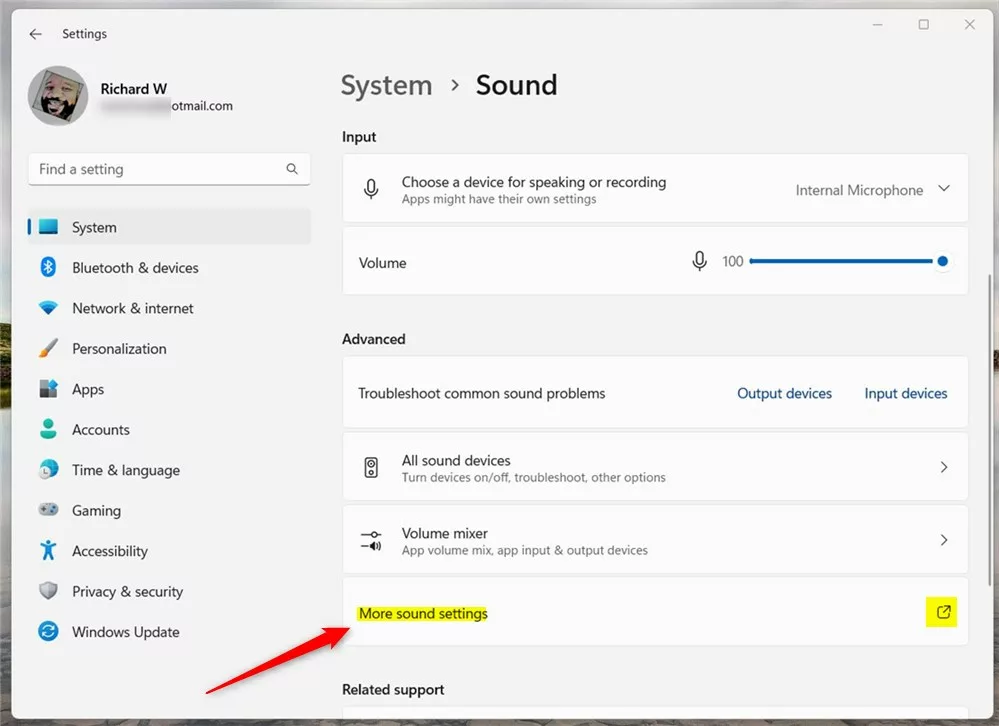
- Go back to System Sound
- In the Advanced section, find More sound settings and open it.
- The classic Sound window appears with tabs such as Playback and Recording.
Step 6Open Speakers Properties
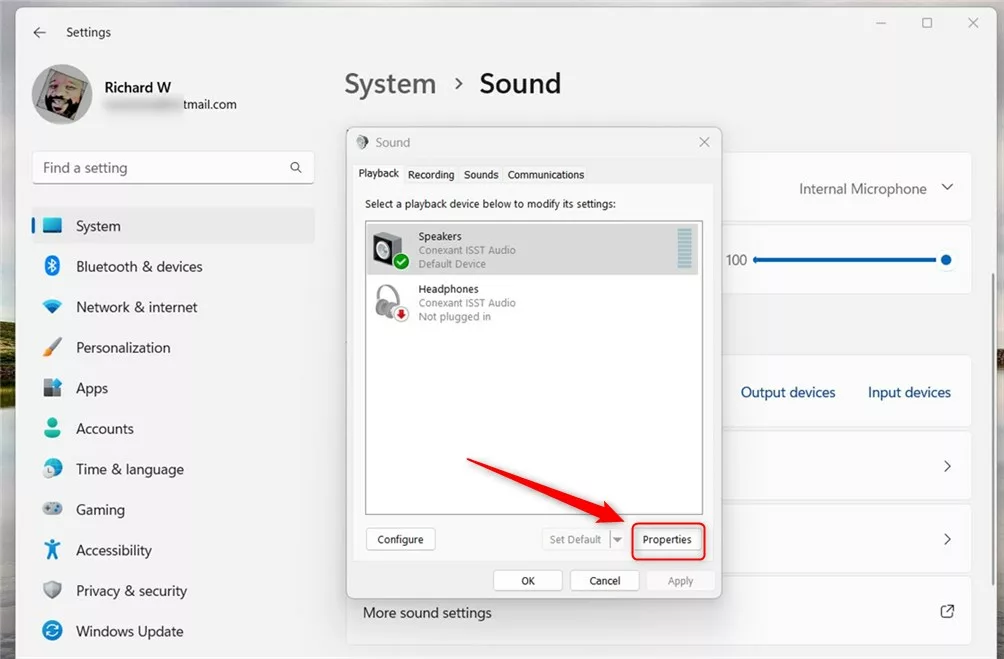
- On the Playback tab, choose Speakers in the list on the left side of the new window.
- Click Properties.
- The Speakers Properties window opens.
If your device is headphones or a USB or HDMI output, pick that device instead. For a microphone, use the Recording tab and select the microphone. If a device is missing from the list, right-click an empty area and tick the option to show disabled devices.
Step 7Restore Defaults
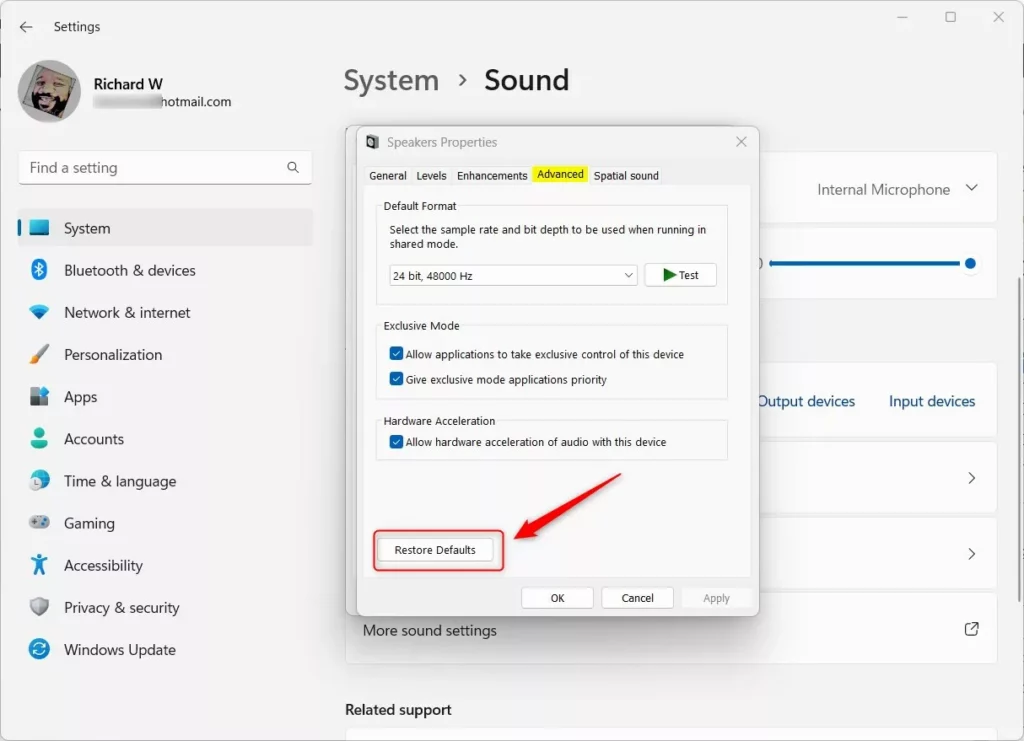
- Open the Advanced tab inside the Speakers Properties window.
- Click Restore Defaults. This clears custom audio device configurations, such as a changed default format or exclusive mode settings.
- Click Apply, then OK, and test your sound again.
The tabs shown depend on your audio driver. Some drivers add their own tabs, or hide Advanced options. If you do not see Restore Defaults, your driver does not offer it, and you can move on to the driver step. A restart is not normally needed, but restart the PC if the sound still sounds wrong after applying.
Step 8Update Sound Drivers (Optional)
If the sound still fails after both resets, the audio driver is the next suspect. Refreshing or reinstalling the driver package resolves many stubborn hardware conflicts, especially after a major Windows update. Restart the PC once the driver is reinstalled so Windows can load it cleanly. Learn how to update device drivers in Windows 11
Summary
Reset audio settings in Windows 11 to fix common sound problems like low volume, crackling noises, or missing devices. Use the Settings app to restore the default sound configuration for your speakers and headphones in a few clicks. If a quick reset does not fix the issue, update or reinstall your audio drivers.
- Resetting your audio settings can fix many sound problems on your Windows 11 PC.
- You can reset app volume levels and sound device settings using the Settings app and the classic Sound window.
- Updating or reinstalling your audio drivers can help if resetting settings doesn't fix the problem.
- If you have questions or tips, feel free to leave a comment below!
- Good luck, and enjoy your sound working properly again!
Was this guide helpful?
100% of readers found this helpful (2 votes)

About the Author
Richard
Tech Writer, IT Professional
Richard is a writer at Geek Rewind who turns complex IT tasks into clear, step-by-step guides. He draws on years of hands-on experience in system administration and enterprise IT operations, focusing on Windows, Linux and WordPress: the problems people actually run into, and the fixes that work. His server and WordPress guides come from systems he runs himself. Richard builds and maintains the platform behind Geek Rewind, from its Ubuntu servers and Nginx configuration to its custom WordPress plugins. Many new tutorials start with readers' questions, and he's always glad to answer them in the comments.

No comments yet — be the first to share your thoughts!