How to Reset Audio Enhancements in Windows 11 Sound Properties

Resetting audio enhancements in Windows 11 sound properties clears out custom audio tweaks and forces your PC to reload sound hardware from scratch. It returns volume levels, default playback selections and spatial sound configurations to their defaults when sound devices stop working or drivers glitch.
Sound properties control how your computer plays audio through speakers and headphones. Restoring these settings fixes distorted sound or missing audio options without deleting your physical sound drivers.
Before you change anything, try the built-in fix. Go to Settings System Sound and, under Advanced, select Troubleshoot common sound problems. In current Windows 11 builds this opens the Get Help app and walks you through checks for your output and input devices. It costs nothing, changes little, and often solves the problem. If it doesn’t, work through the sections below from the least to the most disruptive.
Open Settings System Sound Volume mixer, scroll to the bottom, and select Reset sound devices and volumes for all apps to the recommended defaults, then click Reset. This restores every app’s volume level and output device to its default, and fixes apps that play through the wrong speakers or stay silent. Your sound drivers stay installed.
Using the Volume Mixer Reset Options
Resetting per-app settings in the Volume Mixer fixes audio routing conflicts, where an app plays sound through the wrong speakers or stays silent. You can restore default sound levels and output paths for every app at once from the quick settings menu on your taskbar .
- Right-click the speaker icon in the taskbar notification area .
- Select Open Volume Mixer from the pop-up menu. The Settings app opens at Settings System Sound Volume mixer
- Scroll to the bottom of the page and find Reset sound devices and volumes for all apps to the recommended defaults.
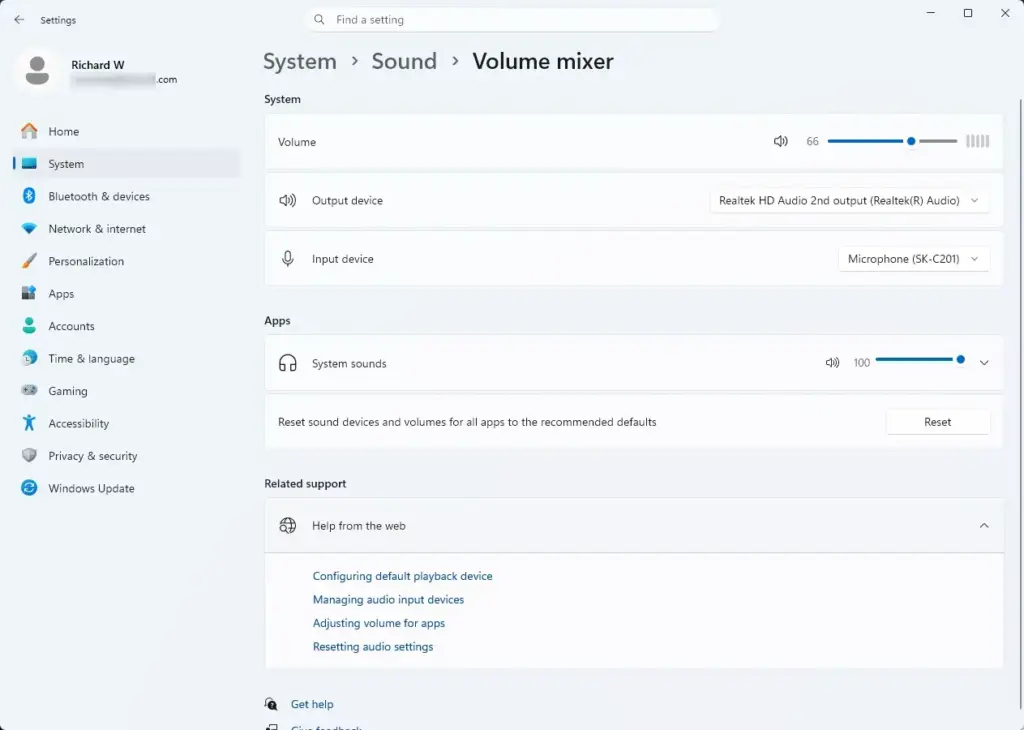
Settings › Sound › Volume mixer - Click the Reset button. Every app’s volume level and output device returns to its default value.
Apps you have open may need to be closed and reopened before they pick up the default output. There is no undo for this reset, so if you had custom levels for particular apps, you will need to set them again.
Resetting Audio Devices via Sound Settings
Refreshing a device’s configuration helps when your default output changes unexpectedly or your microphone won’t pick up sound. You do this from the main Settings app by switching the device off and on again, which makes Windows reload it.
- Open Settings by pressing the Windows key and the I key together.

Windows 11 Start menu with Settings gear icon highlighted. - Click System in the left-hand menu.
- Click Sound to view your playback and recording options.
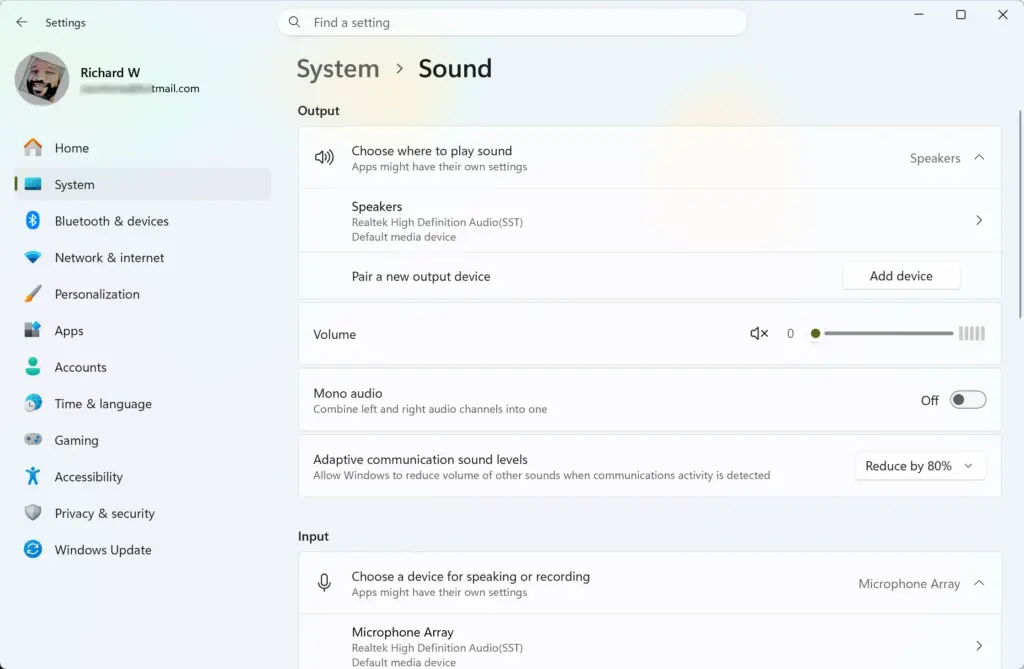
Settings › System › Sound - Scroll down and click All sound devices to see a complete list of connected hardware.
- Select the playback or recording device that is causing problems. Its properties page opens.
- Under Audio, click Don't allow to disable the device. The device moves to the disabled list. Then click Allow to re-enable it and force Windows to reload its configuration.
While you are on the properties page of an output device, check the Audio enhancements dropdown. It has two choices: Off and Device default effects. Set it to Off to test whether an enhancement is causing crackling, echo or muffled sound. Set it to Device default effects to go back to what the driver ships with. If the dropdown is missing or greyed out, the driver doesn't expose enhancements for that device, which is common with generic drivers and some USB and Bluetooth devices.
Restoring Sound Services in Task Manager
Restarting background audio services clears temporary software glitches without a full reboot. You can force stuck sound services to start fresh while keeping your open work.
- Open Task Manager by pressing the Ctrl, Shift and Esc keys together.
- Click Services in the left sidebar. If you don't see a Services page, or the Restart option is missing, open the Services console instead by typing services.msc in the Run dialog.
- Scroll down to find the audio services, starting with Audiosrv (Windows Audio).
- Right-click Audiosrv and select Restart. Sound may cut out for a second or two while the service restarts.
- Find AudioEndpointBuilder in the same list, right-click it and select Restart. Windows may ask to restart dependent services, including Windows Audio. Confirm if so.
Clearing and Reinstalling Audio Drivers
Uninstalling a corrupted or outdated driver forces Windows to detect your sound hardware and install a fresh copy. This clears out broken device software and fixes persistent audio failure.
This step requires administrator privileges.
A restart is required after you remove the driver. Windows normally reinstalls an audio driver on its own during that restart. If it doesn't, open Device Manager, select the Action menu and choose Scan for hardware changes. If that doesn't bring the device back, install the audio driver from your PC or motherboard maker's support page.
Before you continue, download the audio driver for your model from the PC or motherboard manufacturer's website and keep it on the machine or on a USB drive. You can also create a restore point first, so you can roll back if something goes wrong.
- Right-click the Start button and select Device Manager.
- Click the arrow next to Sound, video and game controllers to expand the list of audio hardware.
- Right-click your primary audio device, such as Realtek Audio or Intel High Definition Audio, and select Uninstall device. A confirmation dialog opens.
- Check the box Attempt to remove the driver for this device if the option appears.
- Click Uninstall to confirm. The device disappears from the list.
- Restart your computer right away so Windows can reinstall a clean driver instance.
Troubleshooting Realtek Audio Control Panels
Resetting manufacturer-specific layers ensures that third-party enhancements are no longer silently blocking your audio output.
Open your pre-installed Realtek control application from the Start menu, go to the device's advanced settings or global options, and look for a factory reset or restore defaults button. The name and location of this button depend on the manufacturer's software, so it may look different on your PC. If you can't find the app, it may not be installed, and you can skip this section.
Verifying Default Communication and Spatial Sound Settings
Reset the legacy communication rules when your games or media suddenly drop in volume whenever your microphone activates. You can stop the automatic volume reduction in the classic Sound control panel, and restore the default audio format from the same place.
This step requires administrator privileges.
- Press the Windows key and the R key together to open the Run dialog box.
- Type
mmsys.cplinto the text field and press Enter to open the classic Sound control panel. - Click the Communications tab at the top of the window.
- Select the radio button Do nothing to stop Windows from lowering other sound volumes during communication activity.
- Click Apply, then click OK.
- Go back to the Playback tab, right-click your default speakers or headphones and select Properties. The device's Properties window opens.
- Click the Advanced tab and click Restore Defaults to reset the device's advanced options, such as the default format, to their original values. If the button is greyed out, the settings are already at their defaults.
- Click the Spatial sound tab and check that the dropdown is set to Off if you are troubleshooting odd surround sound distortion. Then click OK.
Some drivers also add an Enhancements tab to this window. If yours has one, you can turn enhancements off there as well. If a tab is missing, the driver doesn't provide it.
If this didn't work
If sound still isn't right, inspect your physical hardware connections, cable integrity and front-panel audio jacks. Then run the Playing Audio troubleshooter from the system settings, as described at the start of this guide, to diagnose deeper hardware conflicts.
Have a question about this guide?
Answered by AI from this guide. Good questions may be added to this page — please don't include personal details.
Did this guide fix your problem?

About the Author
Richard
Tech Writer, IT Professional
Richard is a writer at Geek Rewind who turns complex IT tasks into clear, step-by-step guides. He draws on years of hands-on experience in system administration and enterprise IT operations, focusing on Windows, Linux and WordPress: the problems people actually run into, and the fixes that work. His server and WordPress guides come from systems he runs himself. Richard builds and maintains the platform behind Geek Rewind, from its Ubuntu servers and Nginx configuration to its custom WordPress plugins. Many new tutorials start with readers' questions, and he's always glad to answer them in the comments.
No comments yet — be the first to share your thoughts!