Windows 11 Sound Not Working? 9 Ways to Fix Audio Issues

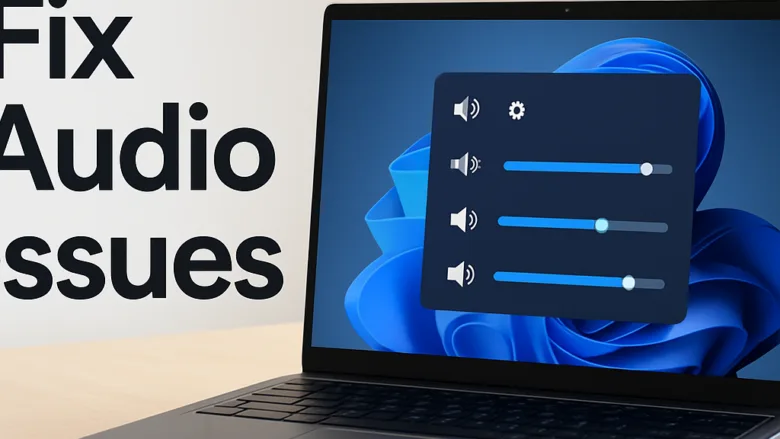
Audio troubleshooting on Windows 11 gets your computer speakers or headphones working again when sound cuts out completely or plays too quietly. Missing sound usually comes from outdated audio drivers, the wrong default playback device, or muted system volume. Broken hardware is the less common cause.
You can try nine methods to fix missing sound in Windows 11 in a few minutes each. They start with basic checks like the taskbar volume slider and move to more advanced fixes like restarting the Windows audio service. Work through them in order. After each one, play a video or music clip to see whether the sound is back. That way you know which fix worked.
Windows 11 sound not working usually comes from the wrong default playback device, muted system volume, or outdated audio drivers, and you can fix most cases in a few minutes. Start by checking the taskbar speaker icon for a muted “X” and the cable or Bluetooth connection. Then open Settings System Sound and choose the correct device under Choose where to play sound.
1Check Your Physical Connections and Volume Levels
Checking your physical connections and volume levels is the fastest way to fix sound that stopped because of a loose speaker plug, disconnected Bluetooth headphones, or a muted hardware dial. Do this before you change any software settings. A surprising number of “no sound” cases end here.
- Check physical cables: If you use external speakers or wired headphones, push the plug firmly into the correct audio jack. On a desktop, the green jack is normally the speaker output, and the front-panel jack can behave differently from the rear one. For USB devices, unplug the cable and plug it into a different USB port on your computer. Plug it directly into the PC rather than into a hub.
- Check wireless connections: If you use Bluetooth headphones or speakers, make sure they are turned on, charged, and connected to your computer. Open Settings Bluetooth & devices and check that the device shows as Connected. If it says only Paired, turn the device off and on again. You can also remove it and pair it again.
- Check physical volume buttons: Many external speakers, keyboards, and headphones have their own volume knobs or mute buttons. Make sure these are turned up and not muted. Some headsets also have an inline mute switch on the cable.
- Check Windows volume: Click the speaker icon in the bottom right corner of your taskbar . Make sure the main volume slider is turned up and that the speaker icon does not show a small “X” or a line through it, which means it is muted. Click the icon once to unmute if it does.
Try a second device, such as a different pair of headphones, if you have one. If that device works, the problem is with the first device or its connection. If neither works, the problem is in Windows, and the next steps apply.
2Select the Correct Speaker Output in Windows Settings
Selecting the correct speaker output fixes sound problems caused by Windows sending audio to the wrong device, such as a disconnected monitor, an HDMI display with no speakers, or Bluetooth headphones you are no longer using. Windows can switch its default output on its own when you plug in or connect a new device. The sound is still playing, just somewhere else.
Follow these steps to choose the correct playback device:

- Click the Start button and select Settings, or press the Win plus I on your keyboard.
- Click System in the left menu, then click Sound on the right side. The Sound page opens.
- Find the Output section, which contains the Choose where to play sound option. On most Windows 11 versions, the available devices are listed here.
- Select the speakers, headphones, or other audio device you want to use. If you see several options, try a different one until you hear sound. Devices such as monitors or HDMI outputs often appear here even when they have no speakers.
- Drag the Volume slider for that device above zero, and play something to test it.
If the device you expect does not appear, scroll down to the Advanced section and open All sound devices. A device listed as disabled can be turned back on there. Nothing here needs a restart, and you can switch back to another device at any time.
3Run the Automated Windows Audio Troubleshooter
The built-in audio troubleshooter scans background services, system settings, and sound drivers, then tries to fix what it finds. It does not solve everything, but it takes only a minute and catches common problems like a disabled device or a stopped service.
Follow these steps to run the troubleshooter:
- Open the Windows Settings app by pressing the Win plus I.
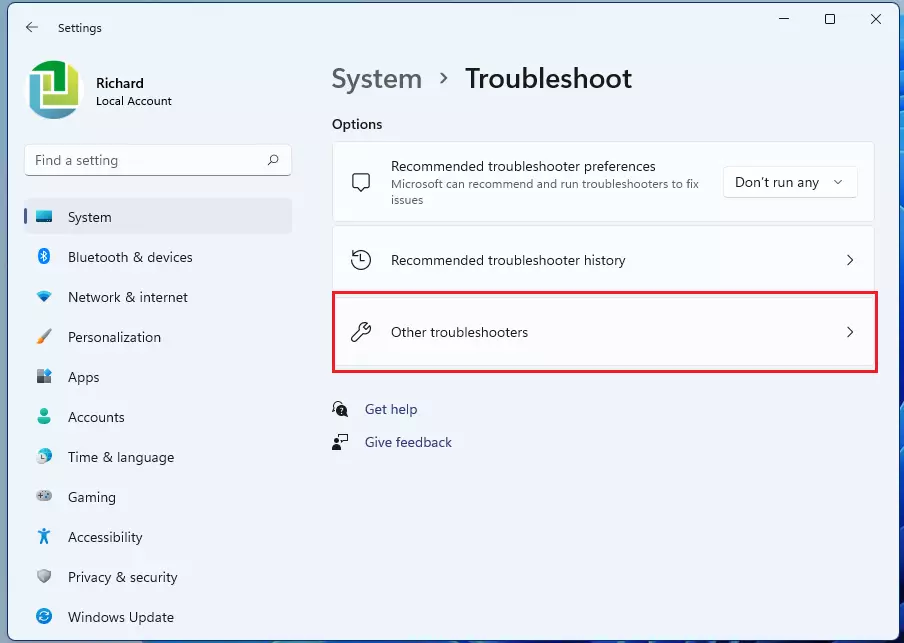
- Stay on the System tab and click Troubleshoot on the right side.
- Click Other troubleshooters. A list of troubleshooters appears.
- Find Playing Audio in the list and click the Run button next to it. On some newer builds this item is labeled Audio, and it may open the Get Help app instead.
- Choose the device you are having trouble with if Windows asks, then follow the instructions on your screen. Windows checks your audio devices and tries to fix any problems it finds.
When it finishes, the troubleshooter reports what it found and whether it fixed it. If it applies a fix, test your sound before moving on. If it says it found nothing, continue with the next method.
4Turn Off Audio Enhancements
Audio enhancements are software effects, such as bass boost or loudness equalization, applied by Windows or by your sound card driver. When they conflict with the driver, they can cause distorted sound, crackling, or no audio at all. Turning them off is a quick test and easy to undo.
Follow these steps to turn off audio enhancements:
- Open the Windows Settings app.
- Go to System Sound
- Under Output, click the speakers or headphones you are currently using. The properties page for that device opens.
- Look for an option called Enhance audio or Audio enhancements. The name and position vary by Windows 11 version and driver.
- Turn this switch to Off. If you see a drop-down menu instead, select Disable all enhancements.
- Play some audio to see whether turning this setting off fixed the problem.
If you cannot find the option, your driver may not offer it for that device. Some devices, such as Bluetooth headphones, never show it. To undo the change, return to the same page and turn the setting back on. No restart is needed.
5Update, Roll Back, or Reinstall Your Audio Drivers
Updating, rolling back, or reinstalling your audio driver fixes problems caused by outdated or corrupted software that stops Windows from communicating with your sound hardware. This is a common fix after a Windows update or a recent driver change.
Follow these steps to update or reinstall your audio driver:
- Right-click the Start button on your taskbar and select Device Manager from the menu.
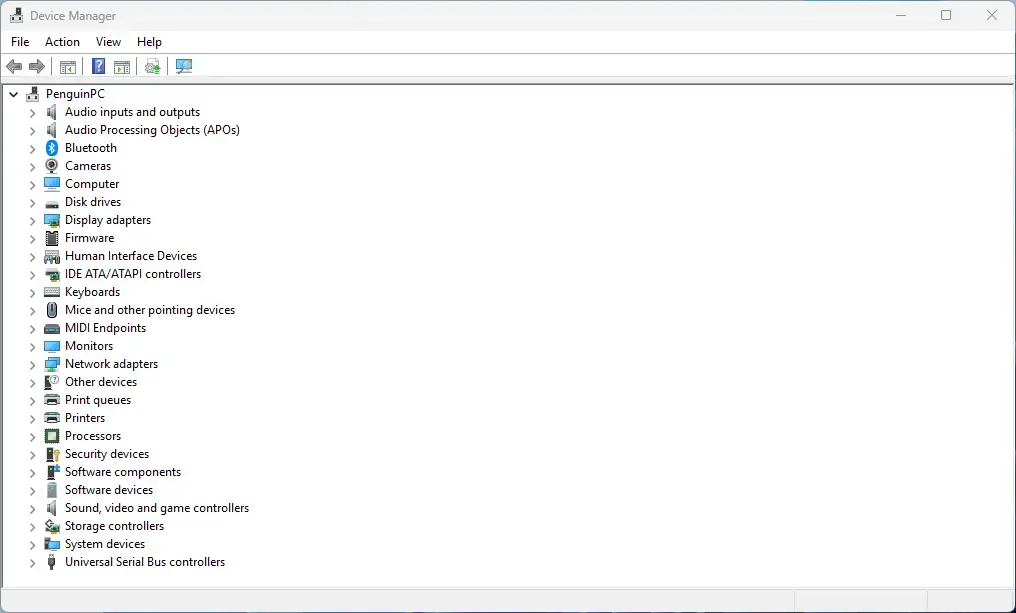
Device Manager - Click the arrow next to Sound, video and game controllers to open the list of audio devices.
- Right-click your main audio device (such as Realtek Audio or Intel Smart Sound Technology) and select Update driver.
- Choose Search automatically for drivers and let Windows look for the newest software. If it says the best driver is already installed, that only means Windows found nothing newer. Your PC maker’s support page may still have a newer driver.
- If updating does not work, right-click your audio device again and select Uninstall device. Confirm your choice. Then restart your computer. When Windows starts back up, it automatically reinstalls a fresh copy of the audio driver.
If the problem started right after a driver update, try a rollback instead. Double-click the audio device, open the Driver tab, and click Roll Back Driver. The button is greyed out if there is no earlier driver to go back to.
6Restart the Windows Audio Services
Restarting the Windows audio services fixes sound problems when the background programs that handle system audio freeze or stop running. A typical sign is a red “X” on the speaker icon with the message that no audio output device is installed, even though the hardware is fine. You can do this on both Windows 11 Home and Pro.
Follow these steps to restart your audio services:
- Press the Win plus R on your keyboard to open the Run dialog box.
- Type
services.mscinto the box and press Enter. The Services window opens.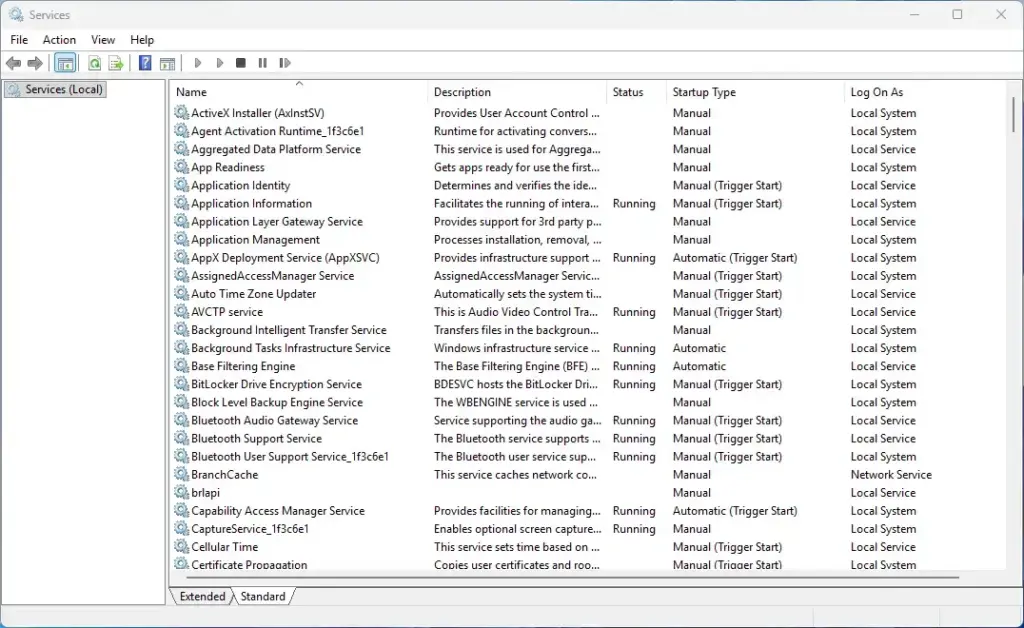
Services - In the list of services, scroll down and find Windows Audio.
- Right-click Windows Audio and select Restart. If the service is not running, click Start instead.
- Next, find Windows Audio Endpoint Builder in the same list, right-click it, and select Restart. Windows may ask to restart dependent services as well. Confirm if it does.
- Finally, find Remote Procedure Call (RPC) and check that the Status column says Running. Windows normally blocks stopping or restarting this service, so the Restart option is usually greyed out. That is expected. As long as it is running, you do not need to change it.
If any of these services will not start, double-click it and check that Startup type is set to Automatic. Then click Start. If you changed anything, click Apply first.
7Change Default Audio Formats (Sample Rate and Bit Depth)
Changing your default audio format, meaning the sample rate and bit depth, fixes problems caused by a setting your speakers or headphones cannot handle. This can show up as no sound, crackling, or sound that works in one app but not another. You make this change in the classic Sound Control Panel .
Follow these steps to change your audio format:
- Open the Windows Settings app and go to System Sound
- Scroll down to the Advanced section and click More sound settings. This opens a smaller, traditional window.
- In the Playback tab, click your default speakers or headphones, then click the Properties button at the bottom right. The default device has a green check mark.
- In the new window that opens, click the Advanced tab.
- Under Default Format, click the drop-down menu and choose a different sample rate and bit depth (for example, 24 bit, 44100 Hz or 16 bit, 48000 Hz).
- Click the Test button to see if you hear a sound. If you do not hear anything, try a different format from the list, then click Apply and OK.
The same tab has an Allow applications to take exclusive control of this device checkbox. If one app seems to block sound in others, clear it and test again. Neither change needs a restart. You can set the format back to its original value at any time.
8Check Microphone Privacy Settings
This check applies to problems with your microphone rather than with playback. Windows privacy settings can block apps like Zoom or Teams from using your microphone. The result is that people cannot hear you, even though you can hear them.
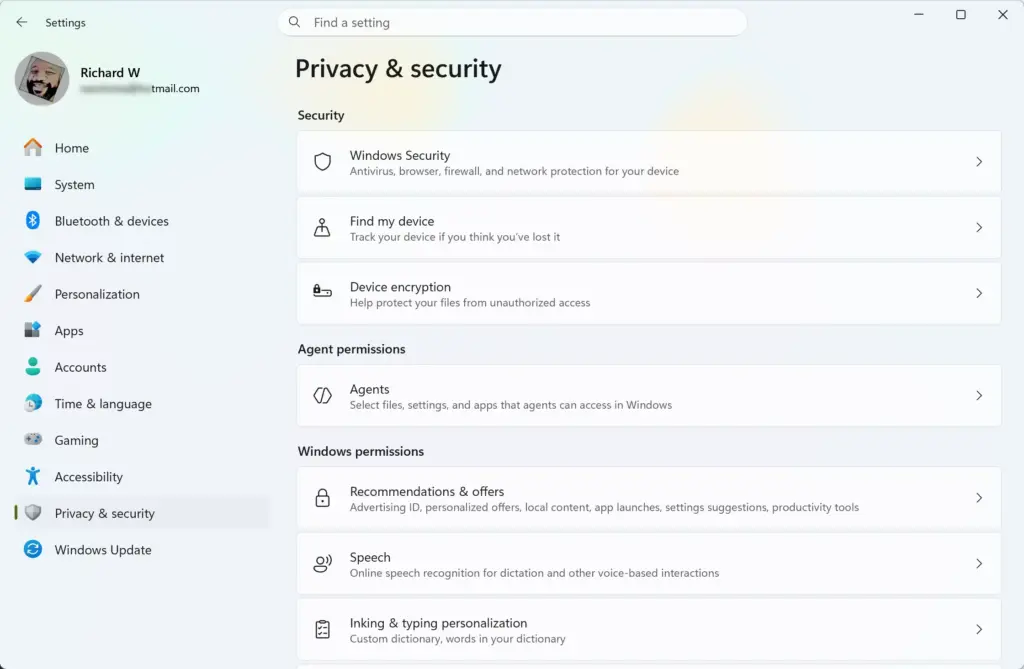
Follow these steps to verify your privacy settings:
- Open the Windows Settings app.
- Click Privacy & security in the left menu.
- Scroll down to the App permissions section and click Microphone.
- Make sure the main Microphone access switch is turned On.
- Make sure the switch that says Let apps access your microphone is also turned On.
- Scroll through the list of individual apps and make sure the applications you want to use have permission to use your microphone. Classic desktop programs, such as the Zoom desktop client, are covered by Let desktop apps access your microphone, which sits at the bottom of the list. Turn that on too.
If the switches were already on, the problem is elsewhere. Check that the right microphone is selected under System Sound > Input.
9Verify That All Windows Updates Are Installed
Installing all pending Windows updates helps when audio problems come from known bugs in system components or hardware drivers. Microsoft often fixes sound bugs in cumulative updates, and some audio drivers are delivered through Windows Update.
Follow these steps to check for updates:
- Open the Windows Settings app.
- Click Windows Update in the left menu.

Settings › Windows Update - Click the Check for updates button at the top right. Windows scans for updates and lists any it finds.
- If Windows finds available updates, let them download and install completely.
- Once the updates finish installing, restart your computer to apply the changes and test your sound.
You can also look for driver updates. Go to Windows Update > Advanced options Optional updates and see whether an audio driver is listed. The Optional updates entry only appears when Windows has something to offer.
Expert Tips: Un-detectable Devices and Browser-Specific Audio Failures
If the basic fixes fail, two situations need a closer look: speakers that Windows cannot detect at all, and sound that is missing only in web browsers like Chrome. Both call for settings that most basic guides skip. For a missing device, check Device Manager for hidden or disabled hardware. For a silent browser, check the per-app volume mixer.
Handling "No Audio Output Device Is Installed" Errors
A "No Audio Output Device Is Installed" error usually means the sound driver is missing, disabled, or hidden, so Windows cannot see your speakers. Device Manager can show hidden devices and force Windows to look for hardware again.
- Right-click the Start button and select Device Manager.
- Click the View menu at the top of the window and select Show hidden devices.
- Look for Sound, video and game controllers or Audio inputs and outputs, and expand these sections.
- If any audio device looks grayed out or faded, right-click it and select Enable device. If you see Disable device instead, the device is already enabled.
- If your audio hardware is missing from the list, click the top item in the list (your computer name), click the Action menu at the top, and select Scan for hardware changes. This forces Windows to search for newly attached or hidden hardware components.
If a device shows a yellow warning triangle, open its properties and read the status message. Then try the driver steps from the earlier section. If your audio hardware still does not appear after a scan and a restart, check your BIOS or UEFI settings to see whether onboard audio is disabled.
Fixing Audio That Only Fails in Web Browsers
When audio fails only in web browsers like Chrome, Edge, or Firefox, the cause is usually that app's own volume level or output device in the system mixer. Windows 11 stores these settings per app, so a muted browser stays muted even when the system volume is up.
- Right-click the speaker icon on your taskbar and select Open volume mixer. The mixer page in Settings opens.

Taskbar - Scroll down to the Apps section, which shows the individual apps currently open on your computer. Your browser appears here only while it is open and has played sound, so start some audio in the browser first.
- Check the volume slider for your web browser (like Chrome or Edge) to make sure it is turned up and not muted.
- Expand the browser's entry if needed, and check its Output device drop-down menu to make sure it points to your active speakers or headphones rather than Default pointing at the wrong device.
- If problems persist, check that the tab itself is not muted. Then open your browser settings, clear your browser cache and cookies, or reset the site sound permissions to their defaults.
If sound works in one browser but not another, the issue is almost certainly in that browser and not in Windows. Restarting the browser after changing the mixer settings also helps, because some browsers only pick up a new output device when they start.
Summary
The fixes in this guide go from the simplest to the most involved, so a quick recap helps you decide where to start next time.
- Start with the basics: Check plugs, wireless connections, physical volume controls, and the Windows volume slider.
- Check the output device: Make sure Windows is sending sound to the device you are actually using.
- Use the built-in tools: Run the audio troubleshooter and turn off audio enhancements.
- Fix the software layer: Update, roll back, or reinstall the audio driver, restart the audio services, and try a different audio format.
- Check permissions and updates: Review microphone privacy settings and install pending Windows updates.
- Handle special cases: Show hidden devices in Device Manager for missing hardware, and check the volume mixer if only your browser is silent.
Most sound problems are solved by one of the first few steps, and you do not need a technician. If none of these work and a second device also stays silent, the sound hardware itself may be faulty, and it is worth contacting the manufacturer.
Frequently asked questions
How to fix sound not working Windows?
Check the volume slider and the speaker icon in the taskbar first, and make sure nothing is muted. Then open Settings, go to System, then Sound, and confirm the right output device is selected. If sound is still missing, update your audio driver in Device Manager or run the Playing Audio troubleshooter.
How to fix audio on PC?
Fixing audio on a PC usually starts with checking the volume and the output device. Confirm the speakers or headphones are plugged in, then right-click the speaker icon in the taskbar and choose Sound settings to pick the correct output. If that fails, restart the PC and update the audio driver through Device Manager.
Why is my sound not working 🪟 Windows 11 aftr pressing a lot of random buttons?
Stray key presses often mute sound or switch the output device. Check the speaker icon in the taskbar to confirm sound is not muted, and check the mute key on your keyboard. Then open Settings, System, Sound and confirm the right output device is selected. Restart the PC if the problem remains.
Can't hear audio 🪟 Windows 11?
If you cannot hear anything on Windows 11, make sure the volume is up and the correct speakers or headphones are selected. Open Settings, go to System, then Sound, and choose the right device under Output. If you still hear nothing, run the Playing Audio troubleshooter.
How to fix sound on 🪟 Windows 11?
To fix sound on Windows 11, first confirm the volume is not muted and the right output device is selected in Settings, System, Sound. Next, update the audio driver in Device Manager by right-clicking your speakers and choosing Update driver. Restart the PC and test with a video.
How to get help in 🪟 Windows 11 sound problem?
To get help with a Windows 11 sound problem, open the Get Help app from the Start menu and type your issue, such as no sound. You can also run the Playing Audio troubleshooter from Settings, under System, then Troubleshoot, then Other troubleshooters. It checks common audio faults and suggests fixes.
Still have a question?
Answered by AI from this guide. Good questions may be added to this page — please don't include personal details.
Did this guide fix your problem?

About the Author
Richard
Tech Writer, IT Professional
Richard is a writer at Geek Rewind who turns complex IT tasks into clear, step-by-step guides. He draws on years of hands-on experience in system administration and enterprise IT operations, focusing on Windows, Linux and WordPress: the problems people actually run into, and the fixes that work. His server and WordPress guides come from systems he runs himself. Richard builds and maintains the platform behind Geek Rewind, from its Ubuntu servers and Nginx configuration to its custom WordPress plugins. Many new tutorials start with readers' questions, and he's always glad to answer them in the comments.
No comments yet — be the first to share your thoughts!