How to Turn On or Off Include System Audio in Live Captions in Windows 11

Live captions (a Windows feature that automatically transcribes audio into on-screen text) can transcribe system audio, your microphone, or both. Choose the sources in the captions bar, or in Registry Editor. Use Option One to change the system audio setting from the captions bar. Use Option Two to set system audio, microphone audio, both, or neither in Registry Editor.
Live captions helps anyone follow audio, including people who are deaf or hard-of-hearing.
The new option arrives in Windows 11 build 26340.9882 (Experimental 26H2) and build 26320.9876 (Beta 26H2) for Windows Insiders, the people who test preview builds before they are released. Before that, captions used system audio, with an option to add your microphone. Now you can pick system audio, your microphone, or both.
Turn system audio off to caption an in-person conversation without picking up sound from your PC. Leave it on to follow a meeting or video playing on your PC.
To turn system audio off in Live captions on Windows 11, select the Settings (gear) button on the live captions bar, select Audio source, then uncheck Include system audio. It is on by default. Turn it off to caption an in-person conversation without picking up sound from your PC. The change takes effect straight away.
Option One
Turn On or Off Include System Audio in Live Captions
- Select the Settings (gear) button on the live captions bar.
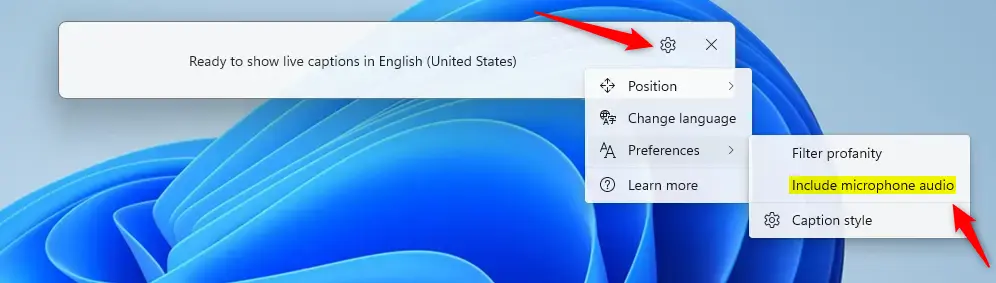

- Select Audio source.
- Select Include system audio to check it (on, the default) or uncheck it (off).
Option Two
Turn On or Off Include System and/or Microphone Audio in Live Captions using Registry Editor
This method changes a setting value in Registry Editor, the Windows tool for editing system settings directly. It also lets you choose microphone audio.
- Open Registry Editor (regedit.exe).
- In the left pane, go to this key:
🗝️HKEY_CURRENT_USER\
Software\ Microsoft\ LiveCaptions\ UI - In the right pane of the UI key, double-click the AudioCaptureMode DWORD value to open it.
- Enter the value data for the audio source you want, then select OK.
- 0None
- 1Include system audio only
- 2Include microphone audio only
- 3Include system and microphone audio
- If Live captions is open, turn it off and on again to apply the change.
- Close Registry Editor.
What to do next
To undo either change, repeat the same steps and pick the previous setting. If the captions still do not change after a registry edit, turn Live captions off and on again. Windows turns system audio on by default.
Have a question about this guide?
Answered by AI from this guide. Good questions may be added to this page — please don't include personal details.
Did this guide fix your problem?

About the Author
Richard
Tech Writer, IT Professional
Richard is a writer at Geek Rewind who turns complex IT tasks into clear, step-by-step guides. He draws on years of hands-on experience in system administration and enterprise IT operations, focusing on Windows, Linux and WordPress: the problems people actually run into, and the fixes that work. His server and WordPress guides come from systems he runs himself. Richard builds and maintains the platform behind Geek Rewind, from its Ubuntu servers and Nginx configuration to its custom WordPress plugins. Many new tutorials start with readers' questions, and he's always glad to answer them in the comments.
No comments yet — be the first to share your thoughts!