How to Enable or Disable Microphone Access for Apps in Windows 11


Microphone access in Windows 11 lets you control which apps can listen through your computer’s mic to keep your private conversations secure. You can turn off the microphone completely for your whole system or change permissions app by app inside the Privacy & security settings.
Windows 11 includes built-in controls to block individual programs like games or chat tools from using your hardware at any time. Reviewing these permissions helps ensure that only trusted applications use your microphone.
Go to Settings Privacy & security Microphone. Toggle “Microphone access” On or Off to control all apps. You can also manage individual app permissions on this screen.
How to Tell if an App is Using Your Microphone
Windows 11 includes a helpful visual indicator to protect your privacy. A small microphone icon appears in the system tray on your taskbar when an app actively uses your microphone. Hovering your mouse over this icon reveals which app is currently accessing your hardware.
Restrict or Allow Apps Access to the Microphone
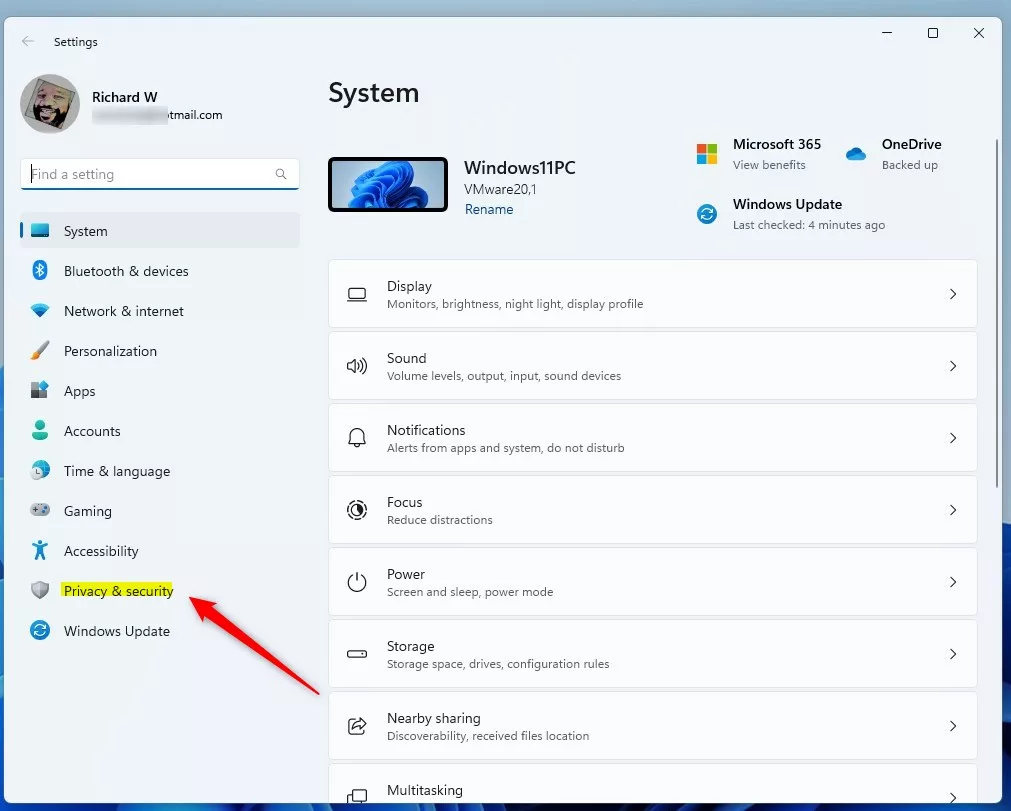
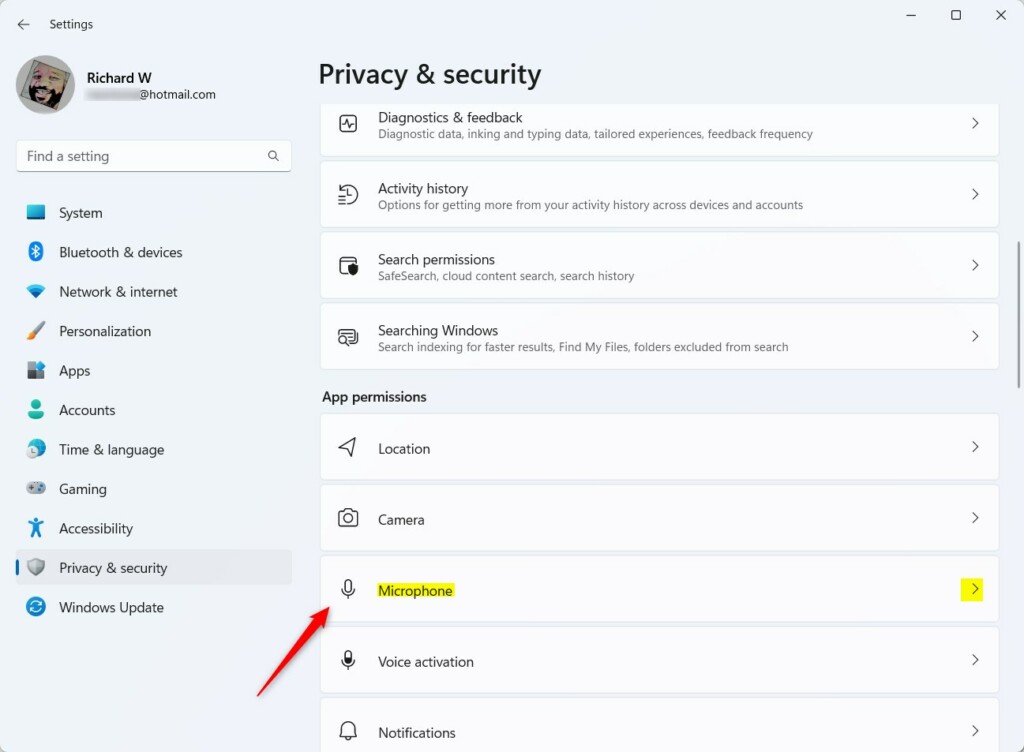
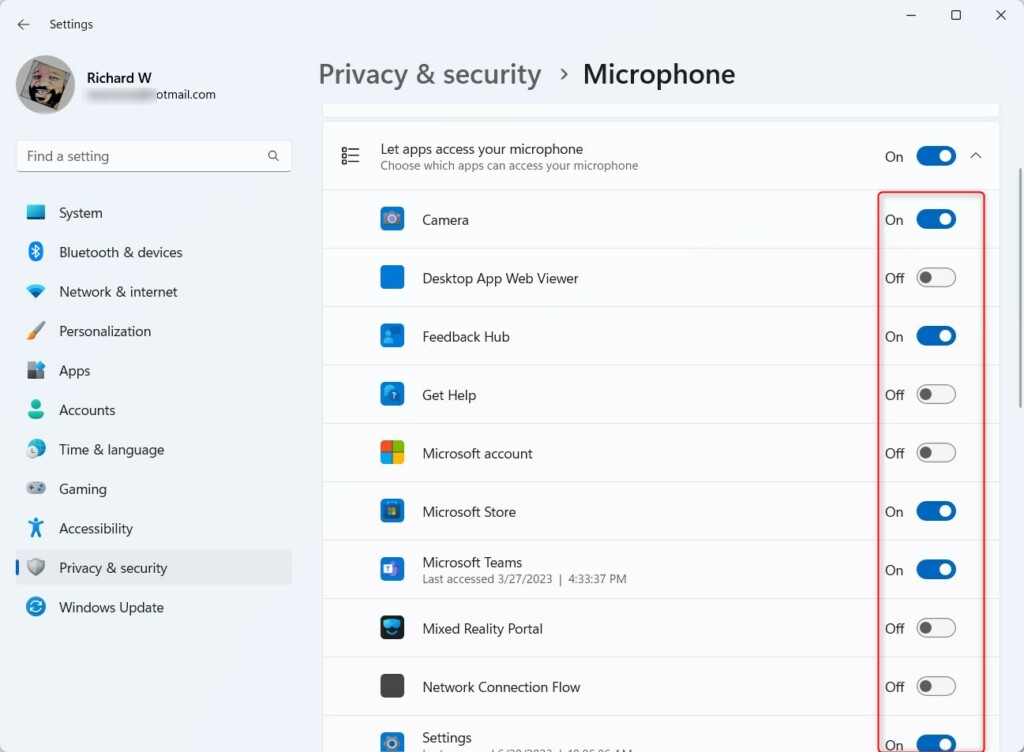
Managing Windows 11 microphone access is done through the Privacy & security settings menu. You can control which specific apps get to use your microphone and block the ones you do not want listening in. Open Settings , go to Privacy & security, and click Microphone to turn access on or off for individual apps or your whole system.
- Click on Privacy & security on the left side of the window.
- Select the Microphone tile on the right to see more options.
- On the next screen, click the Microphone access tile.
- Toggle the switch to On to enable the microphone or Off to disable it for all apps.
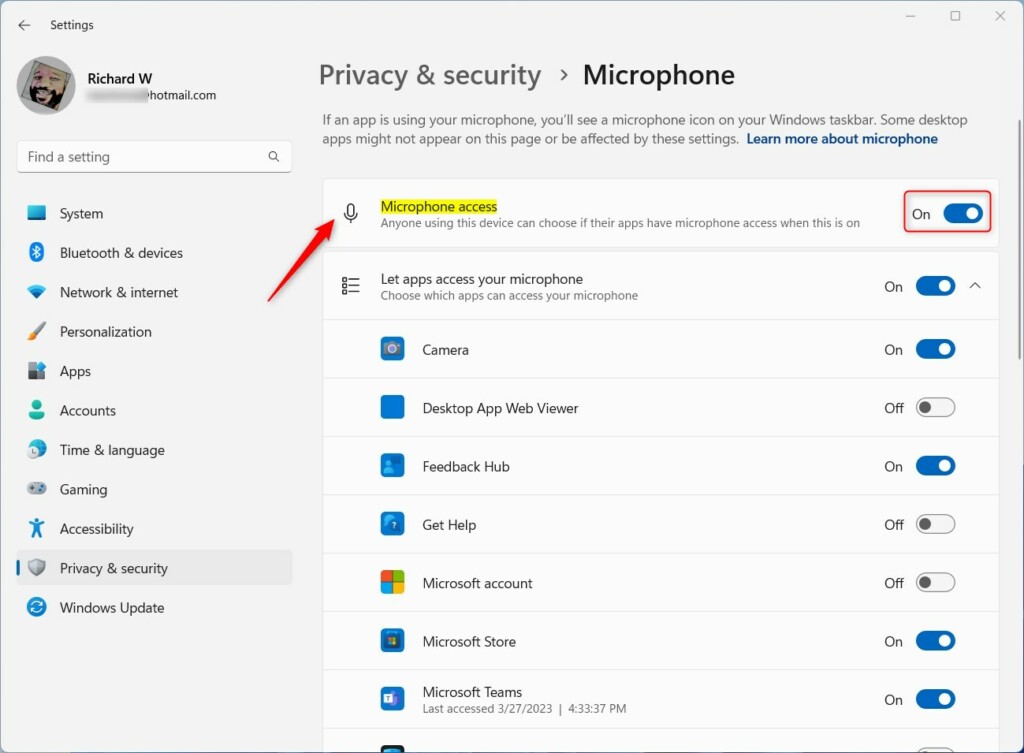
The main ‘Microphone access’ toggle works like a master switch, controlling everything. If this is off, no app can use the microphone, even if individual app permissions are set to ‘On’.
Browser-Specific Permissions
Even if Windows allows an app to use your microphone, you might still need to grant permission within your web browser for sites you visit.
Troubleshooting: Why is Microphone Access Greyed Out?
Microphone access is usually greyed out in Windows 11 because a system administrator locked the setting using Group Policy, or because a physical hardware switch on your headset or laptop has muted the mic. Check your device for a physical mute button first, and if that is not the issue, you will need administrator rights to change the policy restriction.
Allow or Deny Apps Access via the Local Group Policy Editor
Controlling Windows 11 microphone access through the Local Group Policy Editor (a tool used to manage settings across network computers) lets administrators set strict rules for application audio input. You need an administrator account to use this method, which overrides standard user settings and applies microphone rules across the whole computer.
Advanced users can manage microphone access settings using the Local Group Policy editor app. This tool allows for fine-grained control over which applications can use your microphone, a feature useful for enhancing privacy and security on your Windows 11 device.
- Open the Local Group Policy Editor.
- Go to: Computer Configuration - Administrative Templates - Windows Components - App Privacy.
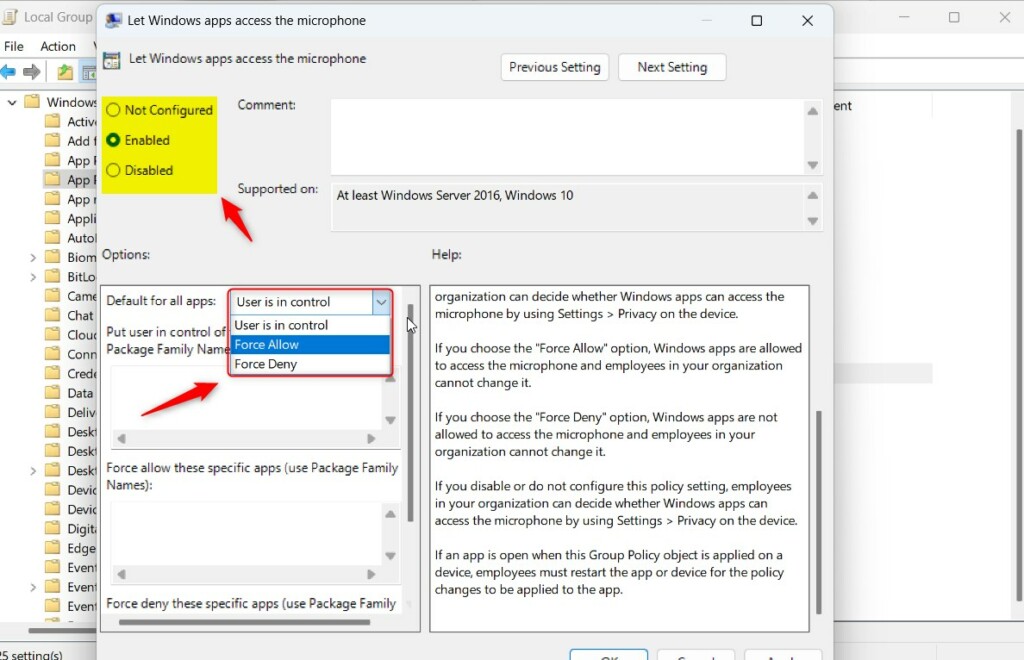
In the right pane, double-click on Let Windows app access the microphone.
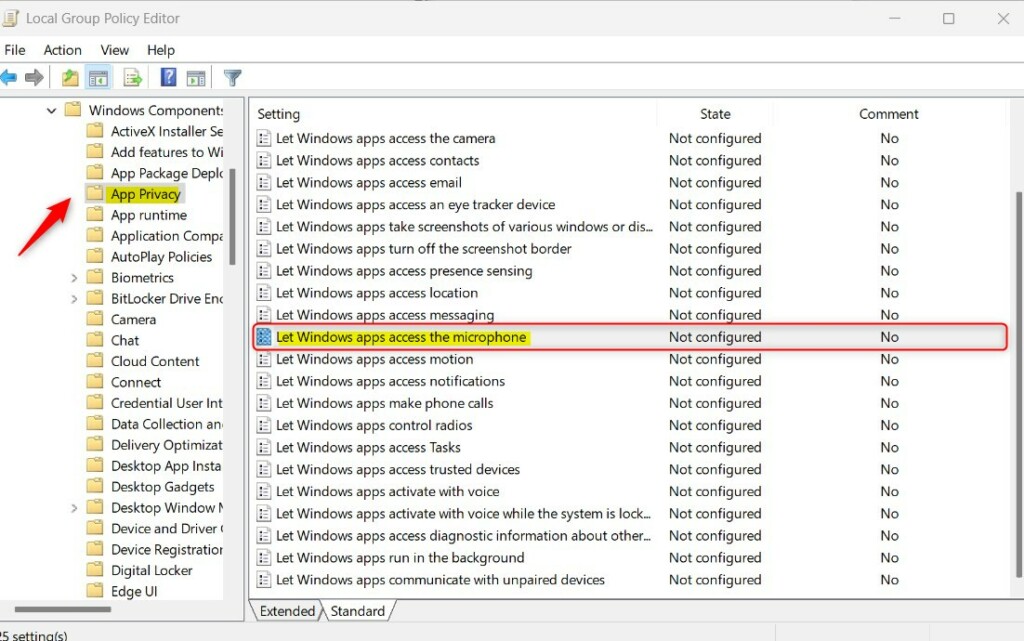
Choose Enabled, Disabled, or Not Configured, then click OK.
Enable or Disable Microphone Access using the Registry Editor
Changing Windows 11 microphone access through the Registry Editor (a database of low-level settings for Windows) lets you fine-tune app permissions at the system level. This method requires administrator rights and careful steps, as mistakes in the registry can cause system problems. Back up your registry before making any changes.
You can also change these settings with the Windows Registry editor, but be cautious – messing with registry settings can impact your system.
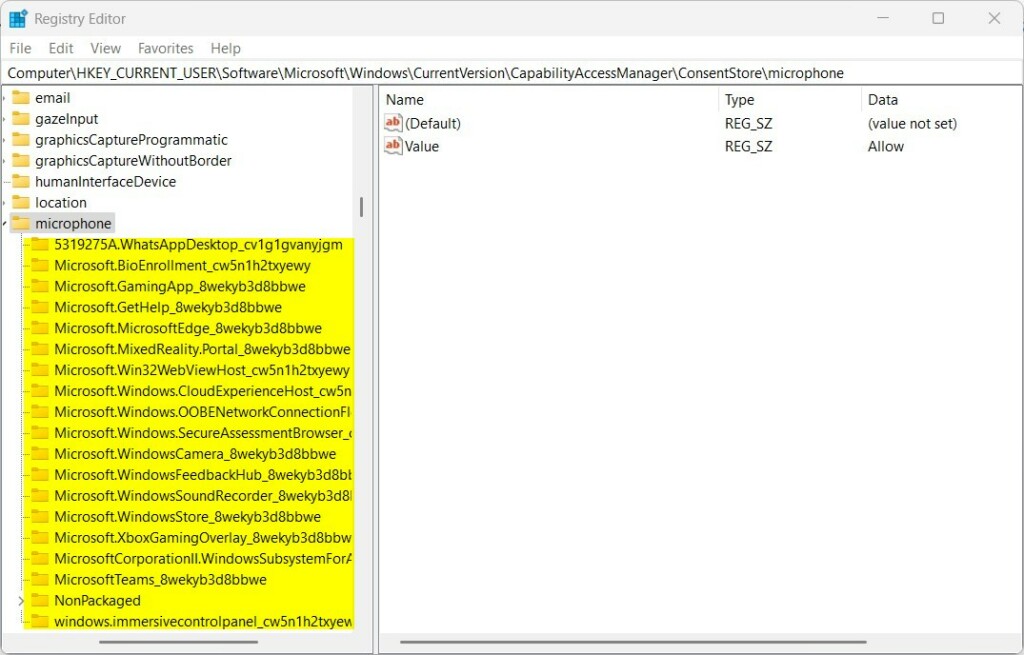
Navigate to the relevant path for your needs:
HKEY_LOCAL_MACHINE\SOFTWARE\Microsoft\Windows\CurrentVersion\CapabilityAccessManager\ConsentStore\microphone
HKEY_CURRENT_USER\Software\Microsoft\Windows\CurrentVersion\CapabilityAccessManager\ConsentStore\microphone
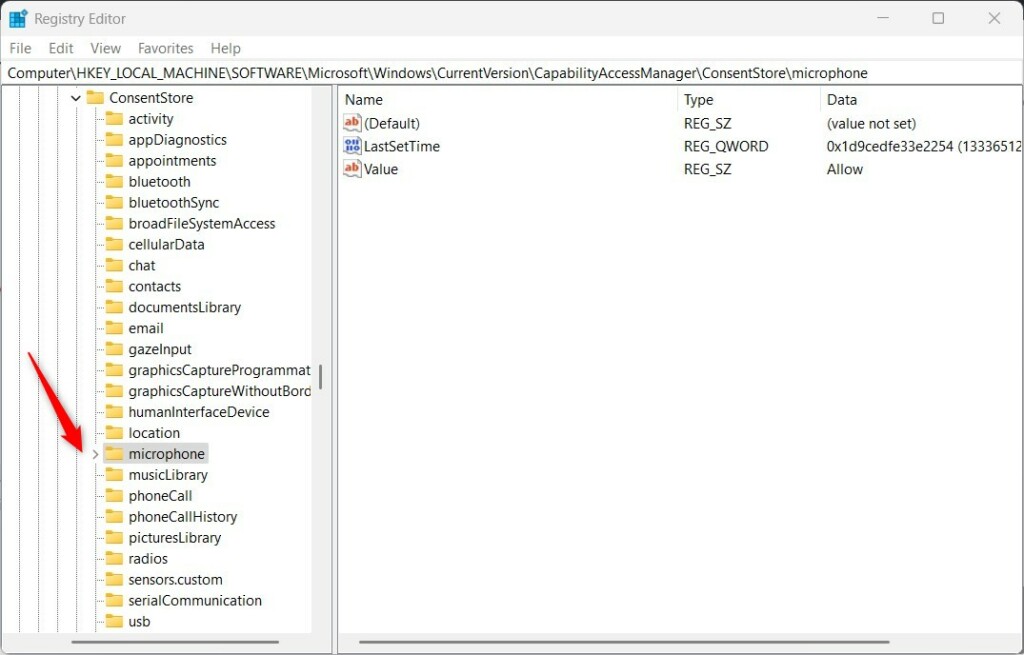
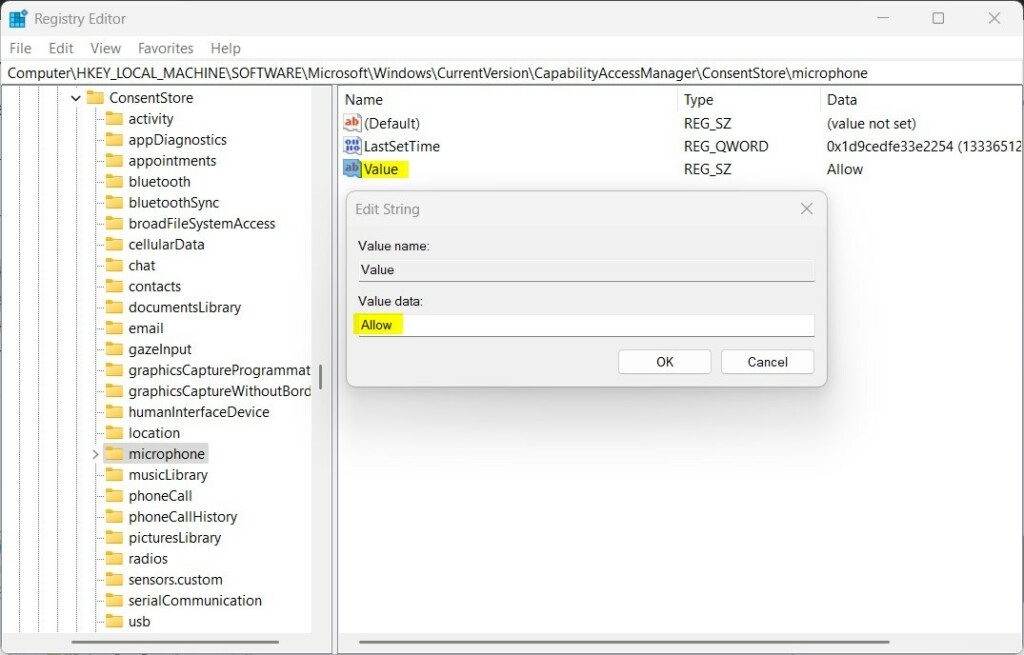
Right-click empty space in the right pane, select New, click String Value, and name it Value. Double-click this new value and type Allow or Deny.
Let Desktop Apps Access Your Microphone
If you want to manage standard desktop programs separately, make sure the main microphone access is turned on first.
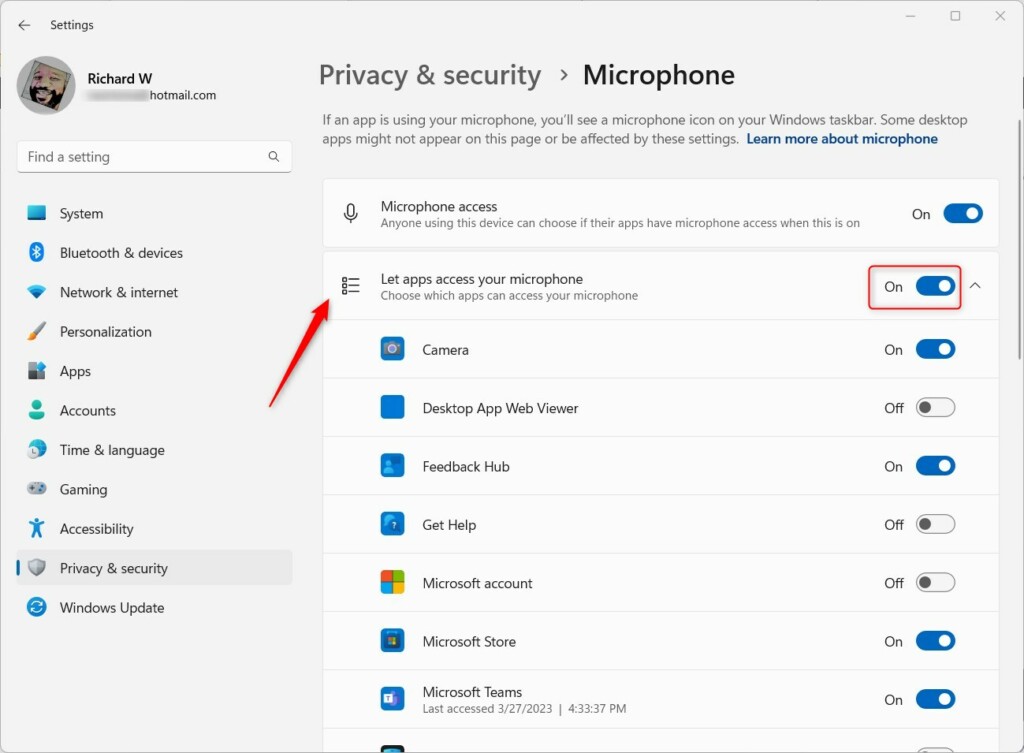
- Go to Start - Settings - Privacy & security - Microphone.
- Toggle the switch for Let desktop apps access your microphone to On or Off.
Manage Desktop App Access via the Registry
Managing desktop app microphone access in Windows 11 requires using the Registry Editor to modify specific registry keys for non-packaged programs. This advanced method requires administrator rights and lets you force microphone permissions for traditional desktop software that might not appear in standard privacy settings lists.
Control desktop app microphone access by opening the Windows Registry Editor and navigating to HKEY_LOCAL_MACHINE\SOFTWARE\Microsoft\Windows\CurrentVersion\CapabilityAccessManager\ConsentItems\{C65E5A4F-745F-430C-975E-13020348A47E}. This method allows fine-grained control for individual applications on Windows 11.
HKEY_LOCAL_MACHINE\Software\Microsoft\Windows\CurrentVersion\CapabilityAccessManager\ConsentStore\microphone\NonPackaged
HKEY_CURRENT_USER\Software\Microsoft\Windows\CurrentVersion\CapabilityAccessManager\ConsentStore\microphone\NonPackaged
Allow or Deny.Restart your computer after making these changes.
Reference: Microsoft Support
Summary
Managing your Windows 11 microphone access helps keep your privacy secure, with options ranging from the simple Settings app to advanced tools like the Group Policy and Registry Editors.
```Was this guide helpful?

About the Author
Richard
Tech Writer, IT Professional
Richard is a writer at Geek Rewind who turns complex IT tasks into clear, step-by-step guides. He draws on years of hands-on experience in system administration and enterprise IT operations, focusing on Windows, Linux and WordPress: the problems people actually run into, and the fixes that work. His server and WordPress guides come from systems he runs himself. Richard builds and maintains the platform behind Geek Rewind, from its Ubuntu servers and Nginx configuration to its custom WordPress plugins. Many new tutorials start with readers' questions, and he's always glad to answer them in the comments.



No comments yet — be the first to share your thoughts!