How to Enable or Disable Voice Clips in Windows 11


Voice clips in Windows 11 are short audio recordings of your speech that Microsoft collects to improve its speech recognition and typing tools. By default, Windows 11 saves these voice samples and sends them to Microsoft servers for product updates.
You can turn off voice clips at any time in your privacy settings to stop Microsoft from saving your spoken audio. This guide covers three ways to do it: the Settings app, the Registry Editor, and Group Policy. Each section says what you should see afterward and how to undo the change.
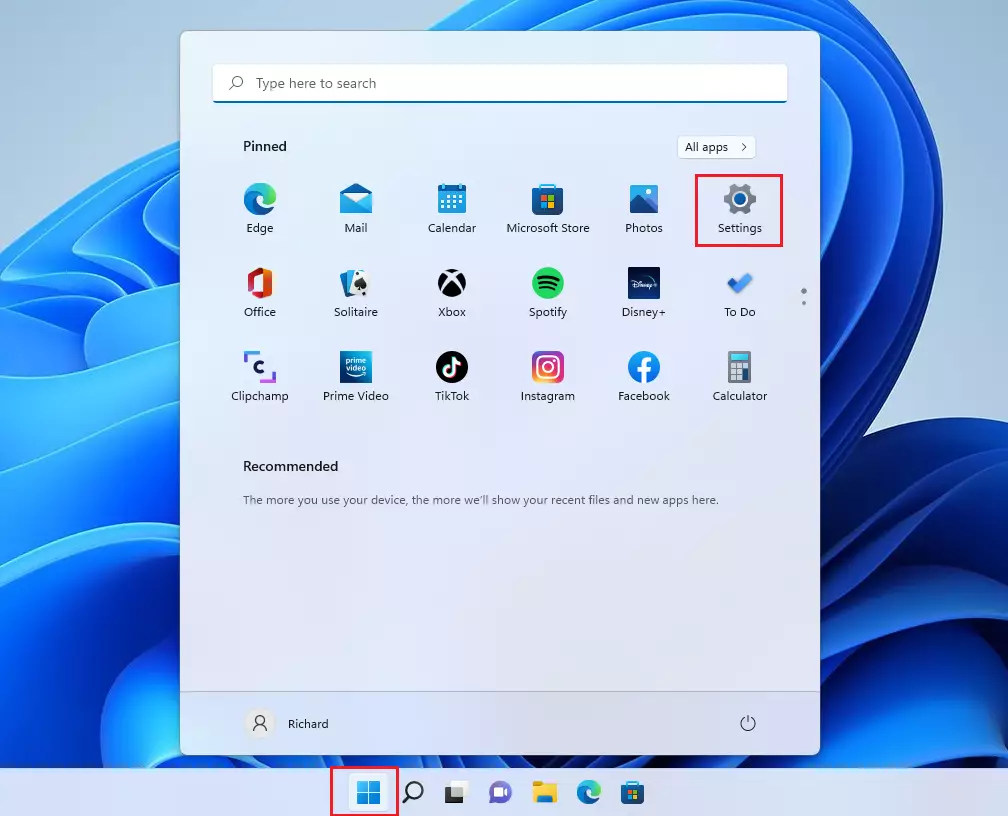
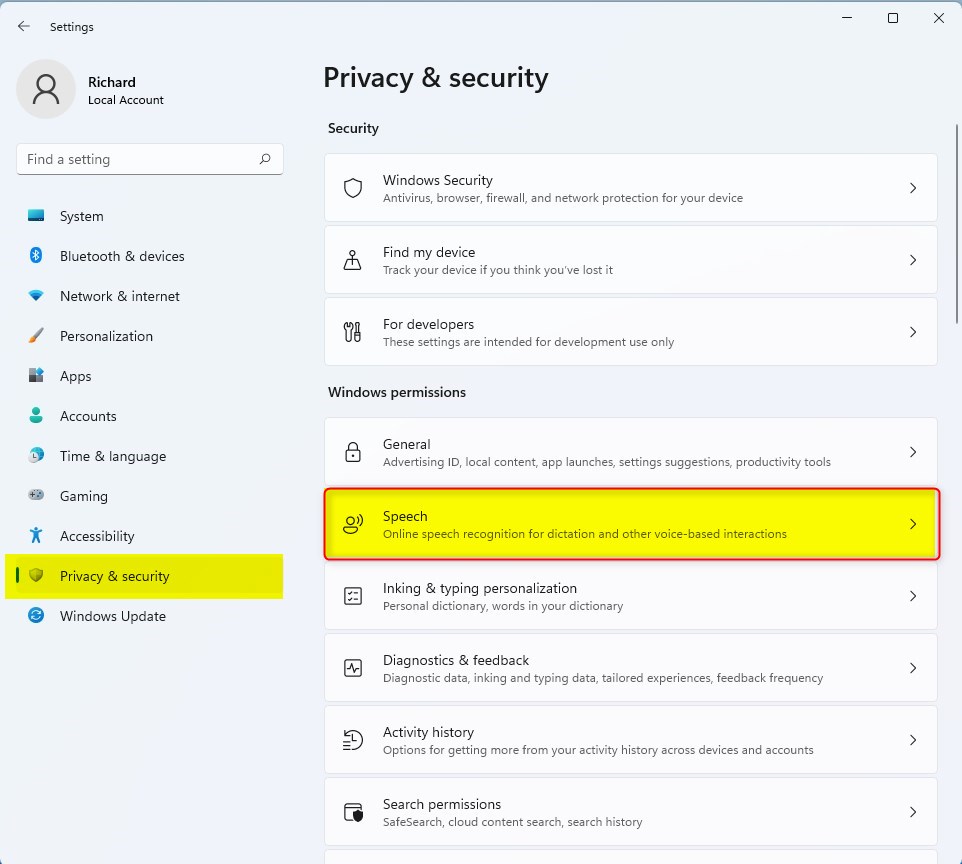
To stop Windows from sending voice data to Microsoft, go to Settings Privacy & security Speech and toggle off Online speech recognition. This prevents audio clips from being uploaded to Microsoft servers for analysis.
Why manage voice clips and dictation?
Windows 11 includes tools like voice typing to help you write text using your microphone. Sometimes these tools collect audio data to improve accuracy. There are two good reasons to disable them. One is protecting your privacy. The other is stopping the voice typing overlay from appearing when you did not ask for it.
If you share a PC, use a work laptop, or often have a microphone near you, it is worth checking these settings. Nothing breaks when you turn them off. You can still type with your keyboard as usual.
What happens when you disable these features?
When you disable voice clips, Microsoft stops collecting your audio samples for training. When you disable dictation, the Win+H shortcut no longer opens the listening interface, so you cannot trigger it by accident.
Turning off online speech recognition can also limit features that rely on the cloud. Voice typing may stop working or become less accurate. Features that use on-device speech recognition are not affected in the same way. If you miss dictation later, you can turn the setting back on.
Understanding Speech Recognition Types
| Feature | Description |
|---|---|
| Online Speech Recognition | Uses Microsoft cloud servers to process your voice. Requires an internet connection. |
| Device-based Speech Recognition | Processes your voice locally on your computer. Does not send audio to the cloud. |
How to disable voice typing overlay and dictation
The voice typing overlay often appears when you press the Win+H shortcut. Disabling the feature entirely stops this behavior. This method works on both Home and Pro editions, and it needs no restart.
- Open Settings by pressing Win+I. The Settings window opens with a list of categories on the left.
- Click Time & language in the left sidebar.
- Select Speech. You should see the speech language and microphone options.
- Toggle off Online speech recognition to stop cloud processing. The switch should now read Off.
The label and its location can differ by Windows 11 version. On some builds, the Online speech recognition switch sits under Privacy & security Speech instead. If you do not see it under Time & language, check there. To undo the change, return to the same page and switch it back to On.
Advanced: Permanently disable dictation via Registry Editor
You can permanently disable voice clips and dictation across Windows 11 by using the Registry Editor to turn off the cloud speech privacy setting. This method stops your computer from sending voice data to Microsoft servers. It works on Home, Pro, and Enterprise. Back up your registry before you start so you can recover if something goes wrong. In Registry Editor, choose File Export, pick All as the export range, and save the file somewhere safe.
- Press Win+R, type regedit, and press Enter. If User Account Control asks for permission, click Yes. The Registry Editor opens.
- Navigate to 🗝️HKEY_CURRENT_USER\
Software\ . You can paste the path into the address bar at the top of the window and press Enter.Microsoft\ Speech_OneCore\ Settings\ OnlineSpeechPrivacy - If the key does not exist, right-click the parent folder to create it. Choose New Key and name it to match the missing part of the path.
- Set the HasUserAccepted value to 0. Double-click it, type 0 in the Value data box, and click OK. If the value is not there, right-click in the right pane and choose New DWORD (32-bit) Value, then name it HasUserAccepted.
Sign out and back in, or restart, so the change applies everywhere. This setting applies only to your user account. To undo it, set HasUserAccepted back to 1, or import the backup file you exported.
Using Group Policy to disable speech services
Note that this step requires administrator rights and only works on Pro or Enterprise editions of Windows. The Local Group Policy Editor is not included in Home, so Home users should use the Settings or Registry method instead.
- Press Windows + R, type gpedit.msc, and press Enter. The Local Group Policy Editor opens.
- Go to Computer Configuration\Administrative Templates\Windows Components\App Privacy. Expand each folder in the left pane until the policy list appears on the right.
- Find Let Windows apps access Speech Recognition and set it to Disabled. Double-click the policy, select Disabled, then click Apply and OK.
The policy name can vary slightly between Windows 11 builds. If you cannot find it, look at the other policies in the same folder. Policy changes usually apply after a restart, or after you run a policy refresh. To undo it, open the same policy and set it to Not Configured.
Summary
Managing voice data in Windows 11 remains essential for maintaining control over your privacy. Adjusting your Speech settings, using the Registry Editor, or applying Group Policy effectively disables voice clips and dictation. Start with the Settings app, since it is the simplest and easiest to undo. For more information on how Microsoft handles data, visit the official Microsoft Privacy documentation.
Have a question about this guide?
Answered by AI from this guide. Good questions may be added to this page — please don't include personal details.
Did this guide fix your problem?

About the Author
Richard
Tech Writer, IT Professional
Richard is a writer at Geek Rewind who turns complex IT tasks into clear, step-by-step guides. He draws on years of hands-on experience in system administration and enterprise IT operations, focusing on Windows, Linux and WordPress: the problems people actually run into, and the fixes that work. His server and WordPress guides come from systems he runs himself. Richard builds and maintains the platform behind Geek Rewind, from its Ubuntu servers and Nginx configuration to its custom WordPress plugins. Many new tutorials start with readers' questions, and he's always glad to answer them in the comments.
No comments yet — be the first to share your thoughts!