Enable or Disable Online Speech Recognition in Windows 11


Online speech recognition in Windows 11 sends your voice clips to Microsoft cloud servers to make dictation and voice commands much more accurate. The feature learns how you talk over time, so it gets better at turning your spoken words into text.
Turning it off forces Windows 11 to use only built-in offline tools, which usually makes voice typing less precise. Voice typing (Win+H) asks for this setting to be on, so expect it to stop working or prompt you once you switch the setting off. Built-in accessibility tools like Narrator still work normally when you disable the cloud setting.
This guide covers three ways to change it: the Settings app, Group Policy, and the Registry Editor. The Settings app works on every edition. Group Policy is for Pro, Enterprise and Education. The registry method works everywhere, Home included.
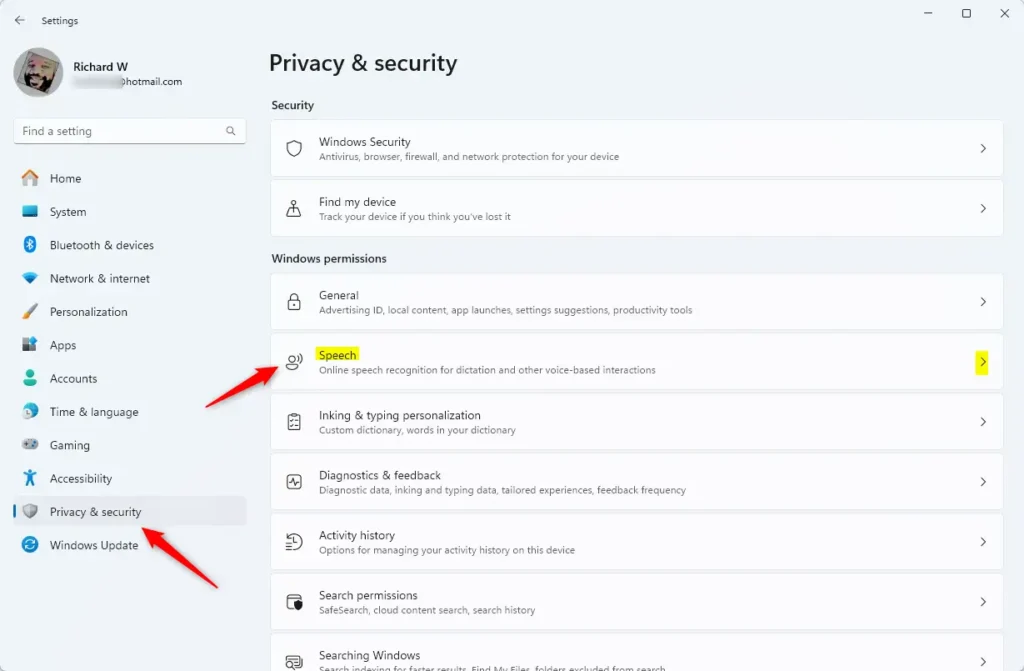
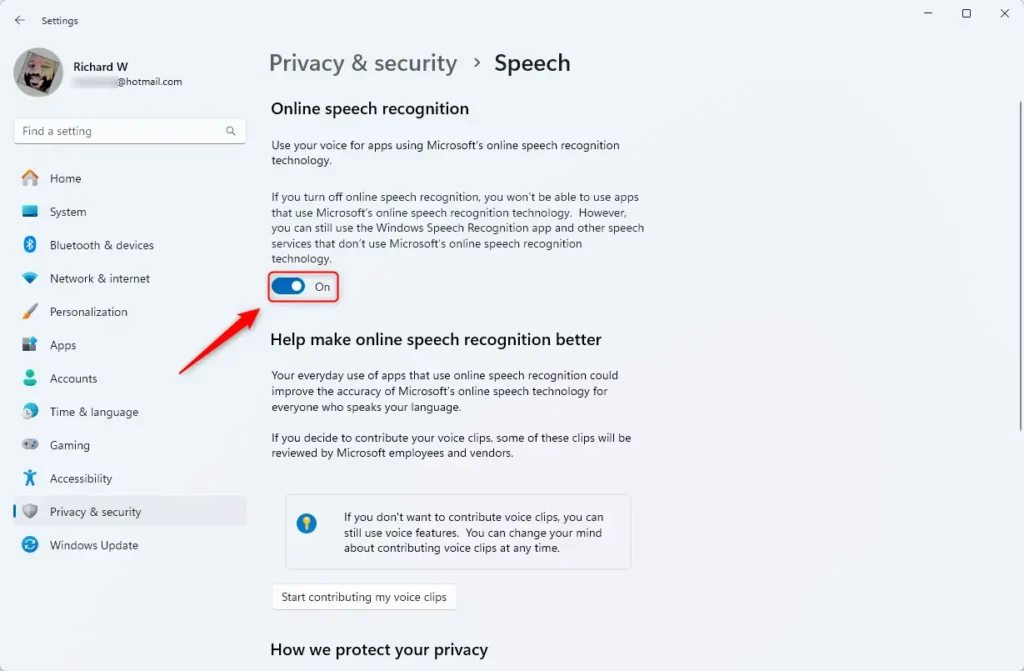
To enable or disable online speech recognition in Windows 11, open Settings , select Privacy & security, click Speech, then toggle the Online speech recognition switch on or off. The change takes effect immediately without restart.
Prerequisites: Setting Up Your Microphone
- Open Settings System Sound
- Under Input, select your microphone, then run the microphone test or the microphone setup wizard to confirm your voice is picked up clearly.
- Speak normally and watch the input level. It should move well above the bottom of the bar without hitting the top.
Good input matters for both cloud-based and local speech recognition. A weak or noisy microphone will hurt accuracy whichever mode you use.
Voice Access vs. Windows Speech Recognition (WSR)
Windows 11 also has a newer voice control tool called Voice Access. It is a big upgrade from the older Windows Speech Recognition (WSR). Voice Access does most of its recognition on the device, so it does not depend on the online speech recognition setting in this guide. Switching the cloud setting off mainly affects voice typing and other cloud-based speech features.
How to turn Online Speech Recognition on or off in Settings
This is the quickest method and works on Home, Pro, Enterprise and Education. You do not need an administrator account just to change your own setting.
- Open the Windows Settings app. You will see the main Settings window with a list of categories on the left.
- Select Privacy & security on the left menu.
- Click the Speech tile on the right. The Speech page opens.
- Toggle the Online speech recognition switch to On to enable it, or Off to disable it. The switch changes state straight away.
The change applies immediately and you do not need to restart. To undo it, come back to the same page and flip the switch again.
If the switch is greyed out, or you see a message that some settings are managed by your organization, a Group Policy or registry rule is controlling it. Use the matching method below to change that rule.
How to manage settings using Group Policy (Admin Required)
Group Policy lets network administrators control online speech recognition settings for all users on a computer. You need an administrator account to use this tool, which blocks or allows cloud-based speech services across the whole system. This method works best for shared PCs or office networks where you want to lock down privacy choices.
The Local Group Policy Editor is only included in Windows 11 Pro, Enterprise and Education. If you run Home, use the registry method further down.
- Search for “Edit group policy” in the Start menu and open it. The Local Group Policy Editor opens.
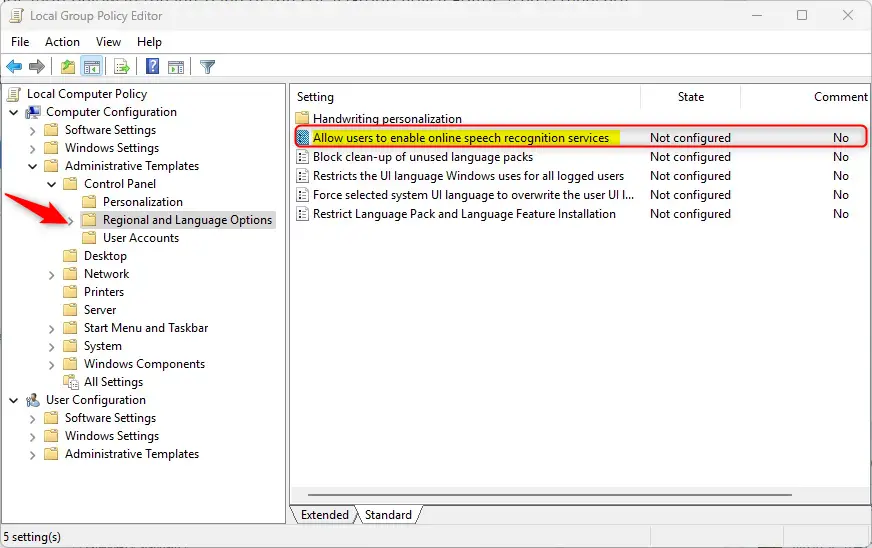
- Go to Computer Configuration Administrative Templates Control Panel Regional and Language Options. This brings you straight to the setting that stops Windows 11 from sending voice data to Microsoft.
- Double-click Allow users to enable online speech recognition services. A settings window for the policy opens.
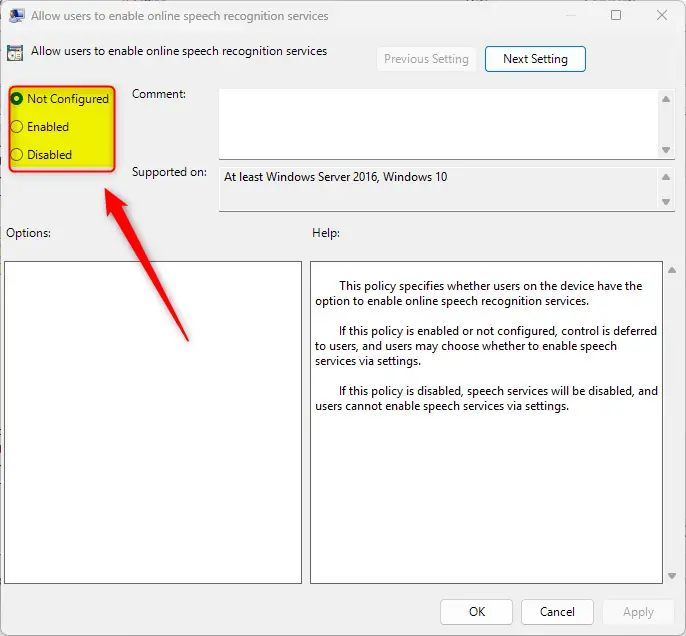
- Choose Enabled, Disabled, or Not Configured. Click OK to save.
What each choice does:
- Enabled lets users turn online speech recognition on if they want to.
- Disabled blocks it. Users cannot turn it on, and the switch in Settings is greyed out.
- Not Configured removes the rule, so each user decides in Settings. Use it to undo your change.
Policy changes normally take effect after a restart, or after the next policy refresh. If the Settings page still shows the old state, sign out and back in or restart the PC.
How to use the Registry Editor (Admin Required)
This method works on every edition, Home included. It requires administrator rights and directly changes the system registry to control whether cloud speech services are allowed. Back up your registry before making changes, as wrong edits can cause system problems. In Registry Editor, you can use File Export to save a copy first.
- Open the Windows Registry editor. Approve the User Account Control prompt if one appears.
- Go to this path:
Computer\HKEY_LOCAL_MACHINE\SOFTWARE\Policies\Microsoft\InputPersonalization - Double-click the
AllowInputPersonalizationitem. Set the value to0to disable it. - If the item doesn't exist, right-click an empty area in the right pane and create a new
DWORD (32-bit)value. Name itAllowInputPersonalizationand set its value to0.
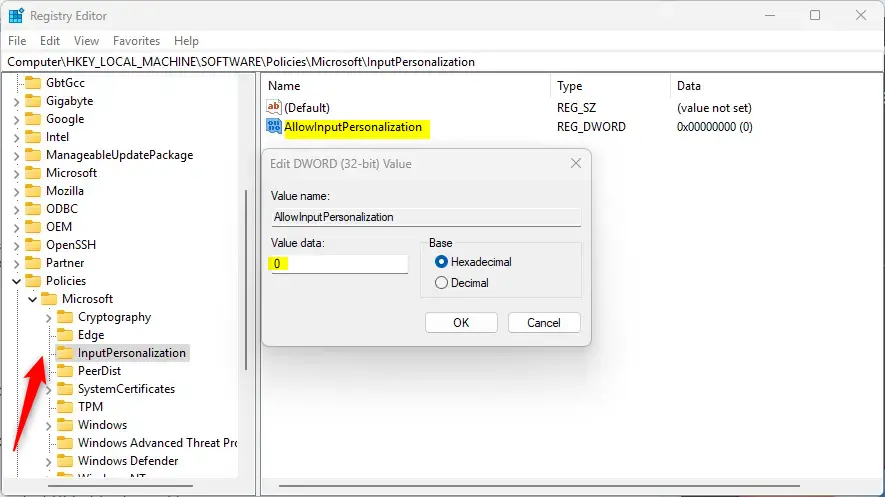
- Restart your computer for the changes to take effect.
To undo the change, return to the same value and set it back to its previous data, or delete the value you created, then restart again. If you exported a backup earlier, you can also double-click that .reg file to restore it.
Summary
Controlling online speech recognition in Windows 11 lets you find the best balance between accuracy and privacy. For most people the switch in Settings is enough. Use Group Policy or the registry when you need the choice enforced for every user on a PC, or when the switch is greyed out.
Have a question about this guide?
Answered by AI from this guide. Good questions may be added to this page — please don't include personal details.
Did this guide fix your problem?

About the Author
Richard
Tech Writer, IT Professional
Richard is a writer at Geek Rewind who turns complex IT tasks into clear, step-by-step guides. He draws on years of hands-on experience in system administration and enterprise IT operations, focusing on Windows, Linux and WordPress: the problems people actually run into, and the fixes that work. His server and WordPress guides come from systems he runs himself. Richard builds and maintains the platform behind Geek Rewind, from its Ubuntu servers and Nginx configuration to its custom WordPress plugins. Many new tutorials start with readers' questions, and he's always glad to answer them in the comments.
No comments yet — be the first to share your thoughts!