How to Enable Audio Hardware Acceleration in Windows 11

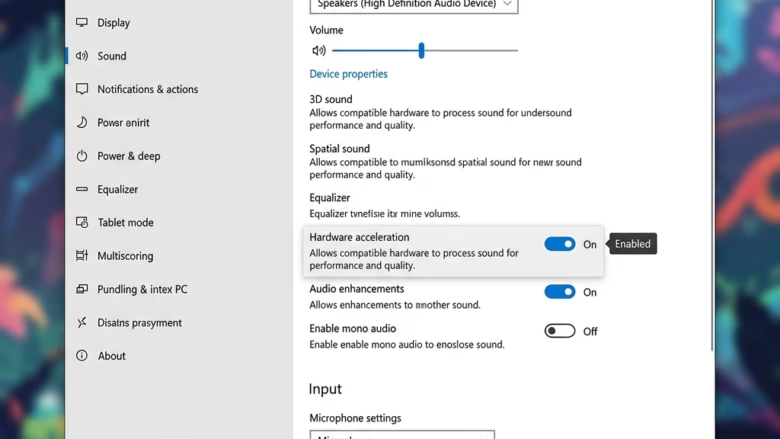
Audio hardware acceleration in Windows 11 moves some sound processing off your main processor and onto your sound hardware. That frees up CPU time, so games and other apps can run a little smoother during heavy audio work.
Compatible devices show this setting in Settings starting with Windows 11 build 29576.1000. If your build is older, or your driver doesn’t support the option, you won’t see the toggle in Settings. In that case, use the Control Panel method later in this guide. Turning acceleration on can help during heavy audio work. Turning it off is a common fix for sound bugs and driver glitches.
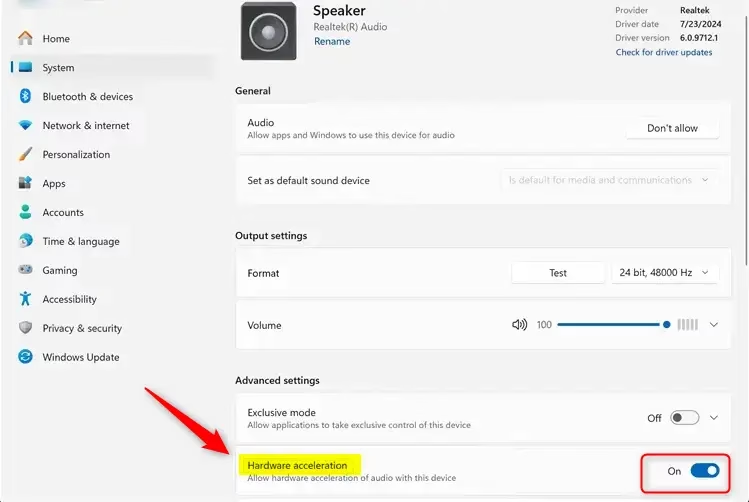
Open Settings by pressing Win+I, then go to System Sound and toggle Audio hardware acceleration on or off next to your device. The setting appears only on Windows 11 build 29576.1000 and later with compatible sound drivers.
Option 1Enable or Disable Audio Hardware Acceleration in Settings
Start with the Settings app. Every step below applies to the current Windows 11 and works the same on Home and Pro.
- Open Settings by pressing Win+I on your keyboard.
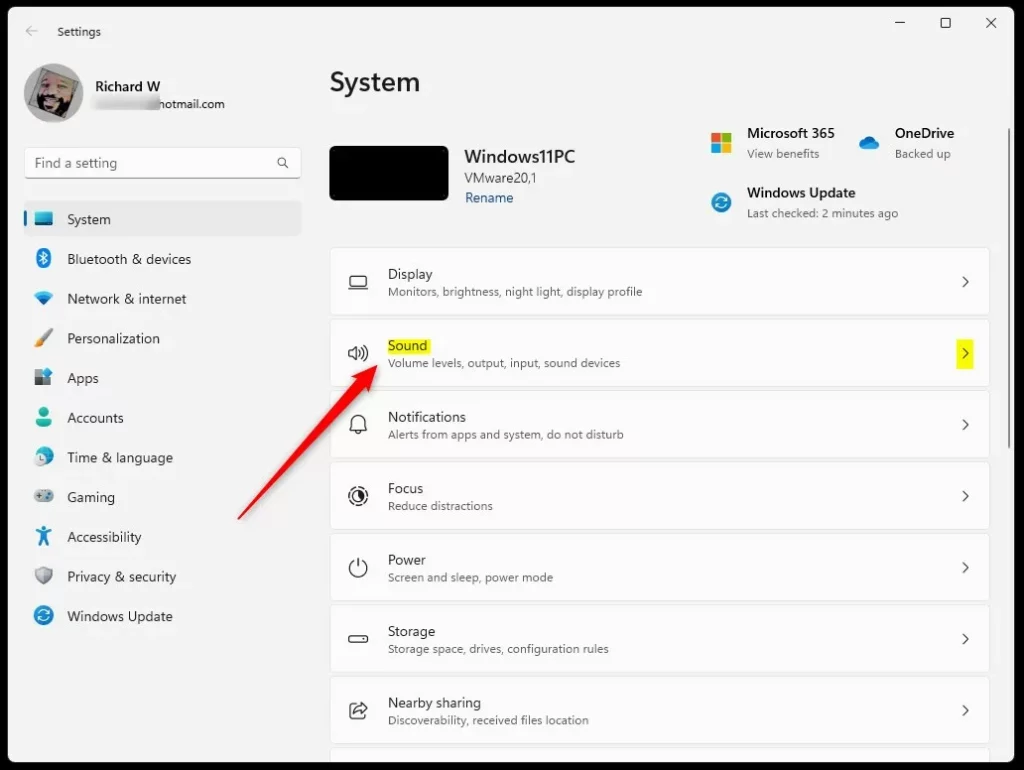
- Go to System Sound You should see your output and input devices listed on this page. Open Sound settings
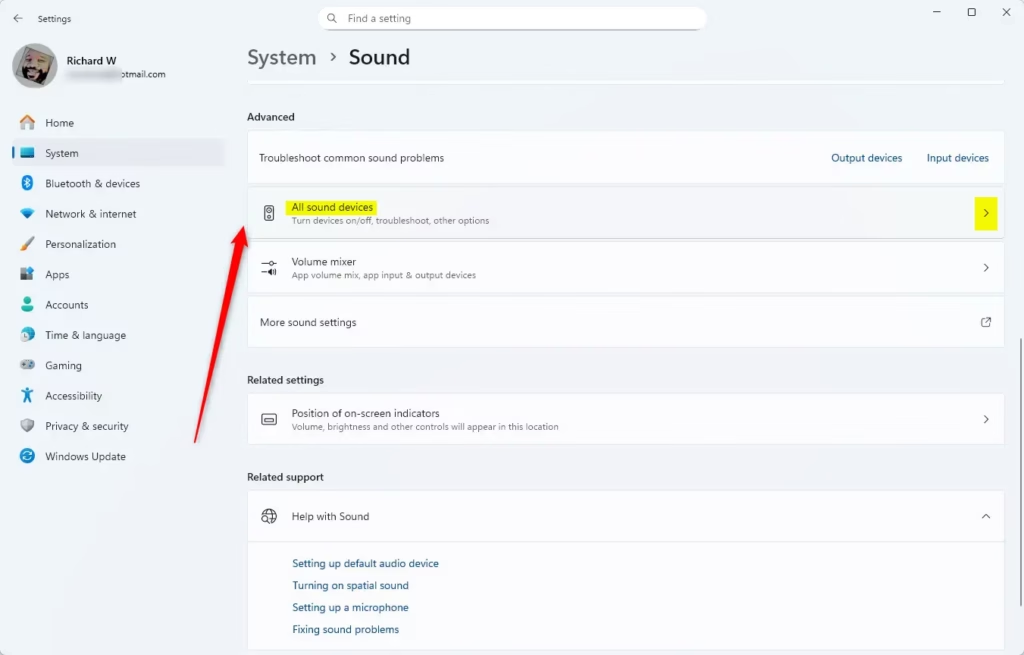
- Scroll down to the Advanced section and click All sound devices. A list of every playback and recording device on your PC opens. Open All sound devices settings
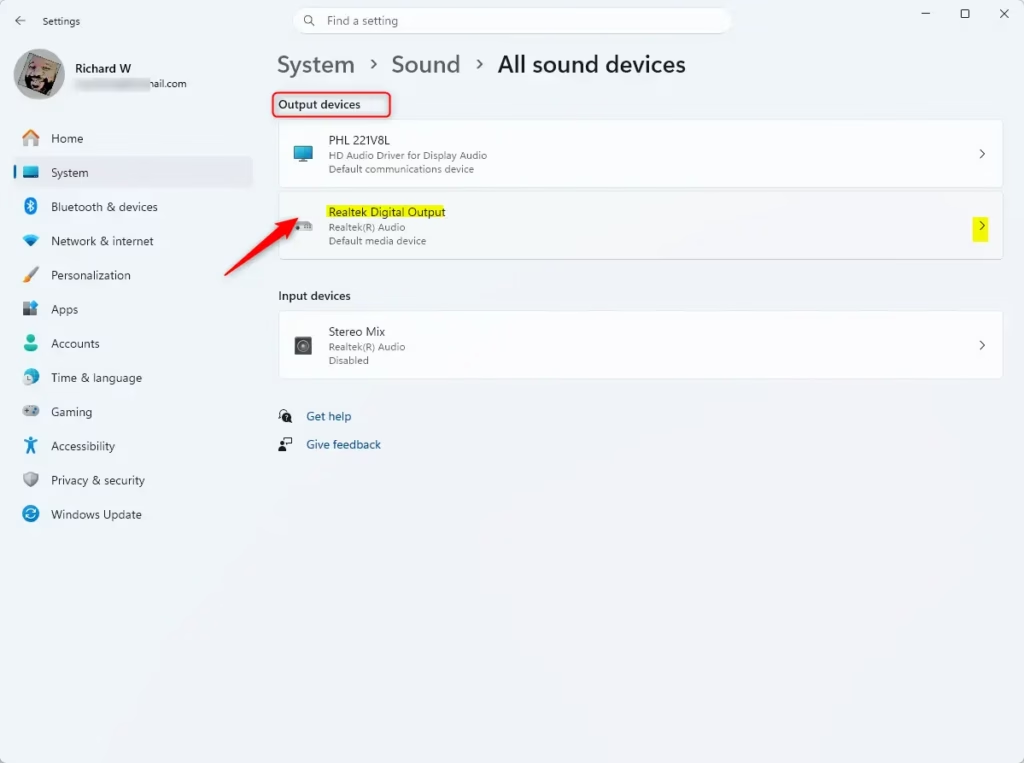
- Click the input or output device you want to change. Its properties page opens.
- Look under Advanced settings and set the Hardware acceleration toggle to On or Off. The change takes effect right away.
If you don’t see Hardware acceleration, your build or your audio driver doesn’t offer it here. The setting is also per device, so changing your speakers does not change your headset. To undo the change, flip the toggle back. If a running app still sounds the same, close and reopen it. If that doesn’t help, restart the PC.
Troubleshooting Audio Latency and Glitching
Crackling, popping and audio delay usually come from a wrong buffer size or sample rate. Before you change anything else, check the hardware acceleration setting for the affected device and update your sound card drivers. If sound keeps stuttering while you watch videos or play games, the way Windows handles your audio streams is the usual cause, and the steps below tend to clear it up.
Updating the Realtek High Definition Audio driver resolves many of these conflicts. If you have a Realtek chip, install the latest driver from your PC or motherboard maker. Next, check the sample rate in the Sound Control Panel and match it to what your apps need. For example, use 48kHz for video playback. If problems continue, turn hardware acceleration off. That pushes Windows onto a stable, software-based processing path. It uses a bit more CPU, but it often fixes the stutter.
Advanced Control: Windows Registry and Driver Settings
Registry Editor is a tool for changing advanced system settings, and it is available on both Home and Pro. Open it from the Start menu, then go to HKEY_LOCAL_MACHINE\SOFTWARE\Microsoft\Windows\CurrentVersion\MMDevices. Each sound device has its own entries under that key.
A wrong edit can break your sound. Manufacturer tools such as the Realtek Audio Console are usually the better choice. They give you finer control over DirectSound and WASAPI settings that the standard Windows menus leave out.
Option 2Control Panel Method
The Control Panel route works when the Settings toggle is missing. It uses the classic Sound dialog.
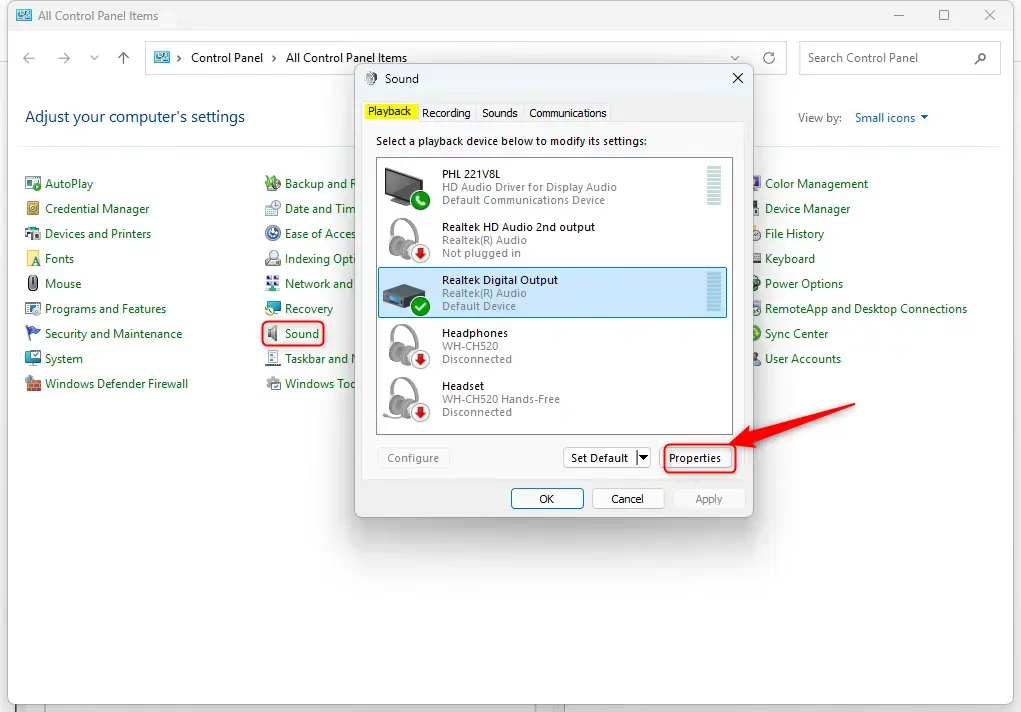
- Open the Control Panel and click the Sound icon. If you don't see it, switch View by to large or small icons. The Sound window opens.
- Select the Playback tab for speakers and headphones, or the Recording tab for microphones.
- Select your device and click Properties. The device's properties window opens.
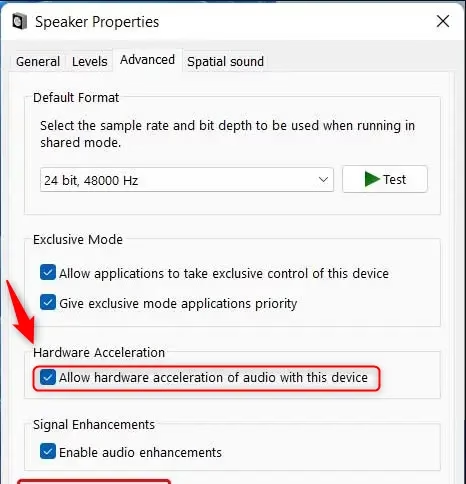
- Go to the Advanced tab.
- Check or uncheck Allow hardware acceleration of audio with this device.
- Click Apply, then OK.
Some drivers don't expose this checkbox, so it may be missing on certain devices. To undo the change, reopen the same window and set the box back. If an app doesn't pick up the change, close and reopen it.
Conclusion
Audio hardware acceleration affects both sound performance and system speed in Windows 11. Turning it on helps your computer run smoother when you game or edit music. Turning it off is a good way to troubleshoot odd sound bugs. Knowing when to change it gives you control over how your PC plays audio and handles heavy workloads.
- Enhanced Performance: Enabling hardware acceleration can improve system responsiveness, especially when multitasking or during resource-intensive tasks like gaming or audio production.
- Troubleshooting Sound Issues: If you have sound problems, disabling hardware acceleration may resolve driver compatibility issues and latency.
- Accessing Settings: You can control audio hardware acceleration in both Windows Settings and Control Panel. Use whichever your build and driver support.
- Advanced Adjustments: The Windows Registry and manufacturer control panels offer deeper control over audio settings, but take care and back up first.
- Regular Updates: Keep your audio drivers updated for the best performance and compatibility with hardware acceleration options.
Adjusting these settings lets you tune audio behavior to your specific hardware.
Frequently asked questions
What does "enable hardware acceleration" mean?
Hardware acceleration moves processing work from your CPU to your sound card or GPU. This frees up your main processor so games and apps run smoother, especially during heavy audio tasks like gaming or video editing.
Where do I find my audio settings?
Open Settings by pressing Win+I. Go to System on the left sidebar, then click Sound. Your audio settings appear there, including volume controls, output device selection, and advanced audio options.
I can't enable spatial Sound in 🪟 Windows 11. How do I fix it?
Update your audio drivers through Device Manager or your sound card manufacturer's website. Restart Windows. Check Settings System Sound to see if spatial Sound is now available. If it stays grayed out, your hardware may not support it.
I'm getting the error "hardware acceleration is enabled but not available due to GPU error." How can I fix this?
Update your GPU drivers from NVIDIA, AMD, or Intel's website. Restart your computer. Disable hardware acceleration in Settings System Sound, then re-enable it. If the error persists, disable it permanently and use standard audio processing instead.
Still have a question?
Answered by AI from this guide. Good questions may be added to this page — please don't include personal details.
Did this guide fix your problem?

About the Author
Richard
Tech Writer, IT Professional
Richard is a writer at Geek Rewind who turns complex IT tasks into clear, step-by-step guides. He draws on years of hands-on experience in system administration and enterprise IT operations, focusing on Windows, Linux and WordPress: the problems people actually run into, and the fixes that work. His server and WordPress guides come from systems he runs himself. Richard builds and maintains the platform behind Geek Rewind, from its Ubuntu servers and Nginx configuration to its custom WordPress plugins. Many new tutorials start with readers' questions, and he's always glad to answer them in the comments.
No comments yet — be the first to share your thoughts!