How to Enable Secure DNS in Microsoft Edge on Windows 11

Secure DNS in Microsoft Edge encrypts your DNS lookups. These are the requests that turn a website name into a server address. With it on, other people on your Wi-Fi network, such as a café or hotel network, cannot easily read which sites your browser is looking up. You turn it on in the Edge privacy settings, and it takes a few clicks.
You can use your current internet provider’s secure DNS, if it supports it, or pick a different secure DNS service. The setting applies to Edge only. Other browsers and apps on the PC keep using their own DNS settings. It works the same on Windows 11 Home and Pro.
Open Microsoft Edge, click the three-dot menu, select Settings, then Privacy, search, and services. Scroll to Security, toggle on “Use secure DNS to specify how to lookup the network address for websites,” and choose your DNS provider. No restart needed.
Step 1Open Edge’s Settings
Start in the Edge settings page. You reach it through the three-dot menu in the top-right corner of the browser window.
- Open Microsoft Edge on your computer.
- Find the three dots icon (
...) in the top-right corner of the browser window. This is the Settings and more menu. Click it. A dropdown menu opens. - Scroll down the menu and click Settings. Edge opens the settings page in a new tab, with a list of categories down the left side.
edge://settings into the address bar and press Enter to jump straight to the settings panel.If you already know where you are going, this is quicker than using the menu.

Step 2Go to Privacy and Security Settings
The secure DNS option is in the privacy section of Settings. This area also holds the tracking protection, certificate and network security controls.
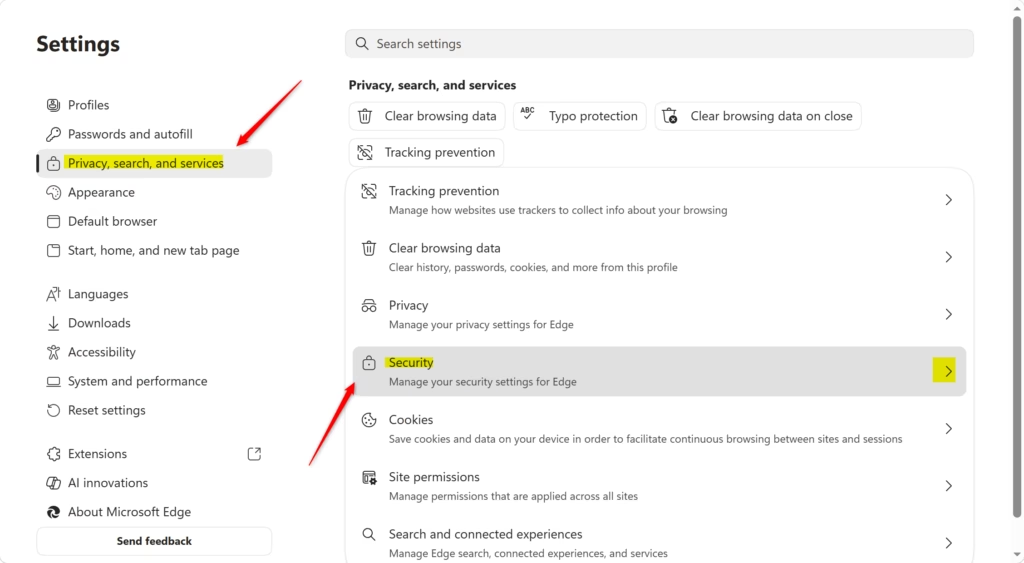
- In the left sidebar of the Settings page, click Privacy, search, and services. The main area on the right now shows Edge’s privacy features.
- Scroll down the page until you reach the Security section. It is usually near the bottom of the main area.
Warning: Many privacy controls sit on this page, including tracking prevention and clearing browsing data. You only need the DNS setting described below, so leave the rest as it is.
Step 3Turn on Secure DNS
The switch for secure DNS sits in the Security section you just scrolled to. Turning it on takes two steps.
- In the Security section, find the option that says "Use secure DNS to specify how to lookup the network address for websites."
- Click the switch next to it to turn it On. The provider choices appear underneath the switch.
You do not need to restart Edge or Windows. If a site does not load right after the change, reload the tab. If you cannot click the switch, or it is greyed out, your device may be managed by a work or school account. In that case an administrator controls the setting through policy, and you will need to ask them to change it.
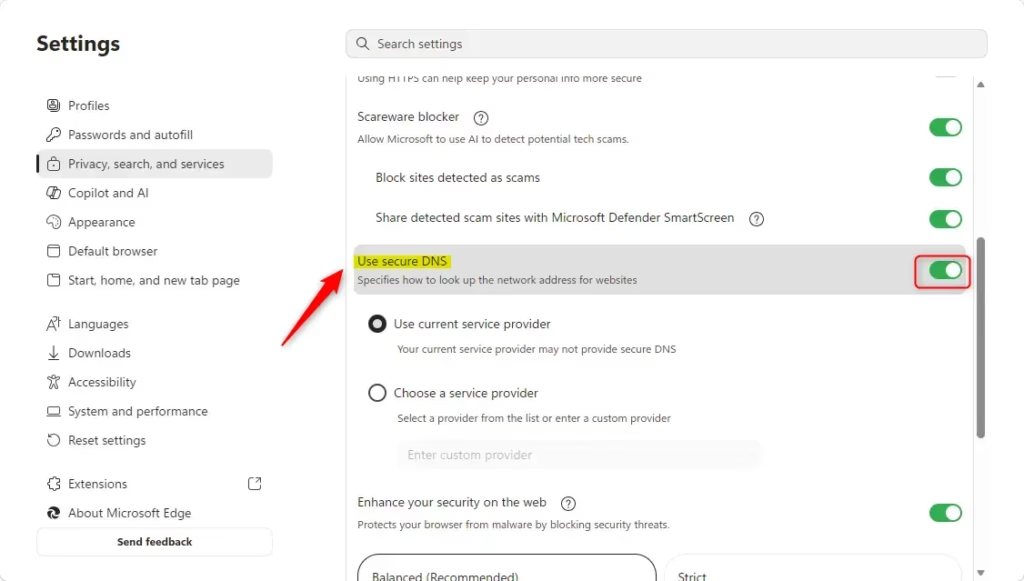
One option uses your current service provider, and another lets you pick a different provider from a list or enter your own. If you pick from the list, you will see well-known services such as Cloudflare or Google. For most people the default selection works well. Choose a different provider if your internet provider does not support secure DNS, or if you prefer a specific service.
To undo the change at any time, return to the same page and turn the switch Off.
Summary
Secure DNS improves your privacy by encrypting the requests that translate website names into server IP addresses. Your internet provider and anyone watching the local network can no longer read those lookups to see which sites you visit.
What happens when done? Your DNS queries are now encrypted, which adds a layer of protection against tracking. Internet providers and network sniffers can no longer read your hostname lookups in plain text. Secure DNS does not hide everything, though. The sites you visit still see your IP address, and it is not a replacement for a VPN.
Did this guide fix your problem?

About the Author
Richard
Tech Writer, IT Professional
Richard is a writer at Geek Rewind who turns complex IT tasks into clear, step-by-step guides. He draws on years of hands-on experience in system administration and enterprise IT operations, focusing on Windows, Linux and WordPress: the problems people actually run into, and the fixes that work. His server and WordPress guides come from systems he runs himself. Richard builds and maintains the platform behind Geek Rewind, from its Ubuntu servers and Nginx configuration to its custom WordPress plugins. Many new tutorials start with readers' questions, and he's always glad to answer them in the comments.
No comments yet — be the first to share your thoughts!