
Microsoft Edge Secure Network is a built-in virtual private network (VPN) that encrypts your internet traffic and hides your browsing on public Wi-Fi networks. The feature gives you 15 gigabytes of free data each month. That makes it harder for anyone on the same network to read your personal details at places like coffee shops and airports.
You turn it on from the browser settings, with no extra software or extensions. Knowing how to switch it on and off lets you decide when your traffic goes through the private tunnel. This guide covers both, plus how to confirm it is running. The steps are written for the current Edge on Windows 11. Edge updates often, so a label may differ slightly on your build.
Open Microsoft Edge and click the three dots in the top-right corner. Select Settings, then Privacy, search, and services from the left sidebar. Scroll down to Microsoft Edge Secure Network and click the switch to turn it on. Sign in with your personal Microsoft account if prompted.
How to Turn On or Off Microsoft Edge Secure Network VPN
You need to be signed in to Edge with a personal Microsoft account. Secure Network is tied to that account, because that is how Edge tracks your monthly data allowance. If the option is missing, check that you are signed in and that Edge is up to date. The feature may also not be offered in every region or on every account type.
Step 1Open Microsoft Edge Settings
Everything starts in the Edge settings. Follow these steps to get there.
- Open the Microsoft Edge browser.
- Click the three dots (…) in the top-right corner of the browser window. This is the Settings and more button.
- Choose Settings from the menu. Edge opens the Settings page in a new tab, with a list of categories down the left side.

Step 2Go to Privacy, Search, and Services
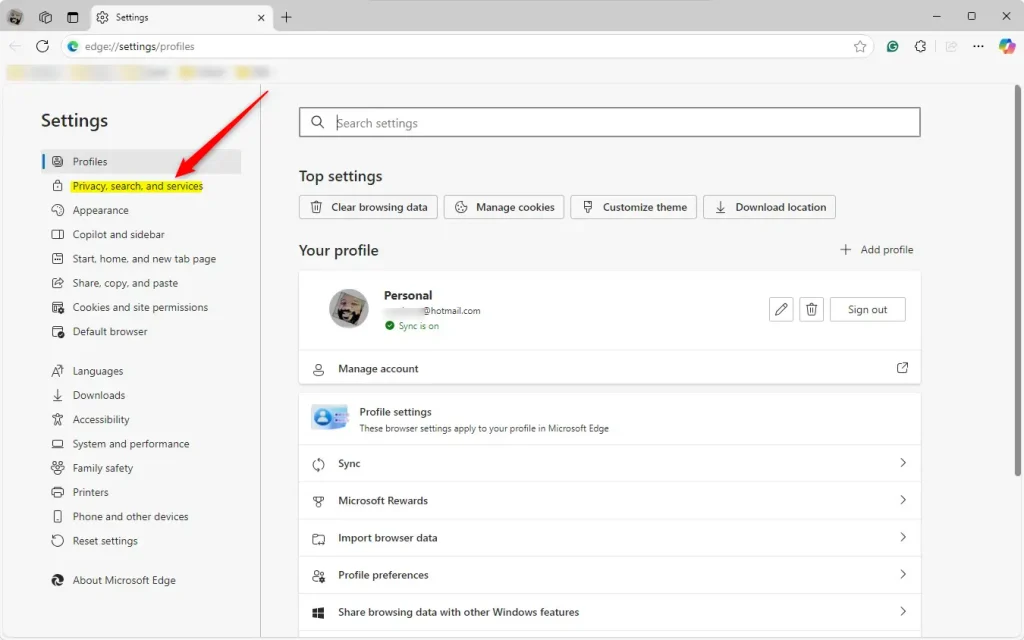
The Privacy, search, and services page holds the Secure Network controls. Next, open that page from the left sidebar.
- Click Privacy, search, and services in the left-hand menu. The right side now shows the options for how Edge handles your information and online activity, such as tracking prevention, clearing browsing data and security settings.
If your browser window is narrow, the left sidebar may be hidden. Click the menu icon in the top-left of the Settings page to bring it back.
Step 3Find and Turn On the Secure Network Feature
The Secure Network switch sits further down the same page. Scroll down until you see it.
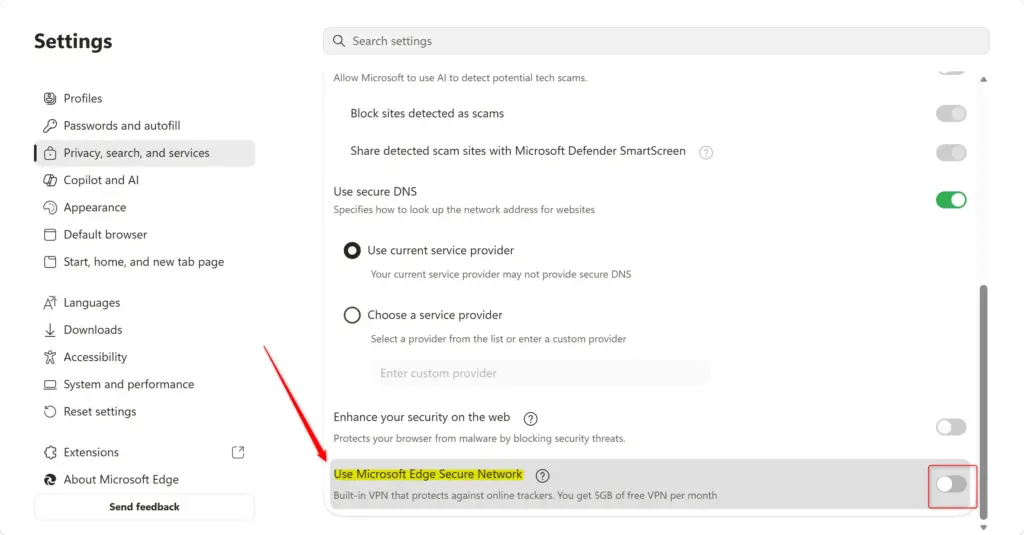
- Scroll down the Privacy, search, and services page until you find the Microsoft Edge Secure Network section.
- Click the switch next to Use Microsoft Edge Secure Network to turn it on. The switch changes color, usually to blue, when it is on.
- If Edge asks you to sign in, sign in with your personal Microsoft account. Once you are signed in, protection starts.
To turn it off, come back to the same page and click the switch again. It returns to its grey, off position and your traffic goes back to using your normal connection. No restart of Edge or Windows is needed for either change.
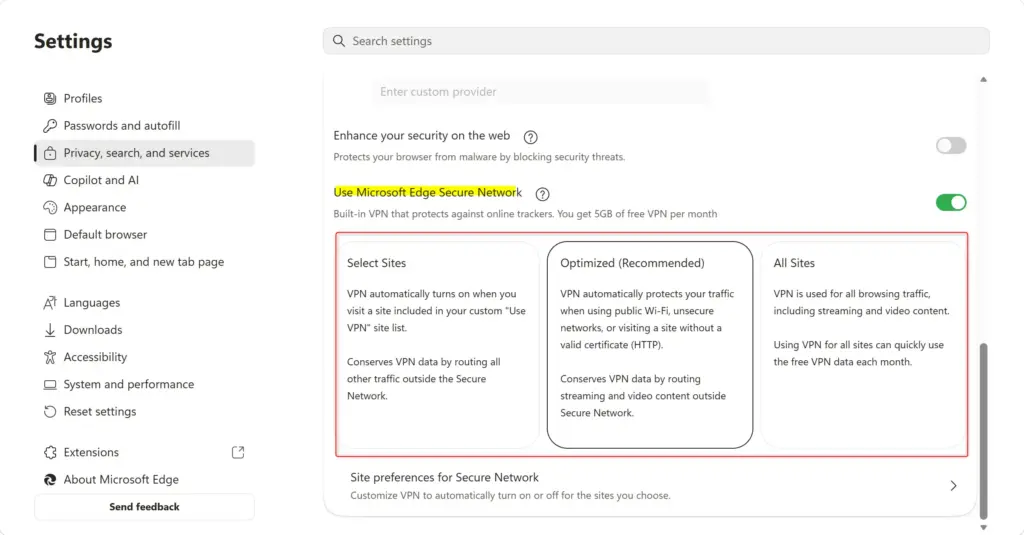
Step 4Understand the Optimized Setting (Recommended)
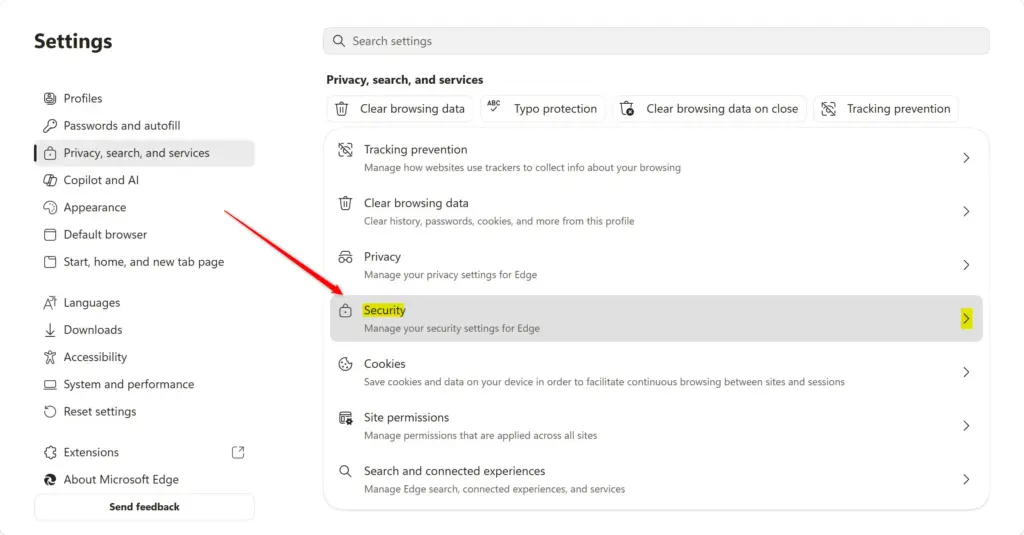
It does not push every page you visit through the VPN. It turns protection on only when it is useful, such as on unsecured sites. This saves your monthly data allowance and still keeps you covered on public Wi-Fi. Here is what that means in practice.
- Protection When Needed: The browser decides when to turn on Secure Network protection. This usually happens when you visit a website that is not secure (its address starts with
http://instead ofhttps://) or when you connect to an open, unsecured Wi-Fi network. - Saves Data: To stop you using up your free data too fast, streaming sites like Netflix, Hulu or YouTube usually do not use the Secure Network VPN by default. This helps a lot if you want your 15 GB to last the month.
- Scrambles Data and Hides Location: While it is active, it still encrypts your connection and hides your location. That protects sensitive information and makes it harder for trackers to follow you.
Step 5Check if Secure Network is Working
You can tell Secure Network is working by looking at the Edge toolbar. A small shield icon appears there when the feature is on.
- After you turn on Secure Network, look at the top-right corner of the Edge toolbar, near your profile picture.
- Look for a new shield icon. It means the Secure Network feature is enabled for your browsing.
- Click the shield icon to see your current data usage and whether protection is active.
If you do not see the icon, go back to Settings Privacy, search, and services and check that the switch is still on. Also confirm you are still signed in to Edge.
References:
Summary
Edge Secure Network VPN protects your online privacy by encrypting your web traffic and hiding your location from trackers. You turn it on or off with one switch in the settings menu. You need to be signed in with a personal Microsoft account to get the free encrypted data each month. Leave it on when you use public Wi-Fi, and switch it off when you do not need it.
Was this guide helpful?

About the Author
Richard
Tech Writer, IT Professional
Richard is a writer at Geek Rewind who turns complex IT tasks into clear, step-by-step guides. He draws on years of hands-on experience in system administration and enterprise IT operations, focusing on Windows, Linux and WordPress: the problems people actually run into, and the fixes that work. His server and WordPress guides come from systems he runs himself. Richard builds and maintains the platform behind Geek Rewind, from its Ubuntu servers and Nginx configuration to its custom WordPress plugins. Many new tutorials start with readers' questions, and he's always glad to answer them in the comments.




No comments yet — be the first to share your thoughts!