How to Browse with HTTPS-First Mode in Microsoft Edge
Microsoft Edge’s HTTPS-First Mode automatically makes your internet browsing safer by encrypting your connection.
This means your passwords, bank details, and private information are scrambled, making them unreadable to hackers. When you switch this feature on, Edge tries to load every website using HTTPS, the secure and encrypted way, instead of the less secure HTTP.
This security setting is available in Microsoft Edge versions starting from the one released in early 2021.
To enable HTTPS-First Mode, go to Settings > Privacy, search, and services, then scroll to Security and turn on “Automatically switch to more secure connections.” This ensures Microsoft Edge prioritizes secure HTTPS connections for your browsing.
What HTTPS-First Mode Actually Does
Microsoft Edge’s HTTPS-First Mode helps keep you safer online by automatically trying to connect to websites using a secure HTTPS connection whenever possible. This mode protects your information while you browse the internet, ensuring your connection is private and secure.
By default, Microsoft Edge’s HTTPS-First mode shows warnings only for public websites. To increase caution for all websites, users can change this behavior. This ensures Edge warns about HTTP connections for both public and private company sites, not just public ones.
Checking If HTTPS-First Mode Is Enabled
Microsoft Edge’s HTTPS-First Mode is already turned on for you by default. This feature tries to use secure “https” connections for all websites without you needing to do anything.
Microsoft Edge’s HTTPS-First Mode automatically protects your web browsing by trying to use secure connections, marked by “https,” for all websites. To confirm your settings, open Edge’s Settings menu and navigate to “Privacy, search, and services.” Then, locate the “Security” section and ensure “Make secure connections only” is turned on to guarantee your browsing stays safe from the start.
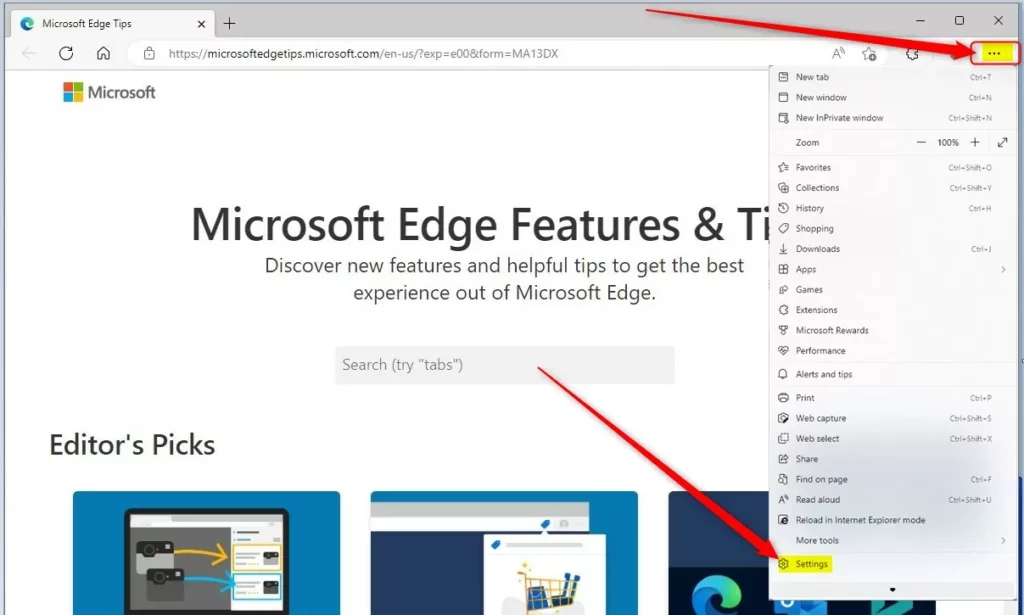
- Open Microsoft Edge. Launch the browser from your taskbar or Start menu.
- Click the menu button in the upper-right corner. This is the three-dot icon (labeled “Settings and more”) at the top right of your browser window.
- Select Settings from the dropdown menu. This opens your Edge preferences in a new tab.
- Navigate to Privacy, search, and services. Look for this option in the left sidebar of the Settings page.
- Scroll down to the Security section. This is where all your connection security options live.
- Look for “Automatically switch to more secure connections with Automatic HTTPS.” This toggle controls whether Edge warns you about unsafe sites. It should be turned on (the switch should be blue and to the right).

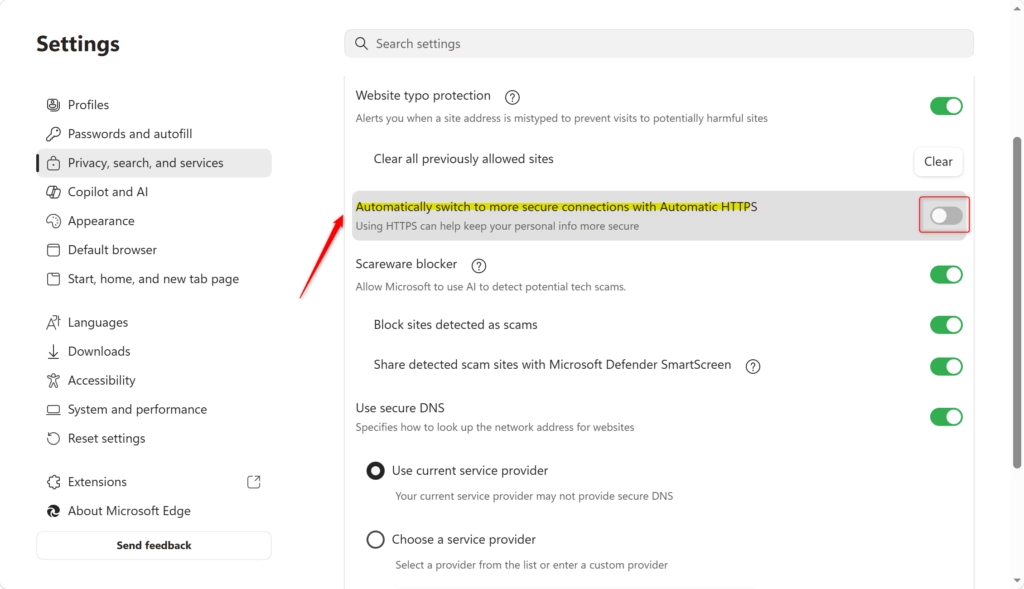
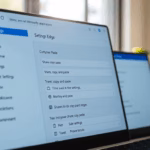
The Security section within Microsoft Edge settings controls HTTPS-First Mode. On smaller screens, this Security section may appear lower and out of view. Users must scroll down to find the Security section to activate HTTPS-First Mode, which uses encrypted connections for safer browsing.
Choosing Your Security Level
Once you’ve confirmed that alerts are enabled, you can decide how aggressive you want HTTPS-First Mode to be. Microsoft Edge gives you two options. Which one you choose depends on your specific situation.
Option 1Default Setting (Recommended for Most People)
Microsoft Edge’s default HTTPS-First Mode setting warns you only when you visit public websites that aren’t using a secure HTTPS connection. This setting offers a good balance, as most websites now use HTTPS, so you’ll rarely see unnecessary warnings.
This setting balances security with practicality. Most public websites support HTTPS now, so you’ll rarely see warnings. You also avoid unnecessary alerts when accessing private networks or older services that haven’t been upgraded to HTTPS yet.
HTTPS-First Mode secures your data by always trying to connect using HTTPS, a more secure web connection than HTTP. This mode helps you when you often use the public internet, even older company websites that only use HTTP. Microsoft Edge automatically changes to HTTPS whenever possible.
Option 2Maximum Security Setting
Choosing the maximum security setting for HTTPS-First Mode means Microsoft Edge will warn you about insecure connections on both public and private websites. This gives you more control, but you will see more warnings and need to decide whether to proceed on less secure sites.
The trade-off is that you’ll see more warnings overall. Every insecure connection gets flagged, so you’ll need to make conscious decisions about whether to proceed or not.
HTTPS-First mode in Microsoft Edge version 115 offers maximum protection. This security mode is recommended for users in security-sensitive fields, individuals handling sensitive personal or financial data, and anyone wanting top-level protection over convenience.
How to Change Your Setting
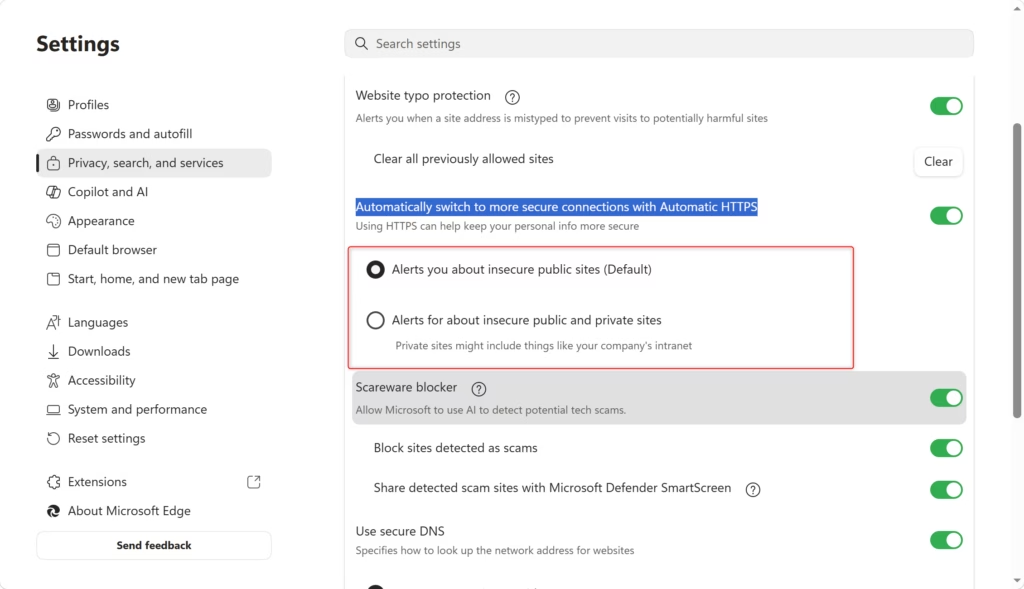
- Stay in the Security section of Settings. You should already be here from the previous steps.
- Find the two alert options below “Automatically switch to more secure connections with Automatic HTTPS.” You’ll see radio buttons next to each option.
- Select the radio button next to your preferred security level. The default option is selected by default. But you can click to switch to the more aggressive setting if you prefer.
- Close the Settings tab when you’re done. Your preference saves automatically.
To change your HTTPS-First Mode setting, stay in the Security section of Edge’s Settings. Look for the two alert options below “Automatically switch to more secure connections with Automatic HTTPS.” Click the radio button next to your preferred security level to select it.
Reference:
Summary
Microsoft Edge’s HTTPS-First Mode is designed to protect you automatically, with default settings offering good security for most people. This mode helps ensure your browsing is secure by prioritizing HTTPS connections, and you can adjust it for even more security if needed.
Microsoft Edge’s HTTPS-first mode enhances your browsing security. For most users, the default settings provide adequate protection. However, individuals handling sensitive data can select a more protective option. Activating this mode will increase the frequency of the padlock icon appearing, signaling that your internet connection uses encryption for better privacy.
How to turn on HTTPS first mode?
Microsoft Edge’s HTTPS-First Mode is enabled by default. To verify it’s on, open Edge Settings, navigate to Privacy, search, and services, then scroll to Security. Look for HTTPS-First Mode and ensure it’s toggled on. You can choose between warnings for all sites or public sites only.
How to bypass Err_SSL_Version_or_Cipher_Mismatch in Edge?
This error means the website is using outdated SSL/TLS encryption. You can’t safely bypass it because it’s there to protect your security. Instead, contact the website owner to report the issue, as they need to update their SSL certificate to modern, secure standards for proper encryption.
How do I enable HTTPS only mode in Edge?
HTTPS-First Mode is Microsoft Edge’s HTTPS-only feature, enabled by default. Access it via Settings > Privacy, search, and services > Security > HTTPS-First Mode. Toggle it on and select your preferred warning level: all sites or public sites only for maximum protection.
What does Ctrl+K do in Edge?
Ctrl+K in Microsoft Edge opens the address bar and automatically selects any existing text, allowing you to quickly search or type a new URL. It’s a faster alternative to clicking the address bar manually and provides instant access to your search or navigation needs.
Was this guide helpful?

About the Author
Richard
Tech Writer, IT Professional
Richard, a writer for Geek Rewind, is a tech enthusiast who loves breaking down complex IT topics into simple, easy-to-understand ideas. With years of hands-on experience in system administration and enterprise IT operations, he’s developed a knack for offering practical tips and solutions. Richard aims to make technology more accessible and actionable. He's deeply committed to the Geek Rewind community, always ready to answer questions and engage in discussions.


No comments yet — be the first to share your thoughts!