How to Add Members to Your Microsoft Family Group


A Microsoft Family group lets you share Microsoft 365 subscriptions, track screen time, and set web filters across Windows 11 PCs, Xbox consoles, and mobile devices. Adult organizers can invite up to 20 total people into the group to manage household settings or monitor kids’ online activity.
You add new members by sending an email invitation through a web browser or the official Family Safety app. Only an organizer can send invites. The person you invite must accept before they appear in the group, so expect a short wait between sending the invite and seeing them listed.
Go to family.microsoft.com, sign in as the organizer, select “Add a family member,” enter their email address or phone number, choose their role (Member or Organizer), and click Next to send the invitation. They must accept the invite via email to join.
Step 1Go to the Family Hub Website
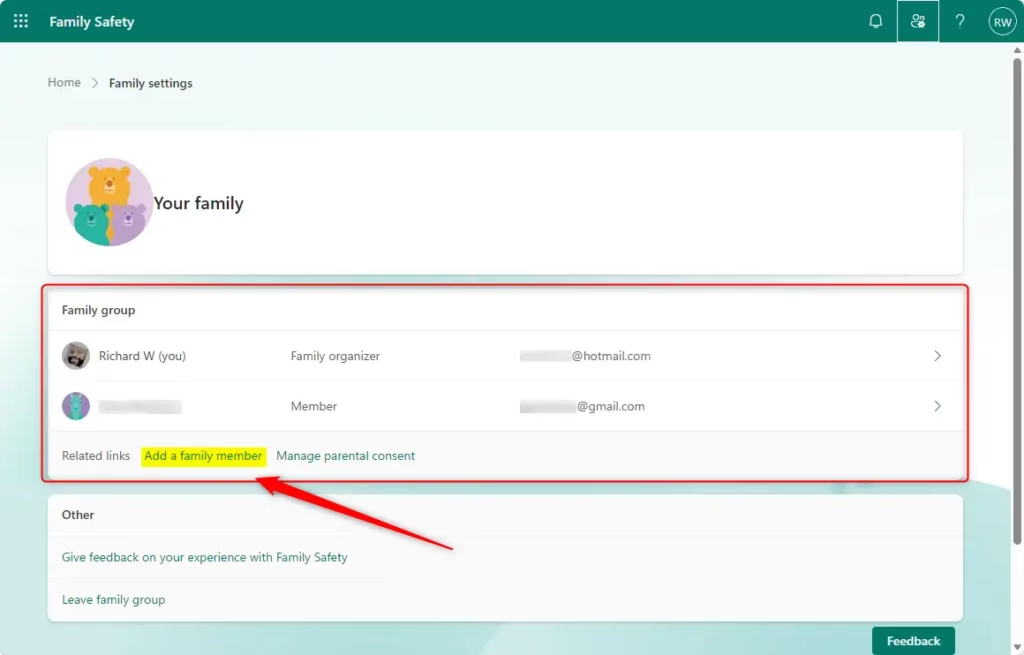
You can add a Microsoft family member by first signing in to the online Family Hub dashboard. Open your web browser, go to family.microsoft.com, and sign in using the Microsoft account you set up as the Family Organizer. Use the correct organizer account, because only organizers have permission to send invites.
- Open your browser and go to family.microsoft.com. You can use any current browser on Windows 11, including Microsoft Edge. You should see a sign-in page, or your family page if you are already signed in.
- Sign in as the Organizer. Use the Microsoft account you used when you first set up the family group. After you sign in, the page lists your current family members.
- Check which account you are using. If you have more than one Microsoft account, look at the account name or picture in the top corner. If it is not the organizer, sign out and sign in again with the right one.
- Find the “Add a family member” option. It is a button or link on the main page, near the list of members. Select it to start the invitation.
If you cannot find the button, the wrong account is the most likely cause.
Step 2Choose Their Role
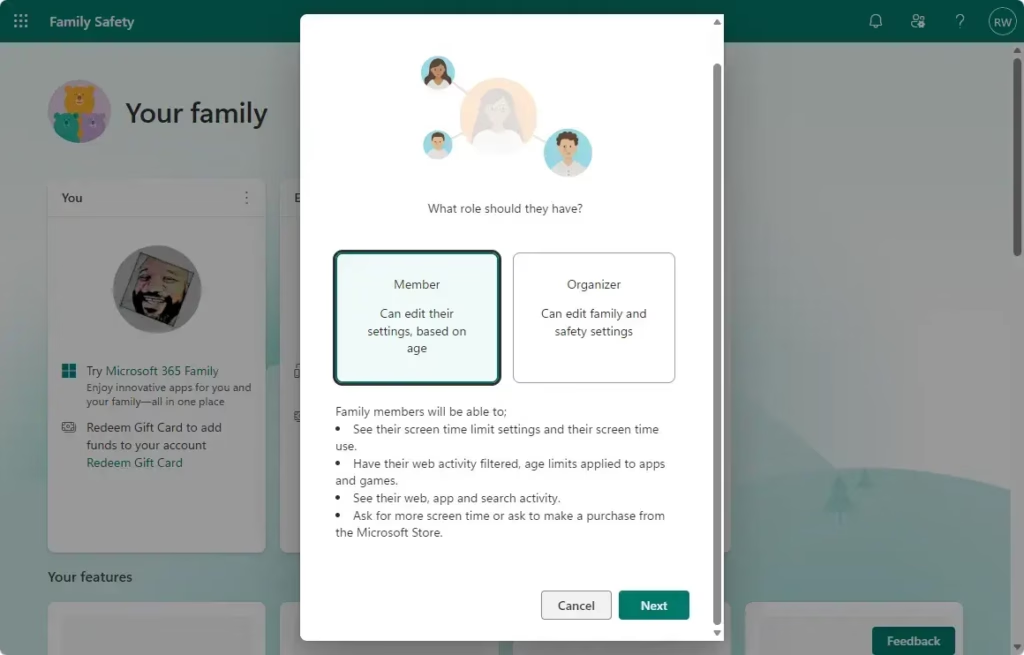
You need to pick a role when you add a Microsoft family member to your group. Microsoft gives you two choices: Member or Organizer. Pick the Member role for children or regular users whose accounts you want to monitor. Pick the Organizer role only for trusted adults who need full control over the family settings.
- Select “Add a family member.” A window opens asking for the email address or phone number of the person you want to invite.
- Enter their details. Type the email address or phone number that belongs to their Microsoft account, or the one they will use to sign in.
- Choose the role. You have two options:
- Member: This is usually for children. Organizers can watch what members do online. Organizers can also control which apps, games, and websites members can use.
- Organizer: This role is for adults in the family group. Organizers can manage other members. They can add or remove people from the group. They can also change settings for everyone. You can have more than one organizer.
- Click “Next” to continue, then follow the on-screen prompt to send the invitation.
Warning: Be careful when you give someone the Organizer role. You are giving them the power to manage the family group, including adding and removing people. Only give this role to adults you trust.
Step 3What Happens for the Person You Invite
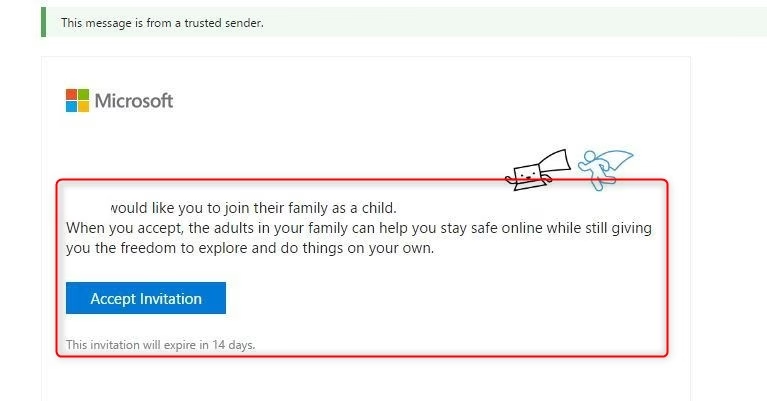
The person you invite must check their email or text messages for a message from Microsoft. They need to open that message, click the invite link, and sign in with their own Microsoft account to accept the invitation and join your family group.
- Check email or texts. The person you invited gets an email from Microsoft, or a text message if you used their phone number. It contains a link to join your family group. If they cannot find it, ask them to check the spam or junk folder.
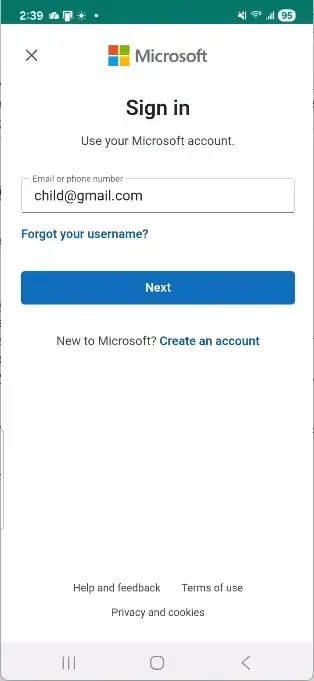
- Click the link in the invitation. This opens a Microsoft page that asks them to sign in with their Microsoft account.
- Sign in and accept. What happens next depends on who is joining:
- If they are an adult: They sign in and confirm they want to join your family group. That is usually all they need to do.
- If they are a child (under the legal age): This takes an extra step. They are asked to get permission from an adult. You (or another organizer) get another message asking you to approve them joining. This makes sure children are only added with a parent's okay.
- Confirm they appear in the group. Once they accept, refresh your family page. They should now show in the list of members.
Important note: A person can only be in one Microsoft Family group at a time. If the person you are inviting is already in another group, they must leave or be removed from it first. They can ask that group's organizer to remove them, or leave the group themselves if they have the right permissions. After that, they can join yours.
Adding Family Members with the Family Safety App
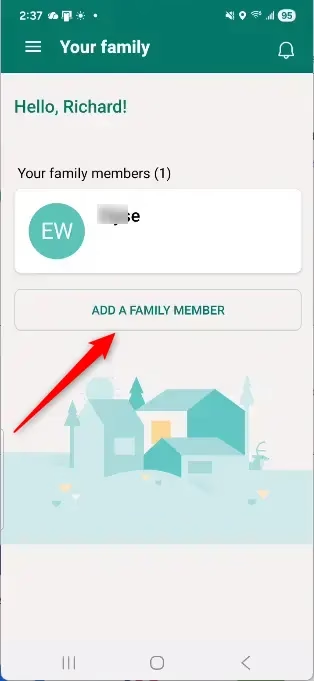
You can add a Microsoft family member right from your phone by using the mobile app. Open the Microsoft Family Safety app on your iPhone or Android device, tap the option to add a family member, and type in their email address or phone number to send the invite. Sign in to the app with the organizer account first.
- Open the app. Start the Microsoft Family Safety app on your phone or tablet. Make sure it is signed in with the organizer account.
- Go to Add Member. Look through the app until you find the "Add a family member" option. Tap it.
- Enter details and role. As on the website, enter the email address or phone number of the person you want to invite. Then choose their role, Member or Organizer.
- Tap "Invite." Check your choices and tap "Invite to family group." The invitation is sent.
- Let them accept. The person you invited follows the same steps as in the web method: open the message, click the link, and sign in with their own Microsoft account. A child's invite still needs your approval.
Reference:
https://support.microsoft.com/en-us/family-safety/add-people-to-your-family-group
Summary
You can add a Microsoft family member by using either the online Family Hub website or the mobile app. Organizers sign in, choose between a Member or Organizer role, and send an invite that the recipient must accept using their own Microsoft login details. If an invite does not arrive, check the spam folder and confirm the person is not already in another family group.
Frequently asked questions
How do I add people to my Microsoft group?
Sign in to family.microsoft.com as the organizer account. Select the person icon or member management option, then choose to add a member. Enter their email address and send the invitation. They'll receive an email and must accept before joining your group.
Can other members of the Microsoft 365 family group see my files?
No. Family group membership doesn't automatically share personal files or folders. Members can only access files you explicitly share with them through OneDrive or other sharing settings. Family group mainly manages subscriptions, screen time, and web filters.
Can I allow my child to add friends in Microsoft Family?
No. Only adults (organizers and some family members with appropriate permissions) can manage who joins the Family group. Children cannot invite or add friends themselves. Parents control all membership changes through the Family Hub.
Can I share my Microsoft 365 subscription without adding someone to my Family group?
Yes. You can share your Microsoft 365 subscription by adding the person as a licensed user directly in your Microsoft account settings, separate from creating a Family group. They won't have access to family management features like screen time tracking.
Still have a question?
Answered by AI from this guide. Good questions may be added to this page — please don't include personal details.
Did this guide fix your problem?

About the Author
Richard
Tech Writer, IT Professional
Richard is a writer at Geek Rewind who turns complex IT tasks into clear, step-by-step guides. He draws on years of hands-on experience in system administration and enterprise IT operations, focusing on Windows, Linux and WordPress: the problems people actually run into, and the fixes that work. His server and WordPress guides come from systems he runs himself. Richard builds and maintains the platform behind Geek Rewind, from its Ubuntu servers and Nginx configuration to its custom WordPress plugins. Many new tutorials start with readers' questions, and he's always glad to answer them in the comments.
No comments yet — be the first to share your thoughts!