Set Screen Time Limits for a Child’s Account in Windows 11

Microsoft Family Safety is the free parental-controls service that sets screen time limits for a child’s Windows 11 account. Windows 11 has no screen time page in Settings, so you set the limits online at family.microsoft.com instead. The quickest way is to add your child to your family group, have them sign in to the PC with their own Microsoft account, and then set a daily allowance and allowed hours under Screen time.
The limits follow the child’s Microsoft account, not the computer. That means they apply on any PC where your child signs in. If you want one schedule across all devices, the same limits can also cover Xbox and Android devices.
The steps below show you how to set it up, what your child sees when time runs out, and how to fix limits that don’t apply.
To set time limits for a child’s account on Windows 11, you use Microsoft Family Safety at family.microsoft.com, not a PC setting. Add the child as a Member of your family group, have them sign in to the PC with their Microsoft account, then set a daily allowance and allowed hours under Screen time. Local and work or school accounts cannot be limited.
What you need before you start
Check these first. Most failed setups come down to one of them.
- A Microsoft account for you. You act as the Organizer (the adult who manages the family group).
- A Microsoft account for the child. Family Safety cannot limit a local account (one that exists only on the PC) or a work or school account. If your child has a local account, see the section on creating a Microsoft account below.
- An internet connection on the child’s PC. Limits are stored online and copied to the PC automatically. A PC that stays offline may not receive new or changed limits.
- Administrator access on the PC. You need it to add the child’s account to the PC and to check its account type.
Windows 11 Home and Windows 11 Pro behave the same here. Family Safety does not depend on the edition, and you do not need to change Group Policy (Windows settings for administrators) or edit the registry (Windows’ settings database).
Create a family group and add the child’s account
A family group links your account to the child’s, which lets you manage their settings. Skip this section if the child is already a member of your family group.
- Open a browser and go to family.microsoft.com. Sign in with your own Microsoft account. The Family Safety page appears, or a prompt to create a family group does.
- Select Create a family group if you have not made one yet. Your account becomes the Organizer.
- Select Add a family member. Enter the child's Microsoft account email address, for example child@example.com.
- Choose the role Member, not Organizer. Only Member accounts get parental controls. Organizers are adults, and the Screen time options do not apply to them.
- Send the invitation. The child receives an email invitation. Ask them to open it and select the accept button, or accept it at account.microsoft.com/family while signed in as themselves.
After the child accepts, their name appears on the Family Safety page under your family group. If it still shows as pending, the invitation has not been accepted yet. Screen time controls stay unavailable until it is.
You can also start from Settings Accounts Family on a Windows 11 PC. Select Add someone. This opens the same Microsoft sign-up flow. The label for this page varies slightly between Windows 11 versions.
If the child doesn't have a Microsoft account
Create one for them. When you select Add a family member, look for the option to create a new account for the child. Follow the prompts to pick an email address and password. Younger children usually need a parent to give consent during sign-up. The age thresholds differ by country, so follow what the sign-up screen asks for.
Write down the child's sign-in details. You need them in the next section.
Add the child's account to the PC
The screen time limits only apply on a PC where the child signs in with their Microsoft account. This step needs administrator privileges, so sign in with an administrator account first.
- Open Settings Accounts
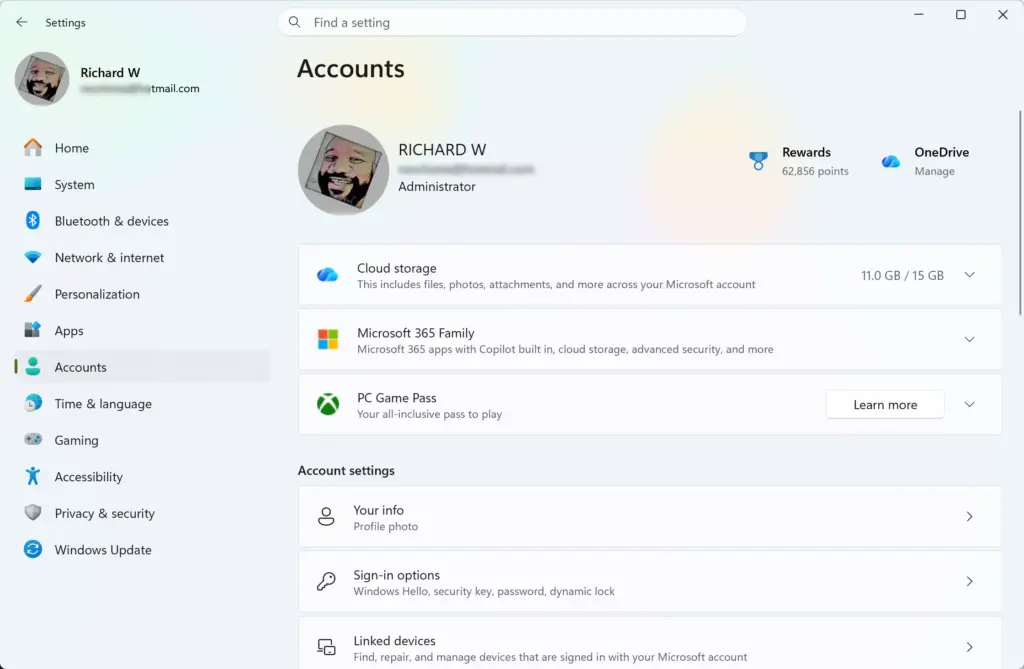
Settings › Accounts - Select Family and check whether the child already appears in the list. If they do, skip to the next section.
- If they are not listed, go back to Accounts and open Other users. On some earlier Windows 11 builds this page is called Family & other users.
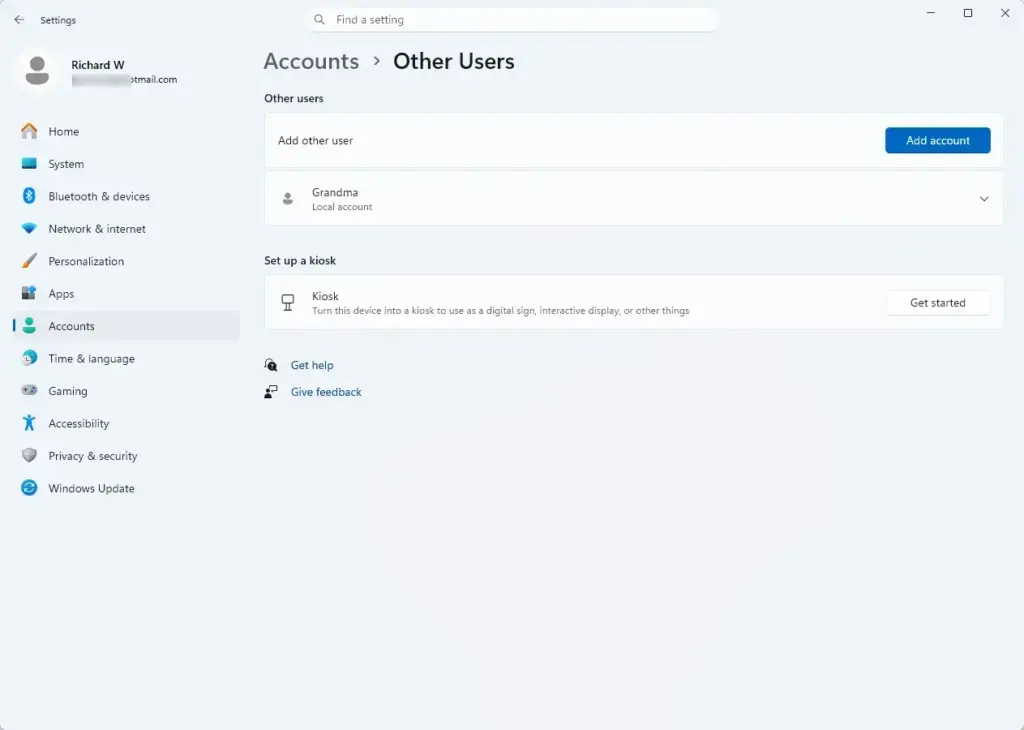
Settings › Accounts › Other users - Select Add account. Enter the child's Microsoft account email address, for example child@example.com, and follow the prompts. The account now appears in the list of users on the PC.
- Sign out of your own account, then sign in as the child once. The first sign-in finishes setting up their profile and registers the PC with their Family Safety account.
The PC now appears under the child's name in Family Safety. This can take a few minutes. If it still does not appear, make sure the PC is online and sign out and in again.
Set screen time limits for the child
These steps set how long the child can use the PC each day and during which hours. You can do this from any device, including your own PC or the Microsoft Family Safety app on a phone.
- Go to family.microsoft.com and sign in as the Organizer.
- Select the child's name, then open Screen time. You should see tabs for devices and for apps and games.
- Open the Devices tab and select the Windows PC the child uses. The PC is listed by its name, for example COMPUTER-NAME.

- Turn on the limit for that device. Look for a toggle named Set limits for this device or similar. The schedule options appear below it.
- Select a day of the week. Set the total time allowed that day and the hours the child may use the PC.
- Repeat for each day. Weekdays and weekends often need different limits.
- Save or confirm the schedule. The new limits sync to the PC the next time it is online.
Exact label wording on the Family Safety site changes from time to time. The pattern stays the same: choose the child, open Screen time, pick the device, then set a daily amount and a time window.
Set a daily time allowance and allowed hours
The two settings do different jobs, and you can use either or both.
- Daily allowance is the total time the child can use the PC in a day. The clock counts only the time they are signed in and active.
- Allowed hours is the window in which the PC can be used at all. For example, you can block use after bedtime even if the child has time left.
If you set both, the child needs time left in their allowance. The child must also be inside the allowed hours.
Use one schedule or a schedule per device
Family Safety can apply one schedule to every device the child uses, or let you set a schedule per device. Use the toggle named Use one schedule on all devices on the Screen time page to switch between the two.
A single schedule is easier to manage. It means 2 hours a day is 2 hours in total across the PC, Xbox and Android phone. A schedule per device lets you give the PC a different limit from the console. Pick whichever fits how the child uses their devices.
Set limits for individual apps and games
A device limit covers everything. If you only want to cap a particular game or app, use the app limit instead.
- On the child's Screen time page, open the Apps and games tab.
- If you are prompted to turn on Activity reporting (the setting that records which apps the child uses), turn it on. App limits depend on this data.
- Find the app or game in the list. It only appears after the child has used it on a device linked to their account.
- Select the app and set a daily time limit for it, or choose to block it.
App limits are separate from the device limit. The app stops at its own limit even if the child still has device time left.
What the child sees when time runs out
The child gets a notification as their time runs low. When it runs out, Windows locks the session and shows a message that their time is up. They cannot continue using the PC until the next allowed period begins or you approve more time.
Unsaved work can disappear when the session locks, so tell the child to save often. Tell the child to save regularly, and consider a limit that leaves enough time to finish homework.
Approving extra time
The child can send a request for more time from the lock screen message. You receive the request by email and in the Family Safety app. Approve it and choose how much extra time to grant. The request does not change the schedule itself, so tomorrow's limits stay as you set them.
Check that the limits are working
Test the limits before relying on them.
- Set a short limit for today, for example 10 minutes, or set the allowed hours to end a few minutes from now.
- Sign in to the PC as the child and use it normally.
- Wait for the warning notification and the lock message.
- Go back to family.microsoft.com and restore the real schedule.
If the child's PC does not lock, check the troubleshooting section below. The cause is almost always the account type or a missing sync.
Why the Screen time options are missing or greyed out
If you cannot find the controls, or the options do not apply, check these causes in order.
- The child has not accepted the invitation. The account must show as a family member, not pending. Ask them to accept the email invitation.
- The child's role is Organizer. Screen time applies only to Member accounts. Remove the child from the group and add them again as a Member. If the role is wrong, you must do this from the family group page.
- The child signs in with a local account. Family Safety cannot manage it. Add their Microsoft account to the PC as described above and have them use it.
- The PC is not listed. The child has not yet signed in on that PC with their Microsoft account, or the PC is offline. Sign in as the child once and check the PC is connected to the internet.
- You are signed in as the wrong person. Only the Organizer sees the controls. Check which account you used at family.microsoft.com.
- The account is a work or school account. Family Safety does not support these.
If a change does not take effect, wait a few minutes and have the child sign out and back in. This makes the PC download the latest settings. A restart is not normally needed.
Stop the child bypassing the limits
Time limits only apply to the child's own account. A child can sidestep them if another way into the PC exists. Check the following:
- Keep the child's account as a Standard user, an account that cannot change system settings or remove other accounts. Open Settings Accounts Other users (or Family & other users), select the child's account and check that the account type is not Administrator. This step needs administrator privileges. An administrator account can change or remove other accounts.
- Protect your own account with a password or PIN. If the child can open your account, they can use the PC without limits.
- Remove spare local accounts. An unlimited local account on the same PC lets the child work around the schedule. Deleting an account is hard to undo, because its files can be removed with it. Back up anything you need first.
- Cover other devices. Limits on the PC do nothing for a phone or console. Use Use one schedule on all devices or set limits on each device the child uses.
Change or remove the limits
You can change a schedule at any time. The change syncs to the PC the next time it is online.
- Go to family.microsoft.com and sign in as the Organizer.
- Select the child's name and open Screen time.
- Edit the daily amount or allowed hours for the day you want to change, or turn off the limit toggle for the device to remove the schedule.
Turning off the limit removes the restriction but keeps the child in your family group. To stop managing the child's account completely, remove them from the family group on the same site. This is harder to undo, because you must send a new invitation and the child must accept it to link the account again.
What to do next
If the limits still don't apply after you sign the child out and in, check the Devices tab on the Family Safety site first. If the PC is missing there, the child hasn't signed in with their Microsoft account on it. Once the limits work, review the Apps and games tab after a week of normal use. It shows which apps take most of the child's time, which helps you set more accurate app limits.
Was this guide helpful?

About the Author
Richard
Tech Writer, IT Professional
Richard is a writer at Geek Rewind who turns complex IT tasks into clear, step-by-step guides. He draws on years of hands-on experience in system administration and enterprise IT operations, focusing on Windows, Linux and WordPress: the problems people actually run into, and the fixes that work. His server and WordPress guides come from systems he runs himself. Richard builds and maintains the platform behind Geek Rewind, from its Ubuntu servers and Nginx configuration to its custom WordPress plugins. Many new tutorials start with readers' questions, and he's always glad to answer them in the comments.




No comments yet — be the first to share your thoughts!