Check Your Screen Time on a Windows 11 PC

Windows 11 does not have a full screen time dashboard like Android or iOS. Instead, it shows a total “Screen on” time under Settings System Power & battery Battery usage, and it lists in-use time for each app. Both numbers come from the battery, so the total only appears on laptops and tablets.
Windows 11 cannot track daily app time or set daily limits on your own account. It also cannot show something like “2 hours in Chrome today.” Desktop PCs without a battery get no screen-on total at all.
For a desktop, or for per-app limits, you need a third-party app or Microsoft’s Family Safety service. Family Safety works for child accounts only. This guide covers each option and explains what the numbers do and do not measure.
Windows 11 shows total screen time under Settings System Power & battery Battery usage, in a figure labelled Screen on, for the last 24 hours or 7 days. That figure only appears on laptops, tablets and 2-in-1 devices with a battery. On a desktop PC, or to see time per app, you need a third-party app or Microsoft Family Safety.
Check Total Screen Time With Battery Usage
The Screen on figure is the time your display has been switched on, over either the last 24 hours or the last 7 days. It is the closest thing Windows 11 has to a built-in screen time total. This works on laptops, tablets and 2-in-1 devices. For desktops, see the next section.
- Open Settings by pressing Win+I.

Windows 11 Start menu with Settings gear icon highlighted. - Select System in the left pane, then select Power & battery.
- Scroll to the Battery section and select Battery usage to expand it. A graph of battery level appears.
- Look below the graph for the Screen on figure. This is your total screen-on time for the period shown.
- Change the time range using the drop-down next to the graph. The choices are the last 24 hours and the last 7 days. The graph and the figures update to match.
Windows builds differ slightly in how this page is laid out. If you don’t see the figures where this guide says, scroll through the expanded Battery usage section. The Screen on label is what you are looking for.
How accurate the Screen on figure is
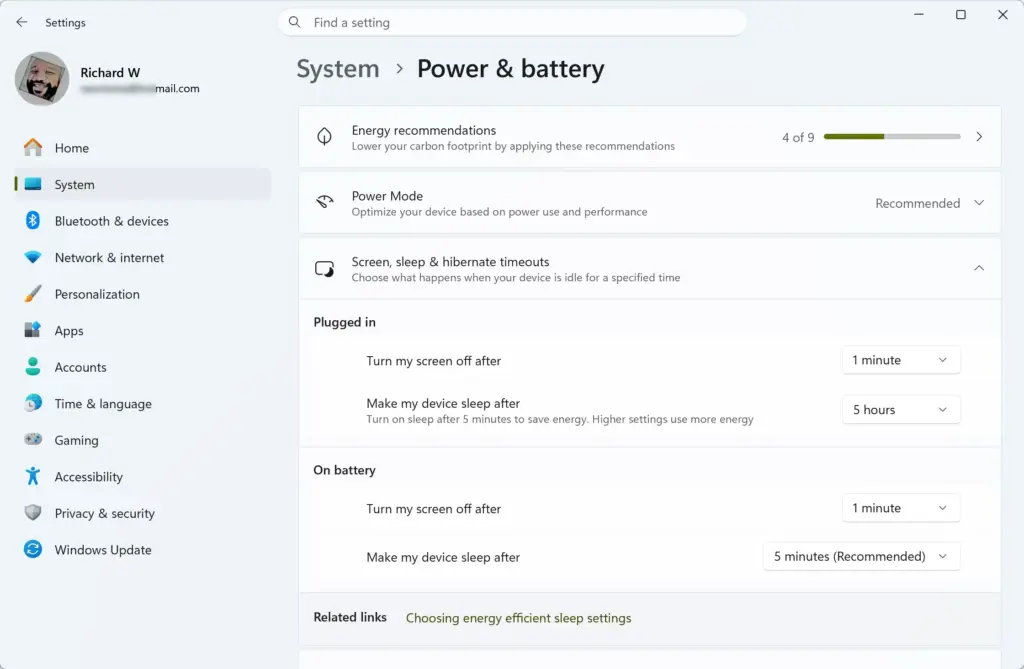
The figure counts every minute the display is lit, whether or not you are at the keyboard. If you leave your desk with the screen on, that time still counts. Your screen timeout setting affects the number directly. A short timeout turns the screen off sooner, so the total drops even if you use the PC the same amount.
To check your timeout, go to Settings System Power & battery and expand Screen, sleep, & hibernate timeouts. Compare it with the usage figure so you know how much idle time may be included.
Check Screen Time Per App
Windows 11 doesn't track screen time per app directly. The closest data is the in-use time in the battery usage list. The in-use time is reasonably reliable on battery power. It is much less accurate when the PC is plugged in. Use it as a guide to which apps you spend the most time in.
- Open Settings System Power & battery Battery usage again.
- Find the Sort by drop-down above the app list and select In use. The list reorders so the apps with the most active time are at the top.
- Read the in-use time shown next to each app name. This is how long the app was in use during the 24-hour or 7-day window you picked.
- Change the time range if you want a longer view. The app list changes along with the graph.
If an app you use daily is missing, it probably had very little recorded activity, or it was only used while the PC was plugged in. Windows builds this list from battery drain data, so plugged-in time is not reflected reliably. If you mostly work at a desk and keep the PC plugged into a wall outlet, expect gaps and low numbers.
Why Battery Usage or Screen On Is Missing
This is the most common problem with this method. Several things cause it.
- Your PC has no battery. Desktop PCs and all-in-ones usually don't show the Battery section at all. Windows has no battery to report on, so there is no Battery usage graph and no Screen on figure. Use the third-party app below instead.
- The page layout differs on your Windows 11 version. Microsoft has moved things around in feature updates. Open Settings System Power & battery, scroll the whole page, and expand every section that looks related to battery.
- The data is empty or very short. If the PC was recently reset or reinstalled, there is little history to show. Use the device normally for a day and check again.
- Your device is a virtual machine (software that runs a separate computer inside your own). Virtual machines usually don't expose battery information to Windows, so the section is missing or empty.
If the Power & battery page itself is missing from Settings System, you are not on Windows 11, or the device is managed by an organisation that has hidden it. In that case, ask your IT administrator or use one of the other methods below.
Use a Third-Party App for Per-App Screen Time
A third-party app is the practical option if you want a real record of time spent per app, or you use a desktop PC. One such app is Digital Wellbeing for Windows, a free app by developer Alexandra Sava. It is modelled on the Android feature of the same name. It records which apps you use and shows the results in charts. You can also set limits for individual apps.
This app is not made by Microsoft. Download it only from a source you trust, and check the publisher name before you run the installer. The steps below walk through the download and install.
- Open the download page for Digital Wellbeing for Windows on the Softpedia website, and select Download Now.
- Select DOWNLOAD: External mirror in the pop-up that appears. The file starts downloading within a few seconds.
- Open the downloaded file to start the installation. Windows may show a User Account Control prompt. Installing may need administrator privileges, so select Yes if you have an administrator account, or enter an administrator's password if prompted.
- If you see Windows protected your PC, that is SmartScreen (a Windows feature that warns you about apps it doesn't recognize). Select More info, then Run anyway. Before you select Run anyway, make sure you trust the file and its source. This step skips a Windows safety check.
- Follow the installer prompts. When it finishes, the app opens to its home screen.
The app sometimes takes a while to show up-to-date data after installation. Leave it running for a while before judging the numbers. It needs time to build a record.
Reopen the app if it says it is already running
If you try to open it again, you may see the message Application is already running. Check your notification tray. The app is fine. The app is running fine. It sits out of sight in the hidden icons.
- Select the up arrow (Show hidden icons) in the taskbar's system tray.
- Right-click the Digital Wellbeing for Windows icon.
- Select Open. The app window appears.
To reach it faster next time, drag the icon from the hidden-icons flyout onto the visible part of the taskbar.
Remove the app if you no longer want it
Open Settings Apps Installed apps, find Digital Wellbeing for Windows, select the three-dot menu beside it, then select Uninstall. Confirm when prompted. Uninstalling also removes the app's record of your past usage, so note down anything you want to keep first.
Check Screen Time on a Child's Account With Microsoft Family Safety
Microsoft Family Safety is Microsoft's parental controls service. It is the only built-in way in Windows 11 to see and limit screen time, and it only applies to child accounts. It can't report on or restrict your own adult account. To use it, you need to add the child's Microsoft account to your Microsoft family group. The child then needs to sign in to the Windows 11 PC with that account.
Once that is set up, you manage screen time from your own account on the Microsoft Family Safety website or app, not from the child's PC. You choose the child, open the screen time options, and review activity or set limits there. The exact menu names change as Microsoft updates the service, so use the labels you see on screen rather than relying on a fixed path.
Family Safety limits only work if the child uses a standard (non-administrator) account on the PC. A child who also has an administrator account on the same device can get around the limits. An administrator account has full control over the PC. If you manage devices for children, check that they don't have local administrator access.
Check How Long the PC Has Been Running
This isn't screen time. It shows the longest a PC could have been on since its last full restart. It is useful on desktops, where there is no Screen on figure.
- Press Ctrl + Shift + Esc to open Task Manager.
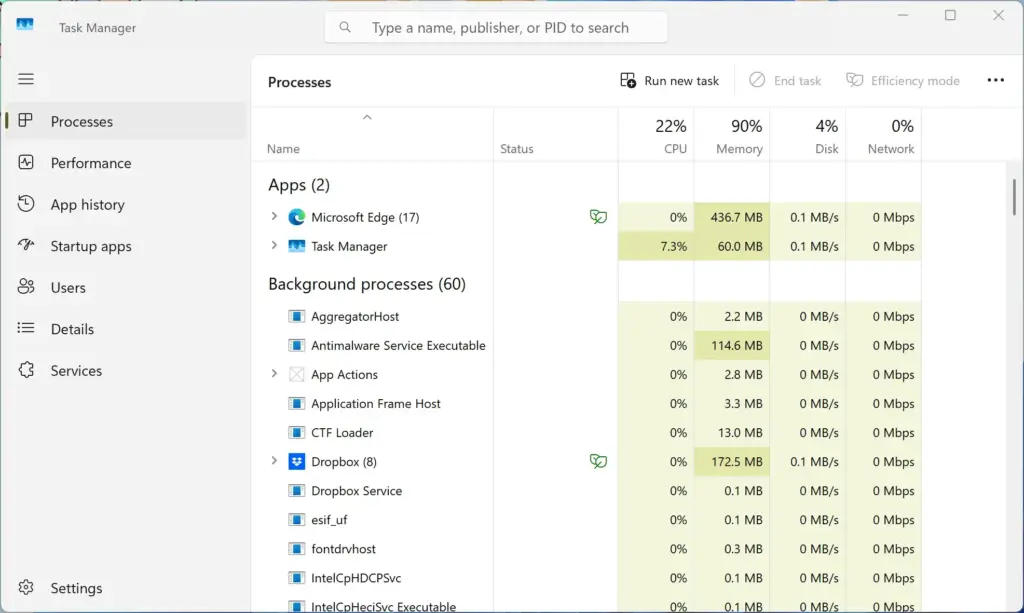
Task Manager - Select Performance in the left pane.
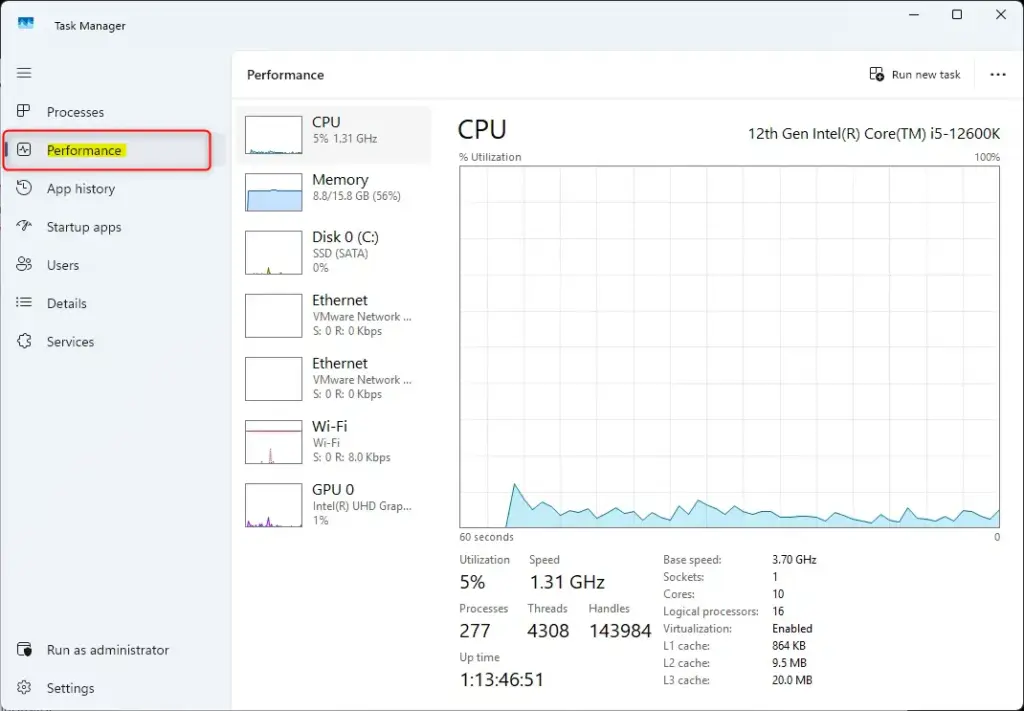
Performance tab selected in Windows 11 Task Manager. - Select CPU.
- Read Up time under the graph. It shows days, hours, minutes and seconds since the last full start.
Fast startup can skew this number. When you choose Shut down with Fast startup (a feature that saves part of the system state to speed up the next boot) enabled, Windows may not reset the counter. A Restart does reset it. So an up time of several days doesn't mean you used the PC for that long.
What These Numbers Don't Tell You
None of the built-in methods measures active, hands-on screen time. Keep these limits in mind when you read the figures:
- Screen on counts idle time while the display stays lit.
- Per-app times come from battery data, so plugged-in use is under-reported.
- Up time measures power-on time, not screen time.
- Data covers only the last 24 hours or 7 days. Windows doesn't keep a long-term log of it.
- The figures are per device. If you use more than one PC, check each one separately.
If you need a tracked history across weeks, a third-party app that runs in the background is the only practical route. If you only want a sense of how long you sit at a laptop in a day, Screen on is enough.
What to Do Next
To stop leaving the display lit while you are away, shorten the timeout under Settings System Power & battery Screen, sleep, & hibernate timeouts. That also makes the Screen on figure more representative of real use. If you installed Digital Wellbeing for Windows and it starts with the PC, you can turn that off in Settings Apps Startup. Battery usage data and layout can change after a Windows 11 feature update, so if the figures move or disappear later, look through the expanded Battery usage section again.
How can I set parental controls on my child's laptop?
Sign in to account.microsoft.com/family with the parent Microsoft account and add your child's account to your family group. Then open the child's profile in Microsoft Family Safety and set screen time limits, app and game limits, and web filters. Your child must sign in to Windows with their Microsoft account for these settings to apply.
What are some apps that can monitor screen activity?
Microsoft Family Safety is the free built-in option for child accounts on Windows 11. Third-party apps such as Qustodio and Kaspersky Safe Kids track app use and websites across more devices and can set per-app limits. Task Manager and Settings do not track how long you use each app.
How do I check what monitor I have in 🪟 Windows 11?
Open Settings, select System, then select Display. Scroll down and click Advanced display. The name and model of the selected monitor appear there. If you have more than one screen, use the display selector at the top of the page to switch between them.
How to set time limits on apps in 🪟 Windows 11?
Windows 11 cannot set daily time limits on apps for your own account. For a child's account, use Microsoft Family Safety: go to account.microsoft.com/family, open the child's profile, select Screen time, and set limits under Apps and games. For your own account, you need a third-party app.
Was this guide helpful?

About the Author
Richard
Tech Writer, IT Professional
Richard is a writer at Geek Rewind who turns complex IT tasks into clear, step-by-step guides. He draws on years of hands-on experience in system administration and enterprise IT operations, focusing on Windows, Linux and WordPress: the problems people actually run into, and the fixes that work. His server and WordPress guides come from systems he runs himself. Richard builds and maintains the platform behind Geek Rewind, from its Ubuntu servers and Nginx configuration to its custom WordPress plugins. Many new tutorials start with readers' questions, and he's always glad to answer them in the comments.
No comments yet — be the first to share your thoughts!