Why Does My Lock Screen Time out Too Soon in Windows 11

Windows 11 turns the display off about one minute after you lock the PC. The normal screen timeout setting does not control this timer.
To change it, you reveal a hidden power setting called Console lock display off timeout. Then you set it to the length you want. Before you do that, check that no other timer is the real cause.
Windows 11 turns the display off about a minute after you lock the PC because of a hidden power setting called Console lock display off timeout, which Settings does not show. To change it, open Terminal (Admin) and run a command that reveals the setting, then set the time you want in Power Options under your current power plan.
Why the lock screen times out so quickly
Windows 11 has several separate timers that all look like “the screen timed out”. Changing one leaves the others alone. That is why many people raise the screen timeout and still get a black screen a minute after locking.
- Turn off my screen after is the normal display timeout. It runs while you are signed in and idle.
- Console lock display off timeout is a hidden power setting. It controls how long the lock screen stays lit after the PC locks. The default is short, and Settings does not show it.
- Screen saver wait time starts a screen saver after idle time. If you enable On resume, display logon screen, the PC also locks when you wake it.
- Sleep puts the whole PC into a low-power state. The screen goes off because the PC is asleep, not because of a display timer.
- Sign-in requirement decides whether Windows asks for your password after the PC wakes. It affects when you see the lock screen, not how long the screen stays on.
A power plan (a saved group of power settings) holds most of these values. Each plan stores its own copy, and each plan has separate values for plugged in and on battery. A change made under one plan or power source does not carry over to the others.
Raise the normal screen timeout in Settings
This step sets how long Windows waits before turning off the display while you are idle and signed in. It does not change the lock screen timeout, but you should set it first so it does not interfere.
- Open Settings by pressing Win+I.

Windows 11 Start menu with Settings gear icon highlighted. - Go to System Power & battery. Look for a section called screen, sleep and hibernate timeouts. The exact label varies slightly between Windows 11 versions (updates are numbered builds).
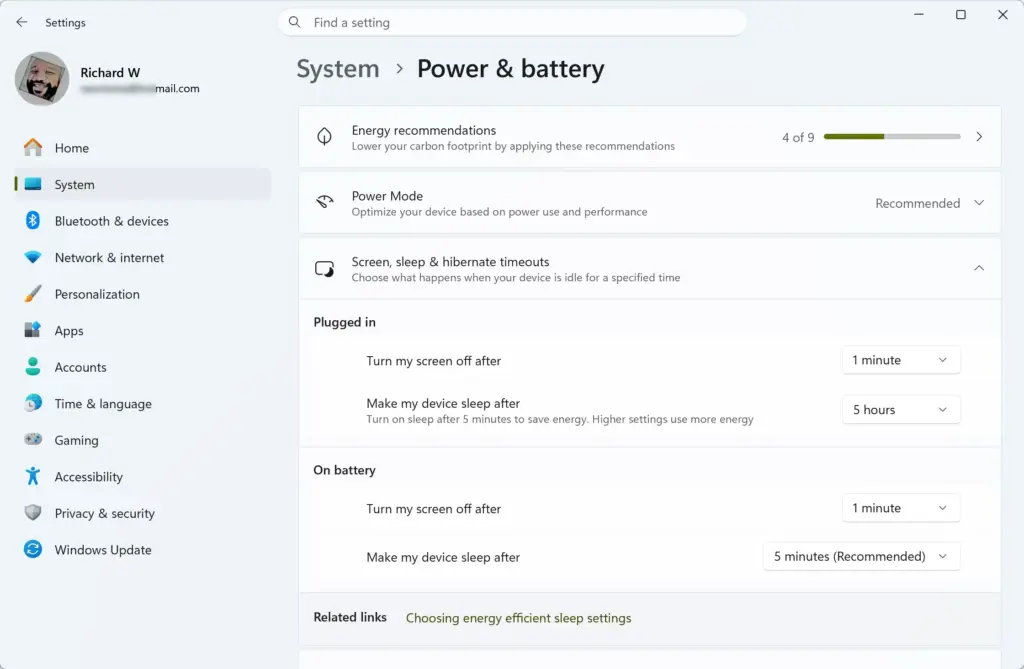
- Select Screen, sleep, & hibernate timeouts to expand it. You should see a set of drop-down lists.
- Next to On battery power, turn off my screen after, choose a longer time. This row appears only on laptops and tablets.
- Next to When plugged in, turn off my screen after, choose a longer time.
- Check the two sleep drop-downs below them. If the sleep time is shorter than the screen time, the PC sleeps first. Set sleep to the same time or longer.
The change applies immediately. You do not need to restart.
If you do not see the battery rows, you are on a desktop PC with no battery. Only the plugged-in setting applies to you.
Fix the lock screen timeout with the hidden setting
Windows 11 includes the Console lock display off timeout setting but hides it from the Power Options window. You make it visible first, then set the time. All Windows 11 editions, including Home, support this.
Reveal the setting (administrator required)
Administrator rights are needed here. It only unhides a setting and does not change any time value. You can reverse it later (see "How to undo the change").
- Right-click the Start button and select Terminal (Admin). On some builds the entry is named Windows PowerShell (Admin).
- Select Yes when User Account Control asks for permission. If you are signed in with a standard account, enter the name and password of an administrator account. A Terminal window opens with administrator rights (shown in the title bar as elevated).
- Type the command below and press Enter. [Verification Required: command block missing from source]Code
powercfg -attributes SUB_VIDEO VIDEOCONLOCK -ATTRIB_HIDEThe command prints nothing when it succeeds. You return to the prompt with no message.
If you see an error such as "access denied" or "You do not have permission", the window is not elevated. Close it and repeat step 1 with the Admin entry.
Set the time in Power Options
This step sets how long the lock screen stays lit. The value is in minutes in this window.
- Press Win+R, type
powercfg.cpland press Enter. The Power Options window in Control Panel opens.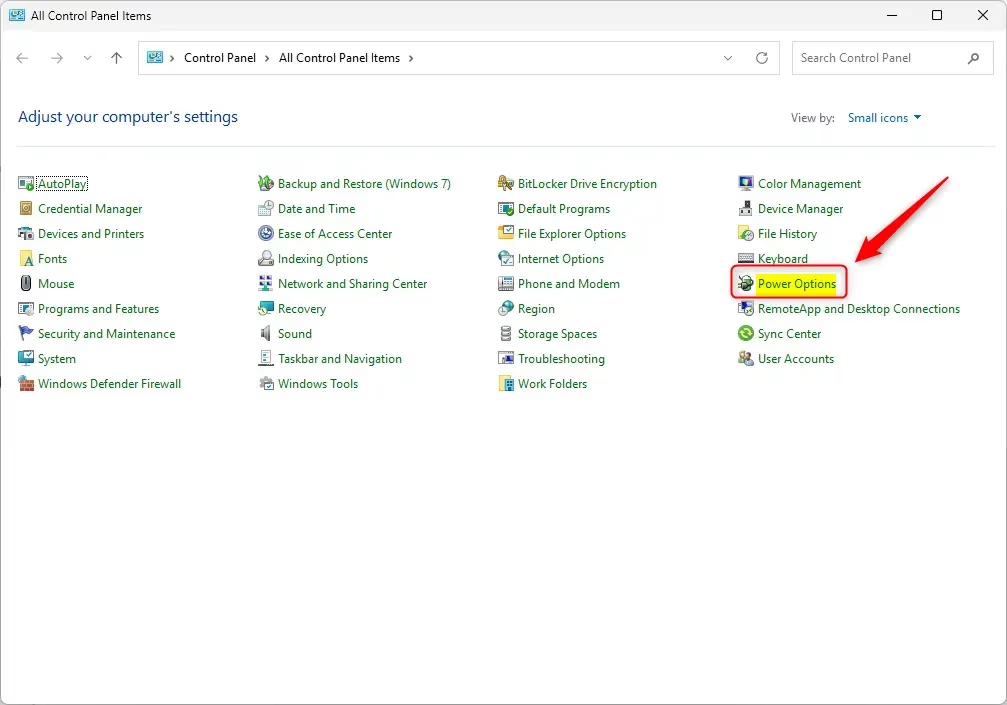
Control Panel Power Options window showing power plan settings in Windows 11. - Select Change plan settings next to the plan marked as selected.
- Select Change advanced power settings. The Power Options dialog opens with a list of settings.
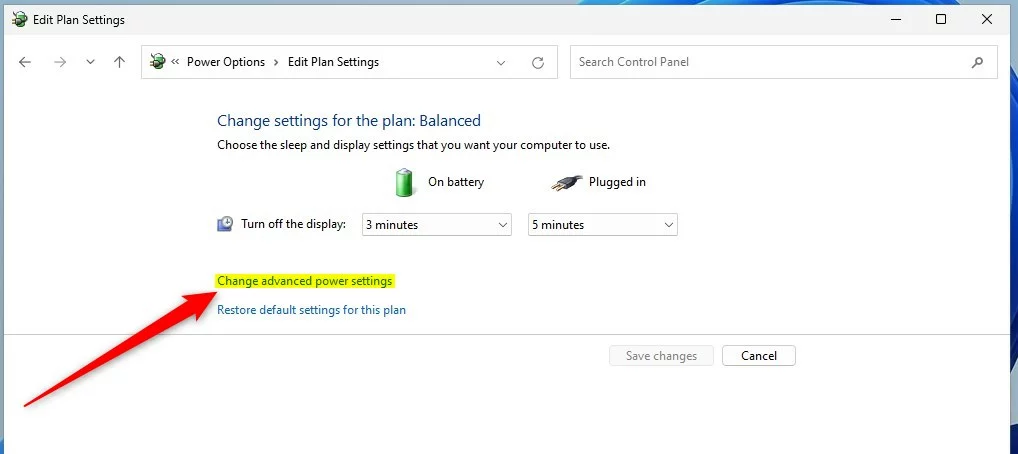
windows 11 change advanced power settings control panel - Expand Display.
- Expand Console lock display off timeout. You should now see this entry. If you do not, go to "When the setting is missing, greyed out or keeps reverting".
- Enter a number of minutes next to Plugged in. If you are on a laptop, also enter a number next to On battery.
- Select OK.
The new value takes effect right away. To test it, press Win+L to lock the PC and watch the lock screen. It should stay lit for the time you set. You do not need to sign out or restart.
On a laptop this drains the battery faster. On an OLED screen (a display where each pixel lights itself), a static image can leave a permanent ghost image, called burn-in, over time. Pick a time that matches how long you are away.
Set the same value with powercfg
Use this method if you manage several PCs or prefer typing commands. It uses powercfg (a built-in tool that changes power settings from the command line). The values here are in seconds, not minutes. The examples below use 600 seconds (10 minutes) plugged in and 300 seconds (5 minutes) on battery. Replace them with your own numbers.
- Open Terminal as in the earlier section. You need the elevated window only if you also run the unhide command.
- Set the plugged-in value:Code
powercfg /setacvalueindex SCHEME_CURRENT SUB_VIDEO VIDEOCONLOCK 600 - Set the on-battery value:Code
powercfg /setdcvalueindex SCHEME_CURRENT SUB_VIDEO VIDEOCONLOCK 300 - Apply the changes to the active plan:Code
powercfg /setactive SCHEME_CURRENT
The commands print nothing when they work. Open Power Options as in the previous section and check that Console lock display off timeout shows the new minute values. On a desktop PC, the on-battery command has no visible effect.
Stop Windows locking the PC too soon
If the PC locks itself sooner than you want, rather than only the screen going dark, one of the settings below is usually responsible. Check each one.
Change when Windows asks you to sign in again
This setting decides whether Windows demands a password after the PC wakes from sleep.
- Open Settings and go to Accounts Sign-in options
- Expand Additional settings.
- Find If you've been away, when should Windows require you to sign in again?
- Choose a different option from the drop-down. The choices depend on your build. Most builds offer When PC wakes up from sleep and Every time. Newer builds also add Never.
This setting is lowest-risk if you use a PC at home. On a shared or portable PC, requiring sign-in is safer.
Turn off the screen saver lock
A screen saver can lock the PC when it ends. If you see a screen saver before the lock screen, check this.
- Go to Settings Personalization Lock screen
- Select Screen saver. The Screen Saver Settings dialog opens.
- Clear the On resume, display logon screen check box to stop the lock on wake. To turn the screen saver off completely, set the drop-down to (None).
- If you keep the screen saver, change the number in Wait to a longer time.
- Select OK.
Check Dynamic lock
Dynamic lock (a feature that locks the PC when your paired phone moves out of Bluetooth range) can lock the PC when you did not expect it. If you have a phone paired with the PC, check it.
- Go to Settings Accounts Sign-in options
- Expand Dynamic lock.
- Clear Allow Windows to automatically lock your device when you're away.
The PC stops locking when your phone leaves range. If you turn this off, you can still lock the PC yourself with Win+L.
When the setting is missing, greyed out or keeps reverting
Console lock display off timeout is missing from Power Options
The setting stays hidden until you run the unhide command. Repeat the steps in "Reveal the setting (administrator required)", then close and reopen the Power Options window. An old window does not refresh.
You cannot change the value, or it resets after a restart
Look for the message "Some settings are managed by your organization" in Settings. If you see it, the administrator controls the timeout and your change will not stick. Ask your IT team to change it.
The change works on one power source but not the other
The plugged-in and on-battery values are separate. Set both in the dialog, or run both /setacvalueindex and /setdcvalueindex.
The change disappears after you switch plans
Each power plan stores its own value. If you switch to another plan, for example through a manufacturer's power utility, that plan uses its own number. Repeat the steps with the new plan selected.
The screen still goes dark at the normal timeout
You set the lock screen value but not the screen timeout. Go back to the Settings steps near the top and raise Turn off my screen after too.
How to undo the change
You can return to the default behavior at any time.
- Open Terminal (Admin).
- Set the value back to one minute. The default Windows ships with is about one minute (60 seconds). Run both commands, then the apply command:Code
powercfg /setacvalueindex SCHEME_CURRENT SUB_VIDEO VIDEOCONLOCK 60
powercfg /setdcvalueindex SCHEME_CURRENT SUB_VIDEO VIDEOCONLOCK 60
powercfg /setactive SCHEME_CURRENT - Hide the setting again, if you want it out of the Power Options window:Code
powercfg -attributes SUB_VIDEO VIDEOCONLOCK +ATTRIB_HIDE
Hiding the setting does not change its value. The last number you set stays in effect, so reset the value first.
What to do next
Lock the PC with Win+L and wait. The lock screen should now stay lit for the time you set. If the timeout reverts later, check whether you switched power plans or whether a work or school policy is managing the PC, because the value is stored per plan. If the problem was the PC locking itself rather than the screen going dark, recheck Dynamic lock and the screen saver setting above.
How do I adjust the screen timeout in 🪟 Windows 11?
Open Settings, then go to System Power & battery Screen and sleep. Choose a time from the Turn off my screen after list. Set it separately for when the PC is plugged in and when it runs on battery.
How do I disable screen timeout?
Open Settings, go to System Power & battery Screen and sleep, and set Turn off my screen after to Never. Do this for both plugged in and on battery. Also set Sleep to Never, or the PC will still enter a low-power state and the screen will stay off.
How do I adjust the lock screen timeout on my 🪟 Windows 10 PC?
Windows 10 has no Settings option for the lock screen timeout. The Console lock display off timeout is a hidden power setting. You reveal it through a command prompt or the registry, then set how long the screen stays on after the PC locks. Check the normal screen timeout first, since it may be the real cause.
How to increase screen time in laptop?
Open Settings, go to System Power & battery Screen and sleep, and pick a longer time from Turn off my screen after. Set it for both plugged in and on battery. A longer time uses more battery, so keep the battery setting shorter if you want to save power.
Was this guide helpful?

About the Author
Richard
Tech Writer, IT Professional
Richard is a writer at Geek Rewind who turns complex IT tasks into clear, step-by-step guides. He draws on years of hands-on experience in system administration and enterprise IT operations, focusing on Windows, Linux and WordPress: the problems people actually run into, and the fixes that work. His server and WordPress guides come from systems he runs himself. Richard builds and maintains the platform behind Geek Rewind, from its Ubuntu servers and Nginx configuration to its custom WordPress plugins. Many new tutorials start with readers' questions, and he's always glad to answer them in the comments.

No comments yet — be the first to share your thoughts!