Screen timeout settings in Windows 11 control how many minutes your PC waits before turning off the display or going to sleep. The usual defaults are 5 minutes on battery and 10 minutes when plugged in, but some manufacturers ship different values. Changing them keeps your monitor on while you read or work, or saves battery when you step away.
Advertisement
Turning off the screen and sleeping are two separate timers. The screen goes dark first, and the PC sleeps later. This guide covers both, using Settings, Control Panel 🎛️, Command Prompt and Presentation Settings.
⚡ Quick Answer
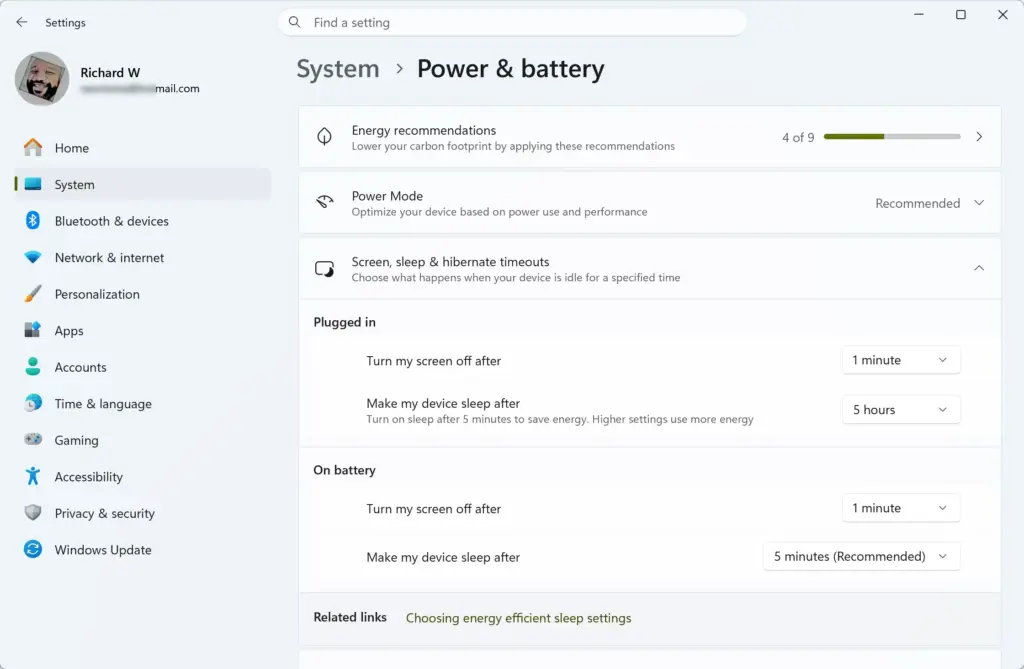
Open Settings›System›Power & battery›Screen and sleep. Use the drop-down menus to set how many minutes pass before the display turns off on battery and when plugged in. Changes apply immediately without restarting.
Advertisement
How to Change Screen Timeout in 🪟 Windows 11
The quickest way to change screen timeout in Windows 11 is the Settings ⚙️ app. You pick how many minutes of inactivity pass before the monitor turns off, once for battery power and once for when you are plugged in. Desktop PCs have no battery, so they usually show only the plugged-in options.
Press the Win+I to open Settings. Windows 11 Start menu with Settings gear icon highlighted.
Select System from the sidebar. The system options appear on the right.
Click Power & battery. The page shows your battery level and the power settings.
Click Screen and sleep to expand it. On some newer builds this section is labelled Screen, sleep, & hibernate timeouts. It is the same section.
Open the drop-down menus for screen and sleep, once for battery power and once for plugged in, and choose the time you want. The change applies as soon as you pick a value, so you do not need to save or restart.
⚠️WarningSet the screen timer to a shorter time than the sleep timer.
If the sleep value is shorter, the PC sleeps before the screen has a chance to turn off by itself. To undo the change, open the same menus and choose your old values. You can also choose Never to stop the screen from turning off, but on a laptop that drains the battery quickly.
How to Modify Screen Timeout in 🪟 Windows 10
If you are on Windows 10, the same setting sits under Power & sleep in the System settings. Use the steps below. The layout differs from Windows 11, so do not look for Power & battery here.
Press the Win+I to open Settings.
Click System.
Select Power & sleep from the left-hand column.
Find the Screen drop-down menus under the Battery and Plugged in headings. The Sleep menus are just below them.
Choose the time you want from each menu. The new limits apply immediately.
Using the Control Panel for Advanced Power Plans
The classic Control Panel 🎛️ gives you more detail, because it works on a specific power plan. You can set exact timers for the display and for sleep, or turn the sleep timer off completely. Use this method if the Settings ⚙️ app shows fewer options than you expect.
Advertisement
Open the Start menu, type Control Panel, and press Enter. Control Panel
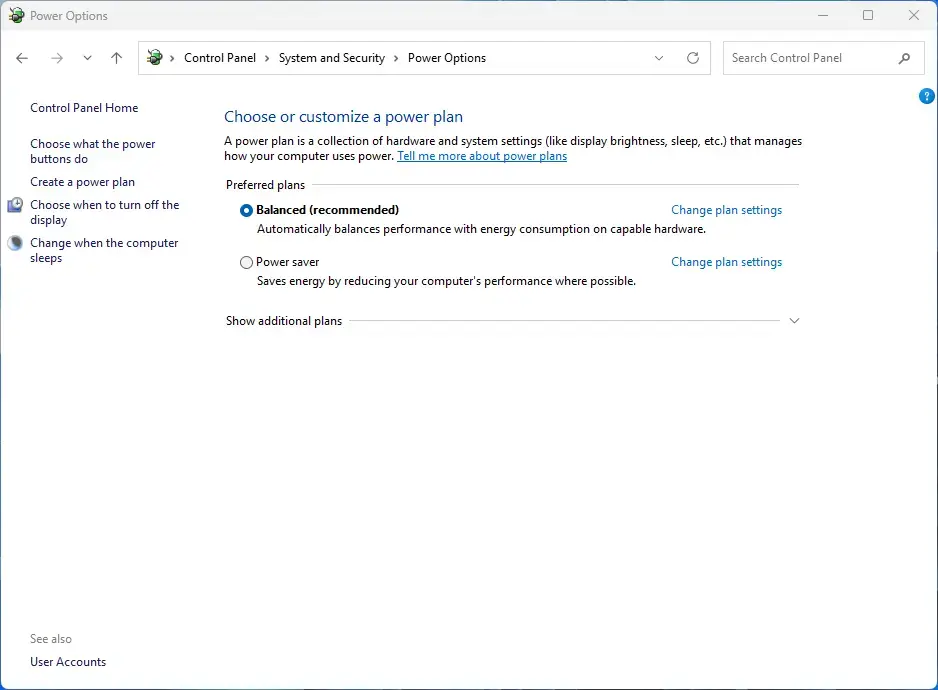
Click Power Options. Control Panel › System and Security › Power Options If your power plan is locked by an organization, you may need administrator privileges to change it.
Click Change plan settings next to your active power plan. This page has simple Turn off the display and Put the computer to sleep drop-downs for battery and plugged-in use. You can set them here and click Save changes.
For finer control, click Change advanced power settings. A small Power Options window opens.
Double-click Sleep, then double-click Sleep after to change the idle time before your PC enters a low-power state. To change the display timer, double-click Display and then Turn off display after.
Click OK to apply the changes.
📝Good to KnowIf the values are greyed out, click Change settings that are currently unavailable at the top of the advanced window.
Settings are tied to the plan you edited, so if you switch to a different power plan, check its values too.
Configuring Screen Timeout via Windows Terminal or Command Prompt
If you prefer typing to clicking, the powercfg tool in Command Prompt can view and change the same timers. It is handy for scripts or for setting several PCs the same way.
Open the Start menu, type cmd, and press Enter. A Command Prompt window opens.
Type powercfg /query and press Enter to list the settings of your current power scheme. The output is long, so scroll up to find the display and sleep entries.
To change the display timeout, type powercfg /change monitor-timeout-ac followed by the number of minutes, for example 15, and press Enter. Use monitor-timeout-dc the same way for battery power. The original version of this guide listed disk-timeout-ac here, but that command sets the hard disk timer, not the display. For the sleep timer, use standby-timeout-ac or standby-timeout-dc.
The command makes no confirmation noise. If it works, you simply get the prompt back. Open Power & battery in Settings to check the new value. Setting a value of 0 means the timer never fires. To undo a change, run the same command with your old number of minutes.
Preventing Screen Timeout Using Presentation Settings
If your screen goes dark in the middle of a talk, you can use Presentation Settings instead of changing your normal timers. It keeps the computer awake while you show slides, and you can switch it off afterwards without touching your power plan.
Advertisement
Open the Start menu, type Windows Mobility Center, and press Enter. The Mobility Center window opens.
Find the Presentation Settings tile.
Click Turn on. This blocks the computer from going to sleep and stops screen savers while presentation mode is active. The button changes to Turn off, so click that when you are finished.
Windows Mobility Center is mainly built for laptops. If it does not open on a desktop PC, it is simply not available there. Use the timers in the earlier sections instead.
Troubleshooting Screen Timeout Issues That Do Not Save
Sometimes your timeout values change back on their own. The usual causes are conflicting background software, a corrupted power profile, or group policies set by an administrator. On a work PC, a policy is the most likely reason, and you will need your IT department to change it.
Open Settings and go to System›Troubleshoot›Other troubleshooters.
Find the Power troubleshooter and click Run. It checks your power settings and offers fixes for the problems it finds.
Check for active device wake timers and for apps that keep the PC awake, since these can also override your timeout.
What to do next
With your display timers set, you can go on to customize your lock screen behavior or adjust your system sleep timers to match how you work.
Frequently asked questions
How do I change how long the screen stays on?
Open Settings with Windows key + I, then go to System›Power & battery. Click Screen and sleep. Set the plugged-in and battery options for turning off the screen to the number of minutes you want, or choose Never to keep the screen on.
Advertisement
How to change screen time on Samsung?
Samsung phones and tablets run Android, so their screen timeout is in their own Settings. Open Settings, tap Display, then Screen timeout, and pick a time. For a Samsung laptop running Windows 11, use Settings›System›Power & battery›Screen and sleep.
How to stop screen timing out on PC?
Open Settings, select System, then Power & battery, and click Screen and sleep. Set both the plugged-in and battery options for turning off the screen to Never. Also set the sleep options to Never, or the PC will still sleep after a while.
Why does my screen timeout?
Windows turns off the screen after a set period with no keyboard or mouse activity. This saves power. The timer is set in Settings under System›Power & battery›Screen and sleep. If it is set to only a minute or two, raise it. Also check Dynamic lock and screen savers, which can blank the display too.
Still have a question?
Answered by AI from this guide. Good questions may be added to this page — please don't include personal details.
📬 Get new Windows tips in your inbox
One email when we publish something worth your time. No spam, unsubscribe anytime.
Richard is a writer at Geek Rewind who turns complex IT tasks into clear, step-by-step guides. He draws on years of hands-on experience in system administration and enterprise IT operations, focusing on Windows, Linux and WordPress: the problems people actually run into, and the fixes that work.
His server and WordPress guides come from systems he runs himself. Richard builds and maintains the platform behind Geek Rewind, from its Ubuntu servers and Nginx configuration to its custom WordPress plugins.
Many new tutorials start with readers' questions, and he's always glad to answer them in the comments.
One email when we publish a guide worth your time — new Windows features, the fixes that actually
work, and a heads-up when Microsoft breaks something. Unsubscribe in one click.
📬 Get new Windows tips in your inbox
One email when we publish something worth your time. No spam, unsubscribe anytime.




No comments yet — be the first to share your thoughts!