Set the Password Timeout After Sleep or Lock In Windows 11

Windows 11 controls how long your PC waits before it locks or asks for your password again with two separate timers. The first timer sets how many idle minutes pass before the PC sleeps or locks. The second decides whether Windows asks for your password when the PC wakes up.
The fastest change is in Settings Accounts Sign-in options, where you pick when Windows asks you to sign in again. To change the idle timers, open Settings System Power & battery You can also use a third method that locks the PC after a set number of idle minutes.
Some PCs do not show these options. This article explains why that happens. You do not need to restart the PC after any of these changes.
To set the password timeout in Windows 11, open Settings Accounts Sign-in options, scroll to Additional settings, and set “If you’ve been away, when should Windows require you to sign in again?” to When PC wakes up from sleep. Then set idle timers under Settings System Power & battery Screen, sleep, & hibernate timeouts. No restart is needed.
How the password timeout works in 🪟 Windows 11
Three separate settings decide when someone has to type a password, PIN or other sign-in method to get back in:
- The wake-up rule. This decides whether Windows asks you to sign in when the PC wakes from sleep. It lives in Sign-in options.
- The idle timers. These decide how long the PC waits before it turns off the screen or goes to sleep. They live under Power & battery.
- The screen saver lock. This locks the PC after a set number of idle minutes, even if the PC never sleeps. It is the only built-in way to get a minute-based lock on most PCs.
Pick the method that matches what you want. If you want the PC to sleep after 10 minutes and always ask for a password afterwards, use the first two. If you want a lock after 5 idle minutes while the PC stays awake, use the screen saver method.
Changing these settings affects security directly. If you set Windows to never ask for a password, anyone who touches the keyboard or opens the lid gets straight into your session.
Set when Windows asks for a password after sleep
This step controls whether Windows shows the sign-in screen after the PC wakes. Do this first, because the idle timers do nothing useful for security if this is set to Never.
- Open Settings by pressing Windows key + I.

Windows 11 Start menu with Settings gear icon highlighted. - Select Accounts in the left pane, then select Sign-in options. You now see a list of sign-in methods, such as Face recognition, PIN (Windows Hello, a sign-in system that uses your PIN, face or fingerprint), and Password, followed by Additional settings.
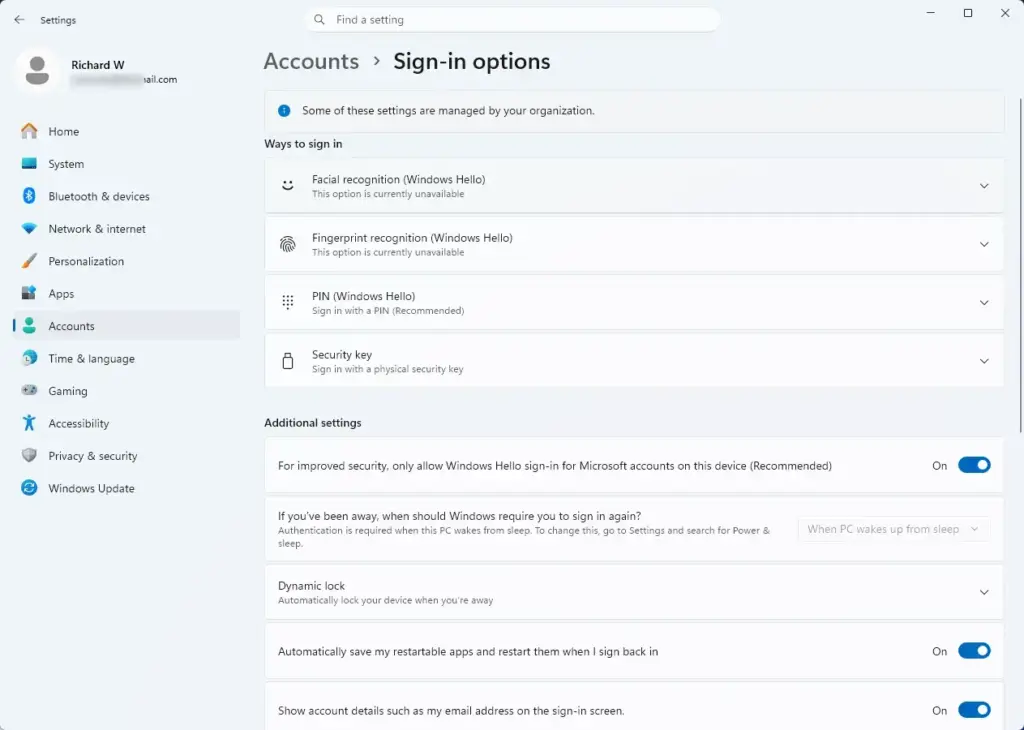
Settings › Accounts › Sign-in options - Scroll to Additional settings. Find the line If you've been away, when should Windows require you to sign in again?
- Open the drop-down next to it and choose When PC wakes up from sleep. Windows now shows the sign-in screen every time the PC wakes.
- Close Settings. The change applies immediately.
The choices in this list depend on your device and Windows 11 version. Most PCs show Never and When PC wakes up from sleep, and some builds add Every time. If yours lists minute-based choices, pick the delay you want. If the line is missing or greyed out, see the troubleshooting section below.
To undo this, return to the same drop-down and choose Never. Only turn this off on a PC that no one else can reach.
Set how long the PC is idle before it sleeps or turns off the screen
These timers set the "timeout" part of the process. The PC counts idle time, then turns off the screen or sleeps. Combined with the wake-up rule above, that is when the password prompt appears.
- Open Settings System Power & battery You see your battery level (on laptops), Power mode, and a section called Screen, sleep, & hibernate timeouts.
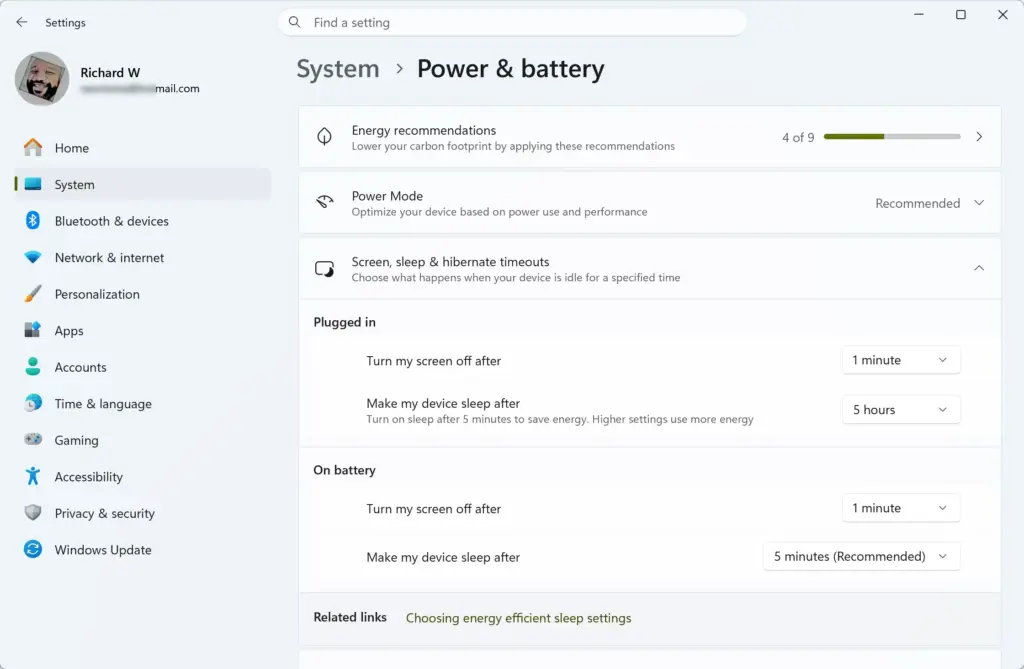
- Select Screen, sleep, & hibernate timeouts to expand it. Four drop-downs appear on a laptop or tablet. A desktop PC shows only the two plugged-in options.
- Open On battery power, turn off my screen after and choose a time. This is how long the PC waits before the display goes dark while running on battery.
- Open On battery power, put my device to sleep after and choose a time. Choose a value longer than the screen timeout, or the PC sleeps before it matters.
- Open When plugged in, turn off my screen after and choose a time.
- Open When plugged in, put my device to sleep after and choose a time.
Each drop-down offers a list of fixed times, plus Never. Choose a short time such as 5 or 10 minutes if you want the password prompt to arrive quickly. Choose Never on the sleep line if you want the PC to stay awake, but know that the PC then never reaches the wake-up password prompt on its own.
If the labels on your PC differ slightly, you may be on a different Windows 11 version. The layout of this page has changed between feature updates. Look for the section that mentions screen and sleep timeouts.
Test that the sleep timer works
- Select Start, select the Power button, then select Sleep. The screen goes dark.
- Wake the PC by pressing a key or moving the mouse. You should see the sign-in screen. If the PC goes straight to your desktop, return to Sign-in options and check the wake-up rule.
Lock the PC after a set number of idle minutes
A screen saver (a picture or blank screen that appears when you stop using the PC) can also lock the session. This method locks the PC after a time you choose, even when sleep is turned off. It is the closest thing Windows 11 has to a minute-based password timeout for someone sitting at the keyboard.
- Open Settings Personalization Lock screen
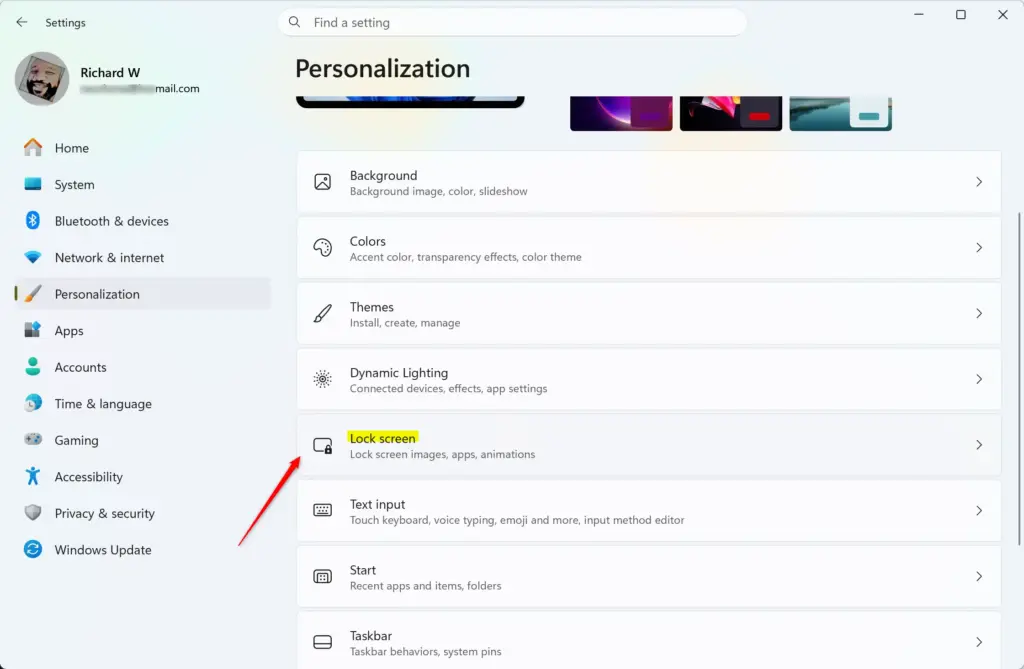
Settings › Personalization › Lock screen - Scroll down and select Screen saver. The Screen Saver Settings window opens.
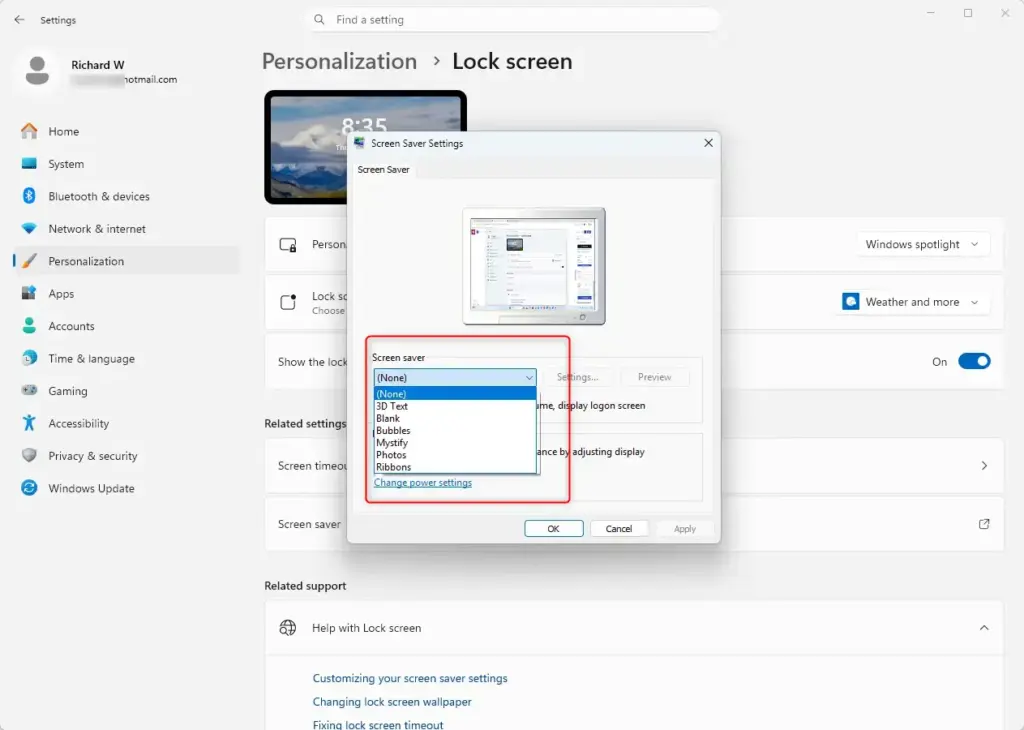
Windows 11 Screen saver settings dialog box with options. - Open the Screen saver drop-down and choose an option other than (None). Choose Blank if you want a plain black screen.
- Set the Wait box to the number of idle minutes before the screen saver starts. This is your timeout. Windows locks the session once this time passes.
- Tick the box On resume, display logon screen. This setting makes Windows ask for your password when the screen saver wakes.
- Select Apply, then select OK.
If On resume, display logon screen is greyed out, the Screen saver drop-down is still set to (None). Pick a screen saver first, and the box becomes available.
To undo this, open the same window and untick On resume, display logon screen, or set the Screen saver back to (None).
Change the wake-up password rule from Power Options
The older Control Panel page also holds a wake-up password setting. Use it if Sign-in options does not show the drop-down, or if you manage several PCs and prefer this page. This step needs administrator privileges. Windows asks you to approve it with a User Account Control prompt.
- Open Control Panel, then select Hardware and Sound, then select Power Options.
- Select Require a password on wakeup in the left pane. The System Settings page opens.
- Select Change settings that are currently unavailable. Approve the User Account Control prompt. The options under Password protection on wakeup are now selectable.
- Choose Require a password (recommended).
- Select Save changes.
The link on step 2 may be missing on some devices. If so, use the Sign-in options route above.
To undo this, return to this page and choose Don't require a password, then select Save changes.
Lock the PC on demand
You do not have to wait for a timer. Press Windows key + L to lock the PC at once. The sign-in screen appears and your apps keep running. Use this whenever you walk away, and rely on the timers as a backup for the times you forget.
If the option is missing or greyed out
These are the causes people run into most often.
The drop-down is missing from Sign-in options
Some devices, particularly desktops and certain virtual machines (software copies of a PC running inside another PC), do not show If you've been away, when should Windows require you to sign in again? If it is not there, use the Screen saver method, which works on every Windows 11 PC. Try the Power Options route as well.
The account has no password or PIN
If your account signs in without a password, there is nothing for Windows to ask for. Under Settings Accounts Sign-in options, add a PIN (Windows Hello) or a password first. Then return to the wake-up rule.
A message says some settings are managed by your organization
On a work or school PC, an administrator can enforce sleep and lock rules through Group Policy (a way for admins to push settings to many PCs) or a device management service. Those rules override what you pick in Settings. The drop-downs are greyed out, or your choice reverts after a while. Ask your IT team to change the rule. You cannot override it from a standard account.
The registry (the Windows database of settings) and Group Policy values behind these rules are not covered here. [Registry method: to be verified]
🪟 Windows 11 Home versus Pro
Every method in this guide works on Windows 11 Home, Pro, Enterprise and Education. The Local Group Policy Editor, which administrators sometimes use for these rules, is not included in Home. If you are on Home, stay with the Settings, screen saver and Power Options routes above.
The PC wakes but never asks for a password
Check three things, in this order:
- Confirm Settings Accounts Sign-in options shows When PC wakes up from sleep (or the delay you chose).
- Confirm the sleep timer under Settings System Power & battery is not set to Never, if you expect the PC to sleep.
- Confirm the Power Options page, if available, shows Require a password (recommended).
If this didn't work
If the PC still skips the password prompt, work through the checks in the last section, starting with the wake-up rule. To go back to the old behaviour, set the Sign-in options drop-down to Never and the Screen Saver Settings box back to unticked. If you are on a managed PC and your settings keep reverting, the cause is a rule set by your administrator, so ask your IT team to adjust it.
Was this guide helpful?

About the Author
Richard
Tech Writer, IT Professional
Richard is a writer at Geek Rewind who turns complex IT tasks into clear, step-by-step guides. He draws on years of hands-on experience in system administration and enterprise IT operations, focusing on Windows, Linux and WordPress: the problems people actually run into, and the fixes that work. His server and WordPress guides come from systems he runs himself. Richard builds and maintains the platform behind Geek Rewind, from its Ubuntu servers and Nginx configuration to its custom WordPress plugins. Many new tutorials start with readers' questions, and he's always glad to answer them in the comments.




No comments yet — be the first to share your thoughts!