How to Adjust Screen Timeout Settings in Windows 11 Power and Sleep

Screen timeout settings in Windows 11 control how many minutes pass before your monitor turns off or your computer goes to sleep. These are two separate timers. The screen can go dark while the PC keeps running, and the PC can sleep later or never. You can set each timer separately for when the PC runs on battery and when it is plugged in. A desktop has no battery, so it only shows the plugged-in options.
Adjusting these timers stops the display from going dark during long tasks, presentations or video playback. Operating system updates and new power management apps sometimes reset these durations to their defaults. If your screen starts turning off sooner than you set it, check these settings first. The steps below work the same on Windows 11 Home and Pro.
Open Settings , go to System Power & battery, click Screen, sleep & hibernate timeouts, then adjust the dropdown menus for screen and sleep intervals on battery and plugged-in. Changes apply immediately without restarting.
Adjusting Screen and Sleep Settings in the Settings App
The main Settings page is the quickest way to change screen and sleep timers. You pick an interval for battery and one for plugged in, which lets you save energy on battery and keep the display awake longer on mains power. These changes apply straight away and do not need a restart.
- Press Win+I to open Settings.

Windows 11 Start menu with Settings gear icon highlighted. - Select System from the left-hand menu.
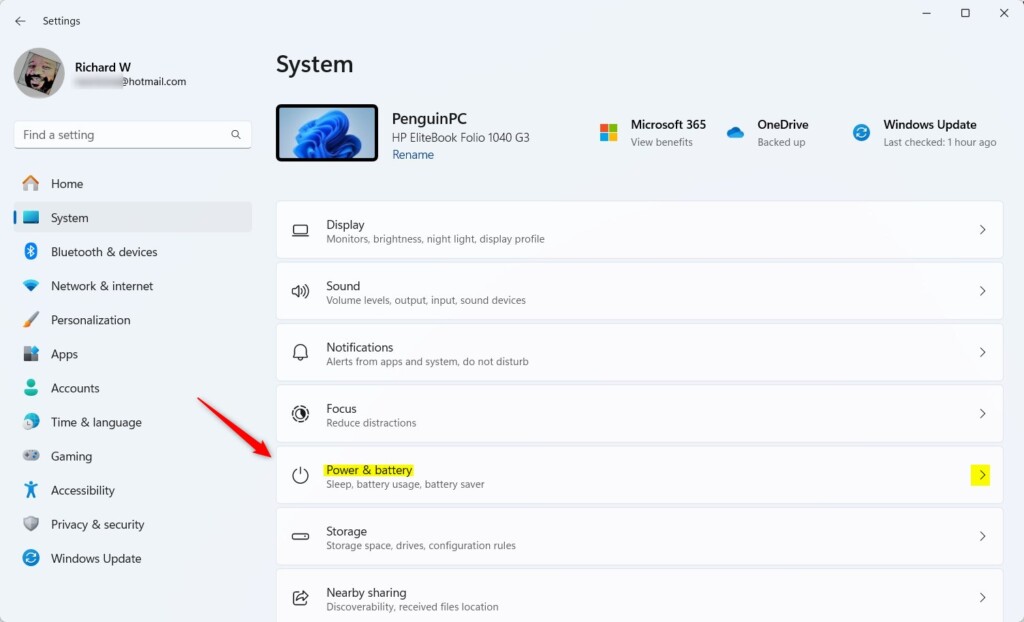
- Click Power & battery. You should see battery usage, if your device has a battery, plus the power settings below it.
- Click Screen, sleep & hibernate timeouts to expand the section. On some builds the label is slightly shorter, and the hibernate option only appears if hibernate is enabled on your PC.
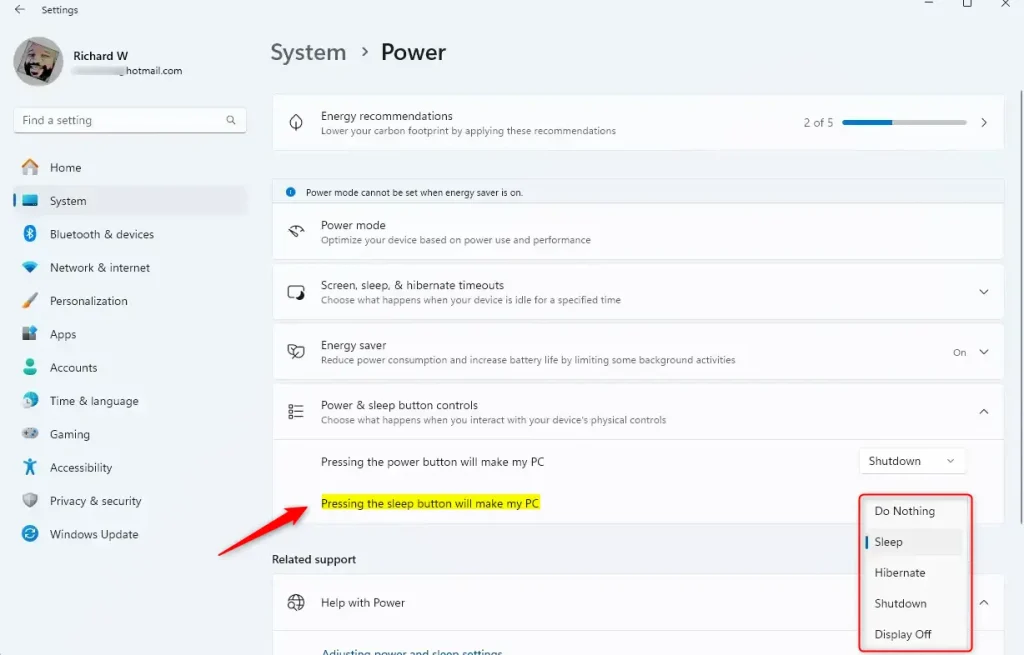
- Open the drop-down menus and choose your intervals. Use the screen menus for when the display turns off and the sleep menus for when the whole PC sleeps. Set each one for both battery and plugged-in states.
Choose Never if you want a timer disabled. Keep the sleep timer longer than the screen timer, or the PC will sleep before the screen has a chance to turn off by itself.
Configuring Advanced Power Options via Control Panel
Control Panel gives you deeper control over hardware power states than the Settings page. Use it when you want to stop the hard drive from spinning down, or change how Windows powers down USB ports. These settings belong to the power plan that is currently active, so check which plan you are editing.
- Press Win+R to open the Run dialog box.
- Type
controland press Enter. Control Panel opens. - Change the View by drop-down in the top right corner to Large icons or Small icons. Without this, Power Options is hidden inside the Category view.
- Click Power Options.
- Click Change plan settings next to the power plan that is currently selected.
- Click Change advanced power settings. A small Power Options window opens with a tree of categories.
- Expand the Sleep category and adjust Sleep after or the hibernate timer. For the display, expand Display and change Turn off display after. For the hard disk, expand Hard disk and change Turn off hard disk after. Set a value of 0 to mean never.
- Click Apply, then OK.
If you also want to change USB behavior, look under USB settings for USB selective suspend setting. If an option you expect is missing, your PC’s hardware or manufacturer settings may hide it. To undo everything, go back to Change plan settings and click Restore default settings for this plan.
Managing Energy Recommendations That Override Timeouts
Energy saver is the main one. When it is active, it can dim the screen and reduce background activity to stretch battery life, which can look like your timeouts being ignored. Check this section before you blame a driver or an app.
- Open Settings by pressing Windows key + I.
- Go to System and select Power & battery.
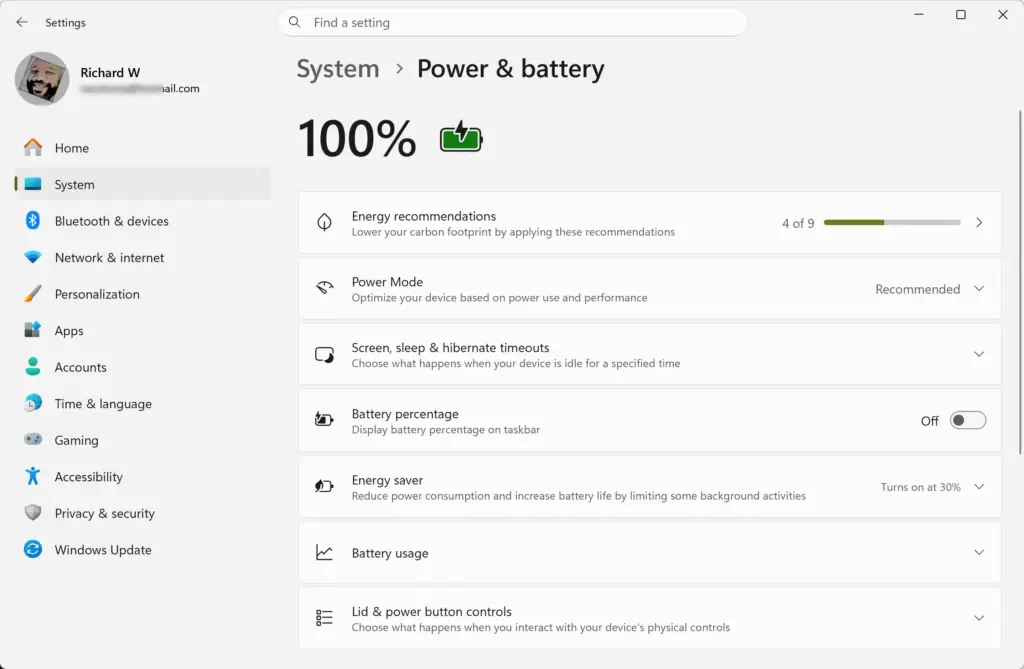
Settings › System › Power - Find the Energy saver section and check whether it is turned on, or set to turn on automatically at a certain battery level. Turn it off, or lower the automatic threshold, if it is getting in the way.
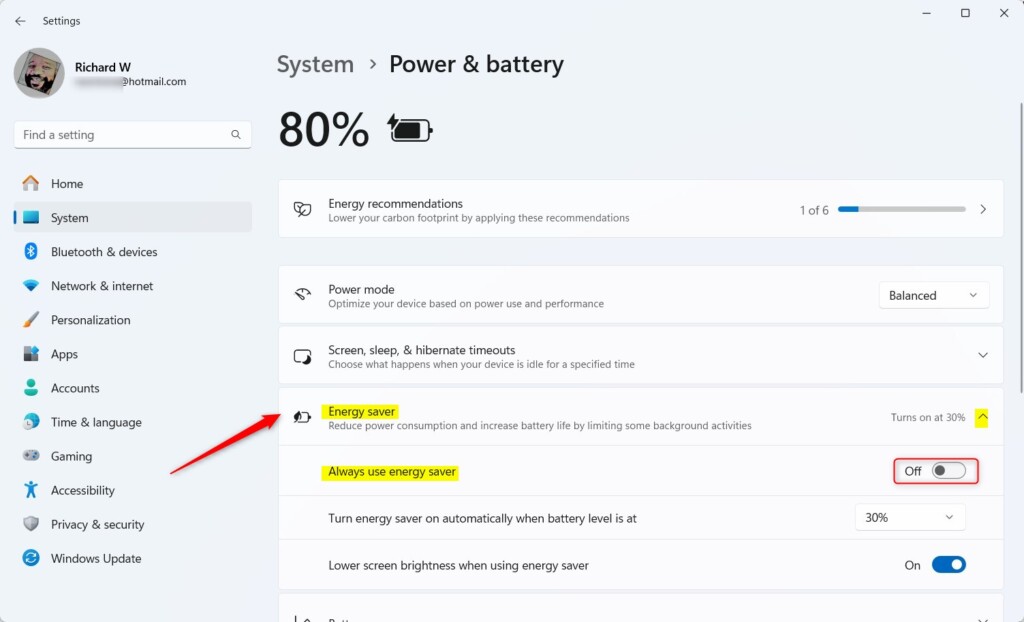
- If your build shows an Energy recommendations section, read the suggestions. Some of them suggest shorter display timers to save power. You do not have to accept them. Leave them alone and your own timers stay as you set them.
Energy saver is not available on every PC. On a desktop without a battery the options are limited. If you do not see the section, move on to the next one.
Configuring Dynamic Refresh Rate and Display Adaptations
If your display dims, flickers or drops frames on its own, the cause may be the dynamic refresh rate rather than a timeout. Dynamic refresh rate lowers the panel's refresh rate when the screen is mostly still and raises it when things move. On some monitors this causes visible flicker or brightness shifts. The option only appears on laptops and monitors that support variable refresh rate, and it needs a current graphics driver.
- Open Settings using the Windows key + I shortcut.
- Go to System and select Display.
- Click Advanced display.
- Find the Choose a refresh rate setting. If your display supports it, you will see dynamic options alongside fixed rates. Pick a fixed rate such as 60 Hz, or the highest rate listed, to turn dynamic switching off. Choose the dynamic option again if you prefer the battery savings.
If you only see fixed rates, your panel or driver does not support dynamic refresh. In that case the flicker comes from something else, and updating the graphics driver is the next thing to try.
Troubleshooting Unexpected Timeouts and Sleep States
Sometimes a PC sleeps or blanks the display too early, or refuses to sleep, even though the settings are correct. The usual causes are background software, a network adapter that wakes the machine, or a USB device that keeps the system awake. The steps below look at the hardware power permissions in Device Manager.
- Open Device Manager by right-clicking the Start button and selecting Device Manager.
- Expand the Network adapters category.
- Right-click your network card and select Properties.
- Click the Power Management tab. If network traffic wakes or sleeps the machine incorrectly, uncheck Allow the computer to turn off this device to save power. The Allow this device to wake the computer box on the same tab controls whether the adapter can wake the PC. Click OK when you are done.
- Check your connected USB devices for similar power-saving permissions. Expand Universal Serial Bus controllers or Mice and other pointing devices, open the Properties of the device and look for the same Power Management tab. Not every device has one.
Change one device at a time and test, so you know which one was the cause. If the problem returns, tick the box again to restore the original behavior. A restart is not normally needed, but it helps if the change does not seem to take effect.
Using Windows PC Manager for Quick Power Optimization
Microsoft offers a utility called Microsoft PC Manager (Windows PC Manager) that groups performance and cleanup features into one dashboard. It is a separate app that you download from Microsoft. It does not come with Windows 11, and it is not available in every region. If you have it installed, it can point out settings that affect idle behavior.
- Open Windows PC Manager from your installed applications list.
- Go to the Health check or Management tab. The layout changes between versions, so the tab names may differ.
- Review any energy optimization suggestions that affect screen blanking and hardware idle timers. Apply only the ones you want, since an automatic fix can change timers you set earlier.
What to do next
If your power states still behave unpredictably, look for conflicting software, such as other power management tools or manufacturer utilities, and make sure your graphics and chipset drivers are current. You should now be able to control your sleep and screen timers. Next, customize your lock screen and sign-in options, so your device is secure when the screen turns off while you are away. In Windows 11, the lock screen settings are under Personalization and the sign-in settings are under Accounts.
Have a question about this guide?
Answered by AI from this guide. Good questions may be added to this page — please don't include personal details.
Did this guide fix your problem?

About the Author
Richard
Tech Writer, IT Professional
Richard is a writer at Geek Rewind who turns complex IT tasks into clear, step-by-step guides. He draws on years of hands-on experience in system administration and enterprise IT operations, focusing on Windows, Linux and WordPress: the problems people actually run into, and the fixes that work. His server and WordPress guides come from systems he runs himself. Richard builds and maintains the platform behind Geek Rewind, from its Ubuntu servers and Nginx configuration to its custom WordPress plugins. Many new tutorials start with readers' questions, and he's always glad to answer them in the comments.
No comments yet — be the first to share your thoughts!