How to Change App Video Playback Hardware Acceleration Settings in Windows 11

Choppy video, faded colors, and random freezes usually come from one of four places: the Windows video settings, the HDR configuration, GPU scheduling, or an out-of-date graphics driver. This guide covers each fix in order, from the least invasive to the most.
Open Settings Apps Video playback and turn on the setting that reads “Automatically process video to enhance it”. For hardware-accelerated GPU scheduling, go to Settings System Display Graphics Change default graphics settings and turn on Hardware-accelerated GPU scheduling, then restart your computer.
Adjusting Video Playback Preferences
The Video playback page in Settings controls how Windows processes video for apps that use the built-in video pipeline. Use it first when movies or streams stutter. Windows 11 has no single “hardware acceleration” switch, so the options below, together with the GPU scheduling section later, are how you push work onto your graphics card. Exact option names can change slightly between Windows 11 versions, so go by the closest match if your wording differs.
- Press the Win+I to open Settings.

Windows 11 Start menu with Settings gear icon highlighted. - Select Apps in the left-hand sidebar.
- Click Video playback. You should see the video options for your PC.
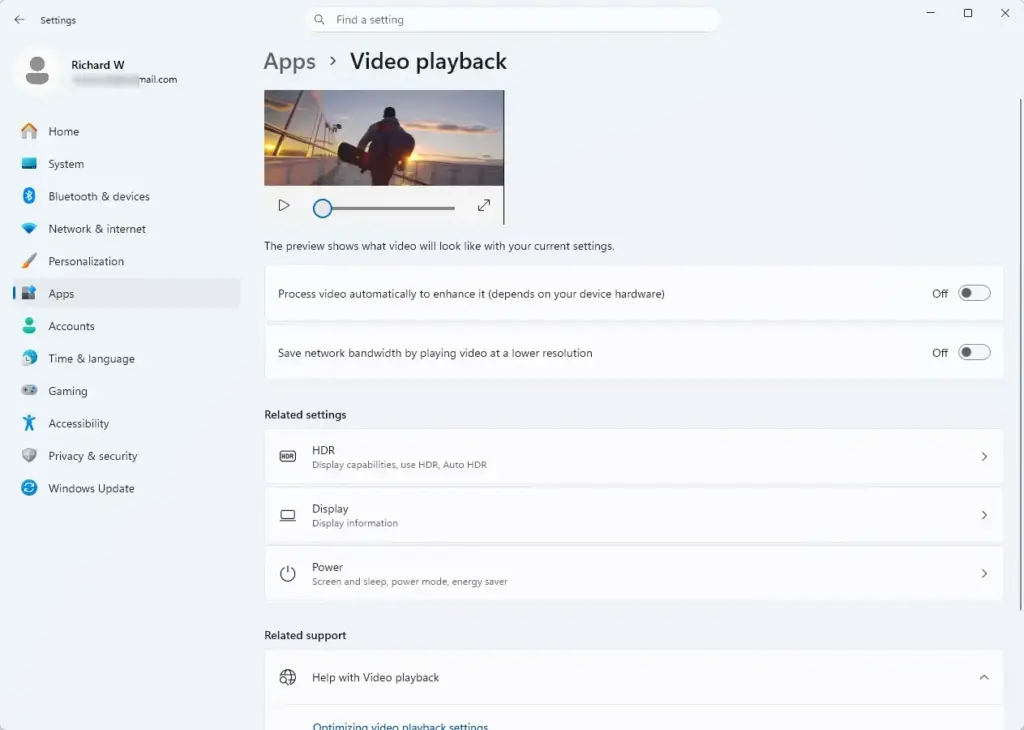
Settings › Apps › Video playback - Find the setting that processes video automatically (on most builds it reads “Automatically process video to enhance it”) and turn the switch On. If it is missing or greyed out, your graphics hardware or driver does not support it. Updating the driver (see the driver section below) is the usual fix.
- If video freezes while other apps run in the background, look for Optimizations for windowed games. In current Windows 11 builds this checkbox sits under System Display Graphics Change default graphics settings, not on the Video playback page. Tick it there if you do not see it here.
These changes apply immediately and normally do not need a restart. To undo one, return to the same page and switch it back.
Calibrating HDR and Color Profiles
Washed-out colors or overly bright whites in movies often come from HDR (High Dynamic Range) being set up badly. Windows may be showing standard-range video on an HDR display, or the other way round. Adjusting the HDR settings makes contrast and tones look right again. The HDR page only appears if your display and graphics card support HDR. If you cannot find it, your monitor probably does not support it, and this section does not apply to you.
- Press the Win+I to open Settings.
- Select System from the left menu.
- Click Display. If you use more than one monitor, pick the HDR-capable one at the top first.
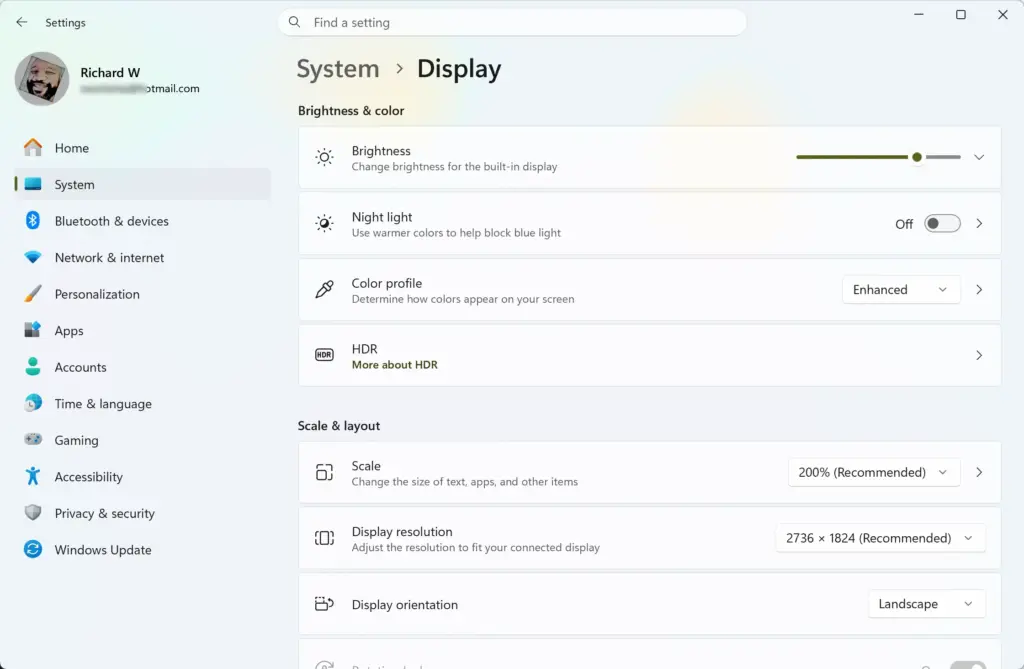
Settings › System › Display - Click HDR. You should see the HDR options for that display, such as Use HDR and Stream HDR video.
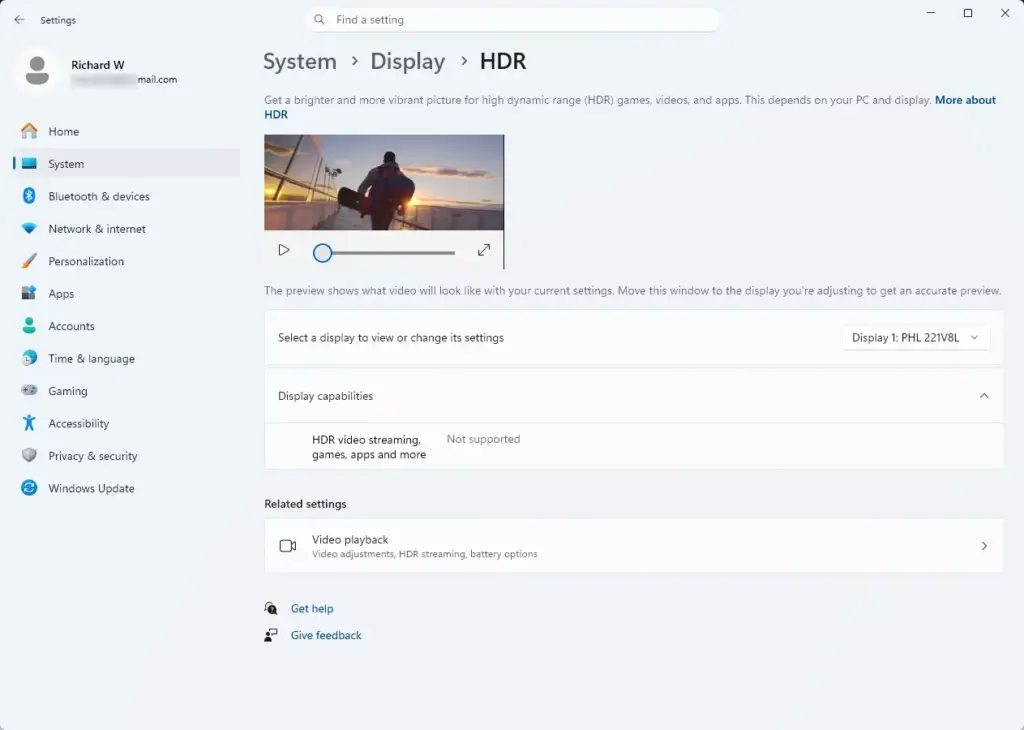
Settings › System › Display › HDR - Open a test video, then drag the content brightness slider (labeled SDR content brightness on many builds) until both the bright and dark areas show clear detail and the highlights are not blown out.
- If colors still look flat, try switching Use HDR off. Many standard videos look better with HDR off, and you can switch it back on for HDR content.
Changes here apply right away, and the screen may flicker briefly when you toggle HDR. You can undo any change by moving the slider back or flipping the switch.
Configuring Hardware-Accelerated GPU Scheduling
Hardware-accelerated GPU scheduling lets your graphics card manage its own video memory instead of waiting on the CPU. On supported hardware this can reduce latency and dropped frames during heavy multitasking. It needs a reasonably recent graphics card and driver. If the option is missing, update your driver first and check again.
- Press the Windows key + I to open Settings.
- Select System.
- Click Display.
- Scroll down and click Graphics.
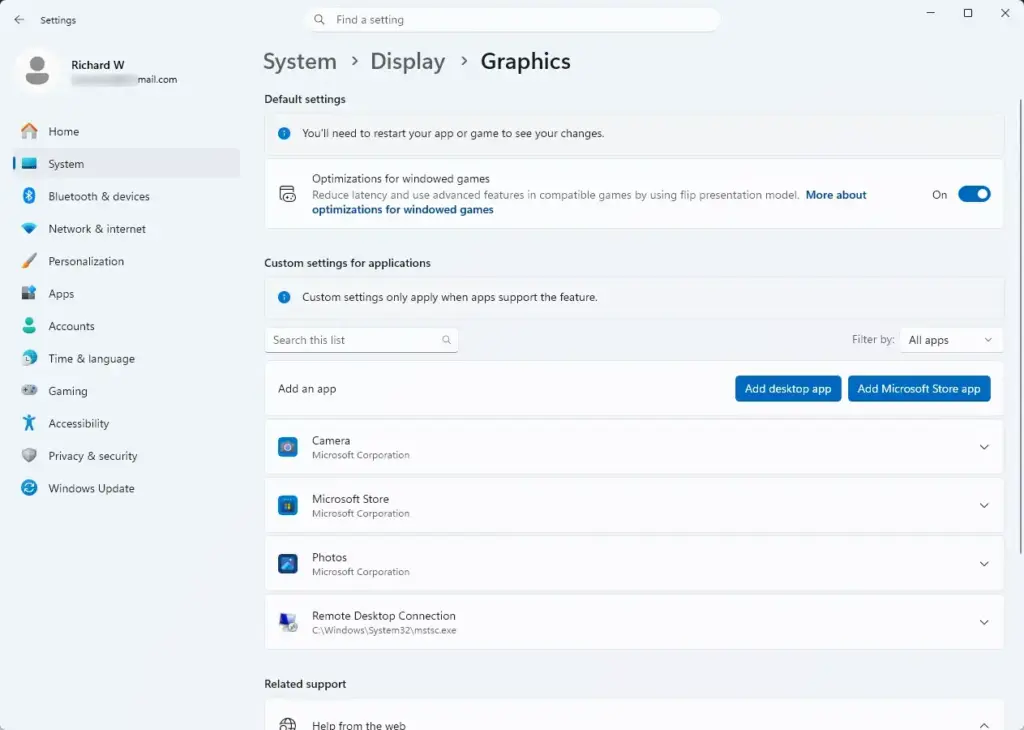
Settings › System › Display › Graphics - Click Change default graphics settings near the top of the window. A page with the default graphics options opens.
- Turn the Hardware-accelerated GPU scheduling switch On.
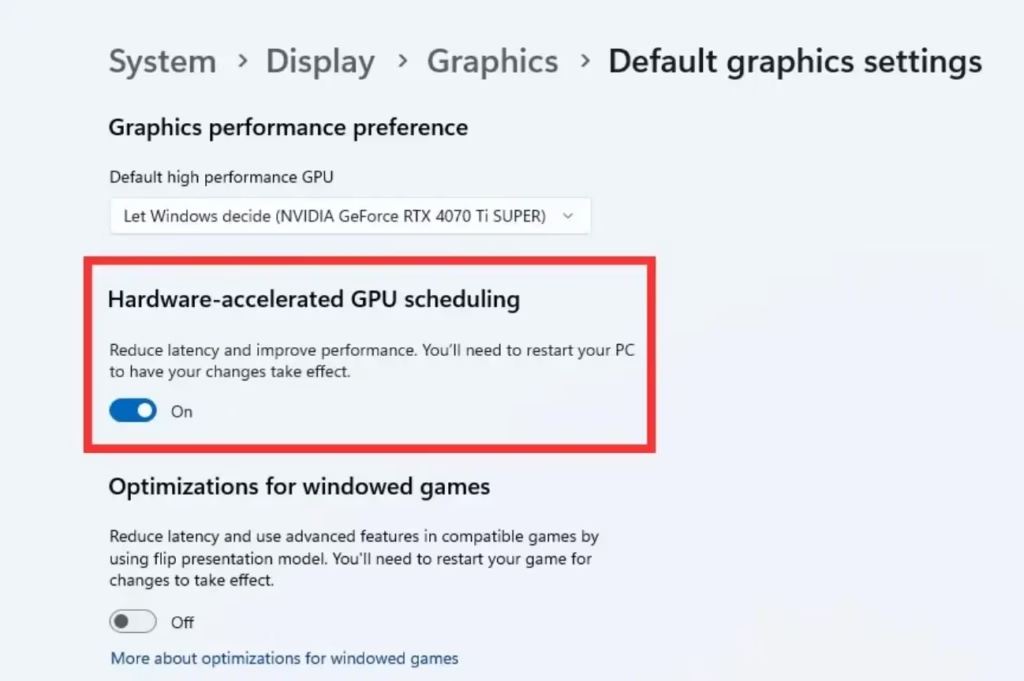
Enable Hardware-Accelerated GPU Scheduling in Windows 11 graphics settings. - Restart your computer. The setting does not take effect until you do.
Go back to the same page, turn the switch Off, and restart again.
Updating Display Drivers
Black screens, stuttering, and audio that drifts out of sync with the picture are often caused by an outdated or damaged display driver. Updating the driver is one of the most reliable fixes, and it often brings in the support that other options, such as GPU scheduling, depend on.
- Right-click the Start button and select Device Manager, the tool for managing hardware devices.
- Click the arrow next to Display adapters to expand the category. You should see your graphics card listed, and possibly an integrated one as well.
- Right-click your graphics card and select Update driver.
- Click Search automatically for drivers and follow any remaining on-screen prompts.
- Restart your PC once the installation finishes.
If Windows says the best driver is already installed, that only means Windows Update has nothing newer. Download the latest package directly from your graphics manufacturer (NVIDIA, AMD, or Intel) and run the installer. If a new driver makes things worse, right-click the card in Device Manager, choose Properties, open the Driver tab, and click Roll Back Driver if it is available.
Resetting Browser Video Decoders
If video only misbehaves inside your web browser, the cause may be corrupted cache or decoding data in the browser, not Windows itself. Resetting the browser clears that data and often restores smooth streaming on sites like YouTube and Netflix. Reset is a last resort, so try the other fixes first.
- Press the Windows key + I to open Settings.
- Select Apps.
- Click Installed apps.
- Scroll down to find your web browser, click the three dots next to its name, and select Advanced options. Not every browser offers this. Microsoft Edge does, but browsers such as Chrome do not, so use the browser's own settings for them.
- Scroll down and click the Reset button. This deletes the app's local data and cache, so you will need to sign in again. If you see a Repair button, try that first, because it keeps your data.
Turning it off, or on, is a quick test if reset does not help. A reset cannot be undone, but any data synced to your browser account will come back when you sign in.
What to do next
Video should now play smoothly with natural colors in both your desktop apps and your web browser. If you want to go further, look at your display refresh rate settings or set up your audio output devices for surround sound.
Frequently asked questions
How do I get to Windows performance settings?
Press Windows key + I to open Settings. Go to System, then select About. Click Advanced system settings, then the Performance tab. From here you can adjust visual effects, processor scheduling, and virtual memory to improve how Windows runs.
How do I change my default video player in 🪟 Windows 11?
Open Settings and go to Apps, then Default apps. Search for the video file type you want to change (like .mp4 or .mkv). Select it and choose your preferred player from the list. Windows will open that file type with your chosen app going forward.
How do I change my video settings?
Press Windows key + I to open Settings. Select System, then Display. Here you can adjust brightness, resolution, refresh rate, HDR settings, and color profiles. For video playback specifically, go to Apps and select Video playback to toggle hardware acceleration.
How do I access the sound settings in 🪟 Windows 11?
Press Windows key + I to open Settings. Go to System, then Sound. You can change your default playback and recording devices, adjust volume levels, and access advanced audio options like spatial audio and noise cancellation from this menu.
Still have a question?
Answered by AI from this guide. Good questions may be added to this page — please don't include personal details.
Did this guide fix your problem?

About the Author
Richard
Tech Writer, IT Professional
Richard is a writer at Geek Rewind who turns complex IT tasks into clear, step-by-step guides. He draws on years of hands-on experience in system administration and enterprise IT operations, focusing on Windows, Linux and WordPress: the problems people actually run into, and the fixes that work. His server and WordPress guides come from systems he runs himself. Richard builds and maintains the platform behind Geek Rewind, from its Ubuntu servers and Nginx configuration to its custom WordPress plugins. Many new tutorials start with readers' questions, and he's always glad to answer them in the comments.
No comments yet — be the first to share your thoughts!