How to Enable or Disable Auto Enhance during Video Playback in Windows 11
This tutorial shows you how to turn video enhancement on or off in Windows 11. Video enhancement automatically improves video quality when your computer is plugged in.
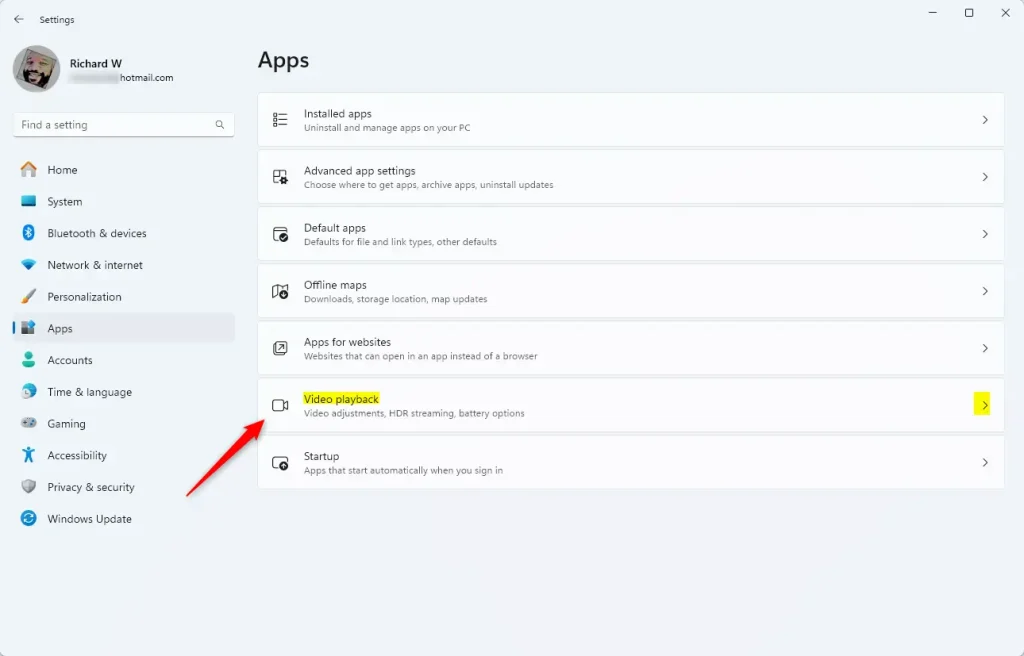
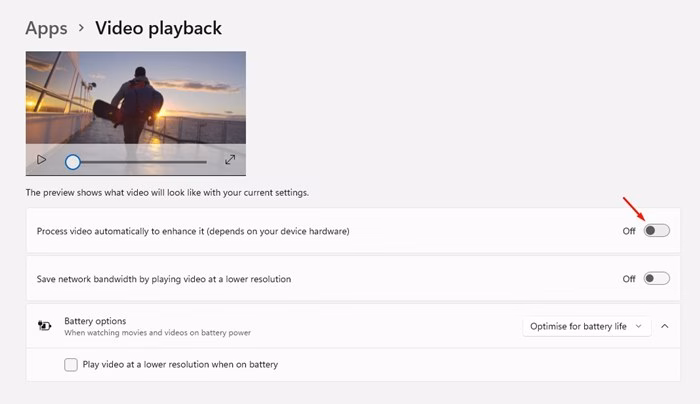
Open Settings, click Apps, then Video playback. Toggle “Process video automatically to enhance it” to enable or disable auto-enhancement. This setting affects apps using Windows’ built-in video system.
Some apps use Windows 11’s built-in video system. This includes apps that come with Windows 11, like Universal Windows Platform (UWP) apps, which are applications designed to run across various Windows devices. Microsoft Edge, Photos, and Movies & TV are examples. Many third-party video apps from the Microsoft Store also use this system. Think Hulu, Netflix, and Vudu.
You can control video playback for these apps using Windows 11’s video playback settings. If your hardware supports it, you can have your PC enhance videos automatically. Or, you can choose to play videos at lower quality to save internet data.
When watching videos on battery power, you can choose to optimize playback for battery life or video quality.
Video playback settings in Windows – Microsoft Support Learn how to change the video playback settings for apps that use Windows’ built-in video system.
Option One
Turn On or Off Auto Enhance in Settings
- Open Settings by pressing
Win+I. - Click Apps on the left side. Then click Video playback on the right side.
- Turn on or off the setting that says “Process video automatically to enhance it (depends on your device hardware).” Choose what works best for you.
- Close Settings when you’re done.
You can easily turn Windows 11 video enhancement on or off directly within the Settings app, making it simple to adjust how your videos look.
You can easily turn Windows 11 video enhancement on or off directly within the Settings app, making it simple to adjust how your videos look.
Option Two
Turn On or Off Auto Enhance using the Registry
Turn On Auto Enhance
reg add "HKEY_CURRENT_USER\Software\Microsoft\Windows\CurrentVersion\VideoSettings" /v EnableAutoEnhanceDuringPlayback /t REG_DWORD /d 1 /fTurn Off Auto Enhance
This is the default setting.
reg add "HKEY_CURRENT_USER\Software\Microsoft\Windows\CurrentVersion\VideoSettings" /v EnableAutoEnhanceDuringPlayback /t REG_DWORD /d 0 /fSummary
Windows 11 offers a video enhancement feature that you can control using either the Settings app or the Registry.
How to enhance video quality in 🪟 Windows 11?
To enhance video quality in Windows 11, go to Settings > Apps > Video playback. Then, turn on the toggle for ‘Process video automatically to enhance it.’
What is the best video enhancer for 🪟 Windows 11?
Vidmore Video Enhancer, one of the best video enhancement software for Windows, allows you to turn old, blurry, or low-resolution videos into clear, high-definition ones (with 4K quality). This software uses advanced AI algorithms to make sure every part of your video looks its best.
How do I process video to enhance it 🪟 Windows 11?
Method 1: Enable or disable via Settings app (GUI) On the left pane, select Apps. On the right pane, click Video playback. Find the “Process video automatically to enhance it (depends on your device hardware)” entry, and switch the toggle beside it to: On = Auto-enhance video playback.
Was this guide helpful?

About the Author
Richard
Tech Writer, IT Professional
Richard, a writer for Geek Rewind, is a tech enthusiast who loves breaking down complex IT topics into simple, easy-to-understand ideas. With years of hands-on experience in system administration and enterprise IT operations, he’s developed a knack for offering practical tips and solutions. Richard aims to make technology more accessible and actionable. He's deeply committed to the Geek Rewind community, always ready to answer questions and engage in discussions.

No comments yet — be the first to share your thoughts!