Reinstall a Network Adapter Driver in Windows 11

Reinstalling a network adapter driver in Windows 11 means removing the adapter in Device Manager, restarting the PC, and letting Windows install the driver again. This fixes many Wi-Fi and Ethernet problems, such as a connection that keeps dropping or an adapter that has stopped working.
The steps work the same on Windows 11 Home and Pro, for both Wi-Fi and Ethernet adapters. You need an administrator account, or the administrator password when Windows asks for it.
Want a different driver version instead? Download a fresh copy from your PC maker or adapter maker first. Removing the adapter can cut off your internet, so save the file before you start.
To reinstall a network adapter driver in Windows 11, open Device Manager, expand Network adapters, right-click your physical adapter, and select Uninstall device. Restart the PC and Windows loads the driver again. Download a replacement first if you need a specific version, because removing the adapter can leave you offline.
Before You Start
Take two minutes to prepare. The most common mistake here is removing your only internet adapter and then having no way to download its replacement. that connects you to the internet, then having no way to download its replacement.
Identify Your Adapter and Note the Current Driver
Knowing the adapter’s exact name and driver version tells you what to download and gives you something to compare against later. Device Manager is the Windows tool that lists your hardware and the driver each device uses.
- Right-click Start and select Device Manager.
- Expand Network adapters. You see a list such as an Intel Wi-Fi adapter, a Realtek PCIe GbE Family Controller, and several virtual entries.
- Double-click your physical adapter to open its properties. Wi-Fi adapters usually have “Wi-Fi” or “Wireless” in the name. Ethernet adapters usually have “GbE”, “Ethernet” or “Family Controller”.
- Select the Driver tab. Write down the Driver Provider, Driver Date and Driver Version.
Leave the virtual entries alone. That includes anything named WAN Miniport, Microsoft Wi-Fi Direct Virtual Adapter, Hyper-V Virtual Ethernet Adapter, or the TAP and VPN adapters. Those belong to Windows features and VPN software, not to your physical hardware.
Download the Replacement Driver on Another Device
If the affected PC has no working connection, use a second PC or a phone and copy the files over on a USB drive. These sources are listed from most to least reliable:
- Your PC maker's support page. Search for your exact model, open the Drivers or Downloads section, and look under Wi-Fi, WLAN, LAN or Network. Laptop makers often tune drivers for their own hardware, so this is the best first choice.
- The adapter maker's site. Intel, Realtek, Qualcomm and MediaTek publish drivers for their chips. Use this if your PC maker's version is old or missing.
- Microsoft Update Catalog. The catalog at catalog.update.microsoft.com hosts drivers that Microsoft distributes through Windows Update. It is useful when you cannot find the driver anywhere else. See the next section for how to match the right one.
To search only Microsoft's own documentation, add site:microsoft.com to a web search, for example network adapter driver Windows 11 site:microsoft.com. Use that for Microsoft's driver guidance. Use your PC maker's page for the driver itself.
Download drivers only from the maker or from Microsoft. Third-party "driver updater" sites are a common way to pick up malware.
Match the Driver to Your Adapter With a Hardware ID
Searching the Microsoft Update Catalog by product name returns many near-identical entries. You might see several Realtek packages with different dates and sizes. A hardware ID (a code that identifies the exact chip) removes the guesswork.
- In Device Manager, double-click your adapter and select the Details tab.
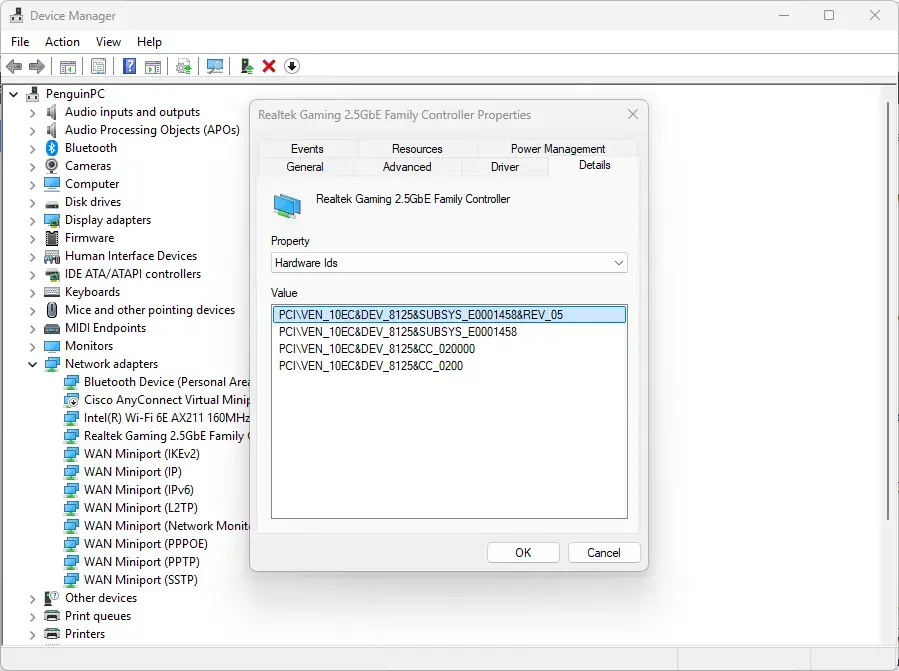
Device Manager showing network adapter hardware details in Windows 11 - Open the Property drop-down and select Hardware Ids.
- Right-click the first value in the list and select Copy. It looks like
PCI\VEN_xxxx&DEV_xxxx. - Paste it into the search box on the Microsoft Update Catalog on the other device and select Search.
- Pick the newest result whose product line matches Windows 11, then select Download.
Catalog downloads arrive as a .cab file (a compressed archive). Double-click it in File Explorer, press Ctrl+A to select everything inside, and copy the files into a new folder such as C:\Drivers\NetworkAdapter. You need this extracted folder for the manual install method below.
Reinstall the Driver in Device Manager
This is the standard method. It removes the adapter from Windows, and the restart triggers a fresh detection and driver install. This step requires administrator privileges. Windows shows a User Account Control prompt if you are not signed in as an administrator.
Your connection drops the moment you uninstall the adapter. Have the replacement driver on a USB drive first if you plan to install a different version.
- Right-click Start and select Device Manager.
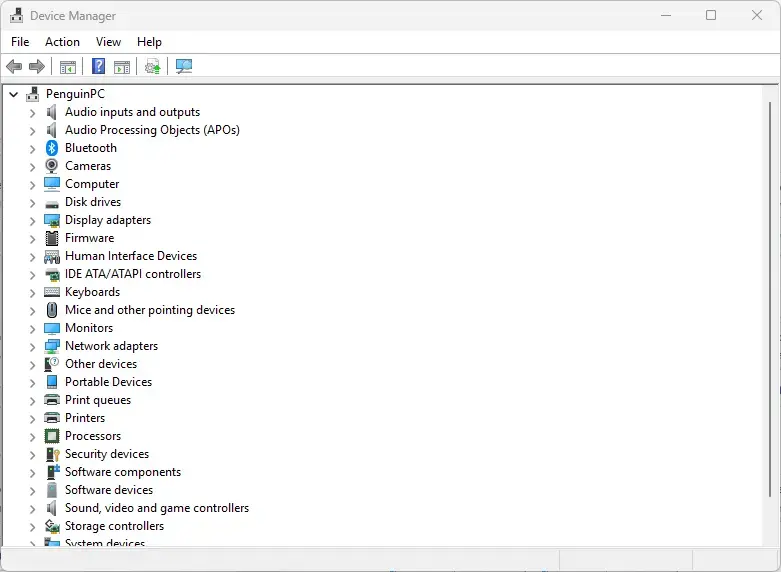
Windows 11 Device Manager window showing hardware and drivers. - Expand Network adapters.
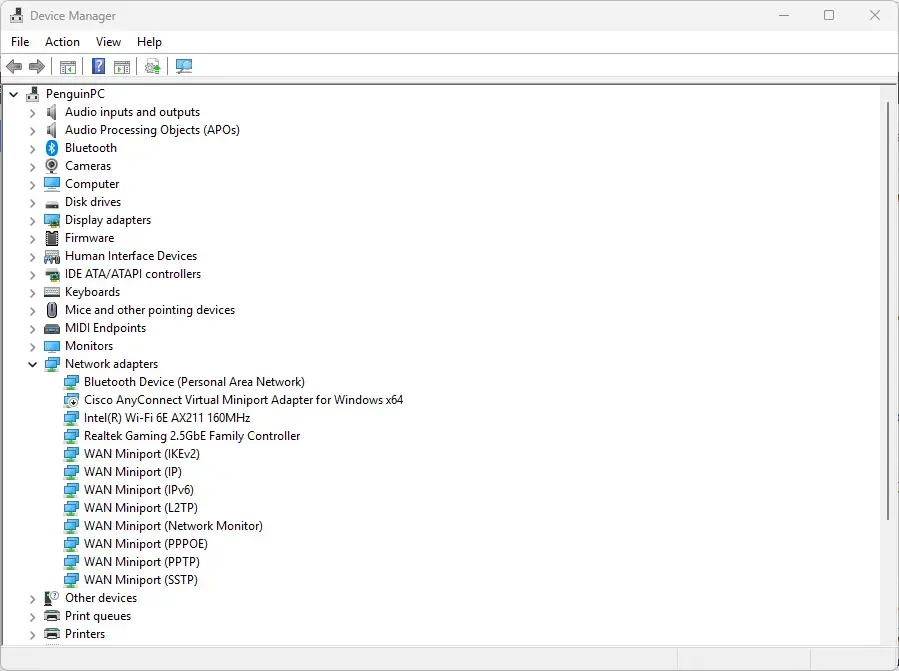
- Right-click your physical adapter and select Uninstall device. A dialog titled Uninstall Device opens with a warning that you are about to uninstall the device from your system.
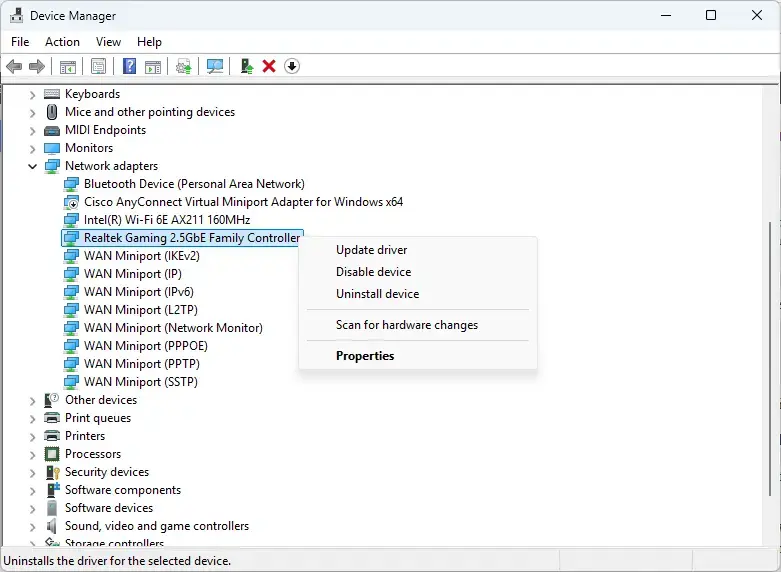
- Decide whether to select Attempt to remove the driver for this device. The two choices behave differently:
- Leave it cleared to keep the driver files in the driver store (the protected folder where Windows keeps installed driver packages). Windows reuses the same driver after the restart. Choose this if you only want a fresh start with the same driver.
- Select it to delete that driver package from the driver store. Windows then has to find a driver elsewhere, such as Windows Update or a version you install by hand. Choose this when the current driver itself is the problem.
If the checkbox does not appear, Windows is using a driver it cannot remove this way. The uninstall then removes only the device entry.
- Select Uninstall. The adapter disappears from the Network adapters list. The Wi-Fi or Ethernet icon in the taskbar changes or disappears.
- Select Start Power Restart.
- Sign in, then open Device Manager again and expand Network adapters. The adapter is back in the list.
If the adapter does not return after the restart, you do not have to restart again. In Device Manager, select Action Scan for hardware changes. Windows rechecks the hardware and reinstalls what it finds.
If you selected Attempt to remove the driver for this device and Windows has no internet to fetch a replacement, it may load a basic driver or none at all. In that case, move on to the manual install below.
Install a Downloaded Driver
Use this when you want a specific driver version rather than whatever Windows picks. Which method applies depends on what you downloaded.
If the Download Is an Installer
PC makers and chip makers usually package the driver as a .exe or .msi file. This is the most direct route when the download includes an installer. This step requires administrator privileges.
- Open the folder that contains the downloaded file. If it is a
.zip, right-click it, select Extract All, and then select Extract. - Double-click the setup file, usually named
Setup.exeor something similar to the driver name. - Select Yes at the User Account Control prompt.
- Follow the installer's prompts. The connection may drop for a few seconds while the driver loads.
- Restart the PC if the installer asks. If it does not ask, restarting is still a good idea for a network driver.
Afterwards, check the Driver tab in the adapter's properties. The Driver Version and Driver Date should match what you installed.
If the Download Is a Folder of Driver Files
Microsoft Update Catalog downloads and some maker packages contain an .inf file (the setup information file that tells Windows how to install the driver) and no installer. Point Device Manager at the folder. This step requires administrator privileges.
- Right-click Start and select Device Manager.
- Expand Network adapters. If you already uninstalled the adapter, look under Other devices instead, where it may appear as Network Controller with a yellow warning triangle.
- Right-click the adapter and select Update driver. The How do you want to search for drivers? window opens.
- Select Browse my computer for drivers.
- Select Browse, choose the folder that holds the extracted files (for example
C:\Drivers\NetworkAdapter), and select OK. - Make sure Include subfolders is selected, then select Next.
- Wait for the message that Windows has successfully updated your drivers, then select Close.
If Windows says The best drivers for your device are already installed, it considers the driver in that folder no better than the current one. To force the install, go back to step 4 and select Let me pick from a list of available drivers on my computer, then select Have Disk, browse to the .inf file, and continue. Windows lists the driver as a choice and installs the one you select.
If you see a message that Windows cannot find a compatible driver in the folder, you probably downloaded the wrong package. Compare the hardware ID you copied earlier against the download's page, and check that it is for 64-bit Windows 11.
If the Adapter Is Missing or Shows a Warning
The adapter can be absent from Network adapters for three common reasons. Each has a different fix.
- It is under Other devices. This means Windows sees the hardware but has no driver for it. Right-click it, select Update driver, and use the folder method above.
- It is hidden. In Device Manager, select View Show hidden devices. Greyed-out entries are devices that were installed once but are not currently connected or active. Right-click an old duplicate and select Uninstall device to clear it. Do not remove an entry if you are unsure whether it belongs to your current hardware.
- It does not appear anywhere. Windows cannot see the hardware at all. A driver reinstall will not fix this. Check for a physical Wi-Fi switch, or an airplane mode key on a laptop. This key is often marked Fn and shows a plane icon., and look in the BIOS/UEFI setup (the settings screen your PC shows before Windows starts) for a setting that disables the wireless or LAN device.. If a USB adapter is the problem, try a different port.
If the adapter shows a yellow triangle, double-click it and read the Device status box on the General tab. Errors such as Code 10 (the device cannot start) or Code 43 (Windows stopped the device because it reported problems) usually point to a faulty or incompatible driver, which a clean reinstall addresses. A Code 43 that returns after a clean reinstall can mean a hardware fault.
Other Ways to Replace the Driver
Install It From Windows Update
Windows Update sometimes holds a newer network driver as an optional update rather than installing it automatically. You need a working connection for this, so use it before you uninstall anything, or after you restore connectivity another way.
- Open Settings > Windows Update Advanced options Optional updates
- Select Driver updates to expand the list. If the entry is not there, Windows has no optional driver updates for your PC right now.
- Select the check box next to the network adapter driver, then select Download & install.
Roll Back to the Previous Driver
If the problem began right after a driver update, you do not need a full reinstall. A rollback restores the driver that was installed before. This step requires administrator privileges.
- In Device Manager, double-click your adapter under Network adapters.
- Select the Driver tab.
- Select Roll Back Driver, choose a reason when asked, and select Yes.
The Roll Back Driver button is greyed out when Windows has no earlier driver stored for the device. That is normal after a clean uninstall with the driver removed, or on a freshly installed system. In that case, install an older version from your PC maker's site by hand.
Remove a Stuck Driver With pnputil
If you keep getting the same faulty driver back after a reinstall, the old package is probably still in the driver store. pnputil is a built-in command-line tool that lists and removes driver packages. This step requires administrator privileges. Removing the wrong package can disable a device, so only delete the one you identified as your network adapter.
- Right-click Start and select Terminal (Admin). Select Yes at the User Account Control prompt.
- Run this command to list every third-party driver package:Code
pnputil /enum-drivers - Find the entry whose Provider Name and Original Name match your adapter's maker and driver file. Note its Published Name, which looks like
oem42.inf. - Run this command, replacing
oem42.infwith your published name:Codepnputil /delete-driver oem42.inf /uninstall - Restart the PC, then install the replacement driver using one of the methods above.
If the command reports that the driver is still in use, the adapter is still using it. Uninstall the device in Device Manager first, then run the command again.
Reset All Network Adapters as a Last Resort
Network reset removes and reinstalls every network adapter and returns networking components to their defaults. It fixes problems a single-adapter reinstall misses, but it has side effects. It forgets saved Wi-Fi networks and passwords, and it can remove VPN clients and virtual switches (virtual network connections used by Hyper-V virtual machines) that you then have to set up again.. Use it only after the methods above fail. This step requires administrator privileges.
- Open Settings > Network & internet Advanced network settings
- Select Network reset.
- Select Reset now, then select Yes to confirm. Windows warns that it will restart in 5 minutes.
- Wait for the restart, then reconnect to your network and re-enter the Wi-Fi password.
If This Didn't Work
If the adapter still fails with the new driver, install an older version from your PC maker's site, since the newest release is not always the stable one. Windows Update can replace a driver you installed by hand during a later update, so recheck the Driver Version on the Driver tab after major updates. To undo a manual install, use Roll Back Driver on the same tab. If the adapter never appears in Device Manager, the next place to look is the BIOS/UEFI setup or the hardware itself.
Was this guide helpful?

About the Author
Richard
Tech Writer, IT Professional
Richard is a writer at Geek Rewind who turns complex IT tasks into clear, step-by-step guides. He draws on years of hands-on experience in system administration and enterprise IT operations, focusing on Windows, Linux and WordPress: the problems people actually run into, and the fixes that work. His server and WordPress guides come from systems he runs himself. Richard builds and maintains the platform behind Geek Rewind, from its Ubuntu servers and Nginx configuration to its custom WordPress plugins. Many new tutorials start with readers' questions, and he's always glad to answer them in the comments.



No comments yet — be the first to share your thoughts!