How to Update Windows 11 Drivers and Check for Driver Updates: A Complete Guide

Driver updates in Windows 11 replace the software that helps Windows talk to parts like your graphics card, printer, and Wi-Fi adapter. Old drivers cause freezing, audio glitches, and broken hardware.
Checking for updates on Windows 11 version 23H2 fixes these bugs and keeps your PC fast. This guide covers the built-in tools first, then manufacturer downloads, then what to do when an update goes wrong.
Press Win+I to open Settings , click Windows Update , then click Check for updates . Windows scans for driver updates automatically. If found, click Download and install, then restart your PC when prompted. For optional drivers, go to Advanced options Optional updates, tick the drivers you want, and click Download & install.
Why Should You Update Your Drivers?
Drivers are small programs that act as translators between Windows 11 and your hardware. Windows does not know how to run every graphics card, printer, or Wi-Fi chip on its own, so it relies on the driver to pass instructions back and forth. Keeping drivers current fixes bugs, improves device performance, and adds support for new features on your printer, graphics card, and other peripherals.
Outdated drivers can lead to system crashes, slow down your computer, create security vulnerabilities, and even stop hardware from working correctly. A few examples I see often:
- An older graphics driver might cause games to lag or the screen to flicker.
- An outdated network driver could reduce your internet speed or drop your Wi-Fi .
- A printer driver that is not current might prevent you from printing important documents.
How Often Should You Update Drivers?
Checking for driver updates every few months is usually enough for most Windows 11 hardware. Gamers and users with dedicated graphics cards like NVIDIA or AMD benefit from monthly checks. Standard peripherals like keyboards and mice rarely need manual updates unless you are having problems with them.
A good rule: if everything works, you do not need to chase every new version. Update when you have a symptom, when a game or app asks for a newer driver, or when a security fix is announced.
Understand What Happens When You Update Drivers
Updating a Windows 11 driver replaces your old software with a newer version so the operating system can communicate better with your hardware. The process usually takes only a few seconds. Your connected device might briefly disconnect and reconnect while the new software loads. Your screen may go black for a moment during a graphics driver update, and Wi-Fi will drop for a moment during a network driver update. This is normal.
If Windows or an installer asks for one, do it before you judge whether the update worked.
Method 1Update Drivers Automatically Through Windows Update
Windows Update is the simplest way to update most drivers. It finds and installs recommended updates automatically, and the drivers it offers have been tested by Microsoft for compatibility. It also lists newer, optional driver updates that it does not install on its own.
Steps to Update Drivers via Windows Update:
- Press Windows key + I to open Settings.
- Click Windows Update in the left sidebar.
- Click Check for updates. Windows will search for available updates, including drivers. This may take a minute or two.
- If updates are found, they will be listed. Click Download and install or Install now.
- To see optional driver updates, go to Settings Windows Update Advanced options Optional updates If you see Driver updates there, click it to expand the list.
- Tick the boxes for the drivers you want, then click Download & install.
- Wait for the installation to finish. Your computer may restart automatically. If you see a Restart now button instead, save your work and click it.
- After the restart, your drivers should be updated.
If the Optional updates entry is missing, Windows has no extra drivers to offer right now. On a work PC managed by your organization, an administrator may control which updates you can see.
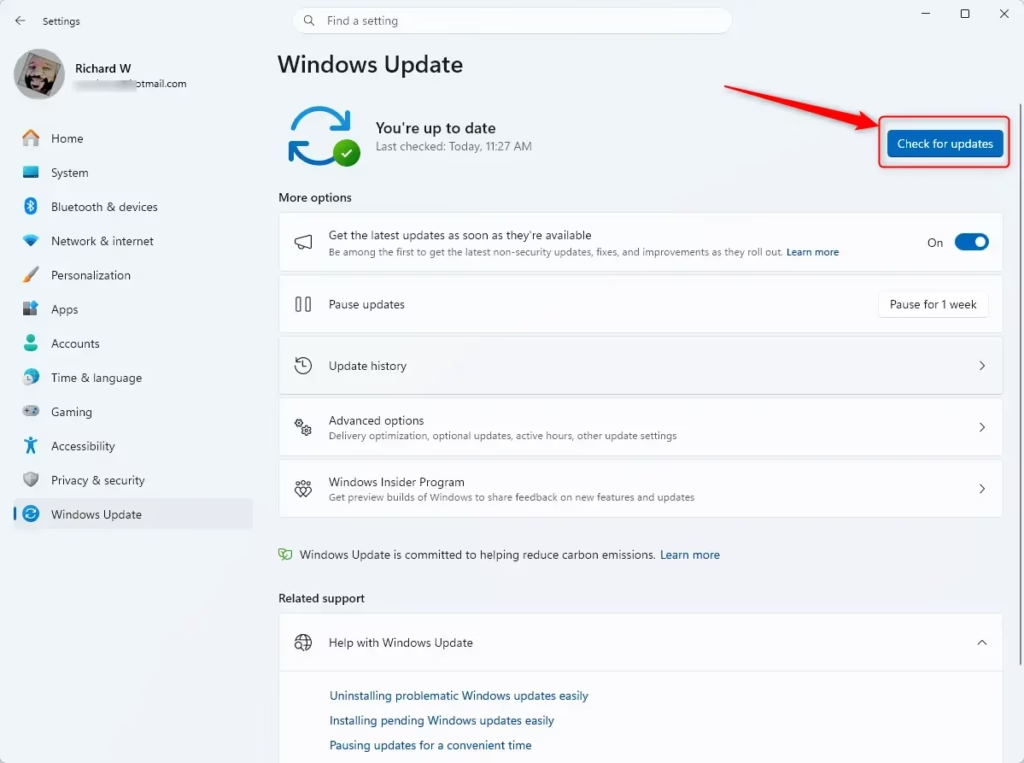
Using Windows Update is the easiest way to find and install official driver updates for your system. Open Settings, check for new updates, and Windows will scan for hardware software alongside your regular security patches and install them for you. Make this your first stop before you try anything else.
Method 2Update Drivers Through Device Manager
Device Manager displays every hardware device connected to your computer. You can use it to check for updates for one specific device, which is handy when a single part is misbehaving. It works the same way on Windows 11 Home and Pro.
Steps to Update Drivers in Device Manager:
- Right-click the Start button (Windows logo) in the bottom left.
- Select Device Manager from the menu that appears. The Device Manager window opens with a list of hardware categories.
- Find the device you want to update. For example, expand Display adapters to find your graphics card, or expand Network adapters to find your internet adapter.
- Right-click the specific device.
- Select Update driver.
- A window opens asking how you want to search for drivers. Choose Search automatically for updated driver software. On some Windows 11 builds this reads Search automatically for drivers.
- Windows will search for the latest driver. This usually takes 30 seconds to a few minutes.
- If a new driver is found, Windows will download and install it automatically.
- If you are already up to date, you may see a message saying "The best driver software for your device is already installed". The wording can differ slightly by build.
- Close Device Manager when finished.
Keep in mind that this search only checks your PC and Windows Update. It will not look on the manufacturer's website, so "already installed" does not always mean you have the newest version available. For that, see the manufacturer section below.
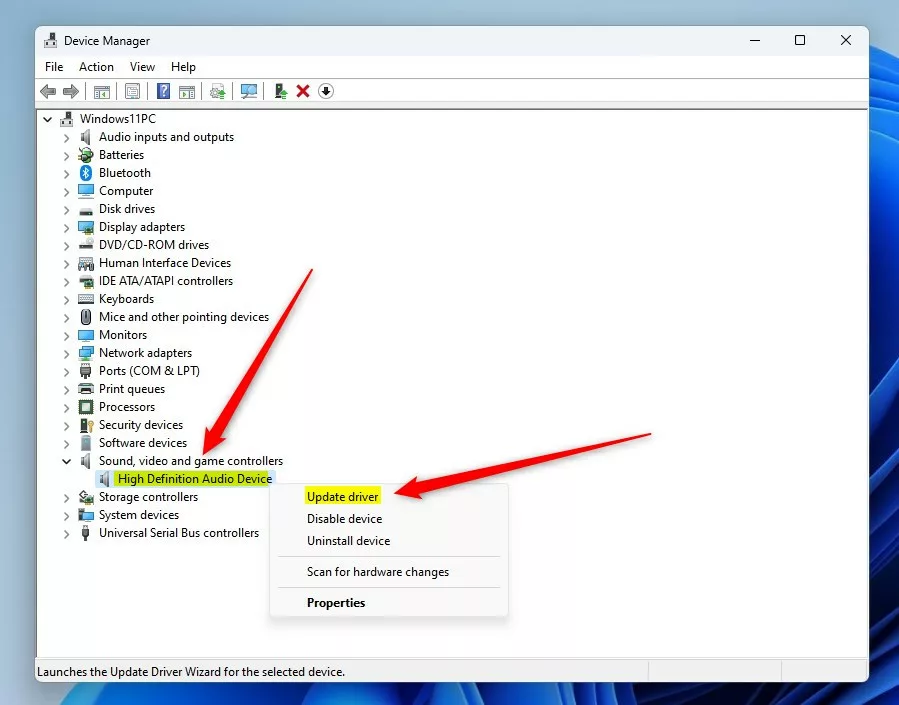
Updating a specific hardware component using Device Manager lets you target individual devices like your graphics card or network adapter. Right-click the Start button, choose Device Manager, select your hardware category, and choose the option to search for updated driver software.
Finding Specific Devices in Device Manager:
Device Manager organizes your computer hardware into logical categories to help you find specific components quickly. These are the ones you will use most:
- Display adapters—your graphics card or integrated graphics
- Network adapters—your ethernet adapter or Wi-Fi card
- Sound, video and game controllers—your sound card and audio drivers
- Universal Serial Bus controllers—USB hubs and controllers
- Printers—connected printers
- Mice and other pointing devices—your mouse or trackpad
- Keyboards—your keyboard
- Bluetooth—Bluetooth adapters (if you have Bluetooth devices)
Click the small arrow next to a category, such as Display adapters, to expand it and see the devices inside, for example an NVIDIA GeForce RTX 3070. That lets you see each individual hardware component. A device with a yellow warning triangle on its icon has a problem, and it is usually the first place to look when something has stopped working.
Method 3Install Drivers From the Manufacturer's Website
Sometimes the newest drivers are not available through Windows Update right away. For the absolute latest versions, especially for graphics cards and gaming peripherals, you may need to visit the manufacturer's website directly. Always download from the official site, not from a third-party "driver finder" page.
Steps to Install Drivers From a Manufacturer:
- Visit the manufacturer's website. Common manufacturers include:
- Graphics: NVIDIA (nvidia.com), AMD (amd.com), Intel (intel.com)
- Motherboards: ASUS (asus.com), MSI (msi.com), Gigabyte (gigabyte.com)
- Printers: HP (hp.com), Canon (canon.com), Epson (epson.com)
- Networking: Realtek (realtek.com), Intel (intel.com)
- Look for a "Support," "Downloads," or "Drivers" section.
- Enter your device model number. You can find it in Device Manager: right-click the device, select Properties, and look for the model name.
- Select Windows 11 as your operating system.
- Download the latest driver file to your computer, usually to your Downloads folder.
- Locate the downloaded file and double-click it to start the installer.
- Follow the on-screen instructions. Most driver installers are automatic.
- Restart your computer if prompted.
Installing drivers directly from the manufacturer's website gives you the newest software for your specific hardware model. Go to the official support page for brands like NVIDIA, ASUS, or HP, search for your exact product number, and download the installer. On a laptop, check the laptop maker's support page first, since it may supply tuned drivers that differ from the chip maker's generic ones.
How to Check Your Current Driver Version
Before updating, note the driver version you have installed now. That lets you confirm afterward that the update was applied, and it tells you which version to go back to if something breaks.
Steps to Check Driver Version:
- Open Device Manager by right-clicking the Start button and selecting Device Manager.
- Find and expand the category containing your device.
- Right-click the device and select Properties. A Properties window opens.
- Click the Driver tab.
- Look at the Driver Version field. This shows your current version.
- Check the Driver Date field, which shows when this driver was released.
- Compare this version number to what is listed on the manufacturer's website to see if an update is available.
After you update, repeat these steps. If the version number or date has changed, the new driver is in place.
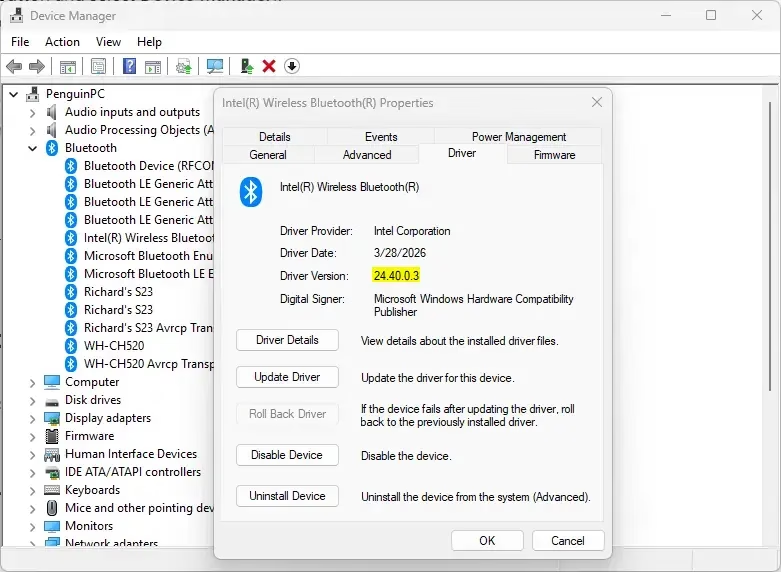
Checking your current driver version tells you whether you need an update or are already running the latest software. Open Device Manager, open the hardware's properties, and click the Driver tab to see the exact version number and release date.
Method 4Uninstall and Reinstall a Driver
If a driver becomes corrupted, meaning the software that lets Windows 11 talk to your printer, for instance, is damaged, it can stop that hardware from working properly. Uninstalling and then reinstalling the driver often fixes the issue and restores full functionality. Try a normal update first, and use this method when that does not help.
Steps to Uninstall and Reinstall a Driver:
- Open Device Manager.
- Find your device and right-click it.
- Select Uninstall device. A confirmation window appears.
- Check the box that says Attempt to remove the driver software for this device. The wording may differ slightly, and the box only appears for some devices.
- Click Uninstall.
- Windows will remove the driver. The device may stop working briefly, and a screen or network adapter may disappear for a moment.
- Restart your computer.
- After the restart, Windows will automatically reinstall a basic driver for your device.
- Then follow the steps above to update the driver through Device Manager or the manufacturer's website for the latest version.
If you uninstall it, you may have no internet until Windows reinstalls it. Download the manufacturer's installer to a USB drive first if you are not sure.
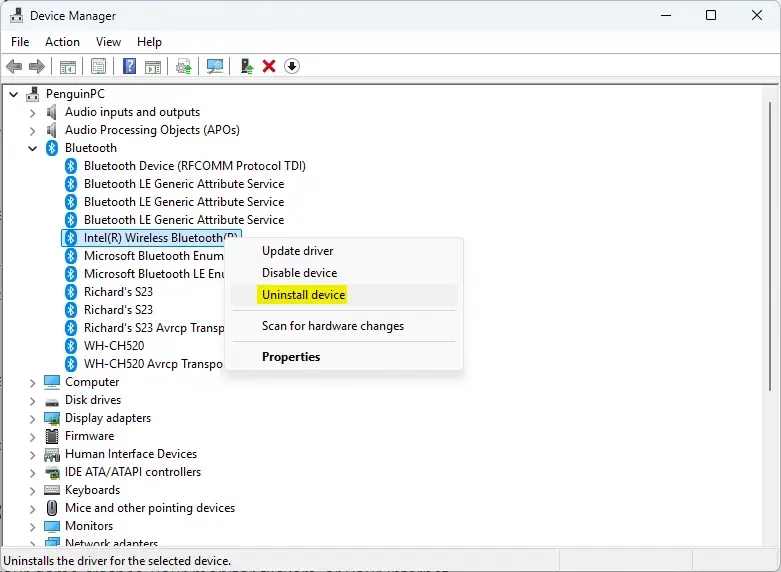
Uninstalling and reinstalling a driver fixes stubborn hardware glitches by clearing out corrupted software files. Open Device Manager, remove the device together with its driver software, and restart your computer so Windows can install a fresh copy.
How to Roll Back a Driver if Updates Cause Problems
In rare cases, a newly installed driver causes problems. Your games might crash, your monitor could flicker, or your internet connection might drop unexpectedly. Windows keeps a copy of the previous driver so you can go back to it.
Steps to Roll Back a Driver:
- Open Device Manager.
- Right-click the device that is causing problems.
- Select Properties.
- Click the Driver tab.
- Look for the Roll Back Driver button. It only works if Windows has a previous version saved. If it is greyed out, there is nothing to go back to.
- Click Roll Back Driver.
- A confirmation window will appear asking why you are rolling back and explaining that you are reverting to the previous driver version.
- Click Yes to confirm.
- Windows will remove the new driver and reinstall the old one.
- Restart your computer if prompted.
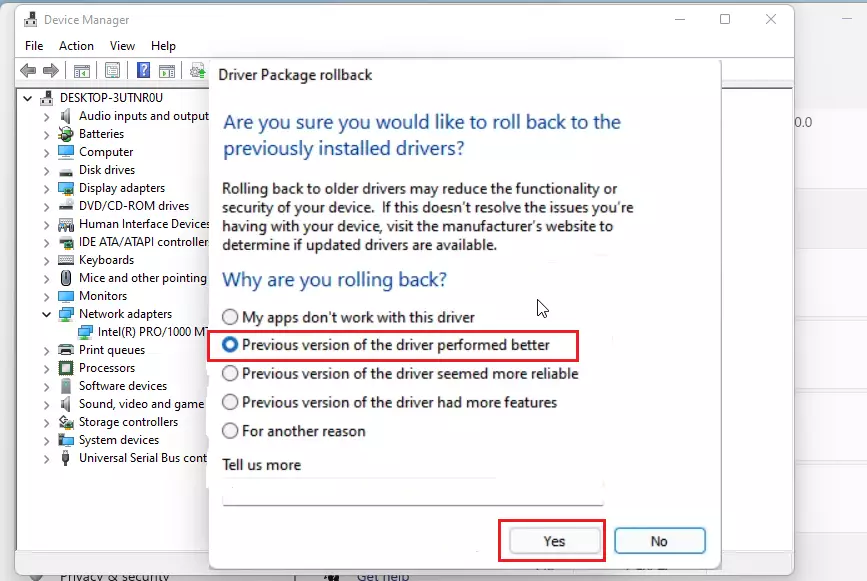
Rolling back a driver lets you return to the previous working version if a recent update causes crashes or hardware problems. Open the properties of the malfunctioning device in Device Manager and click Roll Back Driver on the Driver tab.
If you uninstalled a driver and then installed a new one, you will not be able to roll back with this method. In that case, use a restore point (covered at the end of this guide) or download the older driver from the manufacturer's website.
Update Drivers for Specific Hardware: Graphics Cards
Graphics drivers are among the most important to keep updated, particularly if you play games or use graphics-heavy applications. They control how your computer displays visual information. Newer versions improve gaming performance, video playback, and the behavior of multiple displays, and they are often released to support new games and software.
Updating NVIDIA Graphics Drivers:
- Visit nvidia.com/Download/driverDetails.aspx.
- Select your graphics card model, operating system (Windows 11), and language.
- Click Search.
- Download the latest driver file.
- Run the installer and follow the prompts. If you are fixing a driver problem, choose the custom option and tick the clean installation checkbox.
- Restart your computer.
Updating your NVIDIA graphics drivers ensures the best performance and visual quality in modern PC games. Download the latest software package directly from the official NVIDIA support page, or use the GeForce Experience utility (NVIDIA's newer app does the same job) to install the newest updates automatically.
Updating AMD Graphics Drivers:
- Visit amd.com/support.
- Enter your graphics card model.
- Select Windows 11 and download the latest driver.
- Run the installer and follow the prompts.
- Restart your computer.
AMD also provides the Adrenalin software application, designed to simplify driver management and handle automatic updates.
Updating Intel Graphics Drivers:
Updating Intel integrated graphics drivers keeps your laptop or entry-level desktop running smoothly and prevents display bugs. Use the official Intel Driver & Support Assistant tool to scan your system and install the correct graphics software updates.
- Visit intel.com/content/www/en/en/support/detect.html.
- Download Intel's Driver & Support Assistant tool.
- Run the tool. It automatically detects your system and finds available driver updates.
- Click Update for any available drivers.
- Restart when prompted.
Whichever brand you use, keep your graphics drivers current. Doing so supports better performance and broad compatibility with new games and software.
Update Drivers for Network Adapters
Network drivers manage your internet connection, both wired (Ethernet) and wireless (Wi-Fi). Updated network drivers can improve connection speed and stability. If Wi-Fi keeps dropping, or the adapter disappears after a Windows update, this is the driver to check.
Steps to Update Network Drivers:
- Open Device Manager.
- Expand the Network adapters category.
- Right-click your network adapter. Names look like "Intel(R) Ethernet Connection" or a Realtek PCIe family controller. Ignore entries such as WAN Miniport, which are virtual.
- Select Update driver.
- Choose Search automatically for updated driver software.
- Wait for the search to complete and install any available updates.
- Restart your computer.
Updating your network drivers can fix slow internet speeds, frequent disconnects, and Wi-Fi connection errors on Windows 11. If Windows says the best driver is already installed but problems continue, get the driver from the adapter maker or your PC maker's support page.
What happens: An updated network driver might increase your internet speed, reduce disconnections, or resolve Wi-Fi connectivity issues. Some users have reported noticeable speed improvements after updating their network drivers.
Update Drivers for Sound and Audio
Audio drivers manage your speakers, headphones, and microphone. If you hear distorted sound or audio dropouts, or your microphone does not work, an updated driver for your audio hardware can often fix it.
Steps to Update Audio Drivers:
- Open Device Manager.
- Expand Sound, video and game controllers.
- Right-click your audio device. Look for "Realtek High Definition Audio" or similar.
- Select Update driver.
- Choose Search automatically for updated driver software.
- Install any available updates and restart if needed.
This clears up common sound problems like crackling speakers, missing microphones, and silent output. If the problem started right after an update, try Roll Back Driver instead.
Update Drivers for Printers
Printer drivers let Windows communicate with your printer. Without the correct driver, you may be unable to print or use advanced printer features such as scanning or ink-level checks.
Steps to Update Printer Drivers:
- Open Device Manager and expand the Printers category.
- Right-click your printer and select Update driver.
- Choose Search automatically for updated driver software.
- Alternatively, visit your printer manufacturer's website (HP, Canon, Epson, Brother, etc.).
- Download the latest driver for your specific printer model.
- Run the installer and restart your computer.
Updating the printer driver fixes communication errors that stop documents from printing correctly. If your printer is not listed in Device Manager, use the manufacturer's download, which usually installs the full driver and its software.
Advanced Driver Management: Creating a System Restore Point
Before you update drivers, create a system restore point. If something goes wrong, it lets you return your system to its earlier state. This takes under a minute and is worth doing before graphics or chipset driver updates in particular.
Steps to Create a System Restore Point:
- Press Windows key + R to open the Run dialog.
- Type systempropertiesadvanced.exe and press Enter.
- The System Properties window opens. Click the System Protection tab.
- Click the Create button. If it is greyed out, system protection is off for your drive. Select the drive, click Configure, choose Turn on system protection, and click OK.
- Give your restore point a name like "Before Graphics Driver Update" so you remember what it is for.
- Click Create.
- Wait for the restore point to be created. This usually takes 10 to 30 seconds.
- Click Close when finished.
A restore point saves a snapshot of your current system settings so you can undo risky changes if something breaks. To go back later, return to the System Protection tab and click System Restore, then pick your named restore point.
Steps to Restore from a Restore Point:
Restoring your computer from a saved restore point undoes recent system changes and fixes problems caused by bad driver updates. Open the system restore tool using the Run dialog, select your previously saved backup point, and let Windows revert your settings.- Press Windows key + R and type rstrui.exe, then press Enter.
- The System Restore window will open. Click Next.
- Select the restore point you created before updating (it will show the name and date you chose).
- Click Next.
- Review the information and click Finish.
- A warning will appear saying the process cannot be undone. Click Yes to proceed.
- Your computer will restart and restore to the selected point.
Checking for Driver Updates Regularly: Setting Up Notifications
Instead of manually checking for driver updates each month, you can configure Windows to provide automatic notifications.
Enable Automatic Driver Update Notifications:
- Open Settings (Windows key + I).
- Click System.
- Select About.
- Look for the Advanced options button and click it.
- Scroll down to find "Drivers" or "Driver updates".
- Toggle this setting to On to receive notifications when driver updates are available.
Enabling automatic driver update notifications ensures Windows alerts you the moment new hardware software becomes available. Go to your system settings, open the About menu, and turn on the driver update toggle to receive timely alerts for your components.
Troubleshooting: What If a Driver Won't Update?
Occasionally, Windows may fail to find updates, or an update might encounter an error. Here are common solutions to address these situations.
The Device Says "Best Driver Already Installed"
This message indicates that Windows believes you already have the latest version installed. Consider these steps:
- Visit the manufacturer's website directly to check if a newer version is available there.
- Sometimes manufacturers release drivers before Windows Update includes them.
- Download and install the manufacturer's version directly.
The Driver Update Installation Fails
Fixing a failed driver update installation usually requires running the downloaded installer file with administrator privileges. Right-click the installation file, choose the admin option, and restart your computer if the setup wizard still refuses to complete.
- Right-click the downloaded driver installer file.
- Select Run as administrator.
- Accept any prompts asking for permission.
- Follow the installation steps again.
If the installation still fails, try restarting your computer and attempting the process again. Sometimes, Windows requires a fresh start to successfully complete driver installations.
Device Manager Shows a Yellow Exclamation Mark
Fixing a yellow exclamation mark in Device Manager resolves hardware malfunction errors caused by broken or missing software. Uninstall the flagged device from your system, restart your computer, and let Windows scan for hardware changes to reinstall a working driver.
- Right-click the device with the yellow mark.
- Select Uninstall device.
- Check the box for "Attempt to remove the driver software for this device".
- Click Uninstall.
- Restart your computer.
- Right-click in empty space in Device Manager and select Scan for hardware changes.
- Windows will detect the device again and install a driver.
- Update the driver to the latest version through Device Manager or the manufacturer's website.
Professional Tool: Third-Party Driver Update Software (When Needed)
Certain situations may benefit from additional tools. While Windows' built-in options cover most common needs, third-party applications can offer assistance in specific scenarios.
When You Might Need Third-Party Tools:
- You have many different devices and want to update all drivers at once from a single interface.
- You're managing multiple computers and need centralized driver updates.
- You need older driver versions for compatibility testing.
- You want detailed reports on which drivers need updates.
Using third-party driver tools makes sense when you need to update dozens of different devices at once from a single dashboard. These specialized management utilities help IT administrators handle multiple computers or track down older driver versions for software compatibility testing.
- Windows Update for Business—built into Windows Pro and Enterprise editions for centralized management.
- Device Manager Plus (paid)—advanced device and driver management.
- Driver Booster (free with paid options)—automatic driver scanning and updating.
Some free utilities from untrusted sources may install unwanted software or outdated drivers. When in doubt, it's best to rely on Windows Update or the manufacturer's official websites.
Understanding Driver Conflicts and Compatibility
Occasionally, multiple drivers can interact in unexpected ways. Understanding how to identify and resolve conflicts can prevent future issues.
Signs of Driver Conflicts:
- Your computer crashes after a driver update.
- A device stops working after updating a different device's driver.
- Unusual error messages appear in Device Manager (like Code 43 or Code 37).
- Your system becomes unstable or unpredictable.
Resolving Driver Conflicts:
- Note which driver update caused the problem.
- Use the Roll Back Driver feature to revert
Conclusion
Keeping your Windows 11 drivers updated prevents system crashes, fixes hardware bugs, and keeps your computer running smoothly. Regular maintenance ensures your graphics card, printer, and network adapters communicate properly with the operating system for optimal performance.
- Importance of Drivers: Drivers serve as crucial intermediaries between Windows and your hardware, enabling proper functionality.
- Frequency of Updates: Aim to check for driver updates every few months, focusing on critical devices like graphics and network adapters.
- Methods for Updating: Utilize Windows Update, Device Manager, or manufacturer websites to ensure you have the latest drivers.
- Backup Your System: Create a system restore point before making updates to easily revert changes if issues arise.
- Handling Problems: Know how to roll back drivers or troubleshoot common installation issues to quickly resolve any problems that may emerge after updates.
- Consider Third-Party Tools: Use reputable third-party software for managing multiple devices or when built-in options are insufficient.
Adhering to these driver update guidelines ensures your Windows 11 system functions optimally, maximizing your hardware's potential and preventing performance-related problems on your computer.
Was this guide helpful?

About the Author
Richard
Tech Writer, IT Professional
Richard is a writer at Geek Rewind who turns complex IT tasks into clear, step-by-step guides. He draws on years of hands-on experience in system administration and enterprise IT operations, focusing on Windows, Linux and WordPress: the problems people actually run into, and the fixes that work. His server and WordPress guides come from systems he runs himself. Richard builds and maintains the platform behind Geek Rewind, from its Ubuntu servers and Nginx configuration to its custom WordPress plugins. Many new tutorials start with readers' questions, and he's always glad to answer them in the comments.


No comments yet — be the first to share your thoughts!