Why Does Windows 11 Keep Resetting Network Adapter Drivers After Updates

Windows 11 drops network adapter drivers after updates for two main reasons. A cumulative update can overwrite older hardware files with generic Microsoft software, or a manufacturer driver can conflict with the new operating system build. Network adapter drivers control how your PC talks to your router or ethernet cable. When one is replaced or fails to load, you lose your connection and can’t simply download a fix.
You can stop Windows from replacing these drivers in two ways. One is to block hardware updates through the Local Group Policy Editor. That tool is only available on Windows 11 Pro, Enterprise and Education, not Home. The other is to turn off automatic driver updates in the Device Installation Settings menu, which works on every edition. Before you change either setting, get the adapter working again with the steps below. Use a second computer or your phone for downloads.
Windows 11 replaces network adapter drivers after updates when a cumulative update overwrites your hardware files with generic Microsoft drivers, or a manufacturer driver conflicts with the new OS build.
Identify Your Network Hardware in Device Manager
Device Manager shows the exact model of your network hardware, so you can find the right network adapter driver on microsoft.com or the manufacturer’s page. It also shows whether Windows has loaded a driver at all. A wrong model number is the most common reason a downloaded driver fails to install, so do this step first.
- Press Win+X to open the quick link menu.
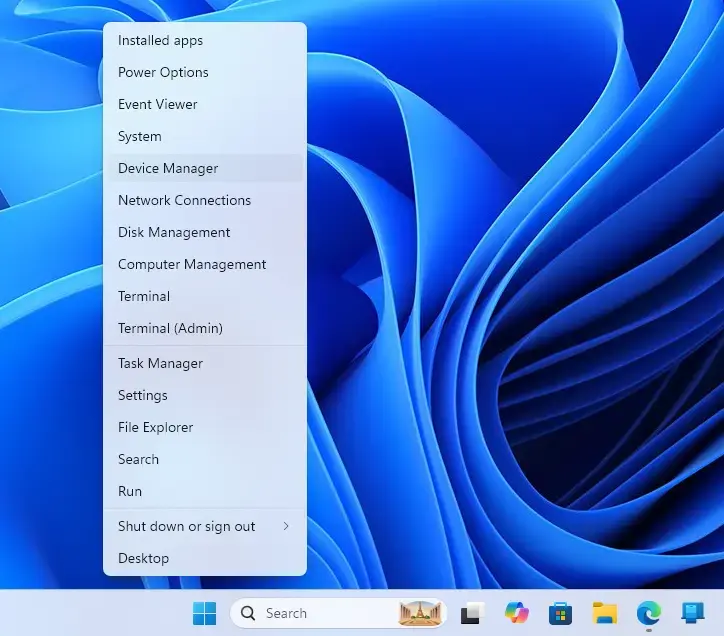
- Select Device Manager from the list. The Device Manager window opens with a list of hardware categories.
- Click the arrow next to Network adapters to expand the category.
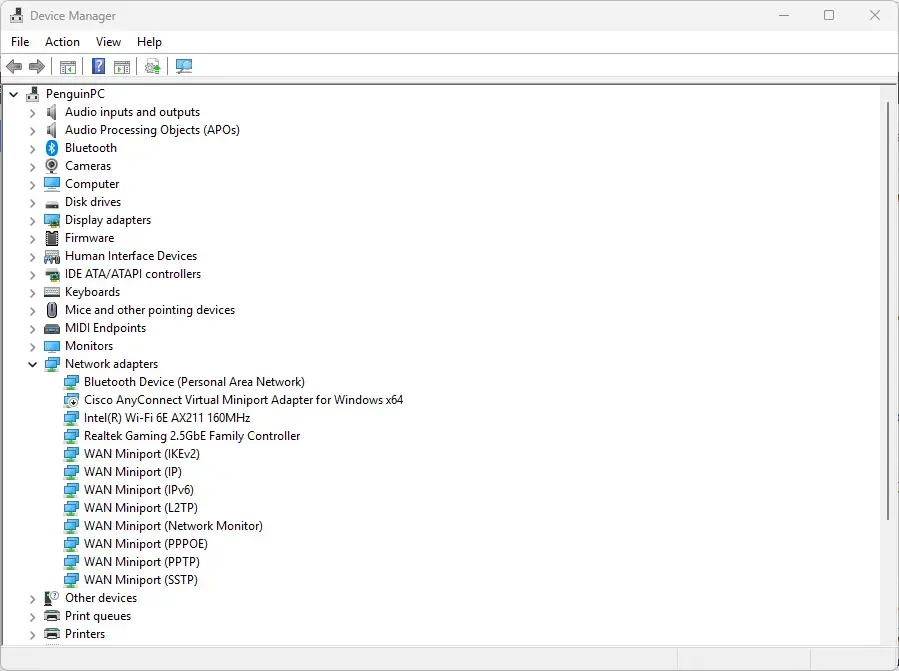
- Locate your Ethernet controller or wireless adapter. If it shows a yellow warning triangle, it lacks a working driver. If you see no network adapters at all, check the Other devices category for an unknown device. That is often the card with no driver.
- Right-click the adapter and select Properties.
- Go to the Details tab.
- Click the Property drop-down menu and select Hardware Ids. The Value box now lists one or more ID strings.
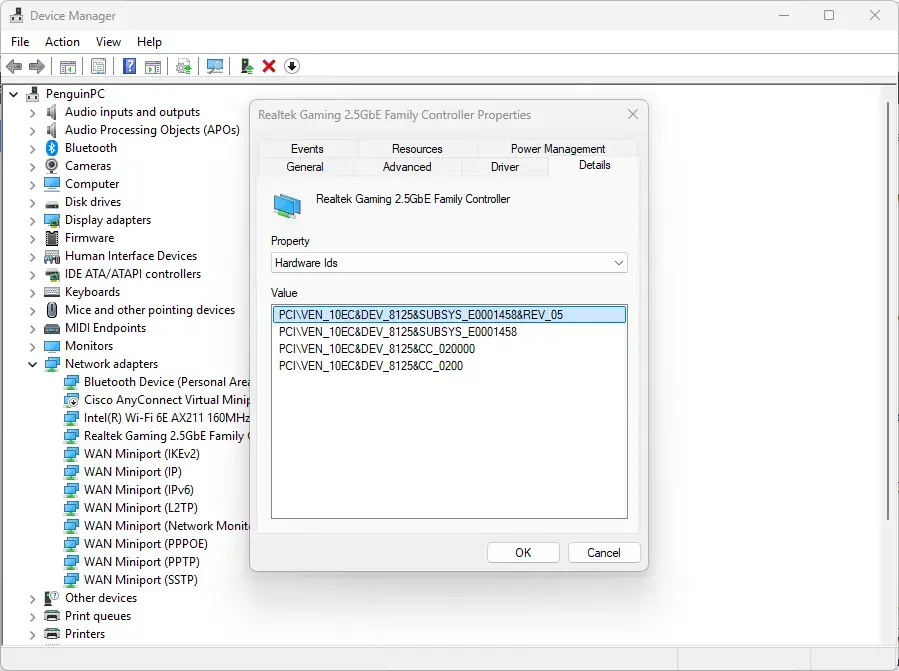
Device Manager showing network adapter hardware details in Windows 11 - Right-click the top value in the list, select Copy, and paste it into a text file on your USB drive. You can then search for the exact driver online from another device.
The top value is the most specific ID. It usually contains the vendor and device codes, which is what you want when searching.
Download the Official Driver Files
Official drivers give you the most stable and secure result for your network hardware. On your working device, go to your computer manufacturer’s support page or microsoft.com. Enter your system serial number or motherboard model, then find the networking section. Download the latest executable or zipped driver package designed specifically for Windows 11.
If the card model from Device Manager doesn’t match what the support page lists, trust Device Manager. Laptops are sometimes sold with different Wi-Fi cards under the same model name. If the package is a ZIP file, extract it on the other device before copying it. Avoid third-party driver updater tools. They often bundle unnecessary software or install generic drivers that degrade network performance.
Transfer and Install the Driver on 🪟 Windows 11
Copying the installer from a USB drive to your desktop lets you run the setup utility without an internet connection. Running it from the desktop instead of the USB drive also avoids permission and path problems that some setup wizards have with removable media.
- Insert your USB flash drive into the Windows 11 computer.
- Open File Explorer and navigate to your USB drive.
- Copy the network driver installer file to your local desktop.
- Right-click the installer file and select Run as administrator. If a User Account Control prompt appears, click Yes.
- Follow the on-screen prompts provided by the manufacturer setup wizard.
- Restart your computer when the installation completes to initialize the new network stack.
After the restart, check the system tray for the network icon. If the driver installed correctly, you should see available networks or a connected cable. If the icon still shows a problem, continue with the checks below.
Use Command Prompt to Verify Driver Status
Command Prompt lets you confirm that Windows 11 recognizes your newly installed adapter. The ipconfig command lists every network interface Windows has loaded, along with its connection state and IP address. If your adapter isn't in the list, the driver isn't loading.
- Type cmd in the Windows search bar.
- Right-click Command Prompt and select Run as administrator.
- Type
ipconfig /alland press Enter. The window fills with a list of adapters, such as Ethernet or Wireless LAN adapter Wi-Fi. - Review the output to confirm that your physical network adapters appear with assigned media states.
Read the result like this:
- An adapter with an IPv4 address means the driver is working and the adapter has a connection.
- An adapter that reports Media disconnected means the driver loaded but there is no link. Check the cable, or check that Wi-Fi is switched on and in range.
- An address starting with 169.254 means the adapter couldn't get an address from your router.
- No physical adapter in the list means Windows isn't using a working driver for it. Go back to the driver steps above.
Run the Network Troubleshooter
The built-in network troubleshooter scans for hidden configuration errors when your adapter is installed but refuses to connect. It can reset adapter settings and restart related services for you. It won't replace a missing driver, but it often clears problems left over from an update.
- Open the Settings app by pressing Windows Key + I.
- Select System from the left sidebar.
- Click Troubleshoot.
- Select Other troubleshooters. A list of troubleshooters appears.
- Locate the network tool and click the Run button next to it. Depending on your Windows 11 build, it may be named Network and Internet or Network Adapter. If you see both, run Network Adapter first when your adapter is the problem.
- Follow any automated repair suggestions provided by the diagnostic wizard. If it asks you to choose an adapter, pick the one you just installed.
If the troubleshooter reports that it fixed something, test your connection before moving on. If it can't identify the problem, go to the next step.
Reset Network Settings as a Last Resort
Use it when corrupted sockets or a damaged IP stack block connectivity after an update. It's a last resort because it removes saved settings. Windows removes and reinstalls your network adapters, and you will lose:
- Saved Wi-Fi networks and their passwords. Have your Wi-Fi password ready.
- Custom DNS or static IP settings.
- VPN client configurations and virtual adapters. You may need to set up or reinstall these afterwards.
- Open the Settings app.
- Select Network & internet from the left menu.
- Click Advanced network settings.
- Select Network reset. A warning explains what will be reset.
- Click the Reset now button.
- Confirm your choice by clicking Yes when prompted. This requires a system restart, and Windows will restart your PC after a short countdown. Save your work before you confirm.
A reset can't be undone, but you can rebuild any setting you changed by hand.
If this didn't work
If none of the steps above work, check the physical side. Try a different cable or another port on your router. Confirm that the router itself is broadcasting by connecting another device to it. A failed network card itself needs physical replacement. A USB-to-Ethernet adapter is a quick workaround on a desktop or laptop. If the hardware checks out, move on to your TCP/IP properties or look for conflicting third-party firewall software.
How to install network drivers on 🪟 Windows 11 setup?
Windows 11 setup usually installs the network driver on its own when your PC can reach the internet over an ethernet cable. If it can't connect, download the driver on another computer, copy it to a USB drive, and install it after setup. In Device Manager, right-click the adapter, choose Update driver, then Browse my computer for drivers.
Does 🪟 Windows 11 automatically update drivers?
Yes. Windows Update installs driver updates for most hardware, often alongside monthly quality updates. To check for them, open Settings, select Windows Update, then Advanced options and Optional updates. Driver updates appear there, and you can choose which ones to install.
Why isn't my Ethernet driver showing up in Device Manager?
The adapter may be disabled, hidden, or not detected. In Device Manager, select View, then Show hidden devices, and check Network adapters and Other devices for a yellow warning icon. If it still doesn't appear, restart the PC and check that the adapter is enabled in your BIOS or UEFI settings.
How to fix an outdated network driver?
Open Device Manager, expand Network adapters, right-click your adapter, and select Update driver. Choose Search automatically for drivers. If Windows finds nothing new, download the latest driver from your PC or adapter manufacturer's website on another device and install it with Browse my computer for drivers.
Have a question about this guide?
Answered by AI from this guide. Good questions may be added to this page — please don't include personal details.
Did this guide fix your problem?

About the Author
Richard
Tech Writer, IT Professional
Richard is a writer at Geek Rewind who turns complex IT tasks into clear, step-by-step guides. He draws on years of hands-on experience in system administration and enterprise IT operations, focusing on Windows, Linux and WordPress: the problems people actually run into, and the fixes that work. His server and WordPress guides come from systems he runs himself. Richard builds and maintains the platform behind Geek Rewind, from its Ubuntu servers and Nginx configuration to its custom WordPress plugins. Many new tutorials start with readers' questions, and he's always glad to answer them in the comments.
No comments yet — be the first to share your thoughts!