Should You Enable Automatic Network Driver Updates in Windows 11

Automatic network driver updates in Windows 11 are background downloads that keep your Ethernet or Wi-Fi adapter software current, so your connection works without dropouts. For most people, leaving them on is the right choice. Windows Update delivers drivers that Microsoft has tested for your hardware, and you don’t have to hunt for them. The catch is that the version Windows Update offers can be older than the one on the manufacturer’s site. An update can also occasionally break a connection that worked fine.
The other problem is the offline case. A fresh Windows 11 installation often lacks the driver for your motherboard’s network chipset, so you have no internet right after setup, and automatic updates can’t help because they need a connection. This guide covers both situations: how to get a missing driver onto an offline PC, and how to fix or roll back a driver that causes trouble.
The short version for a new, offline machine: download the installer on a second device, copy it to a USB flash drive, and run it on the offline PC.
Yes. Automatic network driver updates in Windows 11 are on by default, and Microsoft tests these drivers for your hardware before delivery through Windows Update . For most users, keeping them enabled prevents connection dropouts and removes the need to find drivers manually.
Locating and Downloading the Correct Driver
Finding the exact package for your hardware prevents compatibility errors and dropped connections. Manufacturers release different packages for different motherboard models and wireless cards, so a driver for a similar-looking chip is not a safe substitute.
Before you download anything, you need two pieces of information: the exact name of your network adapter, and the exact model of your PC or motherboard. The next sections show where to find both.
Identifying Your Motherboard or Network Chipset
Device Manager shows the exact hardware model of your network adapter. If your PC has no working driver, the adapter may appear under a different name or under Other devices with a yellow warning icon. You can still use it to identify the hardware.
- Right-click the Start button, or press the Windows key and X together.
- Select Device Manager from the list. The Device Manager window opens.
- Expand the Network adapters category by clicking the arrow beside it.
- Read the name of each adapter listed. You should see your Ethernet and Wi-Fi hardware, and you need the exact name to download the right update.
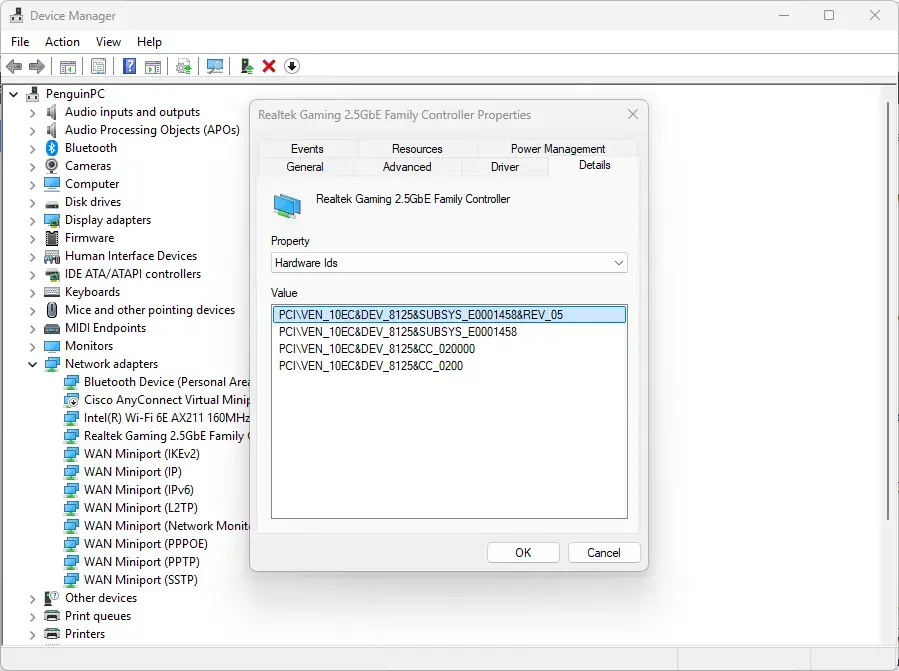
Write down the exact model name listed under Network adapters, such as Intel Ethernet Connection or Realtek PCIe GBE Family Controller. Copy the full name, including any numbers or letters at the end, because those often separate one hardware revision from another.
If you built the PC yourself, also check the motherboard box or the manufacturer's specification sheet for the onboard LAN and Wi-Fi chip details. The motherboard model is usually the most reliable starting point for finding the right driver page.
Accessing Official Sources
Download the driver from the official support page for your motherboard or computer brand. Use a working computer or phone for this step if your new PC is offline.
- Go to the website of your hardware maker, such as Intel, Dell, HP, or Lenovo.
- Enter your exact computer model or serial number in the support search. The site should show a page of drivers and downloads for that machine.
- Find the Network, LAN, or Wireless section, and pick the package that matches your adapter name from Device Manager.
- Download the installer executable or driver package labeled for Windows 11.
They often bundle unwanted software or install generic drivers that degrade network performance. If the maker's page lists only Windows 10 packages for your model, those often work on Windows 11, but check the notes on the page first.
Transferring and Installing Drivers on an Offline PC
A USB flash drive is the simplest way to move the installer to an offline PC. Save the file on the flash drive using a working computer, plug the drive into the offline Windows 11 PC, and run the installer from File Explorer.
- Insert a blank USB flash drive into your working computer.
- Copy the downloaded driver installer file onto the flash drive. If the download is a ZIP file, copy the ZIP as it is and extract it on the offline PC.
- Safely eject the USB drive from the working computer and plug it into the offline Windows 11 PC.
- Open File Explorer and navigate to the USB drive contents. The installer file should be listed there.
- Double-click the installer file to launch the setup wizard. Administrative privileges are required for this step, so click Yes if the User Account Control prompt appears.
- Follow the on-screen instructions provided by the manufacturer setup utility.
- Restart your computer immediately after the installation finishes to initialize the new hardware interface.
After the restart, check the network icon in the taskbar. If you see Wi-Fi networks or an Ethernet connection, the driver is working.
Using Windows Update for Automatic Driver Detection
If you have a smartphone with a data plan, you can let Windows Update fetch the missing driver itself. Share your phone's connection with the PC for a few minutes. This works best when the manufacturer's installer is not available or you don't have a second computer.
- Connect your smartphone to your PC with a USB cable.
- Turn on USB tethering in your phone settings to share its cellular data connection temporarily. On Android, this is usually under the hotspot or tethering settings. An iPhone generally needs Apple's software installed on the PC before it will share its connection over USB.
- Open Settings by pressing the Windows key and I together.
- Click Windows Update in the left sidebar.
Watch your data use. Driver packages are usually small, but a full Windows Update check can download much more. If you are on a limited plan, keep the session short.
- Click the Advanced options tile, then select Optional updates. If no optional updates are listed, this option may not appear.
- Expand the Driver updates section to view available hardware packages provided directly through official update channels.
- Check the box next to your network adapter driver and click Download & install.
Once the driver installs, you can unplug the phone and use your normal connection. Restart if Windows asks you to.
Troubleshooting Common Installation Failures
Sometimes an installation package fails to run, or your hardware stays unresponsive after the setup utility finishes. The usual causes are a package built for a different hardware revision, a leftover corrupted driver, or a bad update. The next sections go through them in order, starting with the simplest check.
Resolving Unrecognized Hardware IDs
If the driver will not install, check that it matches your hardware. Every device reports hardware IDs, and you can compare them against the supported list on the manufacturer's website.
- Open Device Manager and expand Network adapters.
- Right-click your network device and choose Properties.
- Open the Details tab.
- Select Hardware Ids from the Property dropdown menu. The codes appear in the Value box below it.
- Match those codes against the supported list on the manufacturer website.
If the codes don't appear in the driver's supported list, you have the wrong package. Go back to the support page and look for a different one.
Rolling Back Problematic Updates
If a recent update broke your connection, revert to the previous driver version.
- Open Device Manager and expand Network adapters.
- Right-click your adapter and choose Properties.
- Switch to the Driver tab.
- Click the Roll Back Driver button if it is available, then follow the prompts.
Administrative privileges are required to perform this action. If the button is greyed out, Windows has no earlier driver version stored for that adapter. That is common on a fresh install or after a clean driver install. In that case, install an older package from the manufacturer's site instead.
Advanced Driver Management via Command-Line Tools
If Device Manager does not solve the problem, you can inspect the driver store from an elevated Command Prompt. This is useful when a corrupted driver package is blocking new installations.
- Search for cmd in the Start menu.
- Right-click the result and select Run as administrator.
- Click Yes if the User Account Control prompt appears.
You will use the DISM command to view all third-party drivers currently installed on your operating system image.
To view all third-party drivers currently injected into your operating system image, execute the following command:
dism /online /get-driversCheck the provider and class details next to each entry to be sure you have the network one. Removing the wrong package can break another device.
If you need to force-remove a corrupted driver package that blocks new installations, use the removal syntax referencing that specific identifier:
pnputil /delete-driver oemX.inf /uninstall /forceAfter running the removal command, reboot your system and install the fresh package downloaded from the official manufacturer portal. If the PC has no network after the removal, use the USB flash drive method from earlier to reinstall it.
What to do next
Once the driver is installed, test the result and adjust one setting so it stays reliable.
- Open a web browser and load a page to confirm your connection works.
- Open Device Manager, expand Network adapters, right-click your adapter, and choose Properties.
- Open the Power Management tab. This tab does not appear for every adapter.
- Clear the Allow the computer to turn off this device to save power check box, then click OK.
This stops Windows from switching the network device off to save power, which can cause random dropouts, especially on laptops. To undo it, tick the box again. On a laptop running on battery, you may see slightly shorter battery life with the setting off.
How to install network drivers on 🪟 Windows 11 setup?
Download the network driver on a second device, copy it to a USB flash drive, and run the installer on the offline PC. Get the package from your motherboard or laptop maker's support page, and match your exact model. If you don't know the model, check Device Manager for the adapter name under Other devices.
Does 🪟 Windows 11 automatically update drivers?
Yes. Windows 11 downloads and installs many drivers through Windows Update, usually without asking. To stop this, open Settings, go to System, then About, select Advanced system settings, choose Hardware, and open Device Installation Settings. You can still install drivers manually from Device Manager.
Why isn't my Ethernet driver showing up in Device Manager?
Device Manager usually lists a network adapter under Other devices when its driver is missing. Look for an item named Ethernet Controller with a yellow warning icon. If nothing appears, open Device Manager, select View, then Show hidden devices. Also check your BIOS, because the onboard LAN port can be disabled there.
How to fix an outdated network driver?
Open Device Manager, expand Network adapters, right-click your adapter, and select Update driver, then Search automatically for drivers. For the newest version, download it from your device maker's site and run the installer. To undo a bad update, open the adapter's Properties, go to the Driver tab, and select Roll Back Driver.
Have a question about this guide?
Answered by AI from this guide. Good questions may be added to this page — please don't include personal details.
Did this guide fix your problem?

About the Author
Richard
Tech Writer, IT Professional
Richard is a writer at Geek Rewind who turns complex IT tasks into clear, step-by-step guides. He draws on years of hands-on experience in system administration and enterprise IT operations, focusing on Windows, Linux and WordPress: the problems people actually run into, and the fixes that work. His server and WordPress guides come from systems he runs himself. Richard builds and maintains the platform behind Geek Rewind, from its Ubuntu servers and Nginx configuration to its custom WordPress plugins. Many new tutorials start with readers' questions, and he's always glad to answer them in the comments.
No comments yet — be the first to share your thoughts!