Locate Your Device ID in Windows 11

The Device ID is the code Windows uses to identify this PC. In Windows 11, you can find it by opening Settings System About and reading the Device ID line under Device specifications. A single click on the same page copies it to the clipboard.
The steps work on every Windows 11 edition, including Home and Pro. They don’t need administrator rights.
Below, you’ll find faster ways to open that page, how to tell the Device ID apart from similar IDs, and where to look if your PC is joined to a work or school account.
To find your Device ID in Windows 11, open Settings , select System, then select About and read the Device ID line under Device specifications. Press Win+I to open Settings . The Device ID is a long string of letters and numbers separated by hyphens, and it needs no administrator rights on any edition, including Home.
Know Which ID You Need
Windows shows several identifiers on the same screen, and support forms often ask for the wrong one. Check which you need before you copy anything.
- Device ID is a long string of letters and numbers in groups separated by hyphens. Windows generates it for this installation. It is the ID that Microsoft support and some app vendors mean when they ask for your “Windows Device ID”. It looks like this:
00000000-0000-0000-0000-000000000000. - Product ID identifies your Windows edition and licence, not the PC. It sits on the line directly below Device ID, which is why people copy the wrong one. It is shorter and looks like
00000-00000-00000-AA000. - Device name is the friendly name of the PC, such as COMPUTER-NAME. It is not unique and you can change it freely.
- Entra device ID (the ID your organisation’s Microsoft Entra directory, formerly Azure Active Directory, assigns when the PC is joined to a work or school account) exists only on PCs joined to such an account. It is a different value from the Device ID in Settings.
If you are not sure which one you need, use the Settings method below. If an IT department asks for a device ID on a work PC, check with them which ID they mean before you send one.
Find Your Device ID in Settings
The About page lists your PC’s basic identity details in one place. These steps work on all current builds of Windows 11.
- Open Settings by pressing the Windows key + I.

Windows 11 Start menu with Settings gear icon highlighted.
You should see the Settings window with a list of categories on the left. - Select System in the left pane.
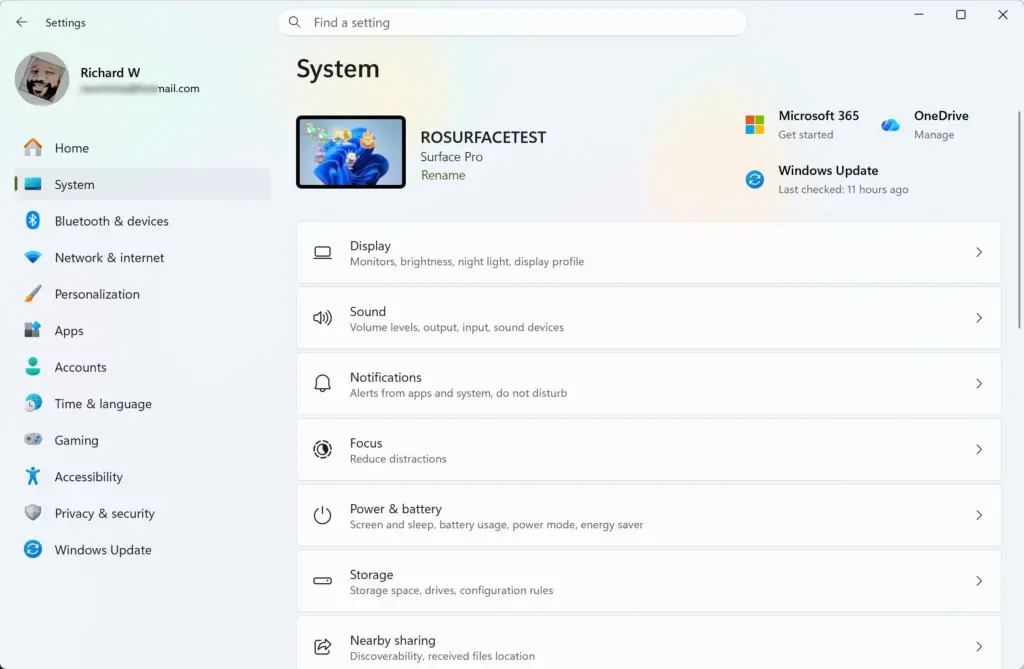
Settings › System
The System page opens with options such as Display, Sound and Notifications. - Scroll to the bottom of the System page and select About.
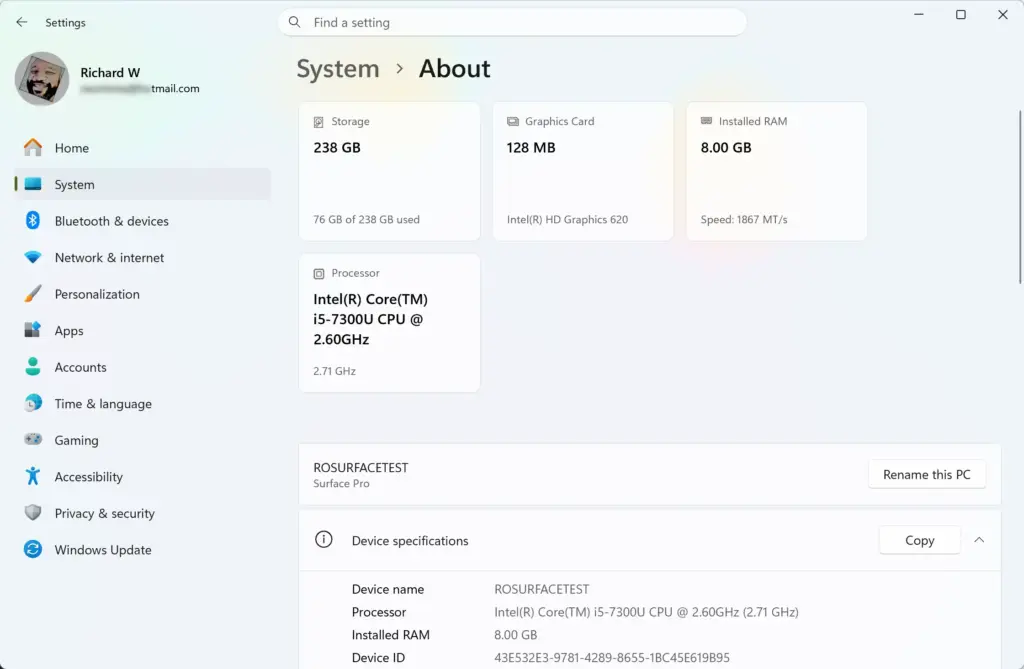
Settings › System › About
The About page opens. At the top you see your PC's name and model, then the Device specifications section. - Find the Device ID line in the Device specifications section.
The value to the right is your Device ID. The section also lists Device name, Processor, Installed RAM, Product ID, System type and Pen and touch.
If the Device specifications section looks collapsed, select its heading to expand it. On some builds the section has a small arrow on the right.
Open the About Page Faster
If you need the Device ID often, these routes skip the scrolling in Settings. Each one lands on the same About page.
Use the Run dialog
- Press the Windows key + R to open the Run dialog.

Run dialog - Type
ms-settings:aboutin the Open box. - Select OK.
Settings opens directly on the About page.
Use the Start button's right-click menu
- Right-click the Start button, or press the Windows key + X.
A menu of system tools appears. - Select System.
Settings opens on the About page.
Use the search box
- Select the search box on the taskbar, or press the Windows key + S.
- Type
About your PC. - Select About your PC in the results.
The About page opens.
On many keyboards the Windows key + Pause/Break also opens the About page. Laptops often lack a Pause key, so the Run dialog is more reliable.
Copy the Device ID
The string is long, and characters like 0 and O or 1 and l are easy to confuse.
- Open Settings System About
- Select the Copy button in the Device specifications section.
The button copies every line in that section, not only the Device ID. That includes Device name, Processor, Installed RAM, Device ID, Product ID and System type. - Paste into Notepad or another text field by pressing Ctrl + V.
You see the whole block of specifications as plain text. - Delete the lines you do not need, so only the Device ID remains.
To copy only the Device ID, select the value with the mouse, or with Shift and the arrow keys, then press Ctrl + C. Some builds do not let you select the text in that part of the page. If the highlight does not appear, use the Copy button and trim the pasted text.
Do not paste the Device ID into a public forum post or a screenshot you share widely. It is not a password, but it ties directly to your installation. Send it only to the support team or vendor that asked for it.
Read Related IDs From PowerShell
No supported PowerShell or Command Prompt command prints the exact Device ID shown in Settings, as far as this guide can confirm. For that value, use the About page. The commands below return two related identifiers that people often confuse with it.
Show the Product ID with systeminfo
The systeminfo command prints a summary of your system. It shows the Product ID, not the Device ID. Use it when a form asks for the Product ID and you want a text output.
- Right-click the Start button and select Terminal.
A Windows Terminal window opens, usually with a PowerShell tab. You do not need administrator rights for this. - Type
systeminfoand press Enter.
The command takes a few seconds, then prints a long list. - Find the Product ID line in the output.
Show the hardware UUID
The UUID (a unique ID stored in your PC's firmware by the manufacturer) belongs to the hardware, not to the Windows installation. It is a different value from the Device ID in Settings. Use it only if a vendor asks for the "system UUID" or "hardware UUID".
- Open Terminal as described above.
- Type
Get-CimInstance -ClassName Win32_ComputerSystemProduct | Select-Object UUIDand press Enter.
The terminal prints a UUID column with one value.
Older guides use wmic csproduct get uuid for this. The WMIC tool is deprecated (Microsoft has stopped developing it and may remove it), and recent Windows 11 versions do not include it by default, so you may see an error that the command is not recognised. The PowerShell command above is the replacement.
Find the Device ID on a Work or School PC
If your PC is joined to an organisation's Microsoft Entra directory, IT staff often need the Entra device ID rather than the one in Settings. The dsregcmd tool reports the join state and the ID.
- Right-click the Start button and select Terminal.
- Type
dsregcmd /statusand press Enter.
The tool prints several sections of join information. - Look under Device State to confirm that AzureAdJoined or DomainJoined shows
YES. - Find the DeviceId line in the Device Details section.
This GUID (a long code that identifies one device) is the Entra device ID.
If the output shows NO for the join states and has no Device Details section, the PC is not joined to an organisation. The Settings value is the only Device ID it has.
Joining, leaving or re-registering a work PC is an IT decision, and some changes are hard to undo.
Why the Device ID Can Change
The Device ID stays the same through normal use, including cumulative updates (routine Windows updates that bundle fixes) and renaming the PC. These events produce a new Device ID: - A clean install of Windows, which generates its own identity. - A reset that removes all data. - A major hardware change, such as replacing the motherboard.
- A clean install of Windows. A fresh installation generates its own identity. The new Device ID will not match the old one, even on the same hardware.
- A reset that removes everything. A reset that removes all data through Settings System Recovery works like a reinstall, so expect a new ID.
- A major hardware change. Replacing the motherboard is the usual trigger. I cannot confirm exactly which parts do or do not affect the ID, so check the About page again after any big hardware swap.
If a vendor or admin has registered your old Device ID for a licence, an allow list (a list of approved devices) or a support case, tell them after a reinstall. The old entry will no longer match.
Renaming the PC changes only the Device name. If you need to do that, select Rename at the top of Settings System About. Renaming needs administrator rights, and Windows asks you to restart before the new name takes effect. Renaming leaves the Device ID unchanged.
If the Device ID Is Missing or Won't Display
These problems are rare. Check the items below before you try anything more drastic.
- The About page opens but you cannot see Device ID. Expand the Device specifications section. If it is collapsed, only the heading and the Copy button show.
- You are looking at Windows Security or System Information instead. Neither shows the Device ID line. Use Settings System About
- Settings will not open. Try the Run dialog with
ms-settings:about. If the Settings app itself fails to launch, restart the PC and try again before you try anything more drastic. - You are looking at the wrong line. Device ID and Product ID sit next to each other. The Device ID is the longer value with hyphens in groups of different lengths.
- A Windows 10 guide shows a different layout. Windows 10 has an About page too, with the same Device ID line. Its Settings menus are arranged differently, so follow the Windows 11 path in this article if you are on Windows 11.
If a remote support agent asks you to read the ID aloud, read it in groups, one hyphen-separated section at a time, and spell out any letters. That avoids mix-ups between similar characters.
What to Do Next
Paste the copied Device ID into the form or support ticket that asked for it, and keep a copy in a note in case you need to reference it later. If you reinstall Windows, check the About page again and update any records that held the old ID. If you are renaming the PC at the same time, use Rename on the same About page and restart when Windows prompts you.
How to find out desktop ID?
On Windows 11, open Settings, then System, then About. Read the Device ID line under Device specifications. This is the code Windows uses to identify this PC. Click Copy next to it to put it on the clipboard. Desktop PCs show the same line as laptops, so the steps don't change.
Is device ID the same as IP address?
No. Device ID and IP address are different things. Device ID is a code Windows creates to identify this installation. An IP address is a network address your router assigns to your connection, and it can change when you reconnect. Device ID stays the same unless Windows is reinstalled.
What is GDID Windows?
GDID usually stands for Global Device ID, an identifier Windows and Microsoft services use to recognize a device across apps and online services. It is not the Device ID shown under Settings System About You don't need to copy it for normal support requests.
How to check device model in 🪟 Windows 11?
Press the Windows key plus R, type msinfo32, and press Enter. In System Information, find the System Model line. It shows the manufacturer's model name, such as a Dell or Lenovo model number. Some custom-built PCs show a generic value. This works on Windows 11 Home and Pro without administrator rights.
Was this guide helpful?

About the Author
Richard
Tech Writer, IT Professional
Richard is a writer at Geek Rewind who turns complex IT tasks into clear, step-by-step guides. He draws on years of hands-on experience in system administration and enterprise IT operations, focusing on Windows, Linux and WordPress: the problems people actually run into, and the fixes that work. His server and WordPress guides come from systems he runs himself. Richard builds and maintains the platform behind Geek Rewind, from its Ubuntu servers and Nginx configuration to its custom WordPress plugins. Many new tutorials start with readers' questions, and he's always glad to answer them in the comments.

No comments yet — be the first to share your thoughts!