Why Is Device Encryption Missing in Windows 11?

Device encryption in Windows 11 scrambles the files on your drive so nobody can read them if your PC is stolen. When the option is missing from Settings, the usual cause is hardware: the PC has no Trusted Platform Module (TPM) 2.0 chip, or the chip is switched off in firmware. Other causes are Secure Boot being off and a broken Windows Recovery Environment.
Your edition matters less than you might expect. Windows 11 Home includes Device encryption, a simplified version of BitLocker. Windows 11 Pro adds the full BitLocker drive encryption controls. So if you run Home and see nothing, don’t assume the edition is the problem. Check the hardware first.
The PC also needs modern hardware that supports Secure Boot and modern standby (or equivalent security-testing support from the manufacturer). Check your system info against these requirements before you try to turn encryption on.
Device encryption is missing in Windows 11 because your PC lacks a Trusted Platform Module (TPM) 2.0 chip, the chip is disabled in firmware, or Secure Boot is turned off. Check System Information by searching for it, running it as administrator, and reading the Device Encryption Support row to see the exact cause on your PC.
How to Check if Your Device Supports Encryption
The System Information app tells you whether your device supports encryption and, if not, why. Look at the Device Encryption Support row. If the value says it meets prerequisites, your hardware is ready. If it lists one or more reasons for failure, each one is an exact cause of the missing option on your PC. The steps below show where to find it.
- Open the Start menu . Click the Windows icon in the bottom-left corner, or press the Win. The Start menu opens with a search box .
- Search for System Information. Type
System Informationinto the search box. System Information appears at the top of the results.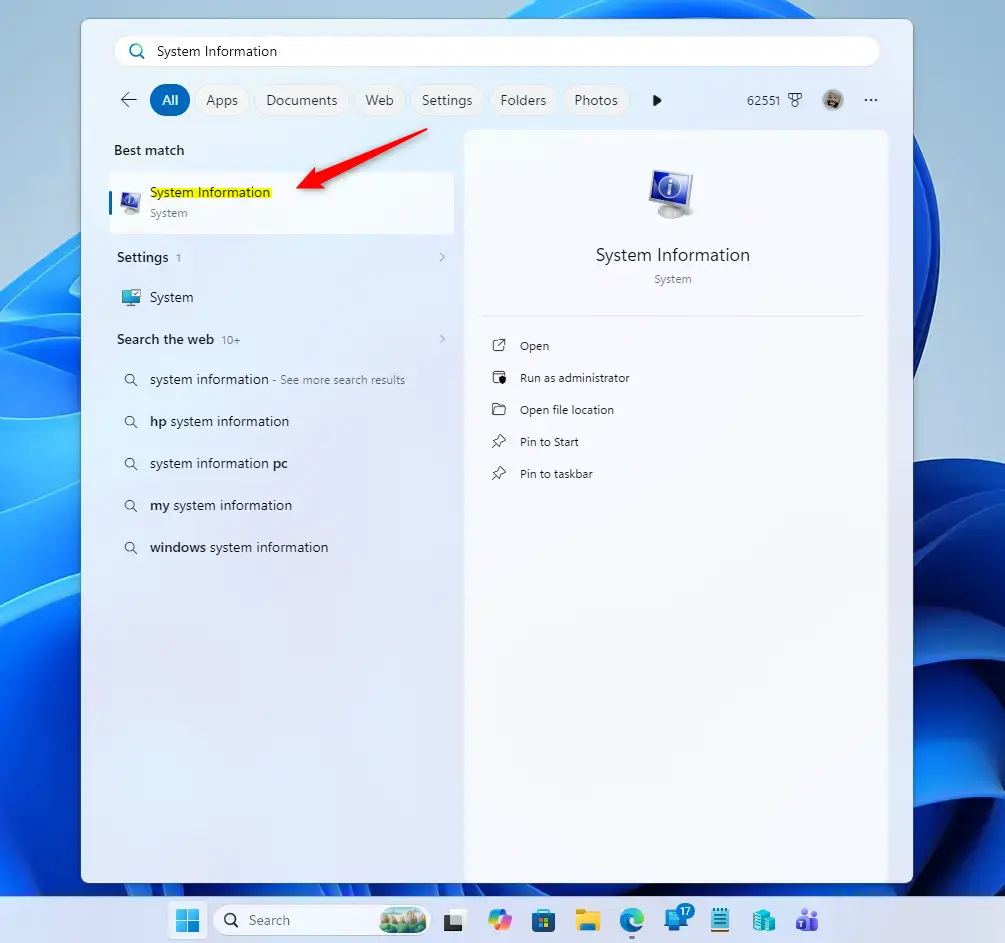
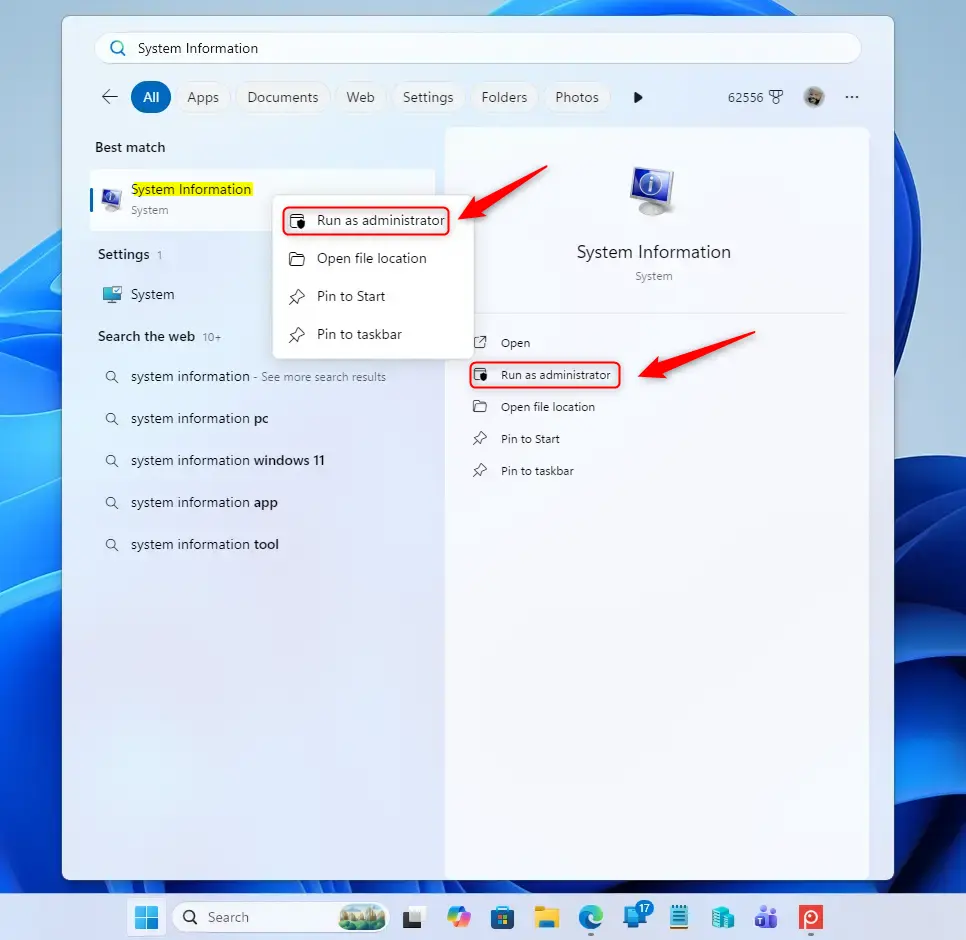
- Run it as administrator. Right-click System Information in the results and select Run as administrator. If a User Account Control prompt appears, click Yes. Running it elevated lets the app read all system details, including the security-related ones. If you only see a standard account sign-in, you will need an administrator password.
- Look for the encryption support line. The System Information window opens with a lot of data. Keep System Summary selected in the left pane. In the right pane, scroll down to the row named
Automatic Device Encryption SupportorDevice Encryption Support. You can also press Ctrl+F and type part of the row name to jump to it. Which name you see depends on your Windows version.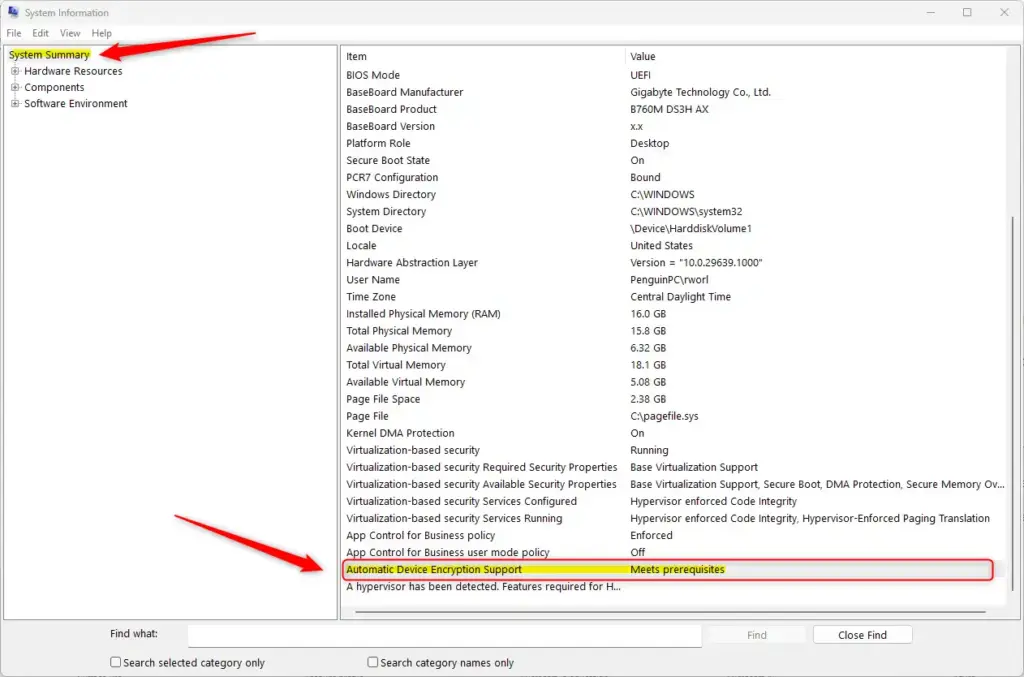
- Read the value next to that row. This value explains why Device Encryption is missing. It either says the device meets prerequisites or names a specific failure. Match it to the sections below.
What the Status Messages Mean
The status message you just found points to the fix. Each message means something different, so don’t skip ahead. Find your message below and follow only that section.
“Meets prerequisites”
If the status says it meets prerequisites, your hardware is compatible. The usual remaining cause is the account type. Device encryption needs to save a recovery key somewhere safe, and that normally means signing in with a Microsoft account or a work or school account. A local account often doesn’t get the option. Newer Windows 11 releases can behave differently on a fresh install, so what you see may vary by version.
The fix is to switch the sign-in:
- Confirm you are an administrator. Only an administrator account can turn Device encryption on.
- Switch to a Microsoft account if you use a local one. You can usually find this setting under
Settings > Accounts > Your info. After you sign in with the new account, restart the PC. - Check Settings again. Open Settings Privacy & security Device encryption The toggle should now appear.
Make sure you have your recovery key saved first, because switching accounts can change how the key is backed up.
"TPM is not usable"
The TPM is not usable message means your Trusted Platform Module is turned off in your motherboard settings or doesn't exist. The TPM is a hardware chip that secures your computer. Windows won't encrypt the drive without it. Many PCs ship with it disabled, so check this first.
Why it matters: The TPM stores and protects your encryption keys. Without it, the encryption would not be secure.
- Check Device Manager. Right-click the Start button and select Device Manager. Expand Security devices. You should see an entry such as Trusted Platform Module 2.0. If the category is missing, the TPM is off or absent.
- Restart into BIOS or UEFI. Restart the PC and press the setup key right after powering on. Common keys are F2, F10, F12 or DEL. The key depends on the manufacturer, and the startup screen often shows it.
- Find the TPM option. Look for TPM, Security Chip or PTT. PTT is Intel's name for a firmware TPM. AMD boards often call it fTPM. Set it to Enabled.
- Save and exit. Use the save option, usually F10. The PC restarts and Windows loads normally.
- Check again. Reopen System Information and confirm the TPM message is gone.
In that case the manufacturer's support page is the next stop. To undo the change, go back into the BIOS and set the option to Disabled. Be careful if the drive is already encrypted, as clearing or disabling the TPM can trigger a recovery key prompt at startup.
"WinRE is not configured"
The WinRE is not configured message means the Windows Recovery Environment is disabled or the recovery partition is broken. WinRE is the set of built-in repair tools Windows uses to fix boot problems. Device encryption relies on it for tasks involving recovery keys and for safe startup and repairs. If WinRE is missing or not set up, you cannot turn on Device Encryption.
Start with the simple fixes. Make sure Windows is fully updated under Settings Windows Update Then run the System File Checker, which checks for and tries to repair damaged system files that might include parts of WinRE:
- Open Command Prompt as administrator. Search for
cmd, right-click the result and select Run as administrator. Click Yes at the User Account Control prompt. A black window opens. - Run the scan. Type
sfc /scannowand press Enter. The scan takes several minutes. Wait until it reports a result. - Restart the PC and check System Information again.
Be realistic about this fix. The scan repairs system files, but it does not rebuild a deleted or damaged recovery partition. If the message stays, open Disk Management and check whether a recovery partition exists on the system disk. If it is gone, you will likely need to repair or reinstall Windows. Back up your files before you do that.
"PCR7 binding is not supported"
The PCR7 binding is not supported message means Secure Boot is turned off in your firmware, or the PC doesn't run in UEFI mode with Secure Boot active. It can also mean an older hardware setup. Secure Boot must be on so Windows can measure system files safely during startup.
Why it matters: For Device Encryption to be secure, the PC must start in a specific, protected way. That needs Secure Boot on, and it can also be affected by certain devices connected at startup.
Action:
- Check Secure Boot. Like the TPM, Secure Boot is set in the BIOS/UEFI. Restart the PC, enter setup with the same key as before, and look for Secure Boot, often under a Boot or Security tab. Set it to Enabled, then save and exit. If the option is greyed out, the firmware may be in legacy (CSM) mode, which has to be switched to UEFI first. Changing that on a PC with an older MBR-formatted Windows install can stop it from booting, so check your setup before you change it.
- Disconnect peripherals. Unplug any external devices you don't need before the PC starts. This includes special network adapters, docking stations, external graphics cards and some USB devices. Once Windows is running and Device Encryption is turned on, you can usually plug them back in.
After either change, reopen System Information to confirm the message has cleared. To undo, set Secure Boot back to Disabled in the firmware, though most people should leave it on.
References:
https://support.microsoft.com/en-US/Windows/Security/encryption/device-encryption-in-windows
Summary
When Device encryption is missing in Windows 11, the cause is usually incompatible hardware settings, a disabled security chip, a broken recovery partition or the wrong account type. Open System Information, read the Device Encryption Support status, and fix the one problem it names, such as a turned-off TPM or Secure Boot. Then check Settings again. The option should appear once the blocker is gone.
Was this guide helpful?

About the Author
Richard
Tech Writer, IT Professional
Richard is a writer at Geek Rewind who turns complex IT tasks into clear, step-by-step guides. He draws on years of hands-on experience in system administration and enterprise IT operations, focusing on Windows, Linux and WordPress: the problems people actually run into, and the fixes that work. His server and WordPress guides come from systems he runs himself. Richard builds and maintains the platform behind Geek Rewind, from its Ubuntu servers and Nginx configuration to its custom WordPress plugins. Many new tutorials start with readers' questions, and he's always glad to answer them in the comments.




No comments yet — be the first to share your thoughts!