How to Change Copilot Key Function in Windows 11


The Copilot key is a dedicated hardware button on keyboards and laptops built for Windows 11 version 23H2 and later. By default it launches the Microsoft Copilot AI assistant. Remapping it lets you open a different app instead, or turn the key off.
Changing the key stops accidental presses and gives you a one-touch shortcut to a program you use more often. You don’t need extra software. There are two ways to do it. The Settings app is the simple one and works on every edition. Local Group Policy is for admins who want to enforce a setting, and it needs Pro, Enterprise or Education.
Open Settings Bluetooth & devices Keyboard, scroll to Customize Copilot key on keyboard, and select from the dropdown: Copilot to keep the default, Do nothing to disable it, or Custom to choose a pre-approved app instead.
Option 1Change What the Copilot Key Opens for Your Account
The Settings app is the easiest route. The change applies to your own user account, so it suits a PC that only you use.
The option only appears on Windows 11 builds that include the Copilot key feature. If your PC is missing updates, install them first through Settings Windows Update You may also not see it if your keyboard has no Copilot key. Some builds show it without a physical key, but it has no effect on a keyboard that lacks one.
Step 1Open Settings
- Press Win+I to open Settings . The Settings window opens with the navigation list on the left.
Step 2Go to Keyboard Settings
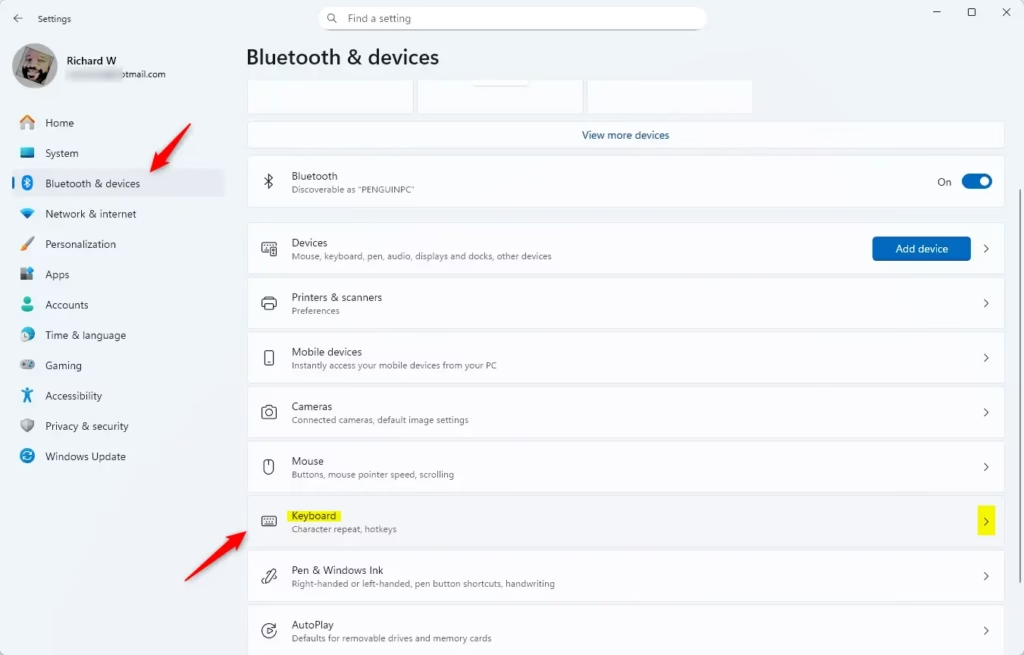
- In the left-hand menu, click Bluetooth & devices.
- On the right, click Keyboard. The keyboard settings page opens.
If you can’t find the Copilot key option on this page, look under Personalization Text input instead. Microsoft has moved some settings between builds, so the location depends on your version of Windows 11.
Step 3Find the Copilot Key Setting
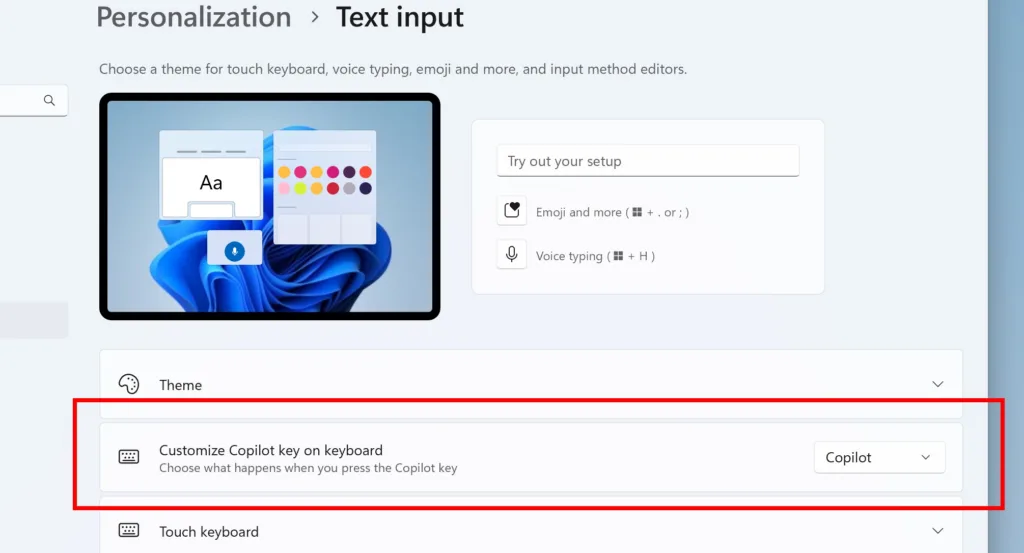
- Scroll down to Customize Copilot key on keyboard.
- Click the dropdown menu next to it. The list of available actions appears.
If the setting is greyed out, a policy from your organization may be controlling the key. See the Group Policy section further down. On a work or school PC, only your administrator can change it.
Step 4Choose What the Copilot Key Does
The dropdown gives you three main choices. You can keep the default Copilot assistant, turn the key off, or set up a custom app to open instead.
- Copilot: This is the default. Pressing the key opens the Copilot AI assistant.
- Do nothing: If you find the key annoying and never want it to do anything, choose this.
- Custom: This lets you choose another app to start.
To undo any change later, come back to this dropdown and pick Copilot again.
Step 5Pick a Custom App (If You Chose "Custom")
The next step only applies if you chose Custom.
- Click the Select button that appears after you choose Custom. A list of apps appears. These are apps Microsoft has pre-approved for launch by the Copilot key, so you can't pick just any program here.
- Choose the app you want to assign to the key.
- Click Select to confirm. The app now shows as the action for the key.
If the app you want isn't in the list, use the Group Policy method below. It lets you assign any installed app by its identifier, but it needs Windows 11 Pro, Enterprise or Education.
Step 6Close Settings
- Close Settings. The change saves automatically and you don't need to restart.
- Press the Copilot key to test it. Your chosen app should open, or nothing should happen if you picked Do nothing.
Option 2Change What the Copilot Key Opens for All Users (More Advanced)
Use the Local Group Policy Editor if the PC has several user accounts, or if you need to enforce the setting for everyone who signs in. It is more advanced than the Settings method. It is only available on Windows 11 Pro, Enterprise and Education. Windows 11 Home does not include it, so Home users should stick with the Settings app.
Policy changes can affect every user on the PC, so note down any value you change.
Step 1Open the Local Group Policy Editor
- Press Windows key + R to open the Run box.
- Type gpedit.msc and press Enter. The Local Group Policy Editor opens.
If you get a message that Windows can't find gpedit.msc, your PC is running Home edition.
Step 2Find the Copilot Policy
- In the folder tree on the left, click User Configuration.
- Expand Administrative Templates.
- Expand Windows Components.
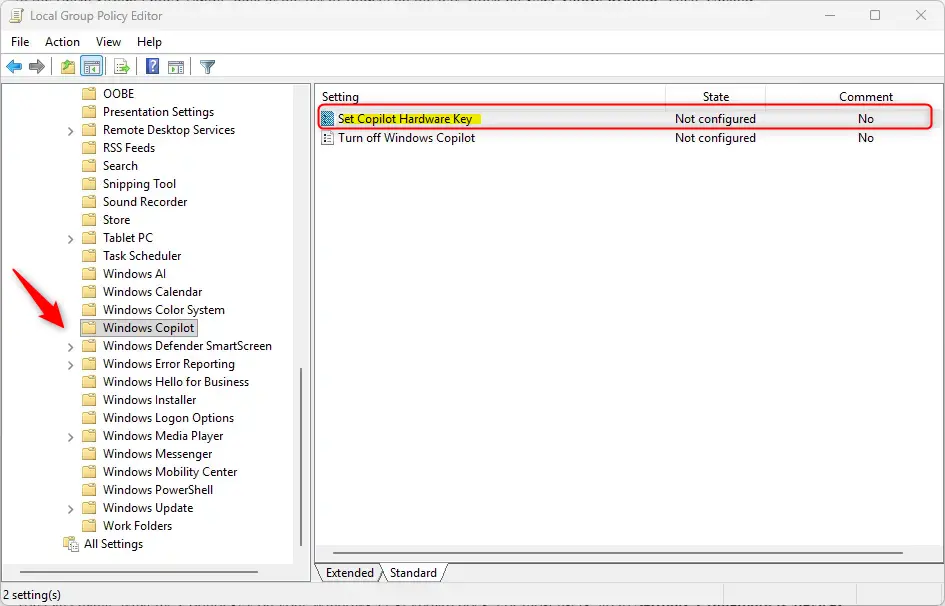
- Select Windows Copilot. The policies for this folder are listed in the right-hand pane.
Step 3Edit the Copilot Hardware Key Policy
- In the right-hand pane, find the setting named Set Copilot Hardware Key.
- Double-click it. The configuration window for the policy opens.
Step 4Set Up the Policy
You enable the policy, then enter the app's identifier in the box. You need the exact identifier, so a typo will stop the key from working.
- To change what the Copilot key does: Select the circle next to Enabled. Then, in the box labeled Enter App AUMID in the box, type the unique identifier of the app you want to start. This identifier is called an Application User Model ID (AUMID). Think of it as a special code for each app. You need to find the AUMID of the app you want to use. For example, the AUMID for the Microsoft Store app might look like
Microsoft.WindowsStore_8wekyb3d8bbwe!App. - To go back to the normal behavior: Select the circle next to Not Configured. This cancels any policy you set here. Windows then uses the setting from the Settings app, or falls back to the default Copilot behavior.
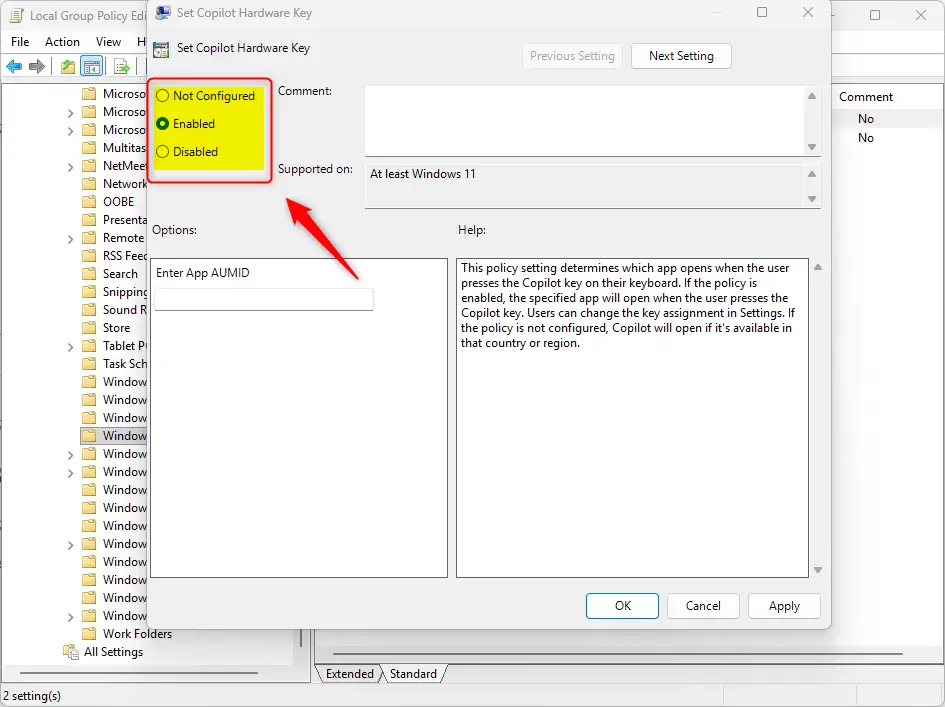
- Click OK to confirm and save the policy. The window closes and the policy shows its new state in the list.
Step 5Close the Local Group Policy Editor
You can now close the Local Group Policy Editor. The change should take effect right away, or at the latest the next time the user signs in. If the key still opens Copilot, sign out and back in, then test again.
References:
Summary
You can change the Copilot key through Settings Bluetooth & devices Keyboard, or through the Local Group Policy Editor on Pro, Enterprise and Education. Most people can pick a new action straight from the keyboard menu. Admins and advanced users can use the policy to map the key to any installed app. To undo either change, set the dropdown back to Copilot, or set the policy back to Not Configured.
Was this guide helpful?

About the Author
Richard
Tech Writer, IT Professional
Richard is a writer at Geek Rewind who turns complex IT tasks into clear, step-by-step guides. He draws on years of hands-on experience in system administration and enterprise IT operations, focusing on Windows, Linux and WordPress: the problems people actually run into, and the fixes that work. His server and WordPress guides come from systems he runs himself. Richard builds and maintains the platform behind Geek Rewind, from its Ubuntu servers and Nginx configuration to its custom WordPress plugins. Many new tutorials start with readers' questions, and he's always glad to answer them in the comments.
No comments yet — be the first to share your thoughts!