How to Reset Network Adapter Settings Using Windows 11 Advanced Network Reset

Advanced network reset in Windows 11 puts all your network settings back to their defaults. It is the tool to reach for when web pages stop loading, Wi-Fi says “no internet,” or the connection drops every few minutes. Wi-Fi cards and Ethernet ports are the hardware that connects you to the internet. Over time, the drivers and settings that go with them can pick up bad data or conflicting configuration.
You do not need to type commands for this. Windows 11 has a Network reset button in the Settings app that does the whole job. A command-line method also exists as a backup, and it is covered later in this guide.
Open Settings Network & internet Advanced network settings More settings Network reset, then click Reset now and confirm with Yes. Windows signs you out, restarts your computer, and reinstalls all network adapters with default settings.
What Happens When You Use Advanced Network Reset
Network reset removes every network adapter installed on your computer and then reinstalls them. It also clears saved Wi-Fi networks and their passwords, Bluetooth connections, and VPN profiles. Your personal files, apps and documents are not touched. After the restart, you have to reconnect to your wireless networks and enter each password again.
It is usually printed on the router or kept by whoever set up the network. If you cannot get back online after the reset, you will have no way to look the password up on this PC.
The reset also removes virtual switches created by virtual machine software and by some VPN tools. If you use a custom setup for your connection, such as a static IP address, custom DNS servers, or a virtual switch for VMs, write those details down first. You will need to enter them again afterward. VPN client software may also need to be repaired or reinstalled so it can recreate its virtual adapter.
The reset cannot be undone. The only way back is to reconnect and reconfigure things by hand.
Step-by-Step Guide: Using Advanced Network Reset in 🪟 Windows 11
This method works in the Settings app: open the network options, find Network reset, and run it. Everything is put back to factory defaults. It works on both Windows 11 Home and Pro, and you should be signed in with an administrator account.
- Click the Start button on your taskbar. It sits in the middle or at the bottom-left, depending on your taskbar alignment.
- Select the Settings app icon, which looks like a small gear. If you do not see it, type Settings into the search box at the top of the menu and click the matching result. The Settings window should open.

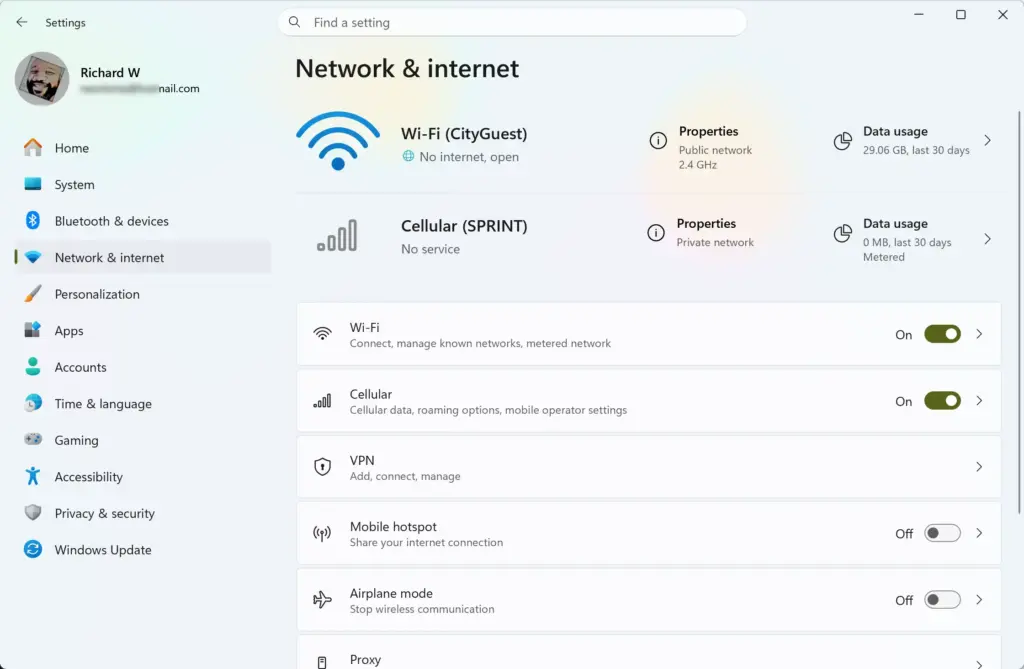
Settings - In the menu on the left side of the Settings window, click Network & internet. The connection options appear in the main panel on the right.
- Scroll down the right panel and click Advanced network settings. A new page of options opens.
- Scroll down to the section titled More settings and click Network reset. The Network reset page opens.
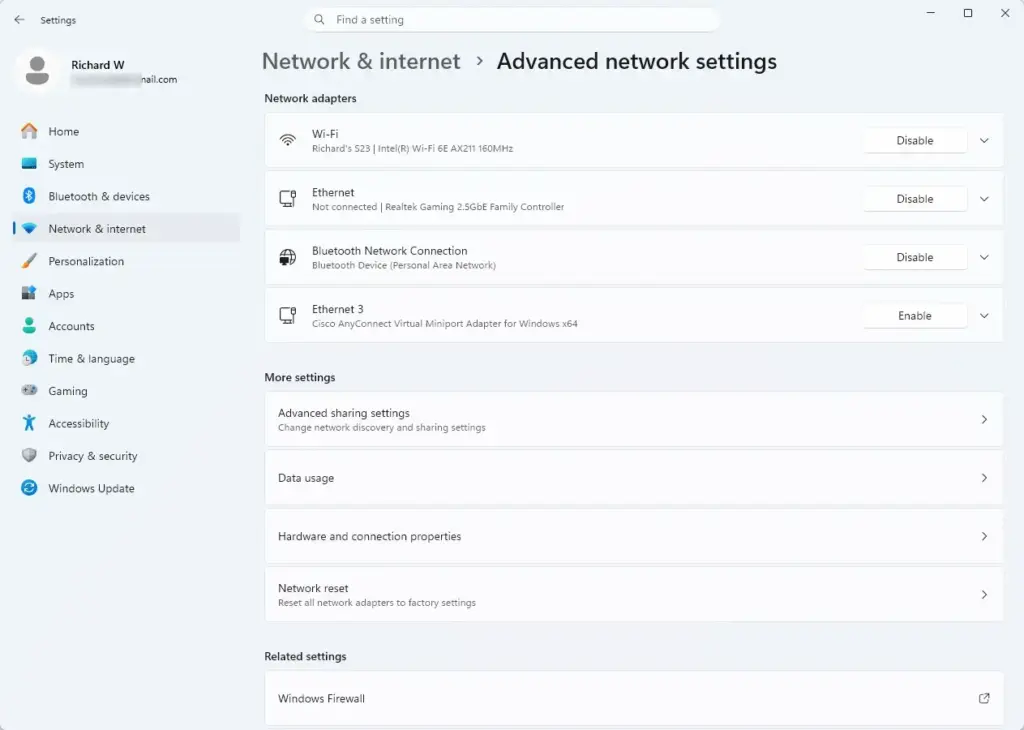
Settings › Network & internet › Advanced network settings - Read the information on the Network reset screen so you know what will be removed. Then click the blue Reset now button.
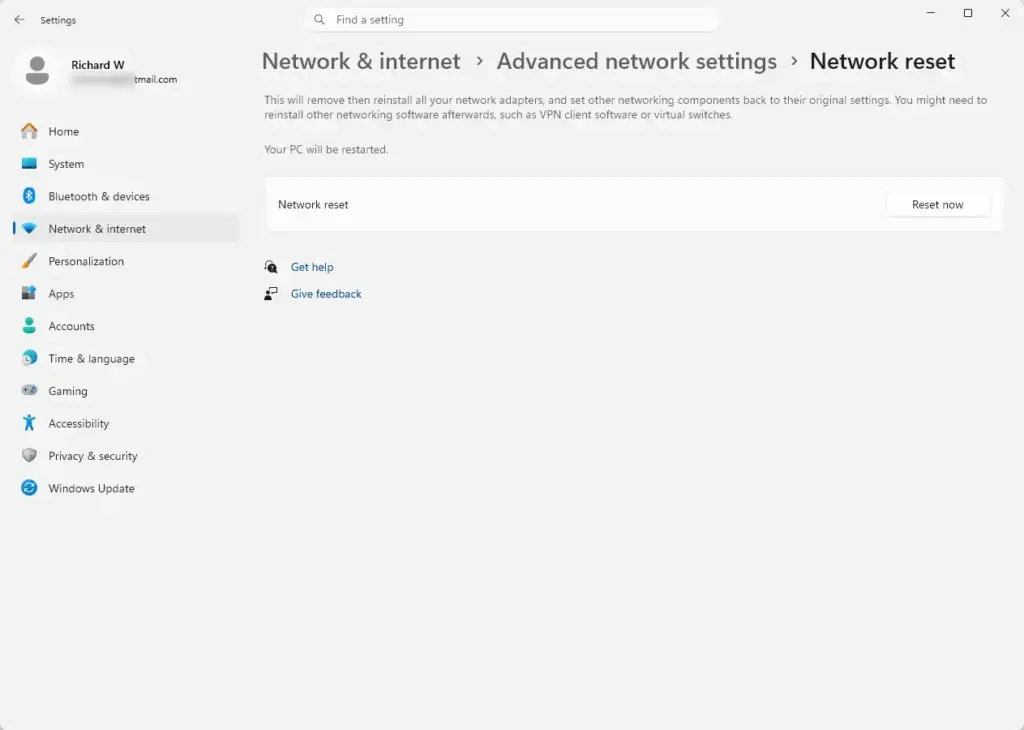
Settings › Network & internet › Advanced network settings › Network reset - A confirmation window asks whether you are sure. Click Yes. Windows then shows a notice that you are about to be signed out.
Windows warns that the computer will restart shortly. It usually gives you a few minutes. Save any open work and let the computer reboot. If you restart sooner by hand, the reset still completes.
Once the PC starts back up, your network adapters are freshly installed. Click the network icon on the taskbar, select your Wi-Fi network, and enter the password. If you are on Ethernet, the wired connection should come back on its own. If the problem persists after this, the cause is more likely the router, the ISP, or an outdated driver than the Windows network settings.
Alternative Method: Resetting via Command Line
Command Prompt is a reliable backup when the Settings app will not open or the Network reset page fails. You open the command tool with administrator rights and run three commands that clear your connection data. Unlike the Settings reset, this method does not guarantee that adapters are removed and reinstalled, so it is a lighter fix.
- Click Start, type cmd into the search box, and look for Command Prompt in the results.
- Right-click Command Prompt and choose Run as administrator. This requires administrator privileges. If a User Account Control prompt appears, click Yes. A window titled Administrator: Command Prompt should open.

Command Prompt - In the black window, type the command
netsh int ip resetand press Enter. Wait for the command to finish and return you to the prompt. - Next, type the command
netsh winsock resetand press Enter. Again, wait for the prompt to return. - Finally, type the command
ipconfig /flushdnsand press Enter.
Close the black window and restart your computer by hand. Some of the changes only take effect after a restart, so do not skip this step. If the commands report an access error, the window was not opened as administrator. Close it and start again from step 2.
Summary
Advanced network reset is a dependable fix for stubborn internet and Wi-Fi drops. It wipes out corrupted network settings and starts fresh, and your personal files stay safe. Use the Settings method first. Keep the command-line method for when Settings will not cooperate.
Frequently asked questions
How to reset network adapter?
Windows 11 resets all network adapters through Advanced network reset. Open Settings, go to Network & internet, select Advanced network settings, then Advanced network reset, and click Reset now. Every adapter is removed and reinstalled, so have your Wi-Fi password ready for the reconnect after the restart.
How to reset network settings?
Use Advanced network reset in Settings to return all network settings to defaults. Open Settings, go to Network & internet, select Advanced network settings, choose Advanced network reset, then click Reset now and confirm. This clears saved Wi-Fi networks, Bluetooth connections, and VPN profiles, so you must reconnect them afterward. Your files and apps stay put.
How to reset network settings laptop. is there a progress bar?
Open Settings, go to Network & internet, then Advanced network settings and Advanced network reset. Plug in the charger first, because the laptop restarts during the reset. There is no progress bar. After you click Reset now and confirm, Windows restarts, so leave the laptop alone until the sign-in screen appears.
Still have a question?
Answered by AI from this guide. Good questions may be added to this page — please don't include personal details.
Did this guide fix your problem?

About the Author
Richard
Tech Writer, IT Professional
Richard is a writer at Geek Rewind who turns complex IT tasks into clear, step-by-step guides. He draws on years of hands-on experience in system administration and enterprise IT operations, focusing on Windows, Linux and WordPress: the problems people actually run into, and the fixes that work. His server and WordPress guides come from systems he runs himself. Richard builds and maintains the platform behind Geek Rewind, from its Ubuntu servers and Nginx configuration to its custom WordPress plugins. Many new tutorials start with readers' questions, and he's always glad to answer them in the comments.
No comments yet — be the first to share your thoughts!