How Do I Let a Device Wake My Computer in Windows 11?

Windows 11 lets you choose which devices can wake your computer from sleep. A mouse click, a key press or incoming network traffic can then bring the PC back, and you don’t have to reach for the physical power button every time.
Open Device Manager, find your device under its category, double-click it, click the Power Management tab, and check Allow this device to wake the computer. Or use Terminal as Administrator and run powercfg -deviceenablewake “Device name” with your actual device name.
Why This Matters
The setting is controlled by Windows power management. Behind it sits Powercfg, a command-line utility for managing power settings. It decides which devices are allowed to wake your PC from sleep. You can change the setting in Device Manager, which is a graphical tool, or with Powercfg commands in Terminal. Both methods are covered below, and both give the same result.
If you are on a standard account, Windows will ask for an administrator password. Home and Pro editions of Windows 11 behave the same way here.
Two things can limit what you see. First, a device only appears as a wake option if its driver supports waking the PC. Second, some desktop PCs also need USB or network wake turned on in the BIOS/UEFI settings. If a device is set to wake the PC in Windows but still doesn’t, check that setting.
Option 1Using Device Manager
Use Device Manager to set up an individual mouse, keyboard or network card to wake your system. No restart is needed.
- Type
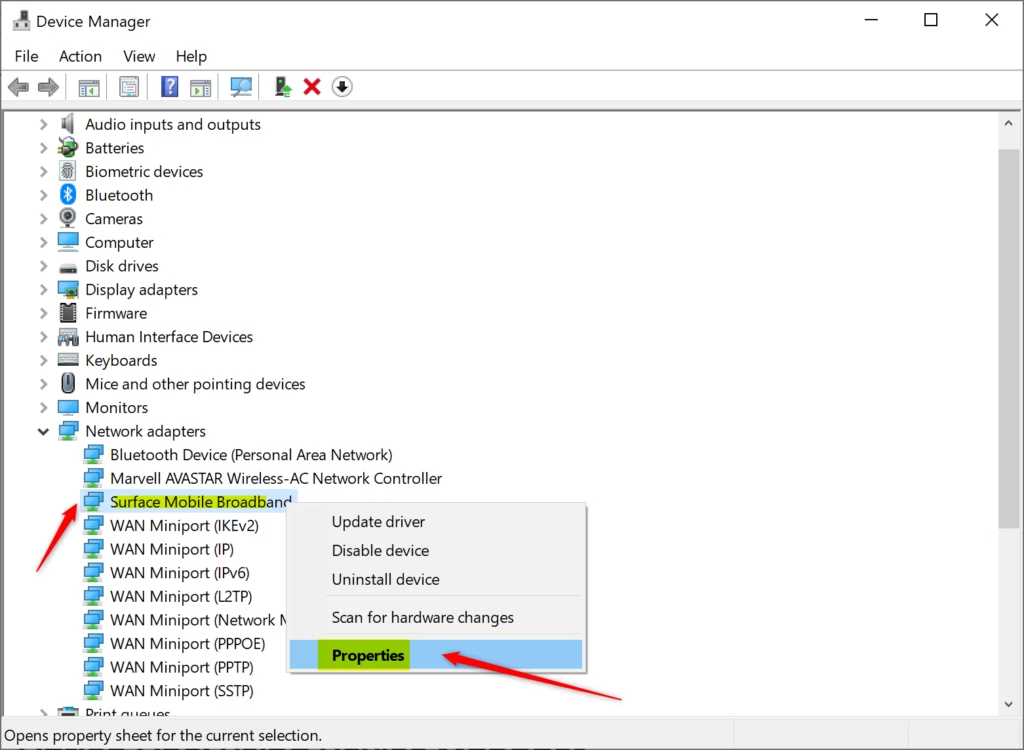
devmgmt.mscin the search bar and press Enter. Device Manager opens with a list of device categories. - Expand the category your device is listed under by clicking the arrow beside it. For a keyboard, expand Keyboards. For a mouse, expand Mice and other pointing devices. For a network device, expand Network adapters.
- Double-click the device you want to enable or disable for waking your computer. Its Properties window opens.
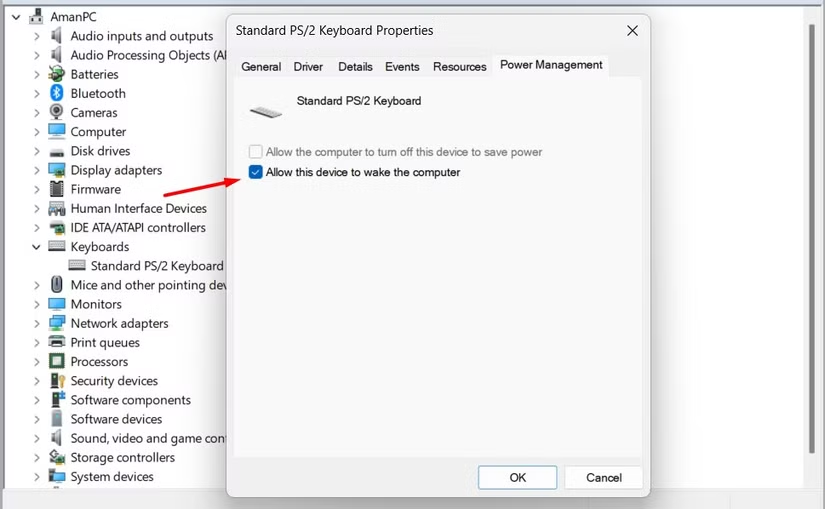
- Click the Power Management tab. If the tab is missing, that device or its driver doesn’t support wake control, so you can’t change it here.
- Select the Allow this device to wake the computer check box to enable waking. Clear the check box to disable it. If the box is greyed out, the driver isn’t allowing the change. Try updating the driver, or make sure you are signed in as an administrator.
- On network adapters, you may also see Only allow a magic packet to wake the computer. Select it if you want only a special wake-on-LAN packet to wake the PC, and not any other network traffic.
- Click OK to save your changes. The window closes.
- Close Device Manager when you’re finished.
To test the change, put the PC to sleep and then use the device. To undo it, return to the same tab and clear the check box.
Option 2Enable a Device Using Command Line
If you prefer the command line, you can use Terminal with Powercfg to make a device able to wake the computer. This also needs administrator rights. The change takes effect straight away, and you don't need to restart.
- Open Windows Terminal as Administrator. Search for Terminal, right-click it and select Run as administrator. If the User Account Control prompt appears, click Yes.
- Select either Windows PowerShell or Command Prompt from the dropdown menu. Powercfg works in both.
- Copy and paste this command, then press Enter to see all devices that can be set to wake your computer:
powercfg -devicequery wake_programmable
A list of device names appears. - Find the device you want to enable and write down its exact name. Spelling, spacing and punctuation must match what the list shows.
- Type this command and press Enter. Replace "Device name" with the actual device name from step 4:
powercfg -deviceenablewake "Device name"
Example:powercfg -deviceenablewake "Intel(R) Ethernet Connection (7) I219-V"
If the command succeeds, it returns to the prompt without an error message. If you see an error, check the device name against the list from step 3, and confirm that Terminal is running as administrator. - Close Windows Terminal when you're finished.
To check that it worked, repeat the Device Manager steps above and look at the Power Management tab. The wake check box should now be selected.
Option 3Disable a Device Using Command Line
This blocks the device from sending the signal that wakes your PC from sleep. It needs administrator access, so open Windows Terminal as an administrator to begin. This is also how you undo the enable steps above.
- Open Windows Terminal as Administrator. Search for Terminal, right-click it and select Run as administrator.
- Select either Windows PowerShell or Command Prompt.
- Copy and paste this command, then press Enter to see all devices currently set to wake your computer:
powercfg -devicequery wake_armed
Only devices that are currently allowed to wake the PC are listed. - Write down the exact name of the device you want to disable.
- Type this command and press Enter. Replace "Device name" with the actual device name from step 4:
powercfg -devicedisablewake "Device name"
Example:powercfg -devicedisablewake "Intel(R) Ethernet Connection (7) I219-V"
Again, no error message means the change was accepted. Run the command from step 3 once more if you want to confirm the device is no longer listed. - Close Windows Terminal when you're finished.
Summary
You can control which devices wake your computer from sleep in Windows 11 using either Device Manager or Powercfg commands in Terminal. Device Manager is easier for a single device. The command line is quicker when you want to check or change several devices. Whichever you use, sleep the PC and test the device to confirm it behaves as you expect.
Was this guide helpful?

About the Author
Richard
Tech Writer, IT Professional
Richard is a writer at Geek Rewind who turns complex IT tasks into clear, step-by-step guides. He draws on years of hands-on experience in system administration and enterprise IT operations, focusing on Windows, Linux and WordPress: the problems people actually run into, and the fixes that work. His server and WordPress guides come from systems he runs himself. Richard builds and maintains the platform behind Geek Rewind, from its Ubuntu servers and Nginx configuration to its custom WordPress plugins. Many new tutorials start with readers' questions, and he's always glad to answer them in the comments.




No comments yet — be the first to share your thoughts!