How to Delete Items from Your Copilot Conversation History

Deleting items from your Copilot conversation history clears past chats and questions from the Copilot sidebar. Microsoft Copilot saves these interactions by default so you can return to them later. Clearing them protects your privacy on a shared computer and removes clutter you no longer need.
You can remove single conversations or clear your entire history in a few clicks directly inside the Copilot panel. This tutorial walks through removing individual conversations, which is the safer option when you only want to get rid of a few chats and keep the rest.
Open Copilot and locate the conversation you want to delete in the sidebar. Click the three dots next to the chat name on the website or mobile app, or right-click it in the desktop app. Select delete from the menu and confirm. The conversation disappears permanently from your history.
Why Delete Copilot Conversations?
Why Delete Copilot Conversations?
Anyone who sits down at a shared or family PC and opens Copilot can see what is in the sidebar, so removing old chats means they can’t read them.
A shorter history also makes it easier to find the conversations you still use. If you have been testing prompts or asking one-off questions, those entries quickly bury the useful ones.
How to Delete a Single Copilot Conversation
You can delete specific chats one at a time. The exact steps vary slightly depending on where you use Copilot (the website, the Windows or macOS app, or the mobile app), so the sections below cover each one. The overall process is the same everywhere: find the chat, open its menu, choose delete, and confirm.
Find the Conversation
Open Copilot and look at the conversation history in the sidebar. Scroll through the list until you find the specific chat you want gone. Open the chat first if you aren't sure it is the right one, and check the conversation before you delete it.
If you want to keep anything from the chat, such as a code snippet, a draft or a list of steps, copy it into a document or note now. You can't get it back from Copilot after deletion.
Start the Deletion
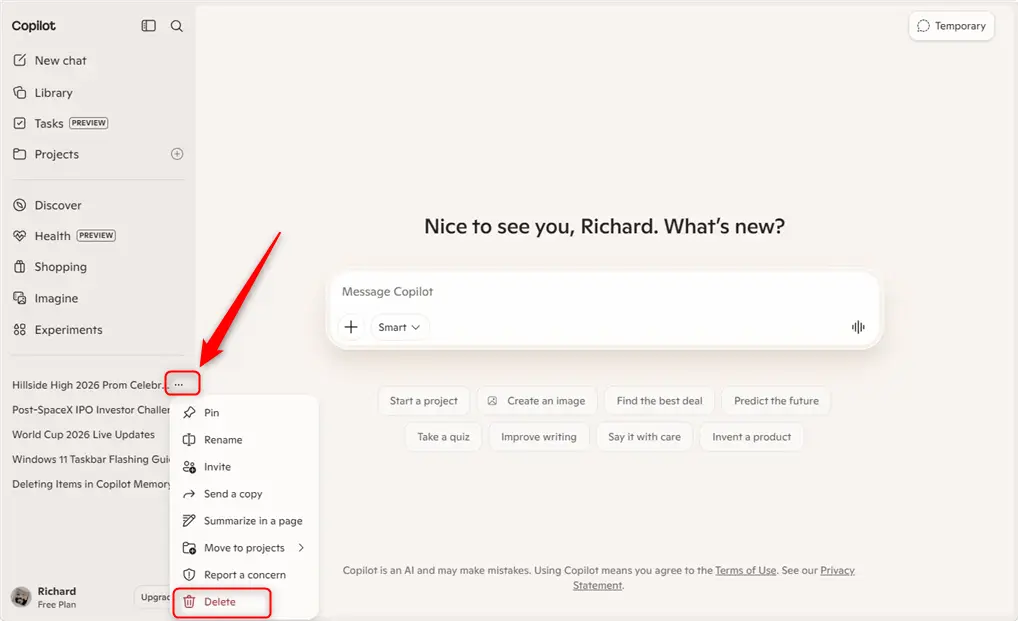
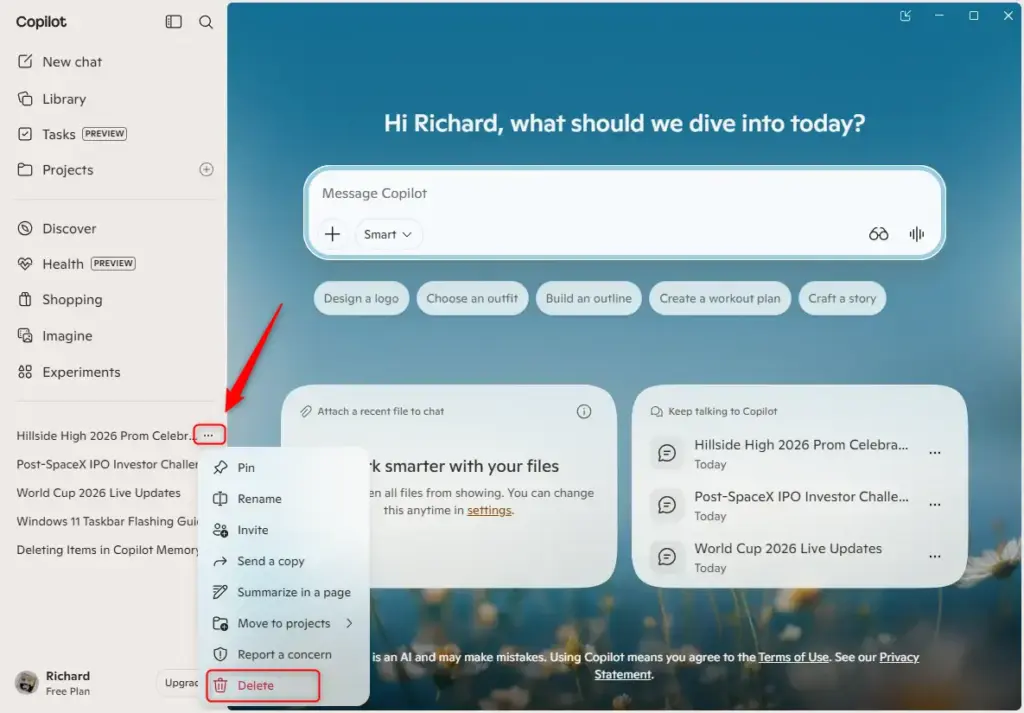
Locate the chat you want to remove in your sidebar. On the website, click the three small dots next to the chat name. In the desktop app, right-click the conversation instead to bring up the menu. On either, a small menu with options for that conversation should appear. If you don't see the dots, hover your pointer over the chat name, as some layouts only show them on mouseover.
- On copilot.com: Look for three small dots (an ellipsis) to the right of the conversation. Click these dots, and the options menu for that chat opens.
- In Copilot for Windows or macOS: Right-click on the conversation you want to remove. A menu will pop up next to the chat.
- In the Copilot mobile app: Like the website, you will see three dots next to the conversation. Tap these dots to open the menu.
Confirm Deletion
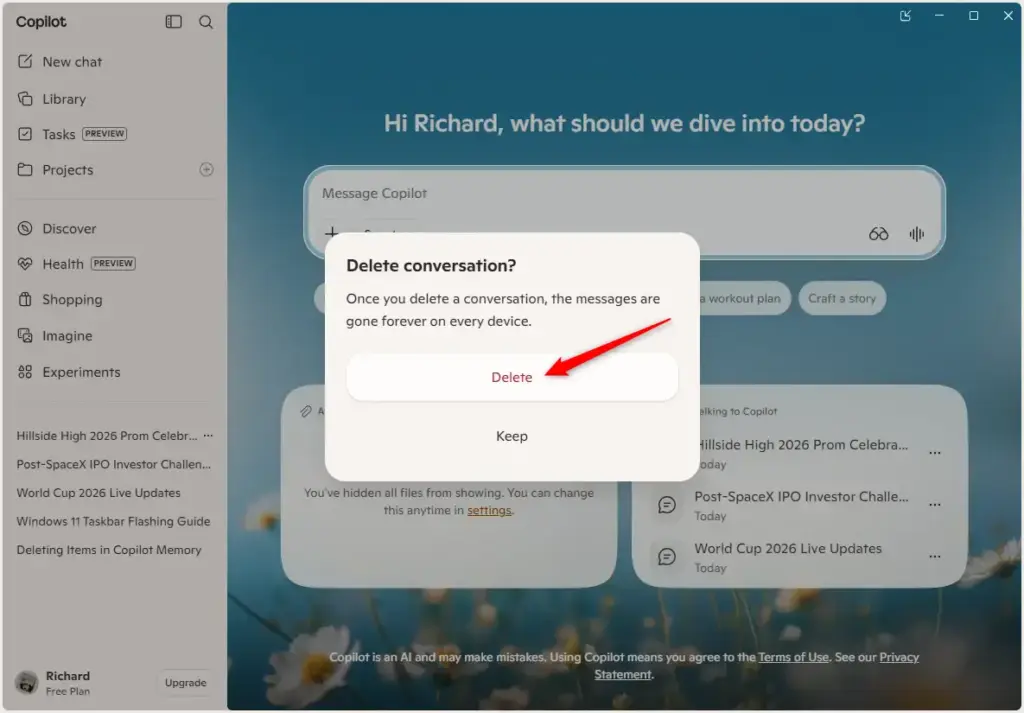
From the menu you just opened, choose the delete option for that conversation. Copilot then asks you to confirm.
- Read the confirmation prompt and check that it refers to the chat you picked.
- Confirm your choice to permanently delete the chat.
Take a careful look at your selection first, because deleted chats cannot be brought back once you click confirm. When the deletion finishes, the conversation should disappear from the sidebar list. Repeat the same steps for each additional chat you want to remove.
There's no undoing this action, so be absolutely sure you want to proceed. If you are unsure, leave the chat in place and copy out anything you need first.
Reference:
https://support.microsoft.com/en-us/microsoft-copilot/conversation-history-in-microsoft-copilot
Summary
Deleting individual Copilot conversations helps keep your chat history clean and private, making it easier to find what you need. Since a deletion can't be reversed, it is worth a quick check of each chat before you confirm.
Frequently asked questions
How to delete Copilot history?
To delete Copilot history, open Copilot and look at the conversation list in the sidebar. Hover over a chat, select the three dots beside it, and choose Delete to remove that one conversation. To clear everything, open Copilot settings and look for an option to clear your chat history. Deleted chats usually can't be recovered, so check the list before you confirm.
How to delete Copilot chat history?
To delete Copilot chat history, find the conversation in the Copilot sidebar. Hover over it, click the three dots next to its name, and select Delete. For a full wipe, open Copilot settings and find the option to clear chat history. Once you confirm, the chats are gone for good, so make sure you no longer need them.
How to delete chats in Copilot?
To delete chats in Copilot, open the sidebar and find the conversation you want to remove. Hover over it, open the three-dot menu, and choose Delete. Repeat for each chat you want gone. This keeps the rest of your history in place. Deleting one chat at a time is the safer choice when you only want to clear a few.
How to clear Copilot history?
To clear Copilot history, open Copilot settings and look for the option that clears your chat history. This removes past conversations from the sidebar. If you only want to remove a few chats, delete them one at a time from the sidebar instead. Cleared history cannot be restored, so decide before you confirm.
How to delete all chats in Copilot?
To delete all chats in Copilot, open Copilot settings and find the option to clear your chat history. Confirm when prompted, and the conversations in the sidebar are removed. If you want to keep some chats, delete the unwanted ones individually from the sidebar instead. Clearing everything cannot be undone.
How to clear Copilot chat history?
To clear Copilot chat history, open Copilot settings and look for the option that clears your history. Confirm the prompt, and the past conversations disappear from the sidebar. Deleted chats cannot be recovered afterward. If you only need to remove a few, delete each conversation from the sidebar using its three-dot menu.
Still have a question?
Answered by AI from this guide. Good questions may be added to this page — please don't include personal details.
Did this guide fix your problem?

About the Author
Richard
Tech Writer, IT Professional
Richard is a writer at Geek Rewind who turns complex IT tasks into clear, step-by-step guides. He draws on years of hands-on experience in system administration and enterprise IT operations, focusing on Windows, Linux and WordPress: the problems people actually run into, and the fixes that work. His server and WordPress guides come from systems he runs himself. Richard builds and maintains the platform behind Geek Rewind, from its Ubuntu servers and Nginx configuration to its custom WordPress plugins. Many new tutorials start with readers' questions, and he's always glad to answer them in the comments.
No comments yet — be the first to share your thoughts!