How to Change Your Device Name for Nearby Sharing in Windows 11

A Nearby Sharing device name is the custom label your Windows 11 PC uses so other computers can spot it easily over Bluetooth or Wi-Fi . Windows assigns a random, confusing name by default, but you can change it in seconds through the system settings.
Giving your PC a clear name helps you avoid sending files to the wrong computer in a room full of devices. You just need to open your system settings, type a new name, and save the change.
Change your device name for Nearby Sharing in Windows 11 by going to Settings System About. Click “Rename this PC,” enter your desired name, and restart your computer. This makes your PC easier to identify on the network.
Computer Name vs. Device Manager Names
Your main computer name controls how you appear on a network and share files, while Device Manager labels only manage internal hardware parts like your graphics card. Understanding the difference between computer name and device manager names ensures you change the right setting for Nearby Sharing without messing up how Windows tracks your physical hardware components.
Device Manager labels apply strictly to hardware drivers like graphics cards or network adapters. Modifying the network identifier leaves internal hardware names untouched.
Change Your Device Name via System Settings
System Settings offers the fastest way to change device name Windows 11 so other computers can recognize your PC during file transfers. Open the Settings app, go to the About page under the System menu, and click the Rename this PC button to update how your computer appears when using Nearby Sharing.
- Open the Settings app by pressing Win+I.
- Go to System and select About at the bottom of the list.
- Click the Rename this PC button.
- Enter your new name and click Next.
- Restart your computer to apply the changes.

Rename Using PowerShell
PowerShell offers a rapid alternative for command-line users via the Rename-Computer cmdlet.
- Right-click the Start button and select Terminal (Admin).
- Type the following command and press Enter:
Rename-Computer -NewName "New-Friendly-Name" - Restart your computer to finish.
Note: This method requires administrator privileges.
Advanced Registry Method
Registry Editor lets you change your sharing identifier for specific network features without altering your computer's main hostname. You need an administrator account to use this advanced method, and you must follow each step carefully because mistakes in HKEY_LOCAL_MACHINE\SOFTWARE\Microsoft can cause serious system problems.
Administrative rights are mandatory for registry edits. Mistakes when modifying `HKEY_LOCAL_MACHINE\SOFTWARE\Microsoft` could lead to system instability.
- Open the Registry Editor by searching for regedit in the Start menu.
- Navigate to:
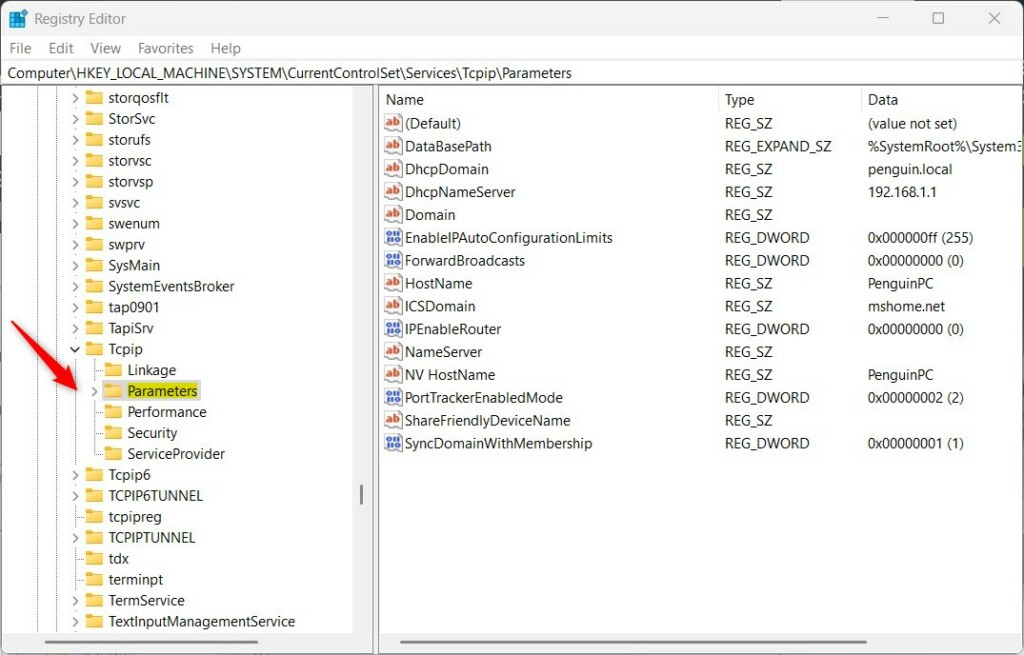
HKEY_LOCAL_MACHINE\SYSTEM\CurrentControlSet\Services\Tcpip\Parameters - Right-click in the empty space, select New, then String Value.
- Name it
ShareFriendlyDeviceName. - Double-click it and enter your preferred name.
Summary
Customizing your PC label streamlines file transfers and network discovery.
Does changing my device name affect my Microsoft Account?
Local renaming leaves your Microsoft account completely untouched. Cloud storage, subscriptions, and profile details remain tied to your email address rather than physical hardware names.
Why does my device name have a number appended to it?
Network conflicts trigger automated numbering sequences in Windows. Unique identifiers prevent routing errors during file sharing.
Was this guide helpful?

About the Author
Richard
Tech Writer, IT Professional
Richard, a writer for Geek Rewind, is a tech enthusiast who loves breaking down complex IT topics into simple, easy-to-understand ideas. With years of hands-on experience in system administration and enterprise IT operations, he’s developed a knack for offering practical tips and solutions. Richard aims to make technology more accessible and actionable. He's deeply committed to the Geek Rewind community, always ready to answer questions and engage in discussions.

No comments yet — be the first to share your thoughts!