How to Change System Product Name in Windows 11
Giving your Windows 11 PC a custom name is possible, and this guide will walk you through changing its System Product Name.
Open Registry Editor by pressing Windows key + R, typing regedit, and pressing Enter. Navigate to the OEMInformation folder, find or create the “Model” string value, and enter your desired system product name. Restart your computer for the changes to apply.
What is the System Product Name?
The System Product Name is how Windows 11 identifies your computer’s model. For custom-built machines, this might show up as a generic ‘System Product Name’. Changing it to something more descriptive makes it easier to manage.
Why Change It?
Personalizing a computer benefits from a custom system product name. Changing this name allows users to assign their PC a cool, unique identifier that reflects personal style. This is also helpful for users with pre-built PCs, letting them assign a name that’s easier to remember.
How to Change the System Product Name in 🪟 Windows 11
You can change the System Product Name in Windows 11 to give your computer a custom identifier. This is particularly helpful if you built your own PC or simply want to personalize its model name. To begin, open the Windows Registry Editor. You can do this by pressing the Windows key and R simultaneously, typing ‘regedit’, and then pressing Enter.
- Open the Windows Registry Editor:💡TipPress Windows key + R on your keyboard. Type
regeditand press Enter.If you want a quick tutorial on opening Registry Editor, check this guide: How to Open Registry Editor in Windows 11.
⚠️ Admin privileges required
- Find the registry folder:
In Registry Editor, find this folder (also called a “key”) by clicking through the folders on the left:
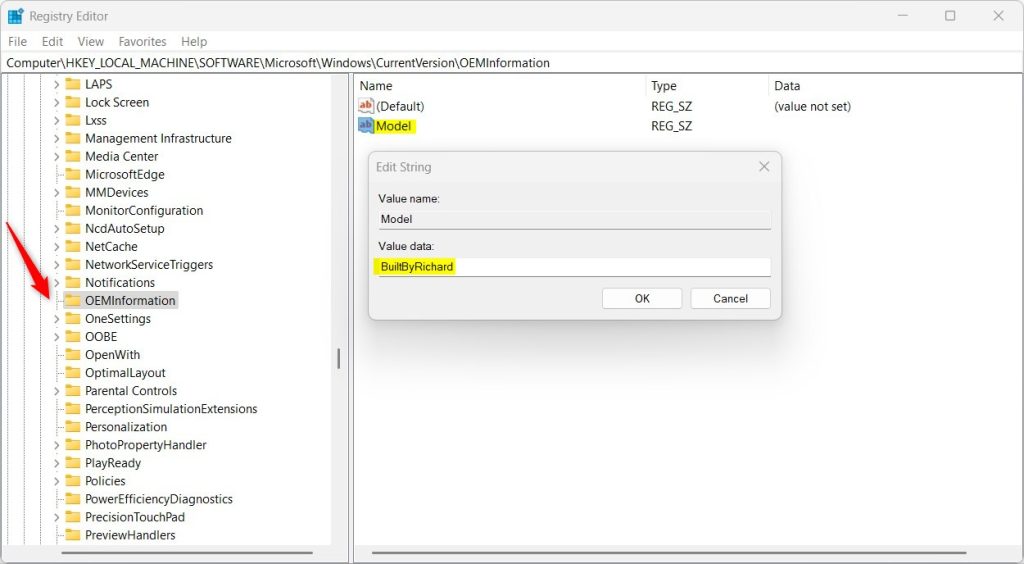
Computer\HKEY_LOCAL_MACHINE\SOFTWARE\Microsoft\Windows\CurrentVersion\OEMInformation - Look for the Model entry:
Look for an entry called Model on the right side.
- If it’s there, double-click it to open.
- If you don’t see it, right-click on an empty space on the right. Select New > String Value and name it Model.
- Type your new name:
In the box that opens, type the name you want your computer to have. For example: My Custom PC. Then click OK.
- Close Registry Editor:
Close the Registry Editor window.
- Restart your computer:⚠️WarningRestart your computer to make sure the change takes effect.
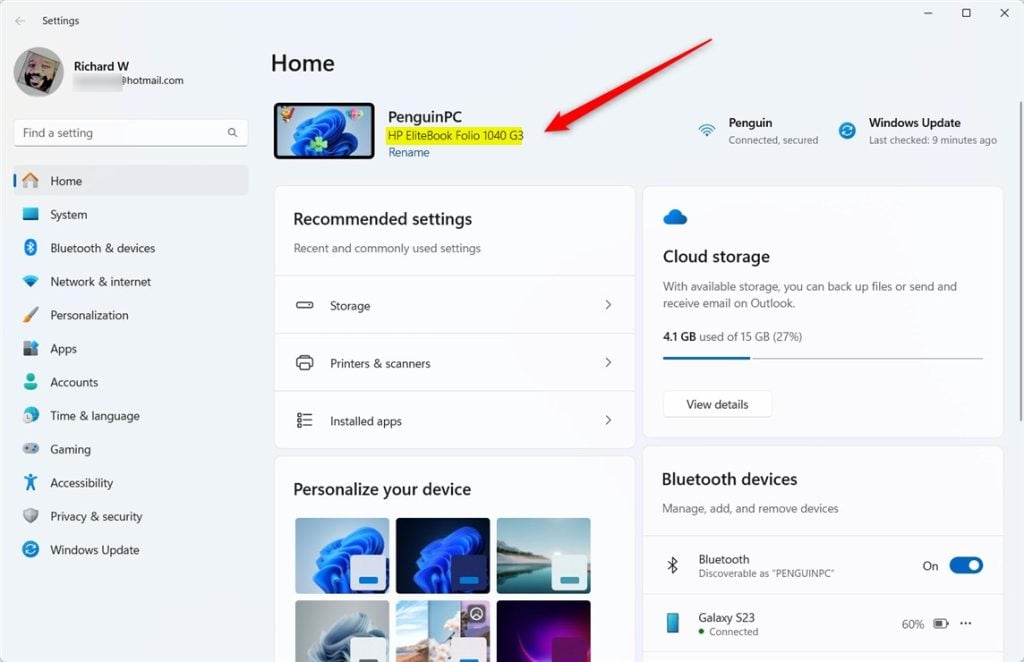
After restarting, you can check your new System Product Name here:
- Open Settings. Press Windows key + I.
- Go to System > About.
- Look for the Device name or System model section to see your new name.
Summary
Summary: Personalizing your Windows 11 PC with a custom name is achievable by changing the System Product Name. This is particularly useful for self-built systems. This involves editing the Windows Registry, a process that allows you to give your computer a name that suits you.- Changing the System Product Name lets you personalize your PC with a name you like.
- This works best on custom-built PCs or devices without a fixed manufacturer name.
- It’s an easy process using Windows Registry Editor. But be careful when editing the registry!
- Tip: Always back up your registry before making changes. You can do this inside Registry Editor by clicking File > Export and saving a copy.
How to rename a PC model?
To rename your PC in Windows 11, open Settings. Click the Start icon on your taskbar.
Was this guide helpful?

About the Author
Richard
Tech Writer, IT Professional
Richard, a writer for Geek Rewind, is a tech enthusiast who loves breaking down complex IT topics into simple, easy-to-understand ideas. With years of hands-on experience in system administration and enterprise IT operations, he’s developed a knack for offering practical tips and solutions. Richard aims to make technology more accessible and actionable. He's deeply committed to the Geek Rewind community, always ready to answer questions and engage in discussions.

No comments yet — be the first to share your thoughts!